Deploy Spring Boot applications using Maven
Note
The Basic, Standard, and Enterprise plans will be deprecated starting from mid-March, 2025, with a 3 year retirement period. We recommend transitioning to Azure Container Apps. For more information, see the Azure Spring Apps retirement announcement.
The Standard consumption and dedicated plan will be deprecated starting September 30, 2024, with a complete shutdown after six months. We recommend transitioning to Azure Container Apps. For more information, see Migrate Azure Spring Apps Standard consumption and dedicated plan to Azure Container Apps.
This article applies to: ✅ Java ❎ C#
This article applies to: ✅ Basic/Standard ✅ Enterprise
This article shows you how to use the Azure Spring Apps Maven plugin to configure and deploy applications to Azure Spring Apps.
Prerequisites
- An Azure account with an active subscription. Create an account for free.
- An already provisioned Azure Spring Apps instance.
- JDK 8 or JDK 11
- Apache Maven
- Azure CLI version 2.45.0 or higher with the Azure Spring Apps extension. You can install the extension by using the following command:
az extension add --name spring
Generate a Spring project
To create a Spring project for use in this article, use the following steps:
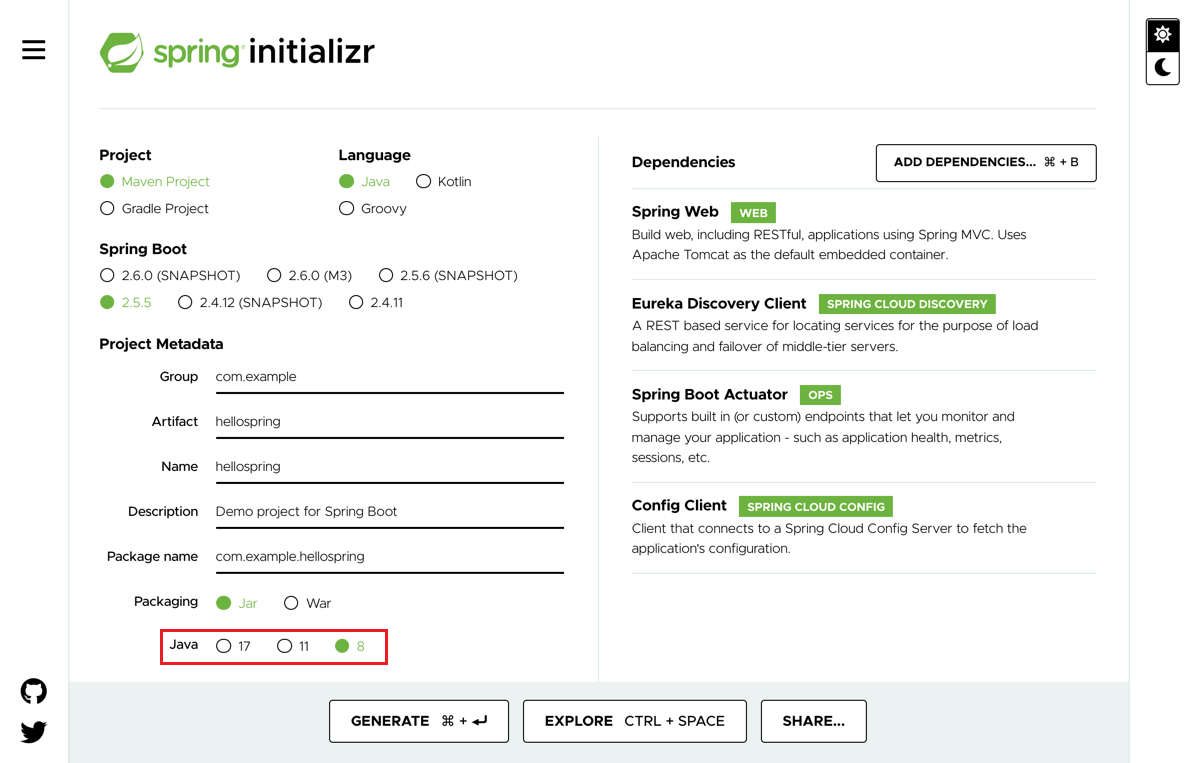
Navigate to Spring Initializr to generate a sample project with the recommended dependencies for Azure Spring Apps. This link uses the following URL to provide default settings for you.
https://start.spring.io/#!type=maven-project&language=java&platformVersion=2.5.7&packaging=jar&jvmVersion=1.8&groupId=com.example&artifactId=hellospring&name=hellospring&description=Demo%20project%20for%20Spring%20Boot&packageName=com.example.hellospring&dependencies=web,cloud-eureka,actuator,cloud-config-clientThe following image shows the recommended Spring Initializr setup for this sample project.

This example uses Java version 8. If you want to use Java version 11, change the option under Project Metadata.
Select Generate when all the dependencies are set.
Download and unpack the package, then create a web controller for a web application. Add the file src/main/java/com/example/hellospring/HelloController.java with the following contents:
package com.example.hellospring;

import org.springframework.web.bind.annotation.RestController;
import org.springframework.web.bind.annotation.RequestMapping;

@RestController
public class HelloController {

    @RequestMapping("/")
    public String index() {
        return "Greetings from Azure Spring Apps!";
    }

}
Build the Spring applications locally
To build the project by using Maven, run the following commands:
cd hellospring
mvn clean package -DskipTests -Denv=cloud
Compiling the project takes several minutes. After it's completed, you should have individual JAR files for each service in their respective folders.
Provision an instance of Azure Spring Apps
The following procedure creates an instance of Azure Spring Apps using the Azure portal.
In a new tab, open the Azure portal.
From the top search box, search for Azure Spring Apps.
Select Azure Spring Apps from the results.
On the Azure Spring Apps page, select Create.
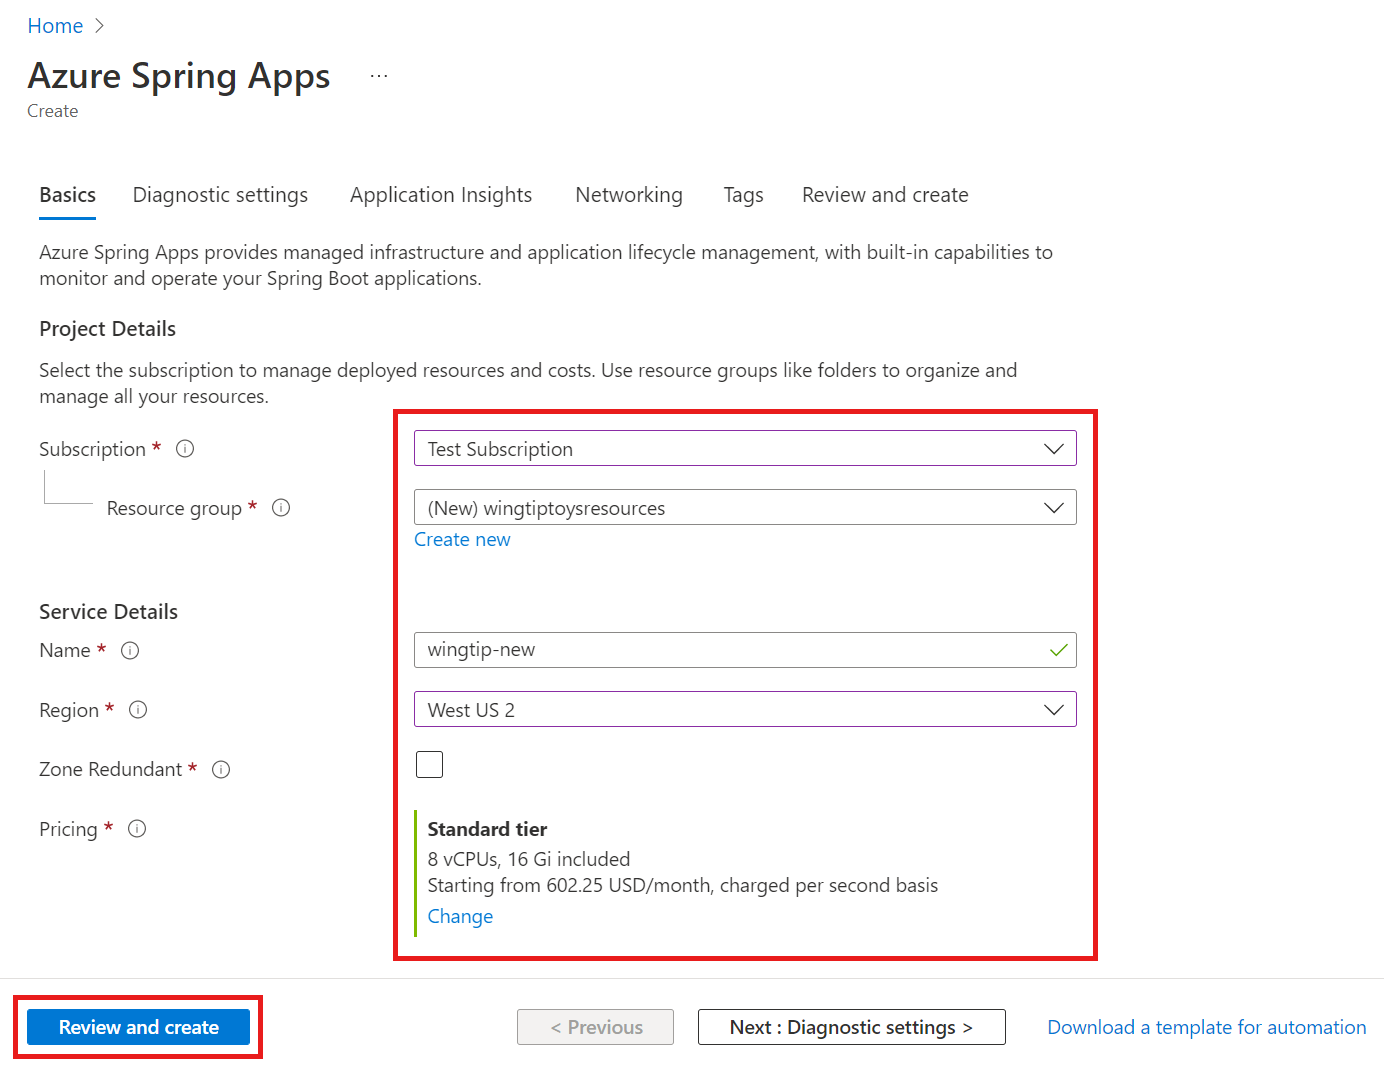
Fill out the form on the Azure Spring Apps Create page. Consider the following guidelines:
- Subscription: Select the subscription you want to be billed for this resource.
- Resource group: Creating new resource groups for new resources is a best practice. You will use this resource group in later steps as <resource group name>.
- Service Details/Name: Specify the <service instance name>. The name must be between 4 and 32 characters long and can contain only lowercase letters, numbers, and hyphens. The first character of the service name must be a letter and the last character must be either a letter or a number.
- Location: Select the region for your service instance.
Select Review and create.
Generate configurations and deploy to the Azure Spring Apps
To generate configurations and deploy the app, follow these steps:
Run the following command from the hellospring root folder, which contains the POM file. If you've already signed-in with Azure CLI, the command will automatically pick up the credentials. Otherwise, the command will prompt you with sign-in instructions. For more information, see Authentication in the azure-maven-plugins repository on GitHub.
mvn com.microsoft.azure:azure-spring-apps-maven-plugin:1.10.0:configYou'll be asked to select:
- Subscription ID - the subscription you used to create an Azure Spring Apps instance.
- Service instance - the name of your Azure Spring Apps instance.
- App name - an app name of your choice, or use the default value
artifactId. - Public endpoint - true to expose the app to public access; otherwise, false.
Verify that the
appNameelement in the POM file has the correct value. The relevant portion of the POM file should look similar to the following example.<build> <plugins> <plugin> <groupId>com.microsoft.azure</groupId> <artifactId>azure-spring-apps-maven-plugin</artifactId> <version>1.10.0</version> <configuration> <subscriptionId>xxxxxxxxx-xxxx-xxxx-xxxxxxxxxxxx</subscriptionId> <clusterName>v-spr-cld</clusterName> <appName>hellospring</appName>The POM file now contains the plugin dependencies and configurations.
Deploy the app using the following command.
mvn azure-spring-apps:deploy
Verify the services
After deployment has completed, you can access the app at https://<service instance name>-hellospring.azuremicroservices.io/.

Clean up resources
If you plan to continue working with the example application, you might want to leave the resources in place. When no longer needed, delete the resource group containing your Azure Spring Apps instance. To delete the resource group by using Azure CLI, use the following commands:
echo "Enter the Resource Group name:" &&
read resourceGroupName &&
az group delete --name $resourceGroupName &&
echo "Press [ENTER] to continue ..."

