Quickstart: Connect without keys
Configure Azure AI Search to use Microsoft Entra ID authentication and role-based access control (RBAC) so that you can connect from your local system without API keys, using Jupyter notebooks or a REST client to interact with your search service.
If you stepped through other quickstarts that connect using API keys, this quickstart shows you how to switch to identity-based authentication so that you can avoid hard-coded keys in your example code.
Prerequisites
An Azure subscription. Create one for free.
Azure AI Search, any region or tier, but you need Basic or higher to configure a managed identity for Azure AI Search.
A command line tool, such as PowerShell or Bash, and the Azure CLI.
Step 1: Get your Azure subscription and tenant IDs
You need this step if you have more than one subscription or tenant.
Get the Azure subscription and tenant for your search service:
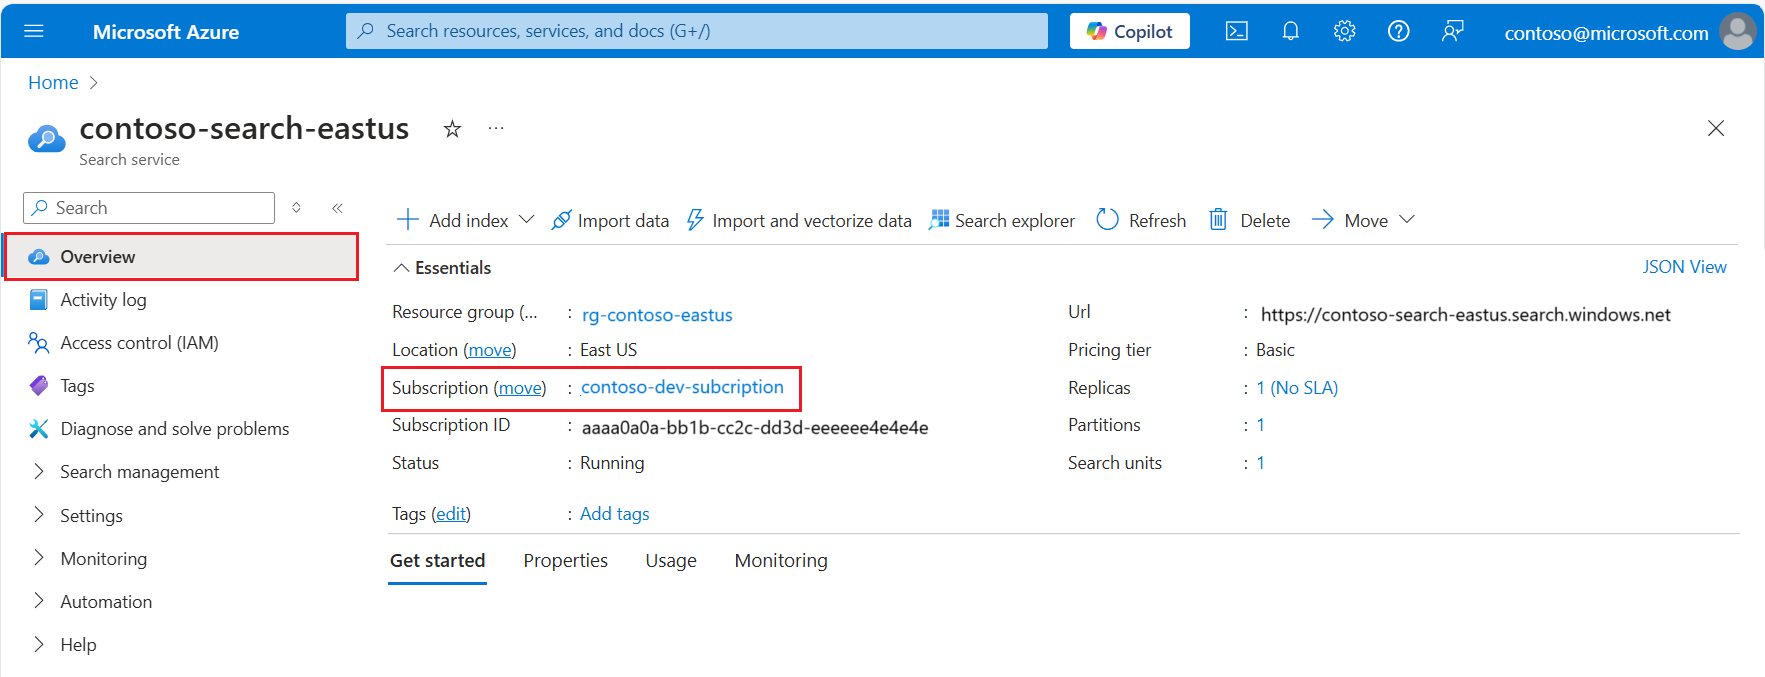
Sign into the Azure portal and navigate to your search service.
Notice the subscription name and ID in Overview > Essentials.
Now select the subscription name to show the parent management group (tenant ID) on the next page.
You now know which subscription and tenant Azure AI Search is under. Switch to your local device and a command prompt, and identify the active Azure subscription and tenant on your device:
az account showIf the active subscription and tenant differ from the information obtained in the previous step, change the subscription ID. Next, sign in to Azure using the tenant ID that you found in the previous step:
 az account set --subscription <your-subscription-id>

 az login --tenant <your-tenant-id>
Step 2: Configure Azure AI Search for RBAC
Sign in to the Azure portal and navigate to your Azure AI Search service.
Enable role-based access control (RBAC):
Go to Settings > Keys.
Choose Role-based control or Both if you need time to transition clients to role-based access control.
If you choose Role-based control, make sure that you assign yourself all roles named in the next instruction or you won't be able to complete tasks in the Azure portal or through a local client.
Assign roles in the Azure portal:
Navigate to your search service.
Select Access Control (IAM) in the left navigation pane.
Select + Add > Add role assignment.
Choose a role (Search Service Contributor, Search Index Data Contributor, Search Index Data Reader) and assign it to your Microsoft Entra user or group identity.
Repeat for each role.
You need Search Service Contributor plus Search Index Data Contributor to create, load, and query objects on Azure AI Search. For more information, see Connect using roles.
Tip
Later, if you get authentication failure errors, recheck the settings in this section. There could be policies at the subscription or resource group level that override any API settings you specify.
Step 3: Connect from your local system
If you haven't yet signed in to Azure:
az login
Using Python and Jupyter notebooks
Install the Azure Identity and Azure Search libraries:
pip install azure-identity azure-search-documentsAuthenticate and connect to Azure AI Search:
from azure.identity import DefaultAzureCredential
from azure.search.documents import SearchClient

service_endpoint = "https://<your-search-service-name>.search.windows.net"
index_name = "hotels-sample-index"

credential = DefaultAzureCredential()
client = SearchClient(endpoint=service_endpoint, index_name=index_name, credential=credential)

results = client.search("beach access")
for result in results:
    print(result)
Using a REST client
Several quickstarts and tutorials use a REST client, such as Visual Studio Code with the REST extension. Here's how you connect to Azure AI Search from Visual Studio Code.
You should have a .rest or .http file, similar to the one described in Quickstart: Vector search.
Generate an access token.
az account get-access-token --scope https://search.azure.com/.default --query accessToken --output tsvAt the top of your file, set variables used for the connection, pasting the full search service endpoint and the access token you got in the previous step. Your variables should look similar to the following example. Notice the values aren't quote-enclosed.
@baseUrl = https://contoso.search.search.windows.net
@token = <a long GUID>
Specify the authorization bearer token in a REST call:
 POST https://{{baseUrl}}/indexes/hotels-sample-index/docs/search?api-version=2024-07-01 HTTP/1.1
   Content-type: application/json
   Authorization: Bearer {{token}}

     {
          "queryType": "simple",
          "search": "beach access",
          "filter": "",
          "select": "HotelName,Description,Category,Tags",
          "count": true
      }
Troubleshoot 401 errors
Check the active subscription and tenant (
az account show) and make sure it's valid for your search service.Check the search service Settings > Keys options in the Azure portal and confirm the service is configured for Both" or Role-based access control.
For the REST client only: Check the token and endpoint specified in your file and make sure there's no surrounding quotes or extra spaces.
If all else fails, restart your device to remove any cached tokens, and then repeat the steps in this section, starting with az login.
Additional configuration
Configure a managed identity for outbound connections:
Configure a system-assigned or user-assigned managed identity for your search service.
Use role assignments to authorize access to other Azure resources.
Network access configuration:
- Set inbound rules to accept or reject requests to Azure AI Search based on IP address.
