Create Standard logic app workflows for hybrid deployment on your own infrastructure (Preview)
Applies to: Azure Logic Apps (Standard)
Note
This capability is in preview, incurs charges for usage, and is subject to the Supplemental Terms of Use for Microsoft Azure Previews.
For scenarios where you need to use, control, and manage your own infrastructure, you can create Standard logic app workflows using the hybrid deployment model in Azure Logic Apps. This model provides capabilities for you to build and host integration solutions for partially connected environments that require local processing, storage, and network access. Your infrastructure can include on-premises systems, private clouds, and public clouds. With the hybrid model, your Standard logic app workflow is powered by the Azure Logic Apps runtime, which is hosted on premises as part of an Azure Container Apps extension.
For an architectural overview that shows where Standard logic app workflows are hosted and run in a partially connected environment, see Set up infrastructure requirements for hybrid deployment for Standard logic apps.
This how-to guide shows how to create and deploy a Standard logic app workflow using the hybrid deployment model after you set up the necessary on-premises resources for hosting your app.
Limitations
Hybrid deployment for Standard logic apps is available and supported only in the same regions as Azure Container Apps on Azure Arc-enabled AKS.
The following capabilities currently aren't available in this preview release:
- Managed identity authentication
- SAP access through the SAP built-in connector
- C# custom code with .NET Framework and the built-in action named Call local function in this logic app
- XSLT 1.0 for custom code
Azure Arc-enabled Kubernetes clusters currently don't support managed identity authentication for managed API connections. Instead, you must create your own app registration using Microsoft Entra ID. For more information, follow these steps later in this guide.
Some function-based triggers, such as Azure Blob, Cosmos DB, and Event Hubs require a connection to the Azure storage account associated with your Standard logic app. If you use any function-based triggers, in your Standard logic app's environment variables in the Azure portal or in your logic app project's local.settings.json file in Visual Studio Code, add the following app setting and provide your storage account connection string:
"Values": {
  "name": "AzureWebJobsStorage",
  "value": "{storage-account-connection-string}"
}
Prerequisites
An Azure account and subscription. If you don't have a subscription, sign up for a free Azure account.
The following on-premises resources, which must all exist within the same network for the required connectivity:
- An Azure Kubernetes Service cluster that's connected to Azure Arc
- A SQL database to locally store workflow run history, inputs, and outputs for processing
- A Server Message Block (SMB) file share to locally store artifacts used by your workflows
To meet these requirements, set up these on-premises resources to support hybrid deployment for Standard logic apps.
To work in Visual Studio Code, you need the Azure Logic Apps (Standard) extension for Visual Studio Code with the related prerequisites.
Tip
If you have a new Visual Studio Code installation, confirm that you can locally run a basic Standard workflow before you try deploying to your own infrastructure. This test run helps isolate any errors that might exist in your Standard workflow project.
Create your Standard logic app
After you meet the prerequisites, create your Standard logic app for hybrid deployment by following these steps:
In the Azure portal search box, enter logic apps, and select Logic apps.
On the Logic apps page toolbar, select Add.
On the Create Logic App page, under Standard, select Hybrid.
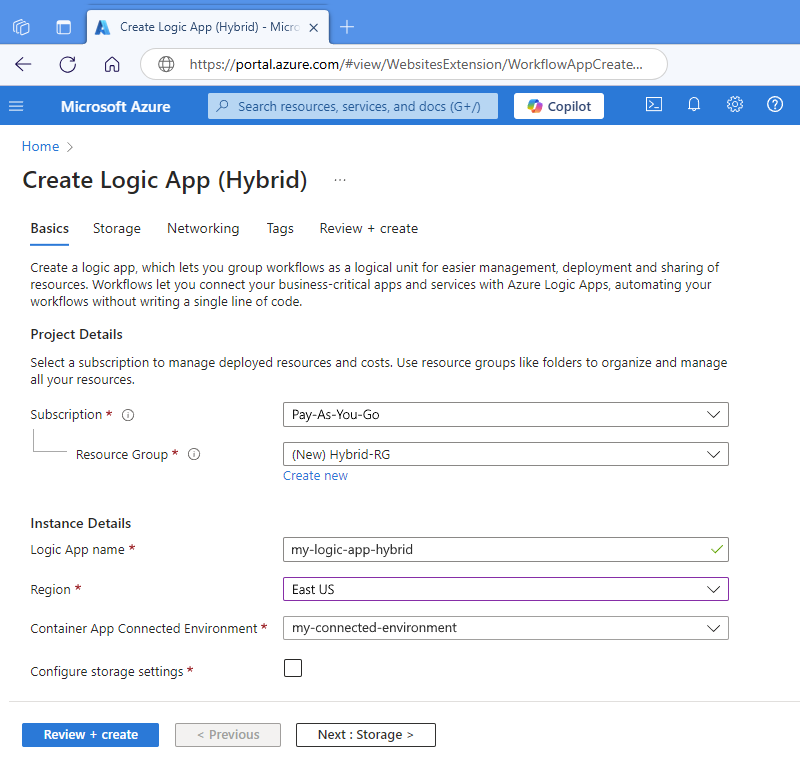
On the Create Logic App (Hybrid) page, provide the following information:
Property Required Value Description Subscription Yes <Azure-subscription-name> Your Azure subscription name.
This example uses Pay-As-You-Go.Resource Group Yes <Azure-resource-group-name> The Azure resource group where you create your hybrid app and related resources. This name must be unique across regions and can contain only letters, numbers, hyphens (-), underscores (_), parentheses (()), and periods (.).
This example creates a resource group named Hybrid-RG.Logic App name Yes <logic-app-name> Your logic app name, which must be unique across regions and can contain only lowercase letters, numbers, or hyphens (-).
This example uses my-logic-app-hybrid.Region Yes <Azure-region> An Azure region that is supported for Azure container apps on Azure Arc-enabled AKS.
This example uses East US.Container App Connected Environment Yes <connected-environment-name> The Arc-enabled Kubernetes cluster that you created as the deployment environment for your logic app. For more information, see Tutorial: Enable Azure Container Apps on Azure Arc-enabled Kubernetes. Configure storage settings Yes Enabled or disabled Continues to the Storage tab on the Create Logic App (Hybrid) page. The following example shows the logic app creation page in the Azure portal with sample values:

On the Storage page, provide the following information about the storage provider and SMB file share that you previously set up:
Property Required Value Description SQL connection string Yes <sql-server-connection-string> The SQL Server connection string that you previously saved. For more information, see Create SQL Server storage provider. Host name Yes <file-share-host-name> The host name for your SMB file share. File share path Yes <file-share-path> The file share path for your SMB file share. User name Yes <file-share-user-name> The user name for your SMB file share. Password Yes <file-share-password> The password for your SMB file share. When you finish, select Review + create. Confirm the provided information, and select Create.
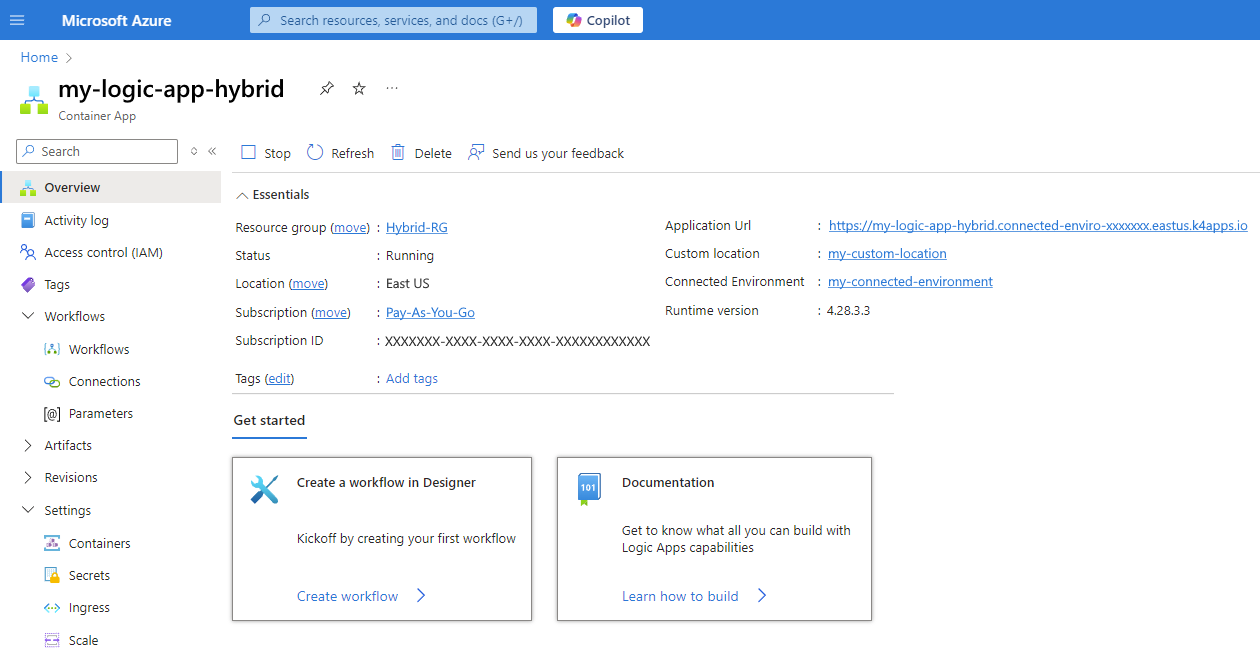
After Azure completes deployment, select Go to resource.

Note
Several known issues exist in the portal around Standard logic apps that use the hybrid hosting option. These logic apps appear with the Container App label, which differs from Standard logic apps that use either the Workflow Service Plan or App Service Environment V3 hosting option. For more information, see Known issues and troubleshooting - Azure portal.
In the Azure portal, on the resource menu, under Workflows, select Workflows.
On the Workflows page toolbar, select Add to add an empty stateful or stateless workflow.
After the designer opens, build your workflow by adding a trigger and actions.
For more information, see Build a workflow with a trigger and actions.
Note
A Standard logic app with the hybrid hosting option automatically creates a new revision, which is a versioning concept from Azure Container Apps, whenever you save changes to a child workflow. This revision might take a little time to activate, which means that after you save any changes, you might want to wait several moments before you test your workflow.
If your changes still haven't appeared in the workflow, you can check whether the revision exists:
On the resource menu, under Revisions, and select Revisions and replicas.
On the Revisions and replicas page, on the Active revisions tab, check whether a new revision appears on the list.
For more information, see the following resources:
Change CPU and memory allocation in the Azure portal
To edit the CPU and memory settings for your Standard logic app resource, follow these steps:
In the Azure portal, open your Standard logic app resource.
On the resource menu, under Settings, select Containers.
On the Containers page toolbar, select Edit and deploy, which opens the Edit a container pane.
On the Properties tab, under Container resource allocation, change the following values to fit your scenario:
Property Value Description CPU cores - Default: 1
- Minimum: 0.25
- Maximum: 2Determines the CPU cores to assign to your container instance. You can increase this value by 0.25 cores up to the maximum value. The total number across all container instances for this logic app is limited to 2 cores. Memory - Default: 2
- Minimum: 0.1
- Maximum: 4Determines the memory capacity in gibibytes (Gi) to assign to your container instance. You can increase this value by 0.1 Gi up to the maximum value. The total capacity across all container instances for this logic app is limited to 4 Gi. When you finish, select Save.
Change replica scaling in Azure portal
You can control the automatic scaling for the range of replicas that deploy in response to a trigger event. A replica is a new instance of a logic app resource revision or version. To change the minimum and maximum values for this range, you can modify the scale rules to determine the event types that trigger scaling. For more information, see Set scaling rules in Azure Container Apps.
In the Azure portal, open your Standard logic app resource.
On the resource menu, under Settings, select Scale.
On the Scale page, under Scale rule setting, change the following values to fit your scenario:
Property Value Description Min replicas - Default: 1
- Minimum: 0
- Maximum: 1000Determines the minimum number of replicas allowed for the revision at any given time. This value overrides scale rules and must be less than the maximum number of replicas. Max replicas - Default: 30
- Minimum: 0
- Maximum: 1000Determines the maximum number of replicas allowed for the revision at any given time. This value overrides scale rules. When you finish, select Save.
Control inbound traffic to your logic app in Azure portal
You can expose your logic app to the public web, your virtual network, and other logic apps in your environment by enabling ingress. Azure enforces ingress settings through a set of rules that control the routing of external and internal traffic to your logic app. When you enable ingress, you don't need to create an Azure Load Balancer, public IP address, or any other Azure resources to enable incoming HTTP requests or TCP traffic. For more information, see Ingress in Container Apps.
Note
When you enable ingress, all of the traffic will be directed to your latest revision by default. Go to Revision management page to change traffic settings.
On the resource menu, under Settings, select Ingress.
On the Ingress page, next to Ingress, select the Enabled box.
Based on your scenario, configure the remaining options.
For more information, see the following documentation:
Set up authentication for managed API connections
To authenticate managed API connections in Standard logic app workflows hosted on Azure Arc-enabled Kubernetes clusters, you must create your own app registration using Microsoft Entra ID. You can then add this app registration's values as environment variables in your Standard logic app resource to authenticate your API connections instead.
Create an app registration with Microsoft Entra ID
Azure portal
In the Azure portal, follow Quickstart: Register an application with the Microsoft identity platform to create an app registration.
After creation completes, find your new app registration in the portal.
On the resource menu, select Overview, and save the following values, which you need later for connection authentication:
- Client ID
- Tenant ID
- Client secret
For the object ID, follow these steps:
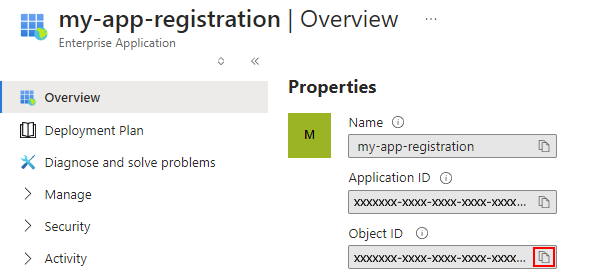
On the Overview page, select Managed application in local directory link for your app registration as shown:

On the page that opens, copy and save the Object ID value:

Now, add the saved values as environment variables to your Standard logic app resource.
Azure CLI
To create the app registration, use the az ad sp create command.
To review all the properties, use the az ad sp show command.
In the output from both commands, find and save the following values, which you need later for connection authentication:
- Client ID
- Object ID
- Tenant ID
- Client secret
Now, add the saved values as environment variables to your Standard logic app resource.
Add app registration values to your Standard logic app
In the Azure portal, go to your Standard logic app resource.
On the resource menu, under Settings, select Containers, and then select the Environment variables tab.
For more information about app settings and host settings, see Edit app settings and host settings.
On the toolbar, select Edit and deploy.
On the Edit a container pane, select Environment variables, and then select Add.
From the following table, add each environment variable with the specified value:
Environment variable Value WORKFLOWAPP_AAD_CLIENTID <my-client-ID> WORKFLOWAPP_AAD_OBJECTID <my-object-ID> WORKFLOWAPP_AAD_TENANTID <my-tenant-ID> WORKFLOWAPP_AAD_CLIENTSECRET <my-client-secret> When you finish, select Save.
Store and reference client ID and client secret
You can store the client ID and client secret values in your logic app resource as secrets and then reference those values on the Environment variables tab instead.
In the Azure portal, go to your logic app resource.
On the resource menu, under Settings, select Secrets.
On the toolbar, select Add.
On the Add secret pane, provide the following information for each secret, and then select Add:
Key Value WORKFLOWAPP_AAD_CLIENTID <my-client-ID> WORKFLOWAPP_AAD_CLIENTSECRET <my-client-secret>
Known issues and troubleshooting
Azure portal
Your Standard logic app is deployed and appears as a Azure Container Apps resource, but the type appears as Logic App (Hybrid).
Azure includes your Standard logic app in the Container Apps resource list, not the Logic apps resource list.
Your Azure Container Apps connected environment lists your Standard logic app as having an App Type named Hybrid Logic App.
To reflect changes in the designer after you save your workflow, you might have to occasionally refresh the designer.
Arc-enabled Kubernetes clusters
In rare scenarios, you might notice a high memory footprint in your cluster. To prevent this issue, either scale out or add autoscale for node pools.
Function host isn't running
After you deploy your Standard logic app, confirm that your app is running correctly.
In the Azure portal, go to the container app resource for your logic app.
On the resource menu, select Overview.
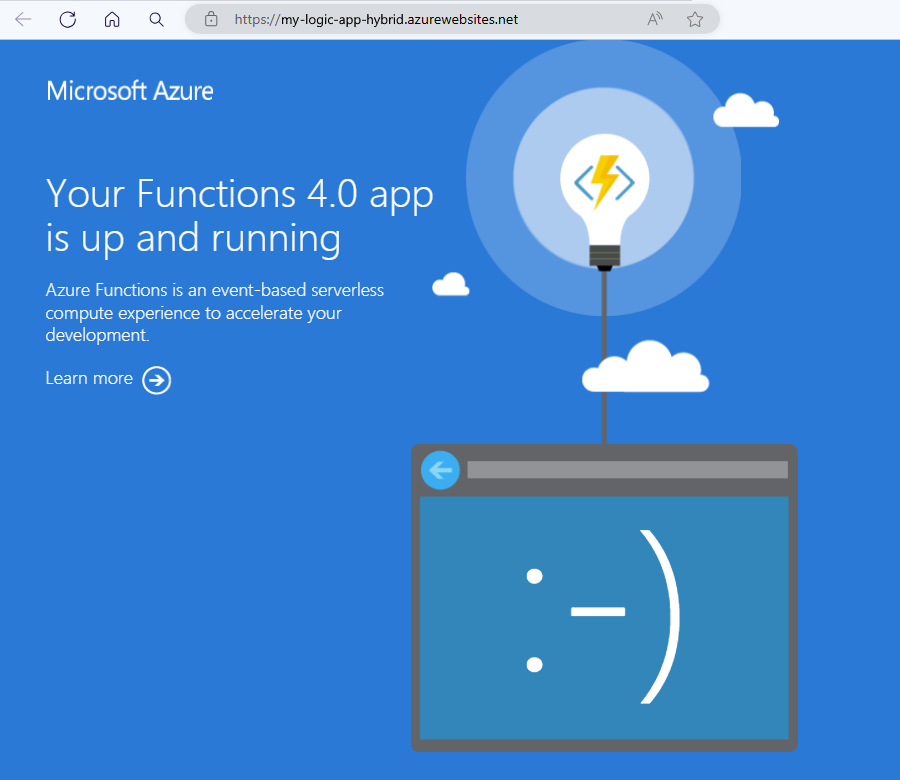
On the Overview page, next to the Application Url field, select the resource URL.
If your app is running correctly, a browser window opens and shows the following message:

Otherwise, if your app has any failures, check that your AKS pods are running correctly. From Windows PowerShell, run the following commands:
az aks get-credentials {resource-group-name} --name {aks-cluster-name} --admin
kubectl get ns
kubectl get pods -n logicapps-aca-ns
kubectl describe pod {logic-app-pod-name} -n logicapps-aca-ns
For more information, see the following documentation:
Cluster doesn't have enough nodes
If you ran the previous command and get a warning similar to the following example, your cluster doesn't have enough nodes for processing:
Warning: FailedScheduling 4m52s (x29 over 46m) default-scheduler 0/2 nodes are available: 2 Too many pods. preemption: 0/2 nodes are available: 2 No preemption victims found for incoming pod.
To increase the number of nodes, and set up autoscale, follow these steps:
In the Azure portal, go to your Kubernetes service instance.
On the instance menu, under Settings, select Node pools.
On the Node tools page toolbar, select + Add node pool.
For more information, see the following documentation:
- Create node pools for a cluster in Azure Kubernetes Service (AKS)
- Manage node pools for a cluster in Azure Kubernetes Service (AKS)
- Cluster autoscaling in Azure Kubernetes Service (AKS) overview
- Use the cluster autoscaler in Azure Kubernetes Service (AKS)
SMB Container Storage Interface (CSI) driver not installed
After you ran the earlier kubectl describe pod command, if the following warning appears, confirm whether the CSI driver for your SMB file share is installed correctly:
Warning FailedScheduling 5m16s (x2 over 5m27s) default-scheduler 0/14 nodes are available: pod has unbound immediate PersistentVolumeClaims. preemption: 0/14 nodes are available: 14 Preemption is not helpful for scheduling.
Normal NotTriggerScaleUp 9m49s (x31 over 14m) cluster-autoscaler pod didn't trigger scale-up: 3 pod has unbound immediate PersistentVolumeClaims
To confirm, from Windows PowerShell, run the following commands:
kubectl get csidrivers
If the results list that appears doesn't include smb.csi.k8s.io, from a Windows command prompt, and run the following command:
helm repo add csi-driver-smb
helm repo update
helm install csi-driver-smb csi-driver-smb/csi-driver-smb --namespace kube-system --version v1.15.0
To check the CSI SMB Driver pods status, from the Windows command prompt, run the following command:
kubectl --namespace=kube-system get pods --selector="app.kubernetes.io/name=csi-driver-smb" --watch
For more information, see Container Storage Interface (CSI) drivers on Azure Kubernetes Service (AKS).