Set up a direct interconnect for internet peering
In this article, you learn how to establish a direct interconnect for internet peering with Azure Peering Service.
Internet peering in Azure Peering Service supports direct interconnects with Microsoft at any of its point-of-presence (PoP) edge sites for internet exchange partners (IXPs). The list of all the public edge sites is available on PeeringDB.
Internet peering provides highly reliable and Quality of Service (QoS)-enabled interconnect for IXPs to ensure high-quality, performance-centric services.
The following flowchart summarizes the process to onboard to Peering Service:
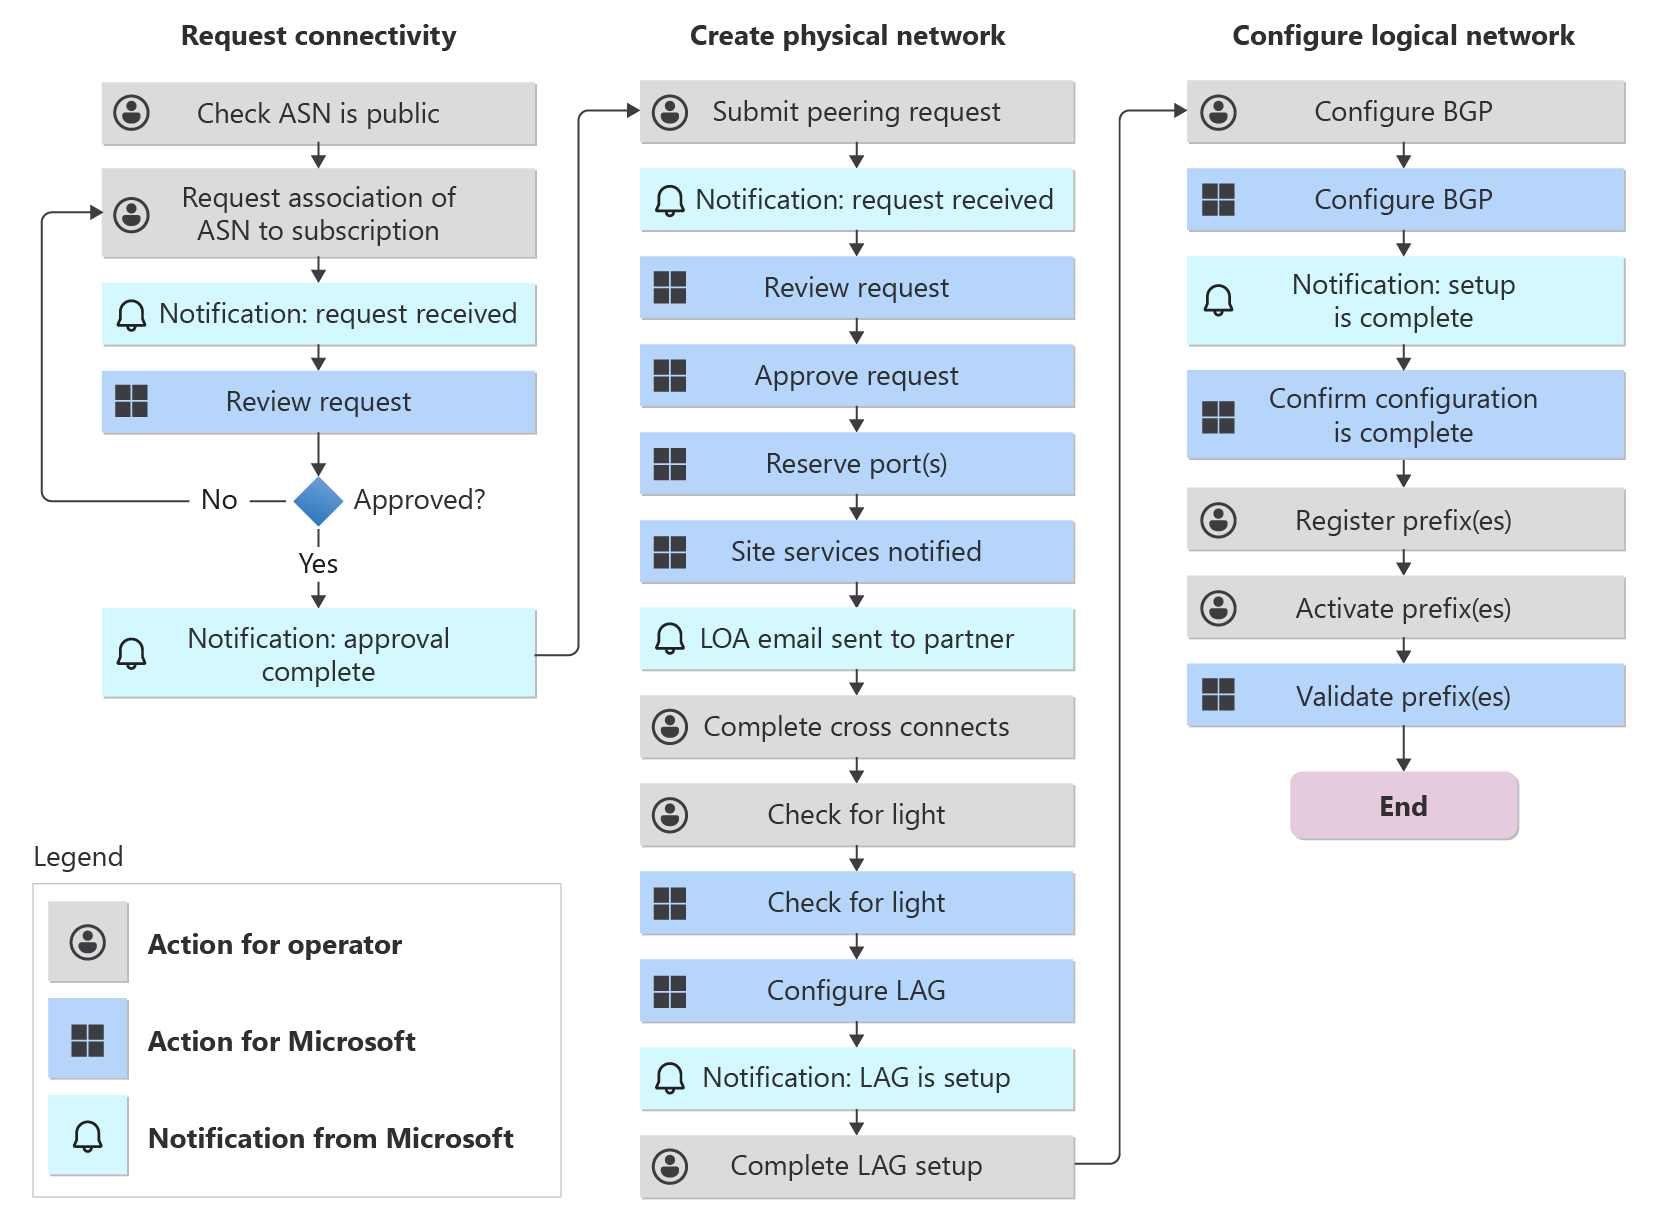
Technical requirements
To establish direct interconnect for Peering Service, follow these requirements:
- The peer must provide its own autonomous system number (ASN), which must be public.
- The peer must have a redundant Private Network Interconnect (PNI) at each interconnect location to ensure local redundancy.
- The peer must supply and advertise its own publicly routable IPv4 address space that's used by the peer's endpoints (for example, by an SBC).
- The peer must not terminate the peering on a device running a stateful firewall.
- The peer can't have two local connections configured on the same router. Diversity is required.
- The peer can't apply rate limiting to its connection.
- The peer can't configure a local redundant connection as a backup connection. Backup connections must be in a different location than the primary connection.
- Primary sessions, backup sessions, and redundant sessions must all have the same bandwidth.
- We recommend that you create Peering Service peerings in multiple locations to achieve geo-redundancy.
- All infrastructure prefixes are registered in the Azure portal and advertised by using the community string
8075:8007. - The peer must support Link Aggregation Control Protocol (LACP) on the interconnect links. Microsoft configures all interconnect links as link aggregation groups (LAGs) by default.
Establish a direct interconnect for Peering Service
Before you proceed, ensure that you sign a Microsoft Azure Peering Service agreement. For more information, see Azure Peering Service partner overview requirements.
To establish a Peering Service interconnect with Microsoft, complete the steps described in the following sections.
Associate your public ASN with your Azure subscription
The first step is to associate your public ASN with your Azure subscription.
For more information, see Associate a peer ASN with an Azure subscription.
If the ASN is already associated with your Azure subscription, go to the next step.
Create a Peering Service peering
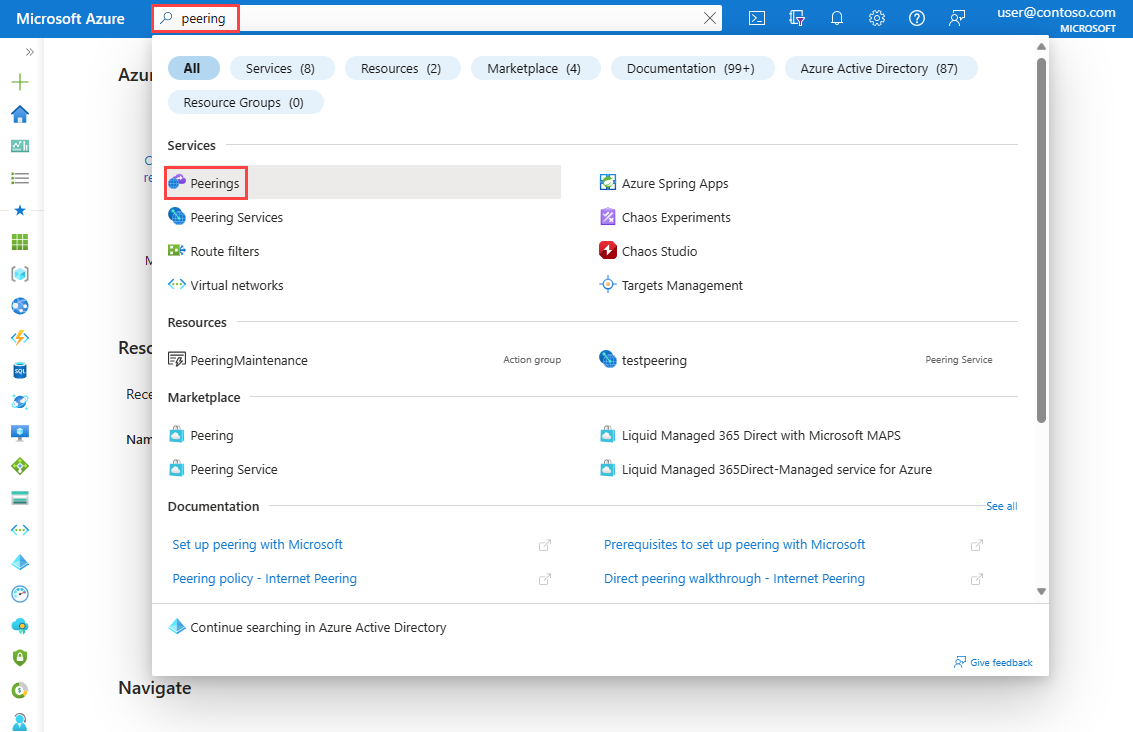
To create a Peering Service peering resource, search for peerings in the Azure portal. In the search results, select Peerings.
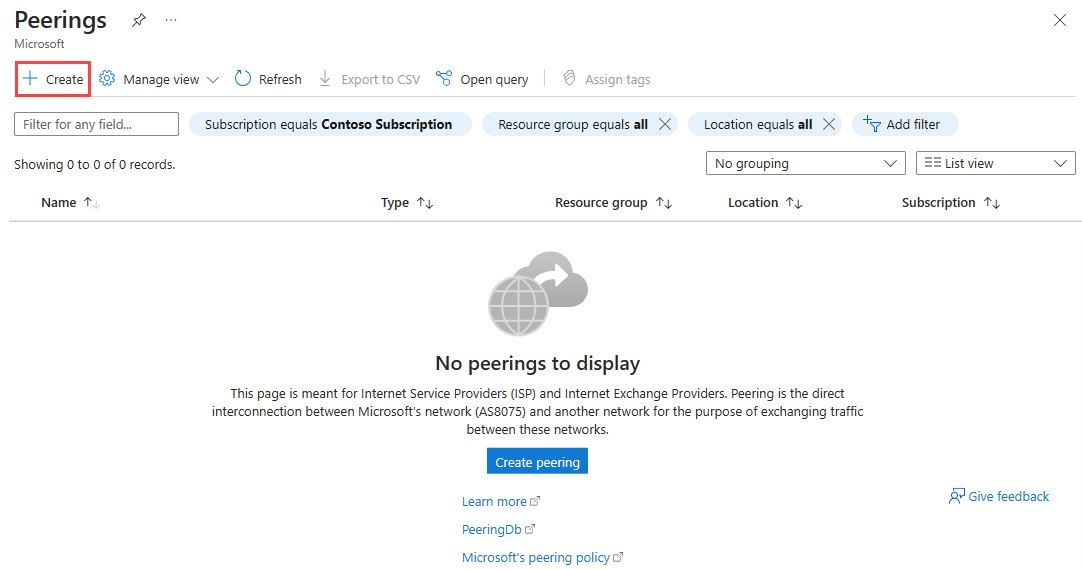
Select Create.
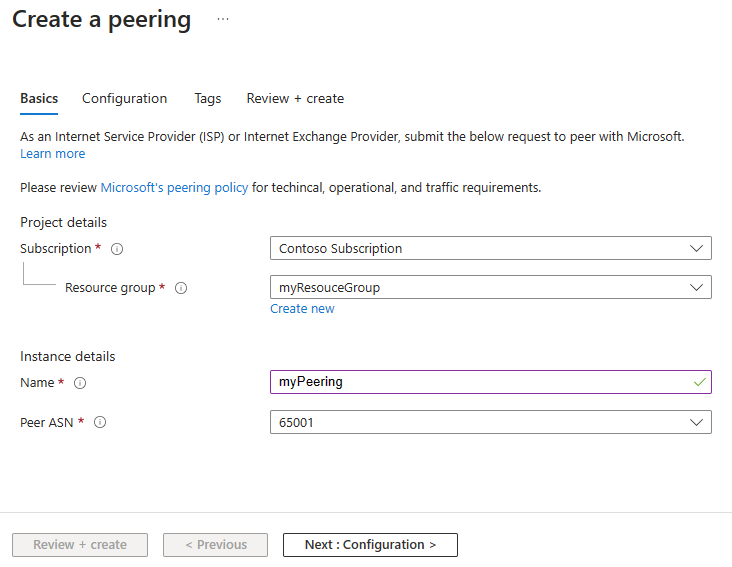
On the Basics tab, enter or select your Azure subscription, the resource group, a peering name, and the ASN of the peering.
Warning
You can't change these options after the peering is created. Confirm that your selections are correct before you create the peering.
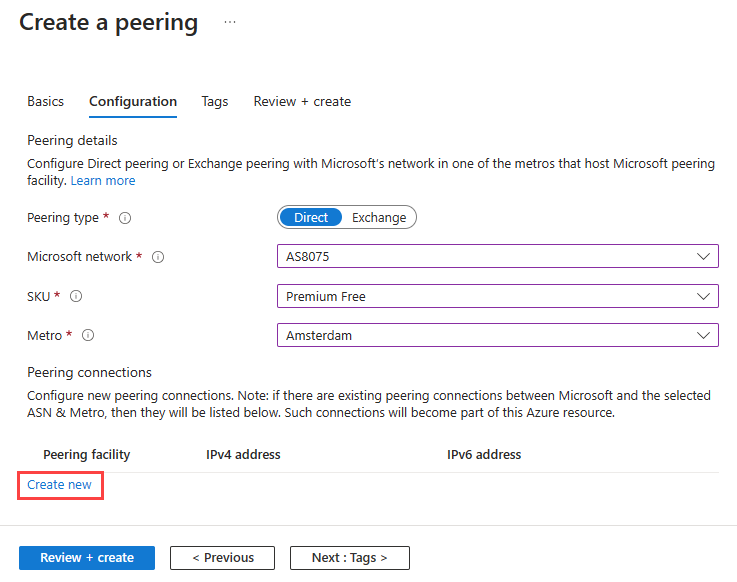
On the Configuration tab, select the following required configurations:
For Peering type, select Direct.
For Microsoft network, select AS8075.
For SKU, select Premium Free.
For Metro, select the relevant value. Then select Create new to add a connection to your peering.
In Direct Peering Connection, enter or select your peering facility details. Select Save.
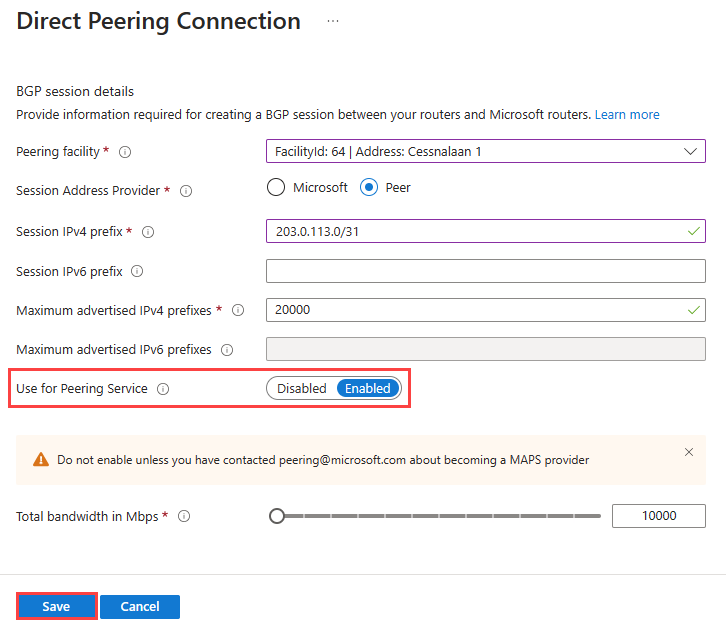
Peering Service peerings must have Use for Peering Service enabled.
Before you finalize your peering, make sure the peering has at least two connections. Local redundancy is a requirement for Peering Service, and creating a Peering with two sessions achieves this requirement.
Select Review + create. Review the summary and select Create when validation passes.
Allow time for the resource to finish deploying. When deployment is successful, your peering is created and provisioning begins.
Configure optimized routing for your prefixes
To get optimized routing for your prefixes with your Peering Service interconnects, complete the steps described in the following sections.
Register your prefixes
For optimized routing for infrastructure prefixes, you must register the prefixes.
Note
The connection state of your peering connections must be Active before you can register any prefixes.
Ensure that the registered prefixes are announced over the direct interconnects established with your peering. If the same prefix is announced in multiple peering locations, you don't have to register the prefix in each location. A prefix can be registered with only a single peering. When you receive the unique prefix key after validation, this key is used for the prefix, even in locations other than the location of the peering it was registered under.
To begin registration:
In the Azure portal, go to the peering.
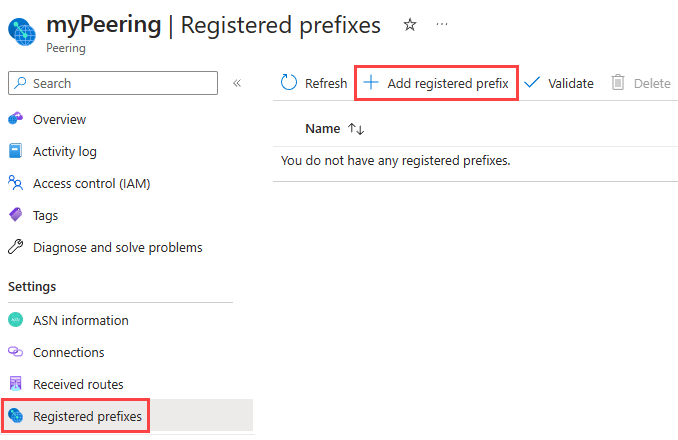
On the service menu, under Settings, select Registered prefixes.
On the Registered prefixes pane, select + Add registered prefix.
Note
If the Add registered prefix button is disabled, then your peering doesn't have at least one Active connection. Wait until this occurs to register your prefix.
Configure your prefix by giving it a name and the IPv4 prefix string, and then select Save.
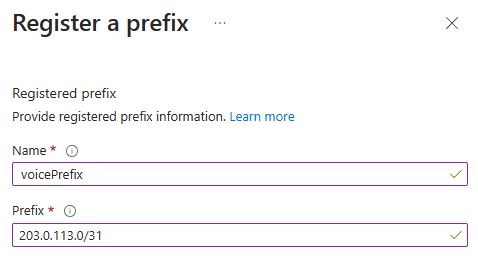
After prefix creation, you can see the generated Peering Service prefix key when viewing the Registered ASN resource:

After you create a Peering Service prefix, the prefix is queued for validation. To check the validation state of the prefix, go to the Peering Service Registered prefixes pane.
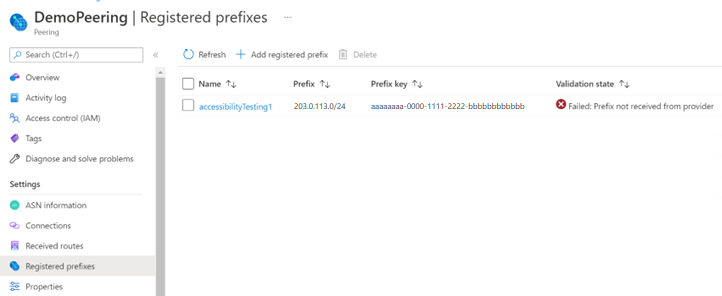
For a registered prefix to become validated, the following checks must pass:
- The prefix can't be in a private range.
- The origin ASN must be registered in a major routing registry.
- All connections in the parent peering must advertise routes for the prefix.
- Routes must be advertised by using the MAPS community string
8075:8007. - Autonomous system (AS) paths in your routes can't exceed a path length of 3, and they can't contain private ASNs or AS prepending.
For more information about registered prefix requirements and how to troubleshoot validation problems, review the peering registered prefix requirements.
Provide Peering Service prefix keys to customers for activation
When your customers onboard to Peering Service, they must follow the steps described in the Peering Service customer walkthrough. Your customers activate prefixes by using the Peering Service prefix key that was obtained during prefix registration. Provide this key to customers before they activate. The key is used for all prefixes during activation.
FAQ
Get answers to frequently asked questions.
Q. When will my BGP mesh be available?
A. When LAG is running, our automated process provisions the BGP mesh. The peer must configure BGP.
Q. When are peering IP addresses allocated and shown in the Azure portal?
A. Our automated process allocates addresses and sends the information via email after the port is configured on the Microsoft side.
Q. I have smaller subnets (</24) for my services. Are smaller subnets routed?
A. Yes, Peering Service supports smaller prefix routing. Ensure that you register the smaller prefixes for routing. Then, they're announced over the interconnects.
Q. What Microsoft routes do we receive over the interconnects?
A. Microsoft announces all Microsoft public service prefixes over the interconnects to ensure that voice and other cloud services are accessible from the same interconnect.
Q. My peering registered prefix failed validation. How should I proceed?
A. Review the peering registered prefix requirements and follow the troubleshooting steps that are described.
Q. Do I need to be aware of any AS path constraints?
A. Yes. A private ASN can't be in the AS path. For registered prefixes smaller than /24, the AS path must be less than four.
Q. I need to set the prefix limit. How many routes will Microsoft announce?
A. Microsoft announces roughly 280 prefixes on the internet. The number might increase by 10% to 15%. A limit of 400 to 500 is safe to set as the value for Max prefix count.
Q. Will Microsoft readvertise peer prefixes to the internet?
A. No.
Q. Is there a fee for this service?
A. No. However, the peer is expected to carry site cross-connect costs.
Q. What is the minimum link speed for an interconnect?
A. 10 Gbps.
Q. Is the peer bound to a service-level agreement (SLA)?
A. Yes. When utilization reaches 40%, an LAG augmentation process that lasts 45 to 60 days begins.
Q. How long is the onboarding process?
A. The time it takes to complete onboarding varies based on the number and location of sites, and whether the peer migrates existing private peerings or establishes new cabling. The carrier should plan for three weeks or more.
Q. How is progress communicated outside of the portal status?
A. Automated emails are sent at varying milestones.
Q. Can we use APIs for onboarding?
A. Currently, there's no API support. You can configure your service only by using the Azure portal.