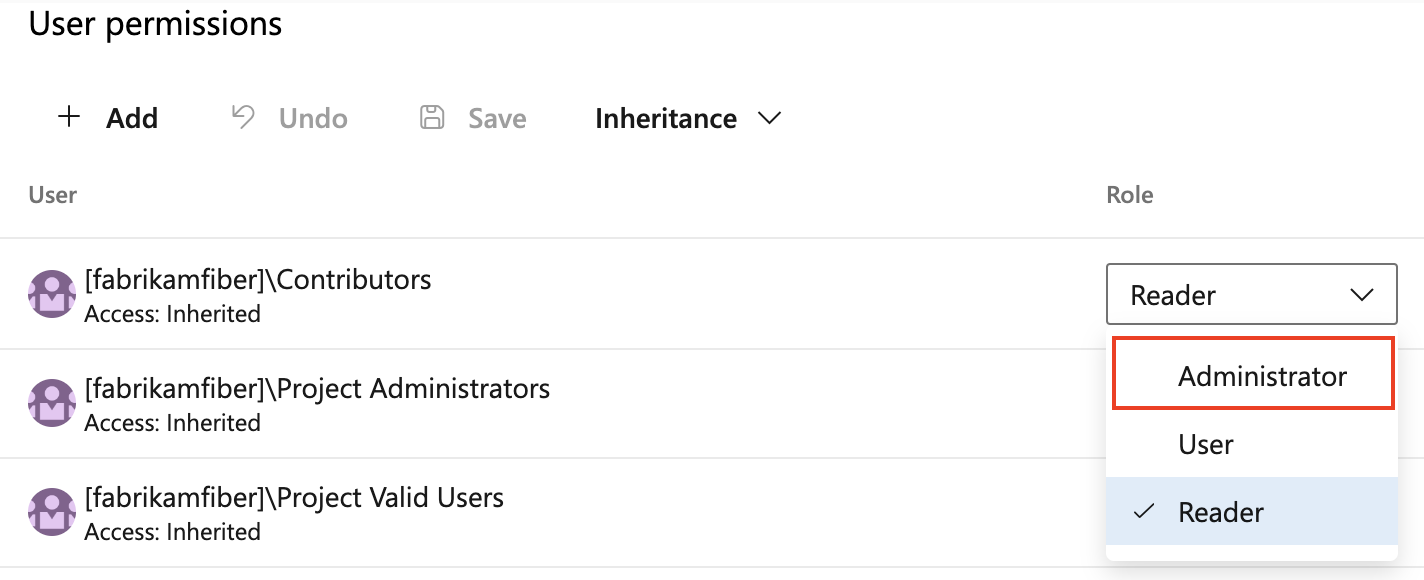
Add an admin role to a protected resource
To manage protected resources, Azure Pipelines requires a user be assigned or to be a member of a group that is assigned the Administrator role for the resource. You can manage security for resources at the project level or for individual resources. To manage security at the project level and for project level administrator groups at the individual resource level, you must be a member of the Project Administrators group.
This article shows you how to assign the Administrator role to users and groups for protected resources.
Protected resources include:
- Agent pools
- Secret variables in variable groups
- Secure files
- Service connections
- Environments
- Repositories
For repository resources, see protect a repository resource.
Prerequisites
You must be a member of the Project Administrators group to update project-level resource permissions or to grant access to all pipelines in the project for an individual resource. Some individual resources also require Project Administrators group membership to change permissions for project administrator groups.
Agent pools
You can add the Administrator role to users and groups for a specific agent pool and for all agent pools.
To add the Administrator role to a user or group for all agent pools:
Go to Project Settings > Pipelines > Agent pools.
Select Security.
Assign the Administrator role in the Role column for a user or group.
Select
 to save the settings.
To add the Administrator role to a user or group for a specific agent pool:
Go to Project Settings > Pipelines > Agent pools.
Select a specific agent pool.
Select Security.
In User permissions, assign the Administrator role in the Role column for a user or group.
Select
 to save the settings.
Library resources (variable groups and secure files)
You can manage security for all library resources at the project level or for individual variable groups and files. To create a library resource, you must be assigned or be a member of a group that is assigned either the Administrator or Creator role. The creator of a resource is automatically assigned the Administrator role for that individual resource.
To assign the Administrator role to users and groups at the project level:
Go to Pipelines > Library.
Select Security.
Assign the Administrator role in the Role column for a user or group.
Select
 to save the settings.
To assign the Administrator role to users and groups for a variable group:
Go to Pipelines > Library.
Select the variable group.
Select Security.
Select
 to save the settings.
To assign the Administrator role to users and groups for a secure file:
Go to Pipelines > Library.
Select Secure files and select a file from the list.
Select Security.
Assign the Administrator role in the Role column for a user or group.
Select
 to save the settings.
Service connections
You can manage security for all service connections at the project level or for individual service connections. To create a service connection, you must be assigned or be a member of a group that is assigned either the Administrator or Creator role. The creator of a service connection is automatically assigned the Administrator role for that individual service connection.
To assign the Administrator role to users and groups at the project level:
Go to Project Settings > Service connections.
Select
 and select Security.
Assign the Administrator role in the Role column for a user or group.
To save the settings, select Save.
To assign the Administrator role to users and groups for a service connection:
Go to Project Settings > Service connections.
Select a service connection.
Select
 and select Security.
Assign the Administrator role in the Role column for a user or group.
To save the settings, select Save.
Environments
You can manage security for all environments at the project level or for individual environments. To create an environment, you must be assigned or be a member of a group that is assigned either the Administrator or Creator role. The creator of an environment is automatically assigned the Administrator role for that individual environment.
To assign the Administrator role to users and groups at the project level:
Go to Pipelines > Environments.
Select
 and select Security.
Assign the Administrator role in the Role column for a user or group.
To save the settings, select Save.
To assign the Administrator role to a user or group for an individual environment:
Go to Pipelines > Environments.
Select an environment.
Select
 and select Security.
Assign the Administrator role in the Role column for a user or group.

To save the settings, select Save.
Next steps
Learn more about permissions in Azure DevOps.