Set work tracking permissions
Azure DevOps Services | Azure DevOps Server 2022 - Azure DevOps Server 2019
To manage work tracking effectively, assign specific permissions to users or groups for particular objects, projects, or collections. You can also define custom rules for processes or projects that apply to specific users or groups, controlling their actions accordingly. For most features, we recommend adding users to the project's Contributors group, which grants comprehensive access and ensures a seamless and efficient work tracking experience.
Note
For public projects, Stakeholder access gives users greater access to work tracking features and full access to Azure Pipelines. For more information, see Stakeholder access quick reference.
Prerequisites
Permissions: To set work tracking permissions, be a member of the Project Administrators group or have explicit permissions to manage the work tracking area as described in this article.
Permissions: To set process permissions, you must be a member of the Project Collection Administrators group or have explicit permissions to edit a collection process.
Understand roles and permission levels for work tracking
The following table summarizes the different permissions you can set at the object, project, or collection level. The team administrator role provides access to add and modify team resources. Also, see Default permissions for Boards, Backlogs, Sprints, Delivery Plans, Test Management, and Queries, further in this article.
Role or permission level
Functional areas set
Team administrator role
Add a team administrator
Object-level permissions
Project-level permissions
Project collection-level permissions
Includes all permissions you can set at the collection-level.
- Create, delete, or edit a process (Inheritance process model)
- Delete field from account (Inheritance process model)
- Manage process permissions (Inheritance process model)
- Edit collection level permissions
Project collection-level permissions include all permissions you can set at the collection-level.
Default permissions for Boards, backlogs, and sprints
Boards default permissions
Task
Readers
Contributors
Team admins
Project admins
View boards and open work items
✔️
✔️
✔️
Add work items to a board; update status through drag-and-drop
✔️
✔️
Reorder work items or reparent child items through drag-and-drop; update a field on a card
✔️
✔️
Add work items to a board; update status, reorder, or reparent child items through drag-and-drop; update a field on a card
✔️
✔️
Add child items to a checklist
✔️
✔️
Assign to a sprint (from card field)
✔️
✔️
Configure board settings
✔️
Backlogs default permissions
Task
Readers
Contributors
Team admins
Project admins
View backlogs and open work items
✔️
✔️
✔️
Add work items to a backlog
✔️
✔️
Use bulk edit features
✔️
✔️
Add child items to a backlog item; prioritize or reorder a backlog; parent items using the Mapping pane; Assign items to a sprint using the Planning pane
✔️
✔️
Configure team settings, backlog levels, show bugs, work days off
✔️
Sprints default permissions
Task
Readers
Contributors
Team admins Project admins
View sprint backlogs, taskboards, and open work items
✔️
✔️
✔️
Add work items to a sprint backlog or taskboard
✔️
✔️
Prioritize/reorder a sprint backlog or taskboard; add child items to a backlog item; reassign items to a sprint using the Planning pane
✔️
✔️
View team capacity and work details
✔️
✔️
✔️
Set team capacity
✔️
Use bulk edit features
✔️
✔️
Define team sprints
✔️
Create child nodes, modify work items under an area or iteration path
Area path permissions let you manage access to edit or modify work items, test cases, or test plans assigned to those areas. You can restrict access to users or groups. You can also set permissions for who can add or modify areas or iterations for the project.
Note
Project members with permissions to create or edit Area Paths or Iteration Paths can't set team Area Paths and Iteration Paths. To configure team settings, you must be added to the team administrator role or be a member of the Project Administrators group.
Do the following steps to define both areas and iterations for a project.
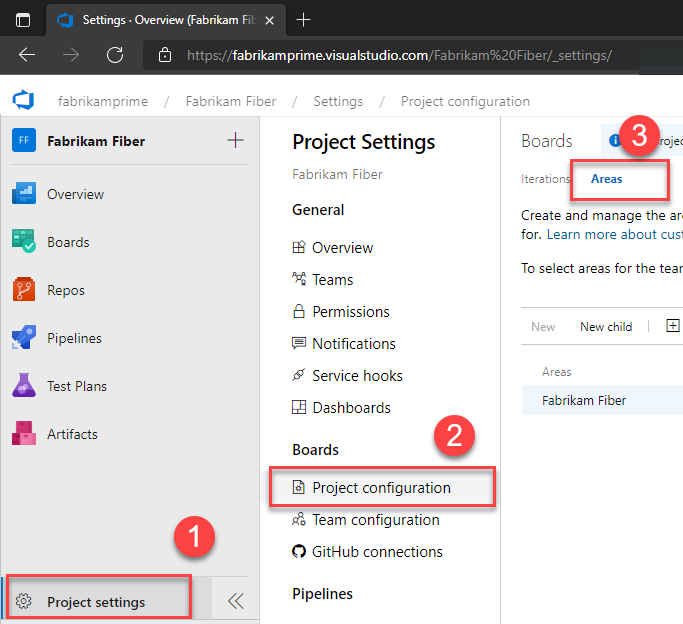
Choose Project settings > Project configuration > Boards, and then select Areas or Iterations to modify Area Paths or Iteration Paths.
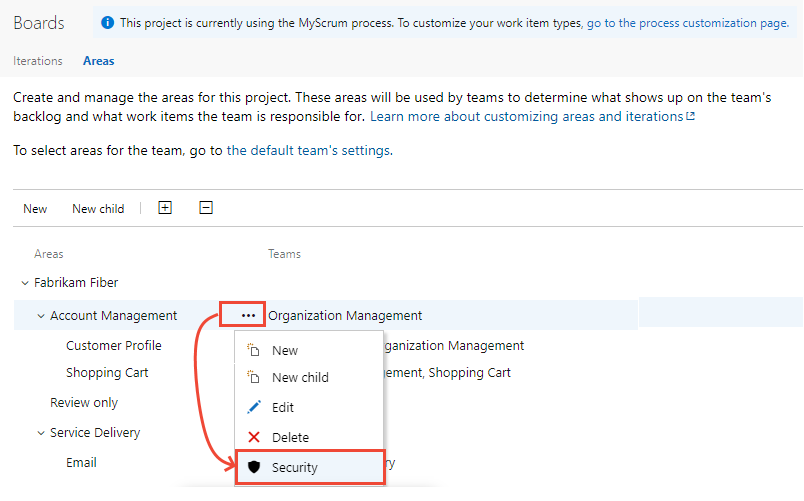
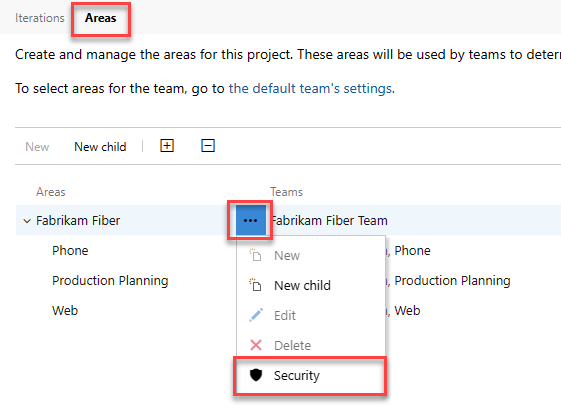
Choose the ... context menu for the node you want to manage and select Security.
Select the group or project member, and then change the permission settings. To add a user or group, enter their name in the search box.
For example, here we added the Disallow Access Group, and disallowed members of this group the ability to view, modify, or edit work items in the Account Management area path.

You can specify two explicit authorization states for permissions: Deny and Allow. In addition, permissions can exist in one of the three other states. For more information, see About permissions, access, and security groups.
(Optional) Choose the Inheritance slider to disable inheritance. Disabling Inheritance persists all inherited permissions as explicit Access Control Entries (ACEs).
When you're done, close the dialog. Your changes automatically save.
Do the following steps to define both areas and iterations for a project.
Select (1) Project settings > (2) Project configuration > (3) Areas.

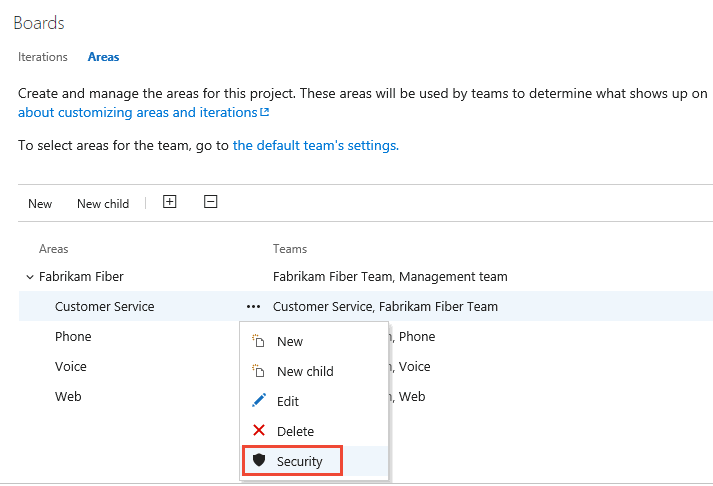
Choose the ... context menu for the node you want to manage and select Security.
Select the group or team member, and then change the permission settings. To add a user or group, enter their name in the search box.
In the following example, we added the Disallow Access Group, and disallowed members of this group the ability to view, modify, or edit work items in the Customer Service area path.
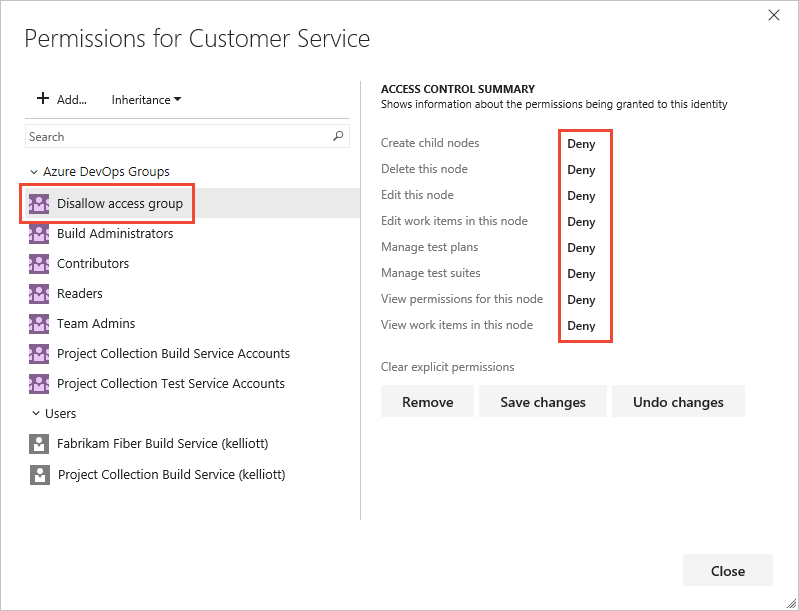
You can specify two explicit authorization states for permissions: Deny and Allow. Permissions can also exist in one of the three other states. For more information, see About permissions, access, and security groups.
(Optional) Toggle Inheritance to Off to disable inheritance. Disabling Inheritance persists all inherited permissions as explicit Access Control Entries (ACEs).
When you're done, close the dialog. Your changes automatically save.
Default permissions for work items
Note
You can change the work item type or move work items to another project within a project collection. These features require that the data warehouse is disabled. With the data warehouse disabled, you can use the Analytics Service to support your reporting needs. To learn more about disabling the data warehouse, see Disable the data warehouse and cube.
Task or permission
Readers
Contributors
Project admins
View work items in this node (Area Path permission)
✔️
✔️
✔️
Edit work items in this node (Area Path permission)
✔️
✔️
Edit work item comments in this node (Area Path permission)
✔️
✔️
Create tag definition
✔️
✔️
Change work item type (Project-level permission)
✔️
✔️
Move work items out of this project (Project-level permission)
✔️
✔️
Email work items
✔️
✔️
✔️
Apply a work item template
✔️
✔️
Delete and restore work items (Project-level permission) (able to restore from the Recycle bin)
✔️
✔️
Permanently delete work items (Project-level permission)
✔️
Provide feedback (through the Microsoft Feedback client)
✔️
✔️
✔️
✔️
Note
Work items are subject to rules applied to them. Conditional rules based on user or group membership are cached for your web browser. If you find yourself restricted to update a work item, you may have encountered one of these rules. If you believe you've encountered an issue that doesn't apply to you, see Work item form IndexDB caching issues. For more information, see Rules and rule evaluation.
Use custom rules
Custom rules don't control permissions, but they affect whether a user can modify a work item or set the value of a work item field. Azure Boards supports the following work tracking customizations that support business workflows.
| Customization | Examples |
|---|---|
| Apply rules upon work item creation, state change, and specified state. | - Make a field read-only - Make a field required |
| Apply rules when a field value is empty, set to a specific value, or change or not changed to a value. | - Clear the value of a field if it's empty or meets certain criteria - Set a predefined value for the field if it's empty or meets specific conditions - Copy the value of one field to another field - Hide a field based on certain conditions or values |
| Apply rules that dictate what state a work item can get moved to from a given state. | - Reassign a work item based on state changes - Specify that a work item can only transition from "State A" to "State B" - Manage the state transitions of parent work items based on the state changes of their child work items |
| Apply rules based on user or group membership of the user modifying a work item. | Specify rules that restrict a group from creating a work item, transitioning a work item to a closed or completed state, or changing the value of a field |
There are some restrictions for applying custom rules to system fields. For example, you can't specify rules that set or clear the value for Area Path or Iteration Path as they're system fields. For more information, see Rules and rule evaluation and Sample rule scenarios.
Set permissions on queries or query folders
You can specify who can add or edit query folders or queries at the object-level. To manage permissions for a query or query folder, you must be the creator of the query or folder, a member of the Project Administrators or Project Collection Administrators group or granted explicit access through the object's Security dialog.
Query folder permissions dialog
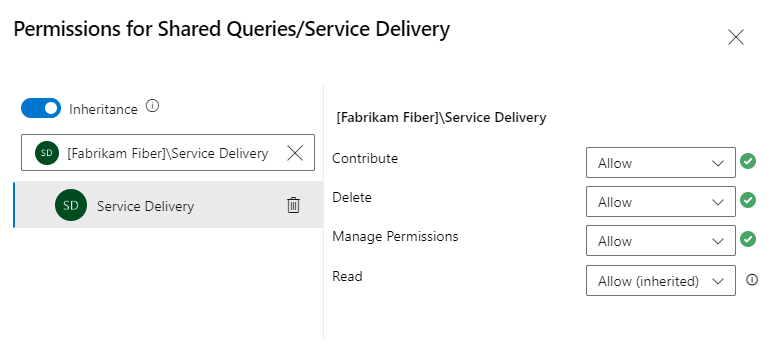
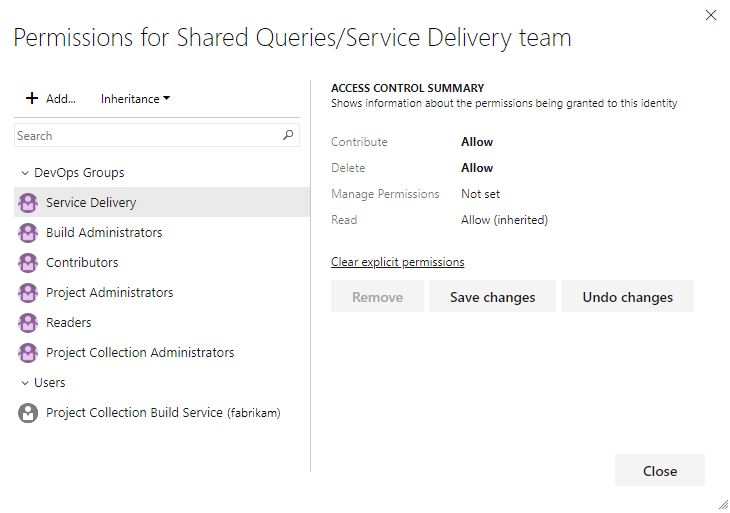
For more information, see Create managed queries to list, update, or chart work items.
Default permissions for queries
Tip
By default, Contributors can't create and save shared queries. We recommend that Project Administrators create a query folder for each team and give the team administrators or the team group query permissions to manage their folder. You need Delete permissions to rename or move a shared query or folder, and Contribute permissions for the folder where you move the query to. For more information, see Set permissions on queries and query folders.
Task
Readers
Contributors
Project admins
View and run managed queries, view query charts
✔️
✔️
✔️
Create and save managed My queries, query charts
✔️
✔️
Create, delete, and save Shared queries, charts, folders
✔️
Adhoc searches are powered by a semantic search engine.
Set permissions for work item tags
By default, all users of the Contributors group can create and add tags to work items. To set permissions for a group or user to restrict this ability, you can set the Create tag definition to Deny at the project-level. To learn how, see Change the permission level for a project-level group.
Manage permissions for Delivery Plans
Delivery Plans are an object within a project. You can manage permissions for each plan like the way you manage permissions for shared queries or query folders. The creator of a Delivery Plan and all members of the Project Collection Administrators and Project Administrators groups have permissions to edit, manage, and delete plans.
Users granted Stakeholder access for private projects have no access to delivery plans, while users granted Stakeholder access for public projects has the same access as regular Contributors granted Basic access. For a comparison chart of Stakeholder versus basic access, see the Feature Matrix.
To edit the permissions for a Delivery Plan, you must be the creator of the plan, a member of the Project Administrators or Project Collection Administrators group, or granted explicit permission through the plan's Security dialog.
Open Boards > Delivery Plans.
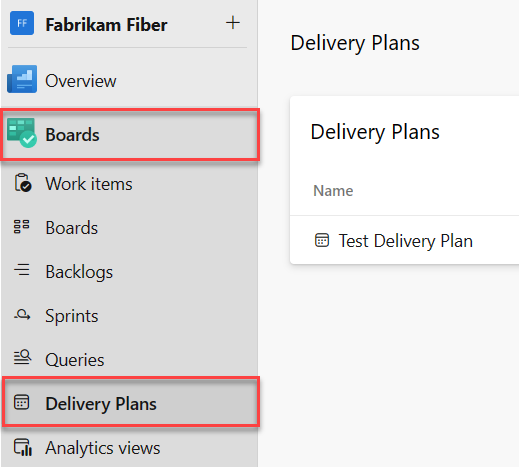
To grant permissions to a group or user to manage or edit a specific plan, choose
 More options to open the Security dialog for the plan.
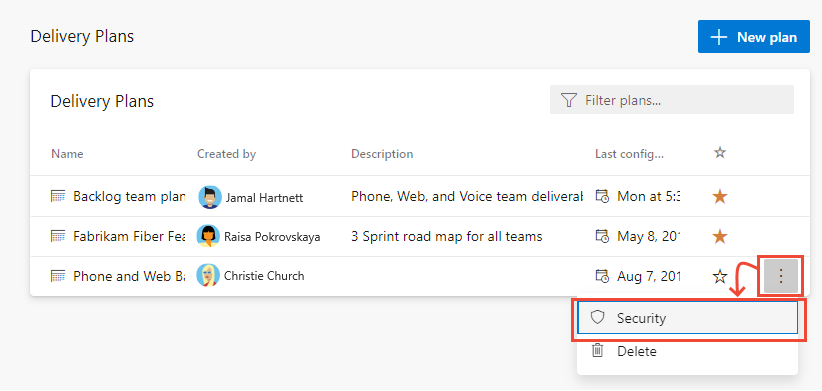
Add a user, team group, or other security group who you want to grant permissions to or restrict access. For details, see Change project-level permissions. By default, nonadministrators can't delete or edit a plan.
With the user or group selected, set the permission you want them to have to Allow. Manage set to Allow enables the user to manage permissions for the plan.
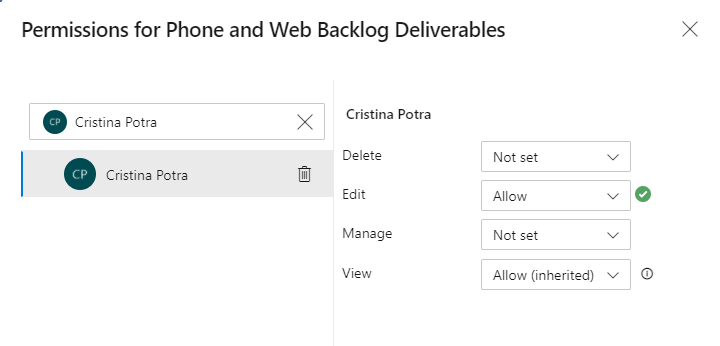
When you're done, close the dialog. Your changes automatically save.
Open Boards > Plans. For more information, see Review team delivery plans.
To grant permissions to a group or user to manage or edit a specific plan, choose the
 actions icon to open the Security dialog for the plan.
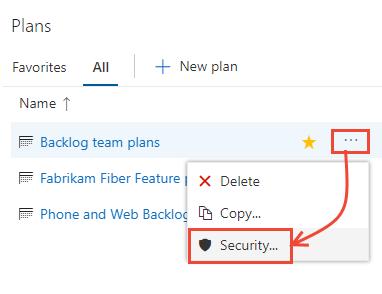
Add a user, team group, or other security group who you want to grant permissions to or restrict access. For details, see Change project-level permissions. By default, non-administrators can't delete or edit a plan.
With the user or group selected, set the permission you want them to have to Allow. Manage set to Allow enables the user to manage permissions for the plan.
For example, here we grant permission to Raisa to edit the plan.
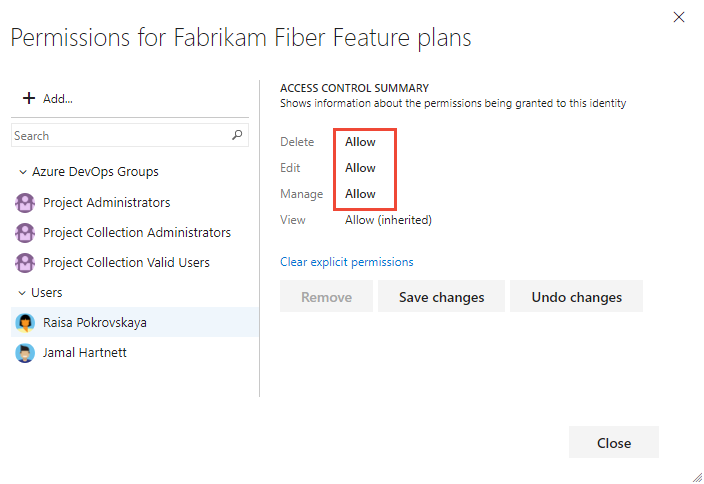
Save when you're done.
Default permissions for Delivery Plans
Task
Readers
Contributors
Team admins
Project admins
View delivery plans
✔️
✔️
✔️
Create, edit, or delete a delivery plan, Contributors can only edit or delete plans that they create
✔️
✔️
Manage permissions for a delivery plan, Contributors can only manage permissions for plans that they create
✔️
✔️
Move or permanently delete work items
By default, Project Administrators and Contributors can change the work item type and delete work items by moving them to the Recycle Bin. Only Project Administrators can permanently delete work items and test artifacts. Project admins can grant permissions to other team members as needed.
For example, as a project admin you can grant a user, team group, or other group you've created to have these permissions. Open the Security page for the project and choose the user or group you want to grant permissions. To learn how to access project-level Security, see Change project-level permissions.
Note
The Move work items out of this project permission requires the Inherited process model for the project.
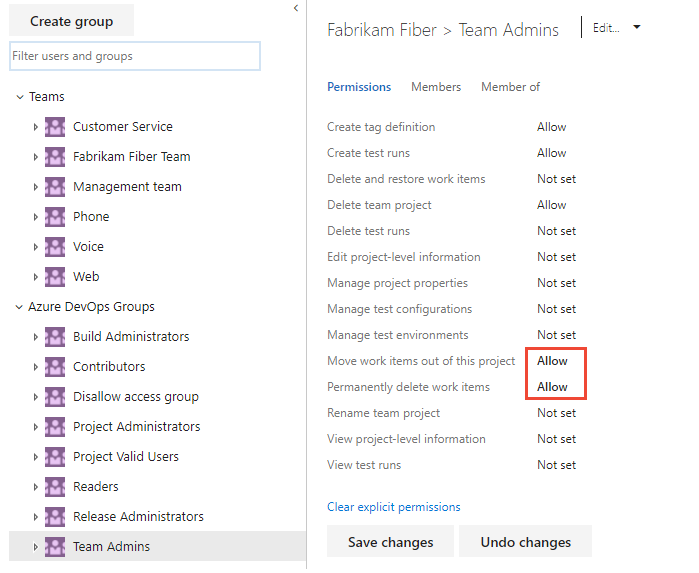
In the following example, we granted members who are assigned to the team administrator role, and who belong to the Team Admin group, permissions to move work items to another project and permanently delete work items.
Manage test plans and test suites
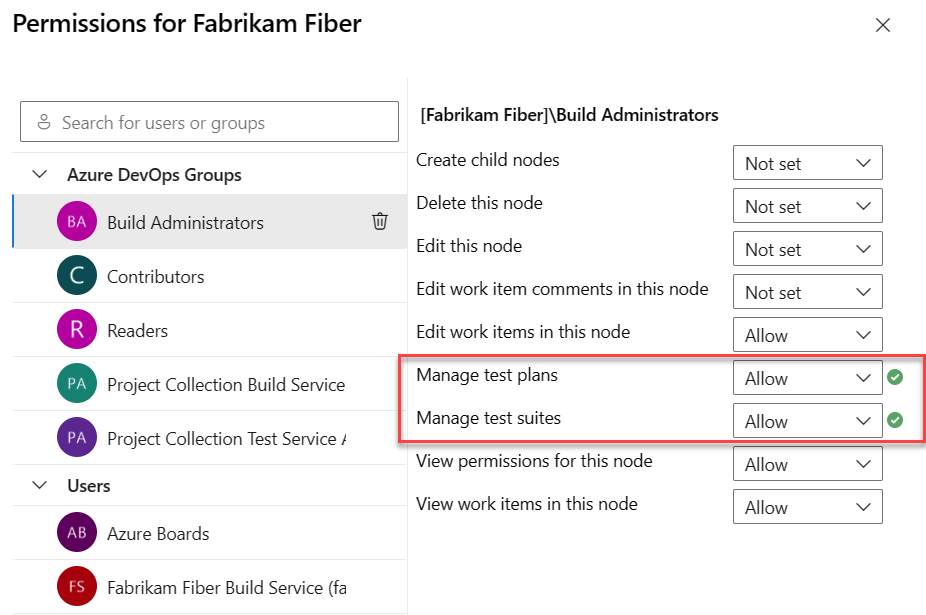
In addition to the project-level permissions set in the previous section, team members need permissions to manage test artifacts that are set for an area path.
Open the Security page for area paths and choose the user or group you want to grant permissions.
Set the permissions for Manage test plans and Manage test suites to Allow.
To have full access to the Test feature set, your access level must be set to Basic + Test Plans. Users with Basic access and with permissions to permanently delete work items and manage test artifacts can only delete orphaned test cases.
Default permissions for test management
Test plans, test suites, test cases and other test artifacts are specific work item types that support manual and exploratory testing. For more information, see Set test permissions at the project level.
Permission
Level
Readers
Contributors
Project Admins
View test runs
Project-level
✔️
✔️
✔️
Create test runs
Delete test runs
Project-level
✔️
✔️
Manage test configurations
Manage test environments
Project-level
✔️
✔️
Create tag definition
Delete and restore work items
Project-level
✔️
✔️
Permanently delete work items
Project-level
✔️
View work items in this node
Area Path
✔️
✔️
✔️
Edit work items in this node
Manage test plans
Manage test suites
Area Path
✔️
✔️
Note
The Change work item type permission doesn't apply to test-specific work items. Even if you choose this feature from the work item form, changing the work item type is disallowed.
Area permissions for web-based test case management and test execution control access to the following actions.
The Manage test suites permission enables users to do the following tasks:
- Create and modify test suites
- Add or remove test cases to/from test suites
- Change test configurations associated with test suites
- Modify the suite hierarchy by moving a test suite
The Manage test plans permission enables users to do the following tasks:
- Create and modify test plans
- Add or remove test suites to or from test plans
- Change test plan properties such as build and test settings
Customize an inherited process
By default, only Project Collection Administrators can create and edit processes. However, these admins can grant permissions to other team members by explicitly setting the Create process, Delete process, or Edit process permissions at the collection level for a specific user.
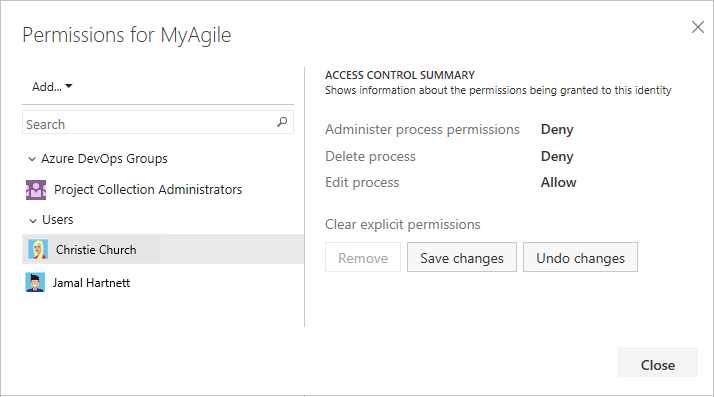
To customize a process, you need to grant Edit process permissions to a user account for the specific process.
Note
Users added to the Project-Scoped Users group can't access Process settings if the Limit user visibility and collaboration to specific projects preview feature is enabled for the organization. For more information including important security-related callouts, see Manage your organization, Limit user visibility for projects and more.
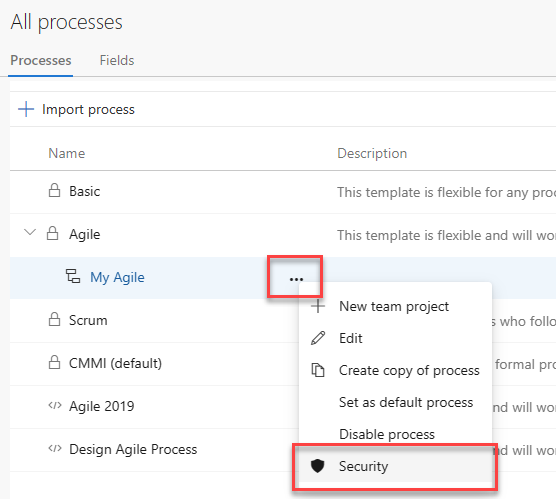
Open the … context menu for the inherited process and choose Security. To open this page, see Customize a project using an inherited process.
Enter the user name, set the applicable permissions to Allow, and then exit. The page automatically saves.
Note
Processes are securable entities with distinct ACLs for creation, editing, and deletion. Project Collection Administrators at the collection level determine the inherited processes. New inherited processes grant full control to the creator and Project Collection Administrators, who can also assign ACLs to others for process management.
More access options for work items
For more information about options for customizing work item types to support restrictions, see Restrict access, Restrict modification of work items based on a user or group.
Grant team members additional permissions
For teams to work autonomously, you may want to provide them with permissions that they don't have by default. Suggested tasks include providing team administrators or team leads permissions to:
- Create and edit child nodes under their default area path
- Create and edit child nodes under an existing iteration node
- Create shared queries and folders under the Shared Queries folder.
By default, team members inherit the permissions afforded to members of the project Contributors group. Members of this group can add and modify source code, create and delete test runs, and create and modify work items. They can collaborate on a Git project or collaborate with other team members and check in work to the team's code base (TFVC).
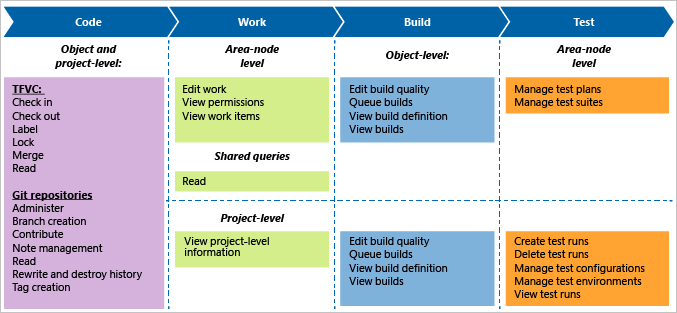
If your on-premises deployment includes reporting, add users to those resources. See Grant permissions to view or create SQL Server reports.