Data access configurations
This article describes the data access settings available for your workspace’s SQL warehouses.
Note
Databricks recommends using Unity Catalog volumes or external locations to connect to cloud object storage. Unity Catalog simplifies the security and governance of your data by providing a central place to administer and audit data access across multiple workspaces in your account. See What is Unity Catalog? and Recommendations for using external locations.
Important
Changing these settings restarts all running SQL warehouses.
Requirements
- You must be an Azure Databricks workspace admin to configure these settings.
Configure a service principal
To configure access for your SQL warehouses to an Azure Data Lake Storage storage account using service principals, follow these steps:
Register a Microsoft Entra ID (formerly Azure Active Directory) application and record the following properties:
- Application (client) ID: An ID that uniquely identifies the Microsoft Entra ID application.
- Directory (tenant) ID: An ID that uniquely identifies the Microsoft Entra ID instance (called directory (tenant) ID in Azure Databricks).
- Client secret: The value of a client secret created for this application registration. The application will use this secret string to prove its identity.
On your storage account, add a role assignment for the application registered at the previous step to give it access to the storage account.
Create an Azure Key Vault-backed or Databricks-scoped secret scope, see Manage secret scopes, and record the value of the scope name property:
- Scope name: The name of the created secret scope.
If using Azure Key Vault, create a secret in Azure Key Vault, using the Client secret in the Value field. For an example, see Step 4: Add the client secret to Azure Key Vault. Keep a record of the secret name that you chose.
- Secret name: The name of the created Azure Key Vault secret.
If using a Databricks-backed scope, create a new secret using the Databricks CLI and use it to store the client secret that you have obtained in Step 1. Keep a record of the secret key that you entered at this step.
- Secret key: The key of the created Databricks-backed secret.
Note
Optionally, you can create an additional secret to store the client ID obtained at Step 1.
Click your username in the top bar of the workspace and select Settings from the drop-down.
Click the Compute tab.
Click Manage next to SQL warehouses.
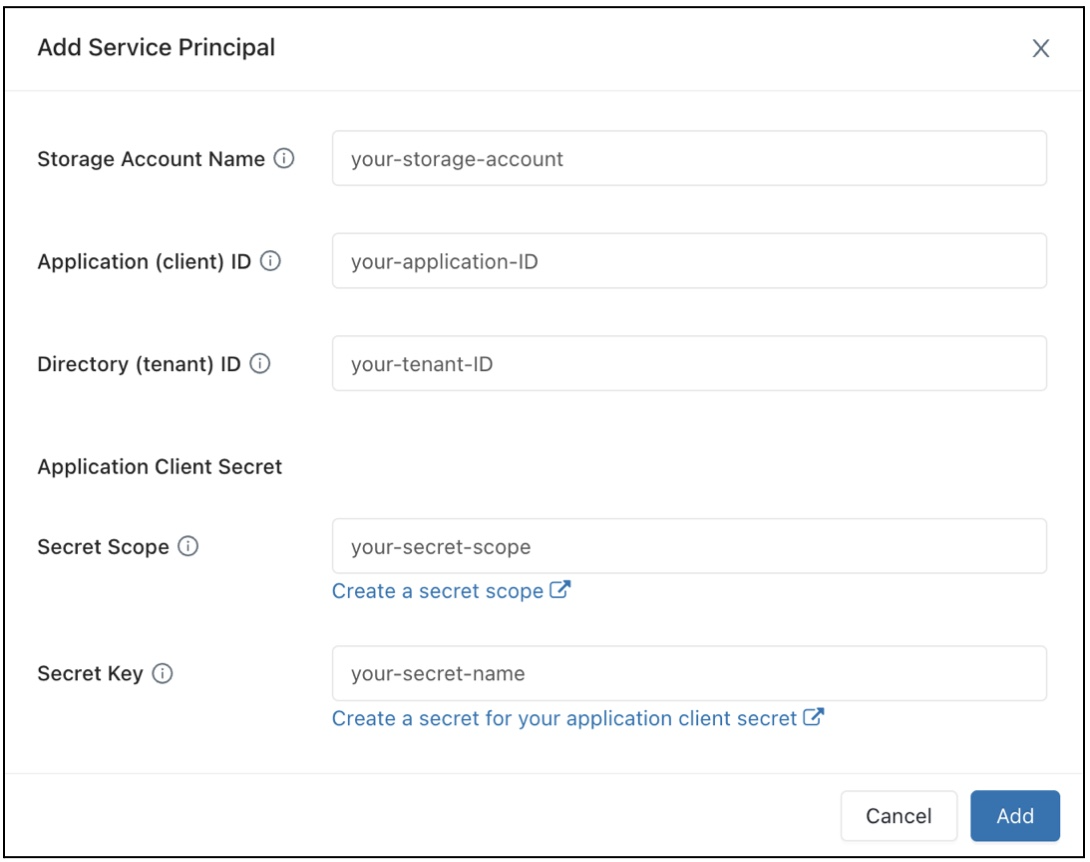
In the Data Access Configuration field, click the Add Service Principal button.
Configure the properties for your Azure Data Lake Storage storage account.
Click Add.

You will see that new entries have been added to the Data Access Configuration textbox.
Click Save.
You can also edit the Data Access Configuration textbox entries directly.
Configure data access properties for SQL warehouses
To configure all warehouses with data access properties:
Click your username in the top bar of the workspace and select Settings from the drop-down.
Click the Compute tab.
Click Manage next to SQL warehouses.
In the Data Access Configuration textbox, specify key-value pairs containing metastore properties.
Important
To set a Spark configuration property to the value of a secret without exposing the secret value to Spark, set the value to
{{secrets/<secret-scope>/<secret-name>}}. Replace<secret-scope>with the secret scope and<secret-name>with the secret name. The value must start with{{secrets/and end with}}. For more information about this syntax, see Manage secrets.Click Save.
You can also configure data access properties using the Databricks Terraform provider and databricks_sql_global_config.
Supported properties
For an entry that ends with
*, all properties within that prefix are supported.For example,
spark.sql.hive.metastore.*indicates that bothspark.sql.hive.metastore.jarsandspark.sql.hive.metastore.versionare supported, and any other properties that start withspark.sql.hive.metastore.For properties whose values contain sensitive information, you can store the sensitive information in a secret and set the property’s value to the secret name using the following syntax:
secrets/<secret-scope>/<secret-name>.
The following properties are supported for SQL warehouses:
spark.sql.hive.metastore.*spark.sql.warehouse.dirspark.hadoop.datanucleus.*spark.hadoop.fs.*spark.hadoop.hive.*spark.hadoop.javax.jdo.option.*spark.hive.*
For more information about how to set these properties, see External Hive metastore.