Copy data to or from Azure Data Explorer using Azure Data Factory or Synapse Analytics
APPLIES TO:  Azure Data Factory
  Azure Synapse Analytics
Tip
Try out Data Factory in Microsoft Fabric, an all-in-one analytics solution for enterprises. Microsoft Fabric covers everything from data movement to data science, real-time analytics, business intelligence, and reporting. Learn how to start a new trial for free!
This article describes how to use the copy activity in Azure Data Factory and Synapse Analytics pipelines to copy data to or from Azure Data Explorer. It builds on the copy activity overview article, which offers a general overview of copy activity.
Tip
To learn more about Azure Data Explorer integration with the service generally read Integrate Azure Data Explorer.
Supported capabilities
This Azure Data Explorer connector is supported for the following capabilities:
| Supported capabilities | IR |
|---|---|
| Copy activity (source/sink) | ① ② |
| Mapping data flow (source/sink) | ① |
| Lookup activity | ① ② |
① Azure integration runtime ② Self-hosted integration runtime
You can copy data from any supported source data store to Azure Data Explorer. You can also copy data from Azure Data Explorer to any supported sink data store. For a list of data stores that the copy activity supports as sources or sinks, see the Supported data stores table.
Note
Copying data to or from Azure Data Explorer through an on-premises data store by using self-hosted integration runtime is supported in version 3.14 and later.
With the Azure Data Explorer connector, you can do the following:
- Copy data by using Microsoft Entra application token authentication with a service principal.
- As a source, retrieve data by using a KQL (Kusto) query.
- As a sink, append data to a destination table.
Getting started
Tip
For a walkthrough of Azure Data Explorer connector, see Copy data to/from Azure Data Explorer and Bulk copy from a database to Azure Data Explorer.
To perform the Copy activity with a pipeline, you can use one of the following tools or SDKs:
- The Copy Data tool
- The Azure portal
- The .NET SDK
- The Python SDK
- Azure PowerShell
- The REST API
- The Azure Resource Manager template
Create a linked service to Azure Data Explorer using UI
Use the following steps to create a linked service to Azure Data Explorer in the Azure portal UI.
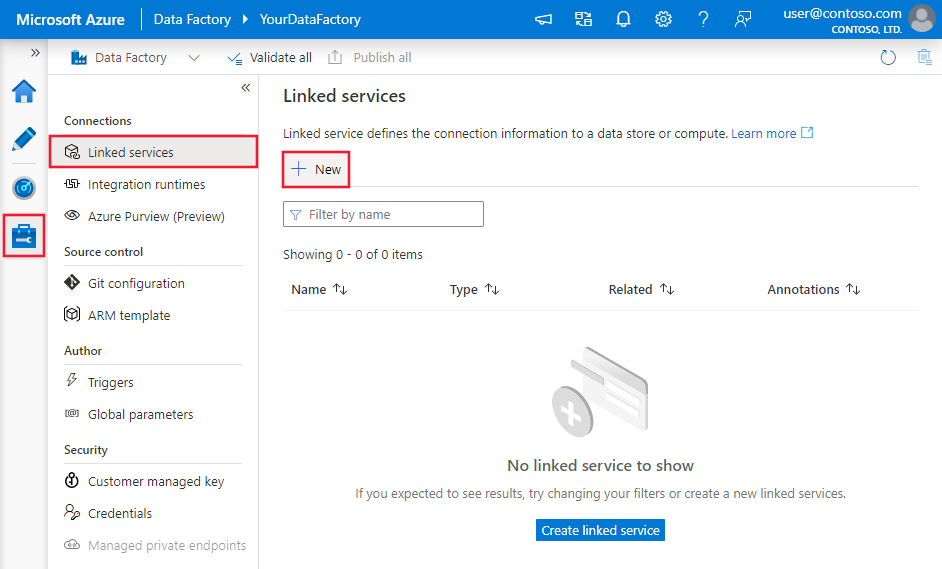
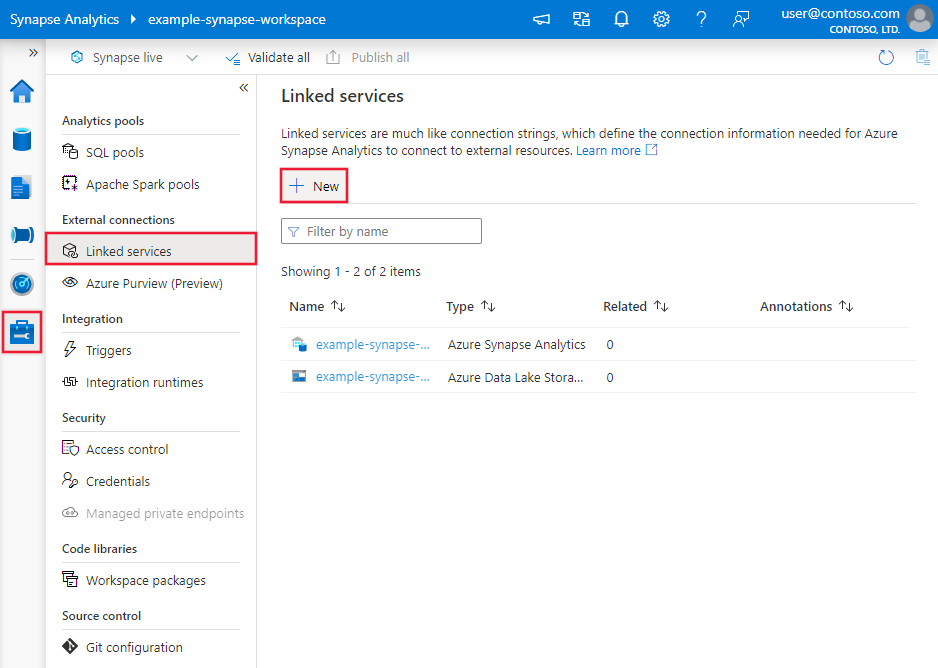
Browse to the Manage tab in your Azure Data Factory or Synapse workspace and select Linked Services, then click New:
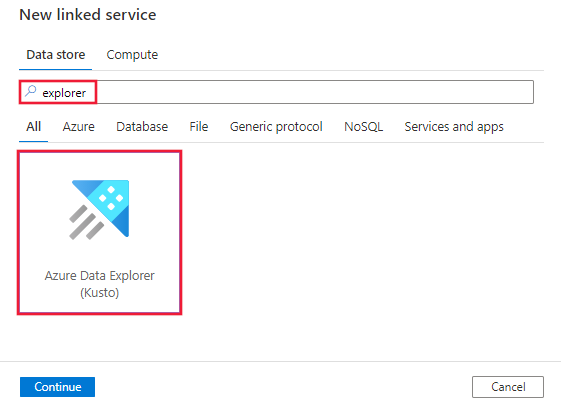
Search for Explorer and select the Azure Data Explorer (Kusto) connector.

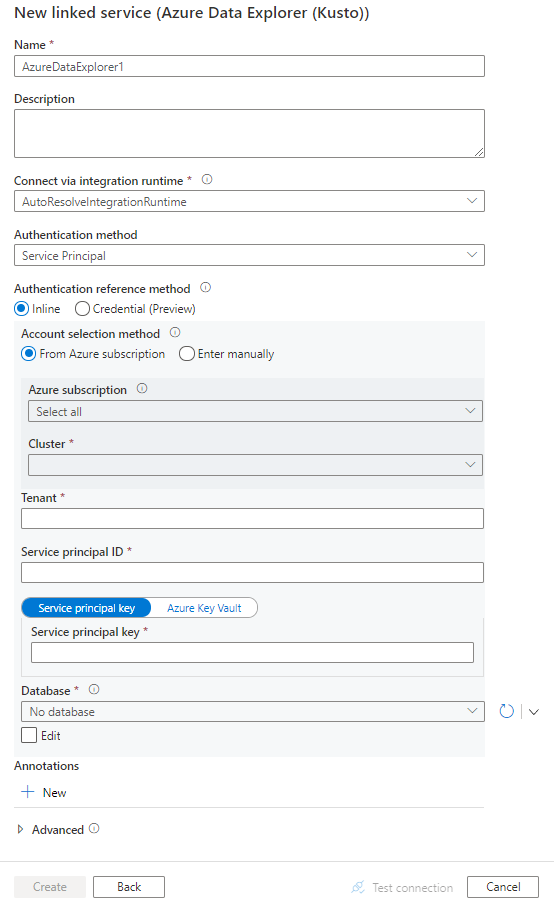
Configure the service details, test the connection, and create the new linked service.

Connector configuration details
The following sections provide details about properties that are used to define entities specific to Azure Data Explorer connector.
Linked service properties
The Azure Data Explorer connector supports the following authentication types. See the corresponding sections for details:
- Service principal authentication
- System-assigned managed identity authentication
- User-assigned managed identity authentication
Service principal authentication
To use service principal authentication, follow these steps to get a service principal and to grant permissions:
Register an application with the Microsoft identity platform. To learn how, see Quickstart: Register an application with the Microsoft identity platform. Make note of these values, which you use to define the linked service:
- Application ID
- Application key
- Tenant ID
Grant the service principal the correct permissions in Azure Data Explorer. See Manage Azure Data Explorer database permissions for detailed information about roles and permissions and about managing permissions. In general, you must:
- As source, grant at least the Database viewer role to your database
- As sink, grant at least the Database user role to your database
Note
When you use the UI to author, by default your login user account is used to list Azure Data Explorer clusters, databases, and tables. You can choose to list the objects using the service principal by clicking the dropdown next to the refresh button, or manually enter the name if you don't have permission for these operations.
The following properties are supported for the Azure Data Explorer linked service:
| Property | Description | Required |
|---|---|---|
| type | The type property must be set to AzureDataExplorer. | Yes |
| endpoint | Endpoint URL of the Azure Data Explorer cluster, with the format as https://<clusterName>.<regionName>.kusto.windows.net. |
Yes |
| database | Name of database. | Yes |
| tenant | Specify the tenant information (domain name or tenant ID) under which your application resides. This is known as "Authority ID" in Kusto connection string. Retrieve it by hovering the mouse pointer in the upper-right corner of the Azure portal. | Yes |
| servicePrincipalId | Specify the application's client ID. This is known as "Microsoft Entra application client ID" in Kusto connection string. | Yes |
| servicePrincipalKey | Specify the application's key. This is known as "Microsoft Entra application key" in Kusto connection string. Mark this field as a SecureString to store it securely, or reference secure data stored in Azure Key Vault. | Yes |
| connectVia | The integration runtime to be used to connect to the data store. You can use the Azure integration runtime or a self-hosted integration runtime if your data store is in a private network. If not specified, the default Azure integration runtime is used. | No |
Example: using service principal key authentication
{
    "name": "AzureDataExplorerLinkedService",
    "properties": {
        "type": "AzureDataExplorer",
        "typeProperties": {
            "endpoint": "https://<clusterName>.<regionName>.kusto.windows.net ",
            "database": "<database name>",
            "tenant": "<tenant name/id e.g. microsoft.onmicrosoft.com>",
            "servicePrincipalId": "<service principal id>",
            "servicePrincipalKey": {
                "type": "SecureString",
                "value": "<service principal key>"
            }
        }
    }
}
System-assigned managed identity authentication
To learn more about managed identities for Azure resources, see Managed identities for Azure resources.
To use system-assigned managed identity authentication, follow these steps to grant permissions:
Retrieve the managed identity information by copying the value of the managed identity object ID generated along with your factory or Synapse workspace.
Grant the managed identity the correct permissions in Azure Data Explorer. See Manage Azure Data Explorer database permissions for detailed information about roles and permissions and about managing permissions. In general, you must:
- As source, grant the Database viewer role to your database.
- As sink, grant the Database ingestor and Database viewer roles to your database.
Note
When you use the UI to author, your login user account is used to list Azure Data Explorer clusters, databases, and tables. Manually enter the name if you don't have permission for these operations.
The following properties are supported for the Azure Data Explorer linked service:
| Property | Description | Required |
|---|---|---|
| type | The type property must be set to AzureDataExplorer. | Yes |
| endpoint | Endpoint URL of the Azure Data Explorer cluster, with the format as https://<clusterName>.<regionName>.kusto.windows.net. |
Yes |
| database | Name of database. | Yes |
| connectVia | The integration runtime to be used to connect to the data store. You can use the Azure integration runtime or a self-hosted integration runtime if your data store is in a private network. If not specified, the default Azure integration runtime is used. | No |
Example: using system-assigned managed identity authentication
{
    "name": "AzureDataExplorerLinkedService",
    "properties": {
        "type": "AzureDataExplorer",
        "typeProperties": {
            "endpoint": "https://<clusterName>.<regionName>.kusto.windows.net ",
            "database": "<database name>",
        }
    }
}
User-assigned managed identity authentication
To learn more about managed identities for Azure resources, see Managed identities for Azure resources
To use user-assigned managed identity authentication, follow these steps:
Create one or multiple user-assigned managed identities and grant permission in Azure Data Explorer. See Manage Azure Data Explorer database permissions for detailed information about roles and permissions and about managing permissions. In general, you must:
- As source, grant at least the Database viewer role to your database
- As sink, grant at least the Database ingestor role to your database
Assign one or multiple user-assigned managed identities to your data factory or Synapse workspace, and create credentials for each user-assigned managed identity.
The following properties are supported for the Azure Data Explorer linked service:
| Property | Description | Required |
|---|---|---|
| type | The type property must be set to AzureDataExplorer. | Yes |
| endpoint | Endpoint URL of the Azure Data Explorer cluster, with the format as https://<clusterName>.<regionName>.kusto.windows.net. |
Yes |
| database | Name of database. | Yes |
| credentials | Specify the user-assigned managed identity as the credential object. | Yes |
| connectVia | The integration runtime to be used to connect to the data store. You can use the Azure integration runtime or a self-hosted integration runtime if your data store is in a private network. If not specified, the default Azure integration runtime is used. | No |
Example: using user-assigned managed identity authentication
{
    "name": "AzureDataExplorerLinkedService",
    "properties": {
        "type": "AzureDataExplorer",
        "typeProperties": {
            "endpoint": "https://<clusterName>.<regionName>.kusto.windows.net ",
            "database": "<database name>",
            "credential": {
                "referenceName": "credential1",
                "type": "CredentialReference"
            }
        }
    }
}
Dataset properties
For a full list of sections and properties available for defining datasets, see Datasets. This section lists properties that the Azure Data Explorer dataset supports.
To copy data to Azure Data Explorer, set the type property of the dataset to AzureDataExplorerTable.
The following properties are supported:
| Property | Description | Required |
|---|---|---|
| type | The type property must be set to AzureDataExplorerTable. | Yes |
| table | The name of the table that the linked service refers to. | Yes for sink; No for source |
Dataset properties example:
{
   "name": "AzureDataExplorerDataset",
    "properties": {
        "type": "AzureDataExplorerTable",
        "typeProperties": {
            "table": "<table name>"
        },
        "schema": [],
        "linkedServiceName": {
            "referenceName": "<Azure Data Explorer linked service name>",
            "type": "LinkedServiceReference"
        }
    }
}
Copy activity properties
For a full list of sections and properties available for defining activities, see Pipelines and activities. This section provides a list of properties that Azure Data Explorer sources and sinks support.
Azure Data Explorer as source
To copy data from Azure Data Explorer, set the type property in the Copy activity source to AzureDataExplorerSource. The following properties are supported in the copy activity source section:
| Property | Description | Required |
|---|---|---|
| type | The type property of the copy activity source must be set to: AzureDataExplorerSource | Yes |
| query | A read-only request given in a KQL format. Use the custom KQL query as a reference. | Yes |
| queryTimeout | The wait time before the query request times out. Default value is 10 min (00:10:00); allowed max value is 1 hour (01:00:00). | No |
| noTruncation | Indicates whether to truncate the returned result set. By default, result is truncated after 500,000 records or 64 megabytes (MB). Truncation is strongly recommended to ensure the correct behavior of the activity. | No |
Note
By default, Azure Data Explorer source has a size limit of 500,000 records or 64 MB. To retrieve all the records without truncation, you can specify set notruncation; at the beginning of your query. For more information, see Query limits.
Example:
"activities":[
    {
        "name": "CopyFromAzureDataExplorer",
        "type": "Copy",
        "typeProperties": {
            "source": {
                "type": "AzureDataExplorerSource",
                "query": "TestTable1 | take 10",
                "queryTimeout": "00:10:00"
            },
            "sink": {
                "type": "<sink type>"
            }
        },
        "inputs": [
            {
                "referenceName": "<Azure Data Explorer input dataset name>",
                "type": "DatasetReference"
            }
        ],
        "outputs": [
            {
                "referenceName": "<output dataset name>",
                "type": "DatasetReference"
            }
        ]
    }
]
Azure Data Explorer as sink
To copy data to Azure Data Explorer, set the type property in the copy activity sink to AzureDataExplorerSink. The following properties are supported in the copy activity sink section:
| Property | Description | Required |
|---|---|---|
| type | The type property of the copy activity sink must be set to: AzureDataExplorerSink. | Yes |
| ingestionMappingName | Name of a pre-created mapping on a Kusto table. To map the columns from source to Azure Data Explorer (which applies to all supported source stores and formats, including CSV/JSON/Avro formats), you can use the copy activity column mapping (implicitly by name or explicitly as configured) and/or Azure Data Explorer mappings. | No |
| additionalProperties | A property bag which can be used for specifying any of the ingestion properties which aren't being set already by the Azure Data Explorer Sink. Specifically, it can be useful for specifying ingestion tags. Learn more from Azure Data Explore data ingestion doc. | No |
Example:
"activities":[
    {
        "name": "CopyToAzureDataExplorer",
        "type": "Copy",
        "typeProperties": {
            "source": {
                "type": "<source type>"
            },
            "sink": {
                "type": "AzureDataExplorerSink",
                "ingestionMappingName": "<optional Azure Data Explorer mapping name>",
                "additionalProperties": {<additional settings for data ingestion>}
            }
        },
        "inputs": [
            {
                "referenceName": "<input dataset name>",
                "type": "DatasetReference"
            }
        ],
        "outputs": [
            {
                "referenceName": "<Azure Data Explorer output dataset name>",
                "type": "DatasetReference"
            }
        ]
    }
]
Mapping data flow properties
When transforming data in mapping data flow, you can read from and write to tables in Azure Data Explorer. For more information, see the source transformation and sink transformation in mapping data flows. You can choose to use an Azure Data Explorer dataset or an inline dataset as source and sink type.
Source transformation
The below table lists the properties supported by Azure Data Explorer source. You can edit these properties in the Source options tab.
| Name | Description | Required | Allowed values | Data flow script property |
|---|---|---|---|---|
| Table | If you select Table as input, data flow will fetch all the data from the table specified in the Azure Data Explorer dataset or in the source options when using inline dataset. | No | String | (for inline dataset only) tableName |
| Query | A read-only request given in a KQL format. Use the custom KQL query as a reference. | No | String | query |
| Timeout | The wait time before the query request times out. Default is '172000' (2 days) | No | Integer | timeout |
Azure Data Explorer source script examples
When you use Azure Data Explorer dataset as source type, the associated data flow script is:
source(allowSchemaDrift: true,
	validateSchema: false,
	query: 'table | take 10',
	format: 'query') ~> AzureDataExplorerSource
If you use inline dataset, the associated data flow script is:
source(allowSchemaDrift: true,
    validateSchema: false,
    format: 'query',
    query: 'table | take 10',
    store: 'azuredataexplorer') ~> AzureDataExplorerSource
Sink transformation
The below table lists the properties supported by Azure Data Explorer sink. You can edit these properties in the Settings tab. When using inline dataset, you will see additional settings, which are the same as the properties described in dataset properties section.
| Name | Description | Required | Allowed values | Data flow script property |
|---|---|---|---|---|
| Table action | Determines whether to recreate or remove all rows from the destination table prior to writing. - None: No action will be done to the table. - Recreate: The table will get dropped and recreated. Required if creating a new table dynamically. - Truncate: All rows from the target table will get removed. |
No | true or false |
recreate truncate |
| Pre and Post SQL scripts | Specify multiple Kusto control commands scripts that will execute before (pre-processing) and after (post-processing) data is written to your sink database. | No | String | preSQLs; postSQLs |
| Timeout | The wait time before the query request times out. Default is '172000' (2 days) | No | Integer | timeout |
Azure Data Explorer sink script examples
When you use Azure Data Explorer dataset as sink type, the associated data flow script is:
IncomingStream sink(allowSchemaDrift: true,
	validateSchema: false,
	format: 'table',
	preSQLs:['pre SQL scripts'],
	postSQLs:['post SQL script'],
	skipDuplicateMapInputs: true,
	skipDuplicateMapOutputs: true) ~> AzureDataExplorerSink
If you use inline dataset, the associated data flow script is:
IncomingStream sink(allowSchemaDrift: true,
    validateSchema: false,
    format: 'table',
    store: 'azuredataexplorer',
    skipDuplicateMapInputs: true,
    skipDuplicateMapOutputs: true) ~> AzureDataExplorerSink
Lookup activity properties
For more information about the properties, see Lookup activity.
Related content
For a list of data stores that the copy activity supports as sources and sinks, see supported data stores.
Learn more about how to copy data from Azure Data Factory and Synapse Analytics to Azure Data Explorer.

