Configure and use Azure Synapse Link for Azure Cosmos DB
APPLIES TO:
NoSQL
MongoDB
Gremlin
Azure Synapse Link for Azure Cosmos DB is a cloud-native hybrid transactional and analytical processing (HTAP) capability that enables you to run near real-time analytics over operational data in Azure Cosmos DB. Synapse Link creates a tight seamless integration between Azure Cosmos DB and Azure Synapse Analytics.
Important
Mirroring in Microsoft Fabric is now available in preview for NoSql API. This feature provides all the capabilities of Azure Synapse Link with better analytical performance, ability to unify your data estate with Fabric OneLake and open access to your data in OneLake with Delta Parquet format. If you are considering Azure Synapse Link, we recommend that you try mirroring to assess overall fit for your organization. To get started with mirroring, click here.
Azure Synapse Link is available for Azure Cosmos DB SQL API or for Azure Cosmos DB API for Mongo DB accounts. And it is in preview for Gremlin API, with activation via CLI commands. Use the following steps to run analytical queries with the Azure Synapse Link for Azure Cosmos DB:
- Enable Azure Synapse Link for your Azure Cosmos DB accounts
- Enable Azure Synapse Link for your containers
- Connect your Azure Cosmos DB database to an Azure Synapse workspace
- Query analytical store using Azure Synapse Analytics
- Improve performance with Best Practices
- Use Azure Synapse serverless SQL pool to analyze and visualize data in Power BI
You can also check the training module on how to configure Azure Synapse Link for Azure Cosmos DB.
Enable Azure Synapse Link for Azure Cosmos DB accounts
The first step to use Synapse Link is to enable it for your Azure Cosmos DB database account.
Note
If you want to use customer-managed keys with Azure Synapse Link, you must configure your account's managed identity in your Azure Key Vault access policy before enabling Synapse Link on your account. To learn more, see how to Configure customer-managed keys using Azure Cosmos DB accounts' managed identities article.
Note
If you want to use Full Fidelity Schema for API for NoSQL accounts, you can't use the Azure portal to enable Synapse Link. This option can't be changed after Synapse Link is enabled in your account and to set it you must use Azure CLI or PowerShell. For more information, check analytical store schema representation documentation.
Note
You need Contributor role to enable Synapse Link at account level. And you need at least Operator to enable Synapse Link in your containers or collections.
Azure portal
Sign in to the Azure portal.
Create a new Azure account, or select an existing Azure Cosmos DB account.
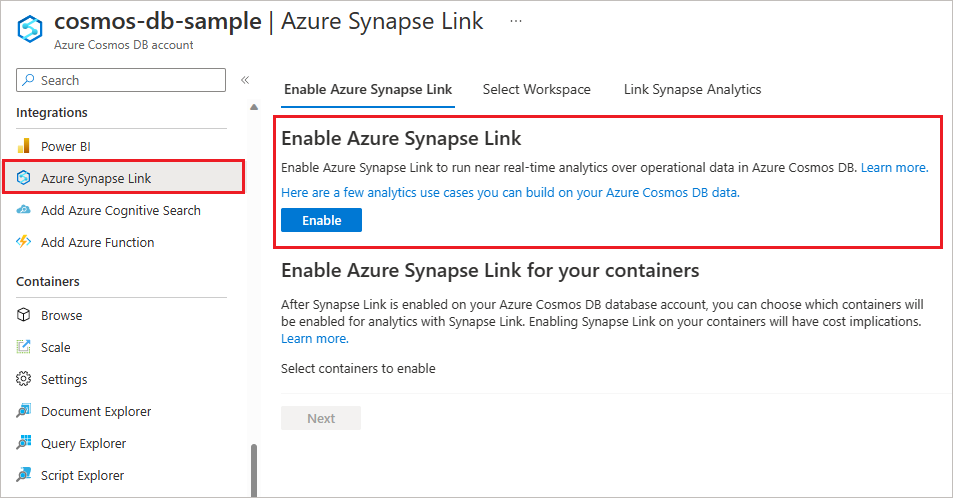
Navigate to your Azure Cosmos DB account and open the Azure Synapse Link under Integrations in the left pane.
Select Enable. This process can take 1 to 5 minutes to complete.

Your account is now enabled to use Synapse Link. Next see how to create analytical store enabled containers to automatically start replicating your operational data from the transactional store to the analytical store.
Note
Turning on Synapse Link does not turn on the analytical store automatically. Once you enable Synapse Link on the Cosmos DB account, enable analytical store on containers to start using Synapse Link.
Note
You can also enable Synapse Link for your account using the Power BI and the Synapse Link pane, in the Integrations section of the left navigation menu.
Command-Line Tools
Enable Synapse Link in your Azure Cosmos DB API for NoSQL or MongoDB account using Azure CLI or PowerShell.
Azure CLI
Use --enable-analytical-storage true for both create or update operations. You also need to choose the representation schema type. For API for NoSQL accounts you can use --analytical-storage-schema-type with the values FullFidelity or WellDefined. For API for MongoDB accounts, always use --analytical-storage-schema-type FullFidelity.
- Create a new Azure Cosmos DB account with Synapse Link enabled
- Update an existing Azure Cosmos DB account to enable Synapse Link
Use Azure CLI to enable Synapse Link for Azure Synapse Link for Gremlin API account.
Synapse Link for Gremlin API is now in preview. You can enable Synapse Link in your new or existing graphs using Azure CLI. Use the CLI command below to enable Synapse Link for your Gremlin API account:
az cosmosdb create --capabilities EnableGremlin --name MyCosmosDBGremlinDatabaseAccount --resource-group MyResourceGroup --enable-analytical-storage true
For existing Gremlin API accounts, replace create with update.
PowerShell
Use EnableAnalyticalStorage true for both create or update operations. You also need to choose the representation schema type. For API for NoSQL accounts you can use --analytical-storage-schema-type with the values FullFidelity or WellDefined. For API for MongoDB accounts, always use -AnalyticalStorageSchemaType FullFidelity.
- Create a new Azure Cosmos DB account with Synapse Link enabled
- Update an existing Azure Cosmos DB account to enable Synapse Link
Azure Resource Manager template
This Azure Resource Manager template creates a Synapse Link enabled Azure Cosmos DB account for SQL API. This template creates a Core (SQL) API account in one region with a container configured with analytical TTL enabled, and an option to use manual or autoscale throughput. To deploy this template, click on Deploy to Azure on the readme page.
Enable Azure Synapse Link for your containers
The second step is to enable Synapse Link for your containers or collections. This is accomplished by setting the analytical TTL property to -1 for infinite retention, or to a positive integer, that is the number of seconds that you want to keep in analytical store. This setting can be changed later. For more information, see the analytical TTL supported values article.
Please note the following details when enabling Azure Synapse Link on your existing SQL API containers:
- The same performance isolation of the analytical store auto-sync process applies to the initial sync and there is no performance impact on your OLTP workload.
- A container's initial sync with analytical store total time will vary depending on the data volume and on the documents complexity. This process can take anywhere from a few seconds to multiple days. Please use the Azure portal to monitor the migration progress.
- The throughput of your container, or database account, also influences the total initial sync time. Although RU/s are not used in this migration, the total RU/s available influences the performance of the process. You can temporarily increase your environment's available RUs to speed up the process.
- You won't be able to query analytical store of an existing container while Synapse Link is being enabled on that container. Your OLTP workload isn't impacted and you can keep on reading data normally. Data ingested after the start of the initial sync will be merged into analytical store by the regular analytical store auto-sync process.
Note
Now you can enable Synapse Link on your existing MongoDB API collections, using Azure CLI or PowerShell.
Azure portal
New container
Sign in to the Azure portal or the Azure Cosmos DB Explorer.
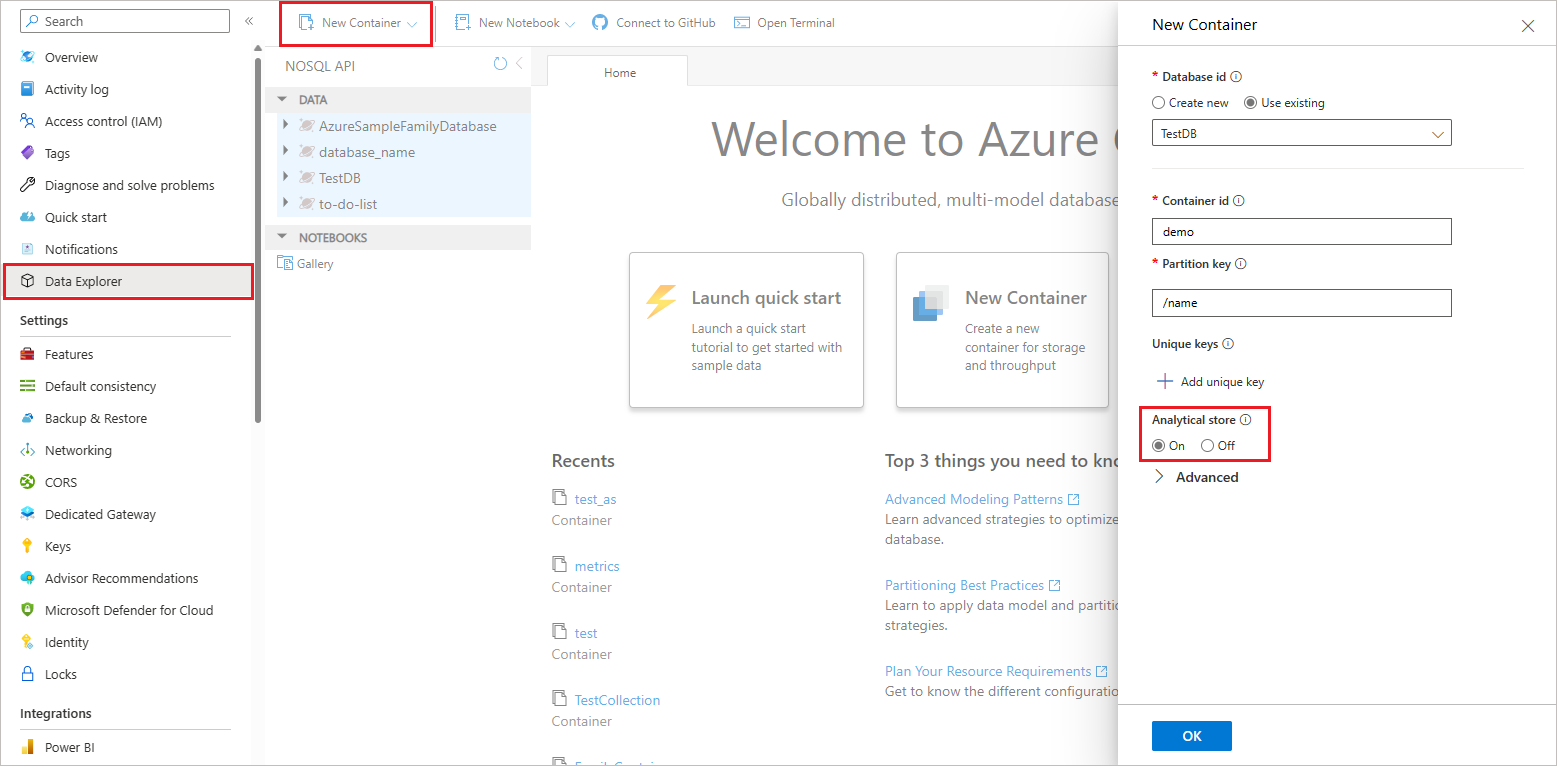
Navigate to your Azure Cosmos DB account and open the Data Explorer tab.
Select New Container and enter a name for your database, container, partition key and throughput details. Turn on the Analytical store option. After you enable the analytical store, it creates a container with
analytical TTLproperty set to the default value of -1 (infinite retention). This analytical store that retains all the historical versions of records and can be changed later.
If you have previously not enabled Synapse Link on this account, it will prompt you to do so because it's a pre-requisite to create an analytical store enabled container. If prompted, select Enable Synapse Link. This process can take 1 to 5 minutes to complete.
Select OK, to create an analytical store enabled Azure Cosmos DB container.
After the container is created, verify that analytical store has been enabled by clicking Settings, right below Documents in Data Explorer, and check if the Analytical Store Time to Live option is turned on.
Existing container
Sign in to the Azure portal or the Azure Cosmos DB Explorer.
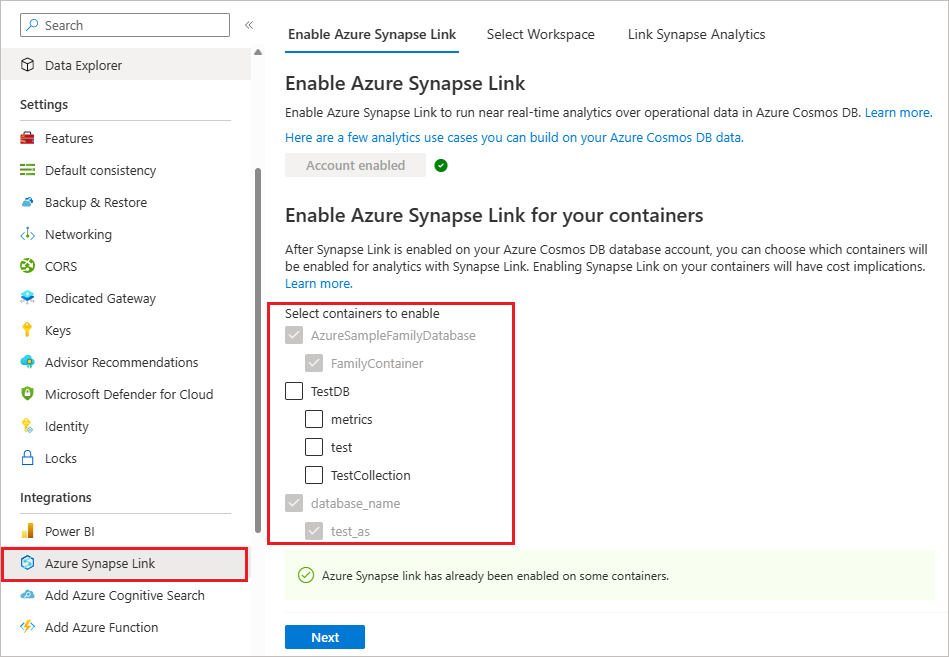
Navigate to your Azure Cosmos DB account and open the Azure Synapse Link tab.
Under the Enable Azure Synapse Link for your containers section select the container.

After the container enablement, verify that analytical store has been enabled by clicking Settings, right below Documents in Data Explorer, and check if the Analytical Store Time to Live option is turned on.
Note
You can also enable Synapse Link for your account using the Power BI and the Synapse Link pane, in the Integrations section of the left navigation menu.
Command-Line Tools
Azure CLI
The following options enable Synapse Link in a container by using Azure CLI by setting the --analytical-storage-ttl property.
- Create or update an Azure Cosmos DB MongoDB collection
- Create or update an Azure Cosmos DB SQL API container
Use Azure CLI to enable Synapse Link for Azure Synapse Link for Gremlin API Graphs
Synapse Link for Gremlin API is now in preview. You can enable Synapse Link in your new or existing Graphs using Azure CLI. Use the CLI command below to enable Synapse Link for your Gremlin API graphs:
az cosmosdb gremlin graph create --g MyResourceGroup --a MyCosmosDBGremlinDatabaseAccount --d MyGremlinDB --n MyGraph --analytical-storage-ttl –1
For existing graphs, replace create with update.
PowerShell
The following options enable Synapse Link in a container by using Azure CLI by setting the -AnalyticalStorageTtl property.
- Create or update an Azure Cosmos DB MongoDB collection
- Create or update an Azure Cosmos DB SQL API container
Azure Cosmos DB SDKs - SQL API only
.NET SDK
The following .NET code creates a Synapse Link enabled container by setting the AnalyticalStoreTimeToLiveInSeconds property. To update an existing container, use the Container.ReplaceContainerAsync method.
CosmosClient cosmosClient = new CosmosClient(
    accountEndpoint: "<nosql-account-endpoint>",
    tokenCredential: new DefaultAzureCredential()
);
// Create a container with a partition key, and analytical TTL configured to -1 (infinite retention)
ContainerProperties properties = new ContainerProperties()
{
    Id = "myContainerId",
    PartitionKeyPath = "/id",
    AnalyticalStoreTimeToLiveInSeconds = -1,
};
await cosmosClient.GetDatabase("myDatabase").CreateContainerAsync(properties);
Java V4 SDK
The following Java code creates a Synapse Link enabled container by setting the setAnalyticalStoreTimeToLiveInSeconds property. To update an existing container, use the container.replace class.
// Create a container with a partition key and  analytical TTL configured to  -1 (infinite retention)
CosmosContainerProperties containerProperties = new CosmosContainerProperties("myContainer", "/myPartitionKey");

containerProperties.setAnalyticalStoreTimeToLiveInSeconds(-1);

container = database.createContainerIfNotExists(containerProperties, 400).block().getContainer();
Python V4 SDK
The following Python code creates a Synapse Link enabled container by setting the analytical_storage_ttl property. To update an existing container, use the replace_container method.
# Client
client = cosmos_client.CosmosClient(HOST,  KEY )

# Database client
try:
    db = client.create_database(DATABASE)

except exceptions.CosmosResourceExistsError:
    db = client.get_database_client(DATABASE)

# Creating the container with analytical store enabled
try:
    container = db.create_container(
        id=CONTAINER,
        partition_key=PartitionKey(path='/id', kind='Hash'),analytical_storage_ttl=-1
    )
    properties = container.read()
    print('Container with id \'{0}\' created'.format(container.id))
    print('Partition Key - \'{0}\''.format(properties['partitionKey']))

except exceptions.CosmosResourceExistsError:
    print('A container with already exists')
Connect to a Synapse workspace
Use the instructions in Connect to Azure Synapse Link on how to access an Azure Cosmos DB database from Azure Synapse Analytics Studio with Azure Synapse Link.
Query analytical store using Azure Synapse Analytics
Query analytical store using Apache Spark for Azure Synapse Analytics
Use the instructions in the Query Azure Cosmos DB analytical store using Spark 3 article on how to query with Synapse Spark 3. That article gives some examples on how you can interact with the analytical store from Synapse gestures. Those gestures are visible when you right-click on a container. With gestures, you can quickly generate code and tweak it to your needs. They are also perfect for discovering data with a single click.
For Spark 2 integration use the instruction in the Query Azure Cosmos DB analytical store using Spark 2 article.
Query the analytical store using serverless SQL pool in Azure Synapse Analytics
Serverless SQL pool allows you to query and analyze data in your Azure Cosmos DB containers that are enabled with Azure Synapse Link. You can analyze data in near real-time without impacting the performance of your transactional workloads. It offers a familiar T-SQL syntax to query data from the analytical store and integrated connectivity to a wide range of BI and ad-hoc querying tools via the T-SQL interface. To learn more, see the Query analytical store using serverless SQL pool article.
Use serverless SQL pool to analyze and visualize data in Power BI
You can use the integrated BI experience in the Azure Cosmos DB portal, to build BI dashboards using Synapse Link with just a few clicks. To learn more, see how to build BI dashboards using Synapse Link. This integrated experience will create simple T-SQL views in Synapse serverless SQL pools, for your Azure Cosmos DB containers. You can build BI dashboards over these views, which will query your Azure Cosmos DB containers in real-time, using Direct Query, reflecting latest changes to your data. There is no performance or cost impact to your transactional workloads, and no complexity of managing ETL pipelines.
If you want to use advanced T-SQL views with joins across your containers or build Power BI dashboards in Import mode, see Use serverless SQL pool to analyze Azure Cosmos DB data with Synapse Link.
Improve Performance with Best Practices
Custom Partitioning
Custom partitioning enables you to partition analytical store data on fields that are commonly used as filters in analytical queries, resulting in improved query performance. To learn more, see the introduction to custom partitioning and how to configure custom partitioning articles.
Synapse SQL Serverless best practices for Azure Synapse Link for Cosmos DB
Use this mandatory best practices for your SQL serverless queries.
Getting started with Azure Synapse Link - Samples
You can find samples to get started with Azure Synapse Link on GitHub. These showcase end-to-end solutions with IoT and retail scenarios. You can also find the samples corresponding to Azure Cosmos DB for MongoDB in the same repo under the MongoDB folder.
Next steps
To learn more, see the following docs:
- Check the training module on how to configure Azure Synapse Link for Azure Cosmos DB.
- Azure Cosmos DB analytical store overview.
- Frequently asked questions about Synapse Link for Azure Cosmos DB.
- Apache Spark in Azure Synapse Analytics.
- Serverless SQL pool runtime support in Azure Synapse Analytics.