Manage Cloud Services (classic) in the Azure portal
Important
Cloud Services (classic) is now deprecated for all customers as of September 1st, 2024. Any existing running deployments will be stopped and shut down by Microsoft and the data will be permanently lost starting October 2024. New deployments should use the new Azure Resource Manager based deployment model Azure Cloud Services (extended support).
In the Cloud Services area of the Azure portal, you can:
- Update a service role or a deployment.
- Promote a staged deployment to production.
- Link resources to your cloud service so that you can see the resource dependencies and scale the resources together.
- Delete a cloud service or a deployment.
For more information about how to scale your cloud service, see Configure autoscaling for a cloud service in the portal.
Update a cloud service role or deployment
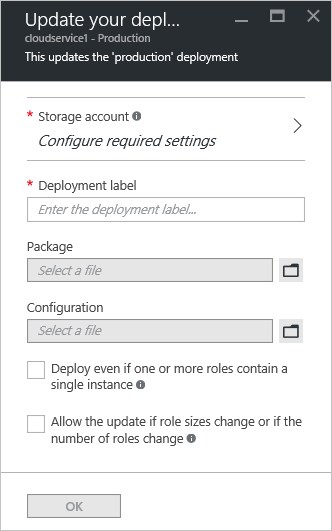
If you need to update the application code for your cloud service, use Update on the cloud service blade. You can update a single role or all roles. To update, you can upload a new service package or service configuration file.
In the Azure portal, select the cloud service you want to update. This step opens the cloud service instance blade.
On the blade, select Update.

Update the deployment with a new service package file (.cspkg) and service configuration file (.cscfg).

Optionally, update the storage account and the deployment label.
If any roles have only one role instance, select the Deploy even if one or more roles contain a single instance check box to enable the upgrade to proceed.
Azure can guarantee only 99.95 percent service availability during a cloud service update if each role has at least two role instances (virtual machines). With two role instances, one virtual machine processes client requests while the other is updated.
Select the Start deployment check box to apply the update after the upload of the package finishes.
Select OK to begin updating the service.
Swap deployments to promote a staged deployment to production
When you decide to deploy a new release of a cloud service, stage and test your new release in your cloud service staging environment. Use Swap to switch the URLs by which the two deployments are addressed and promote a new release to production.
You can swap deployments from the Cloud Services page or the dashboard.
In the Azure portal, select the cloud service you want to update. This step opens the cloud service instance blade.
On the blade, select Swap.

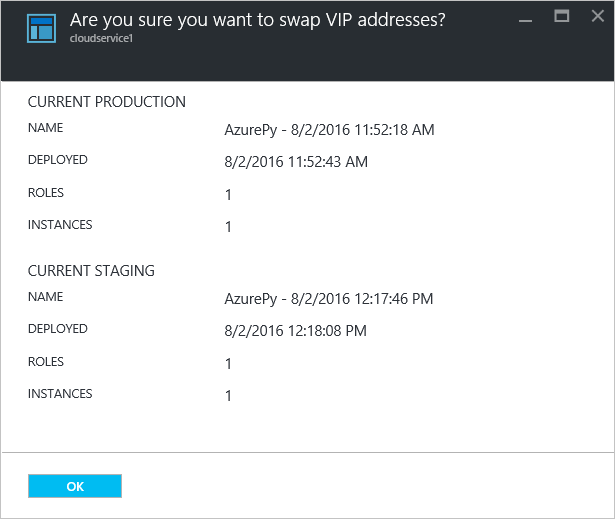
The following confirmation prompt opens:

After you verify the deployment information, select OK to swap the deployments.
The deployment swap happens quickly because the only thing that changes is the virtual IP addresses (VIPs) for the deployments.
To save compute costs, you can delete the staging deployment after you verify that your production deployment is working as expected.
Common questions about swapping deployments
What are the prerequisites for swapping deployments?
There are two key prerequisites for a successful deployment swap:
If you want to use a static IP address for your production slot, you must reserve one for your staging slot as well. Otherwise, the swap fails.
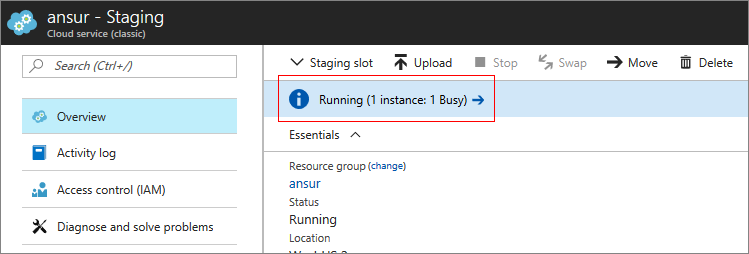
All instances of your roles must be running before you can perform the swap. You can check the status of your instances on the Overview blade of the Azure portal. Alternatively, you can use the Get-AzureRole command in Windows PowerShell.
Note
Guest OS updates and service healing operations also can cause deployment swaps to fail. For more information, see Troubleshoot cloud service deployment problems.
Does a swap incur downtime for my application? How should I handle it?
As described in the previous section, a deployment swap is typically fast because it's just a configuration change in the Azure load balancer. In some cases, it can take 10 or more seconds and result in transient connection failures. To limit the impact to your customers, consider implementing client retry logic.
Delete deployments and a cloud service
Before you can delete a cloud service, you must delete each existing deployment.
To save compute costs, you can delete the staging deployment after you verify that your production deployment is working as expected. Even if you stop your deployed role instances, Azure bills you for compute costs.
Use the following procedure to delete a deployment or your cloud service.
In the Azure portal, select the cloud service you want to delete. This step opens the cloud service instance blade.
On the blade, select Delete.

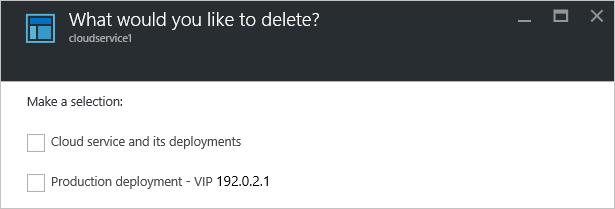
To delete the entire cloud service, select the Cloud service and its deployments check box. Or you can choose either the Production deployment or the Staging deployment check box.

Select Delete at the bottom.
To delete the cloud service, select Delete cloud service. Then, at the confirmation prompt, select Yes.
Note
When a cloud service is deleted and verbose monitoring is configured, you must delete the data manually from your storage account. For information about where to find the metrics tables, see Introduction to cloud service monitoring.
Find more information about failed deployments
The Overview blade has a status bar at the top. When you select the bar, a new blade opens and displays any error information. If the deployment doesn't contain any errors, the information blade is blank.

Next steps
- General configuration of your cloud service.
- Learn how to deploy a cloud service.
- Configure a custom domain name.
- Configure TLS/SSL certificates.