Manage Azure VM backups with Azure Backup service
This article describes how to manage Azure virtual machines (VMs) that are backed up with the Azure Backup service. The article also summarizes the backup information you can find on the vault dashboard.
In the Azure portal, the Recovery Services vault dashboard provides access to vault information, including:
- The latest backup, which is also the latest restore point.
- The backup policy.
- The total size of all backup snapshots.
- The number of VMs that are enabled for backups.
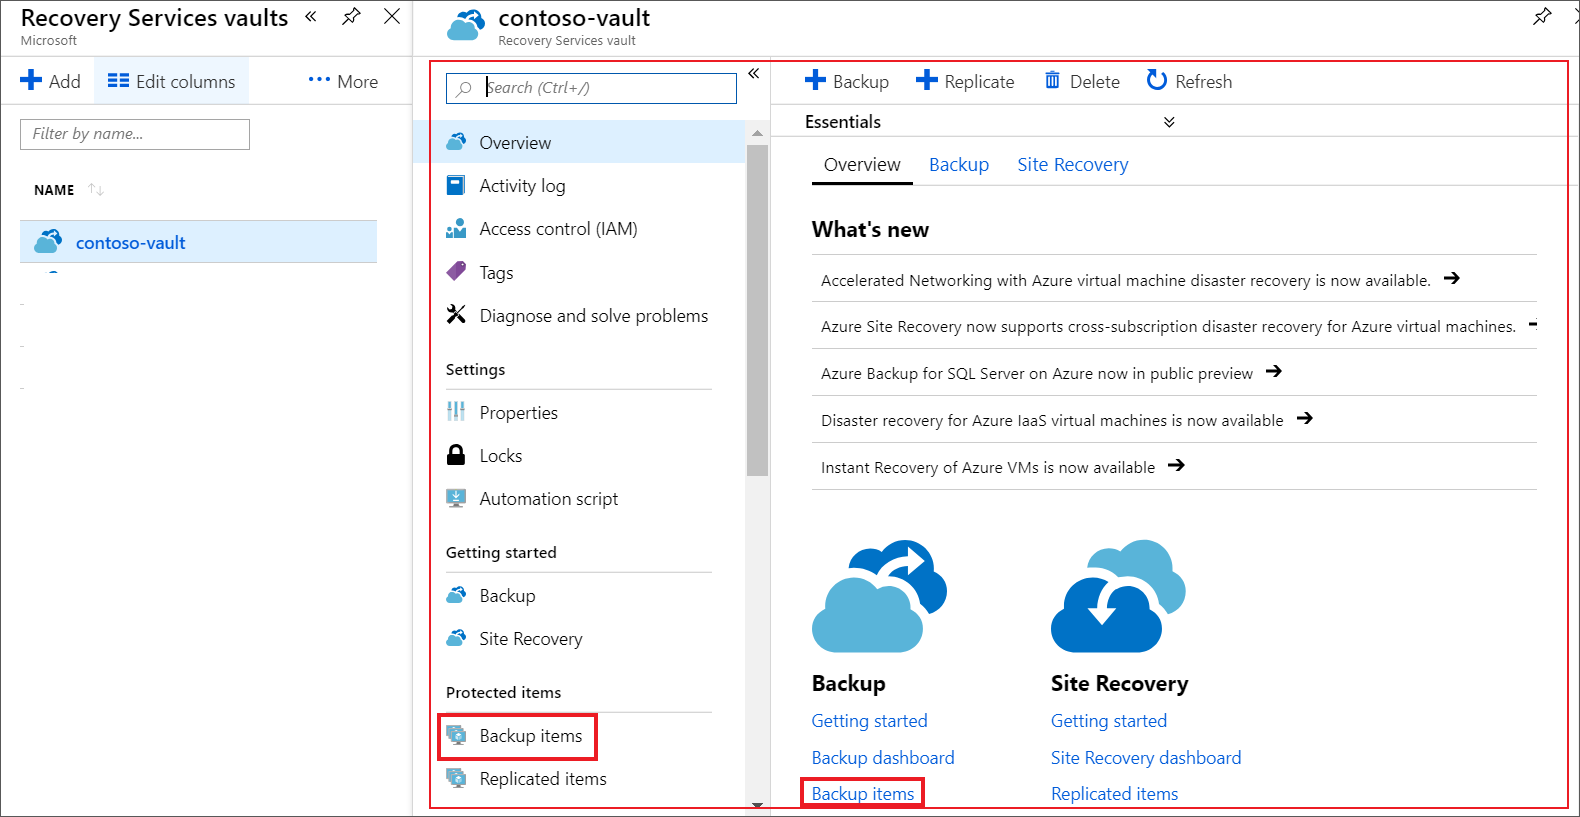
You can manage backups by using the dashboard and by drilling down to individual VMs. To begin machine backups, open the vault on the dashboard:
Note
The functionality described in the following sections can also be accessed via Backup center. Backup center is a single unified management experience in Azure. It enables enterprises to govern, monitor, operate, and analyze backups at scale. With this solution, you can perform most of the key backup management operations without being limited to the scope of an individual vault.
View VMs on the dashboard
To view VMs on the vault dashboard:
Sign in to the Azure portal.
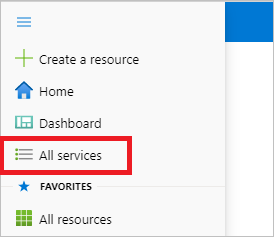
On the left menu, select All services.
In the All services dialog box, enter Recovery Services. The list of resources filters according to your input. In the list of resources, select Recovery Services vaults.
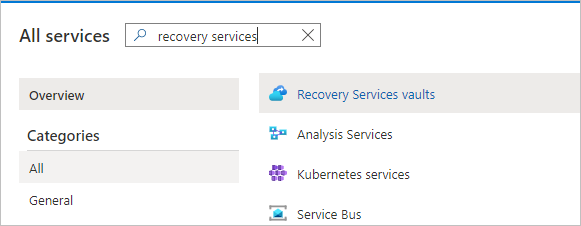
The list of Recovery Services vaults in the subscription appears.
For ease of use, select the pin icon next to your vault name and select Pin to dashboard.
Open the vault dashboard.
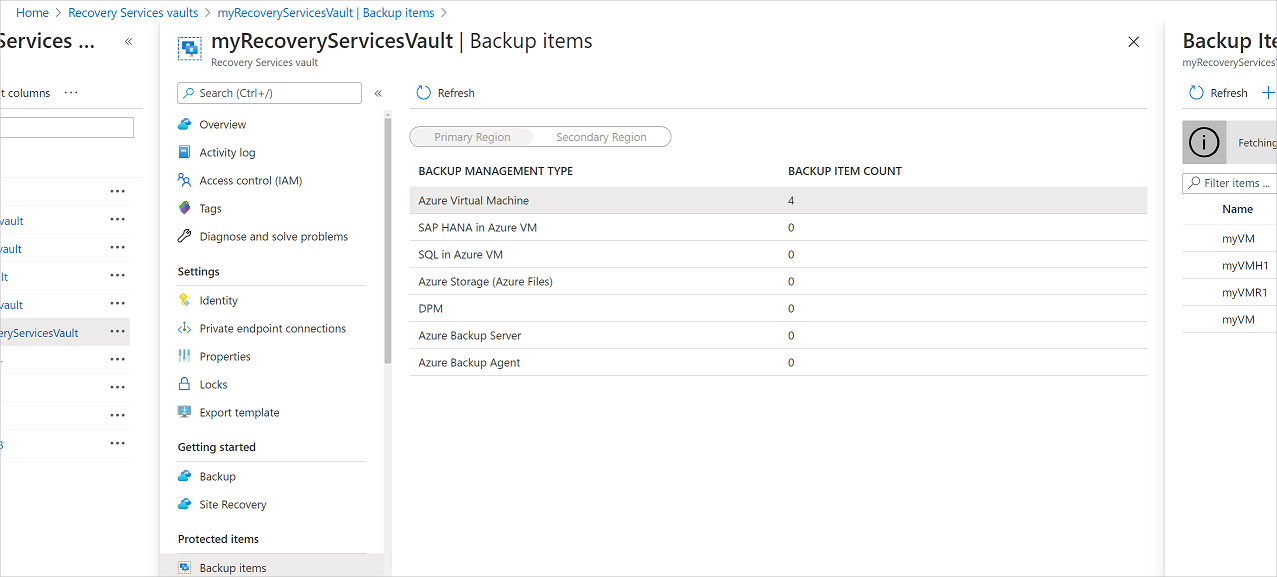
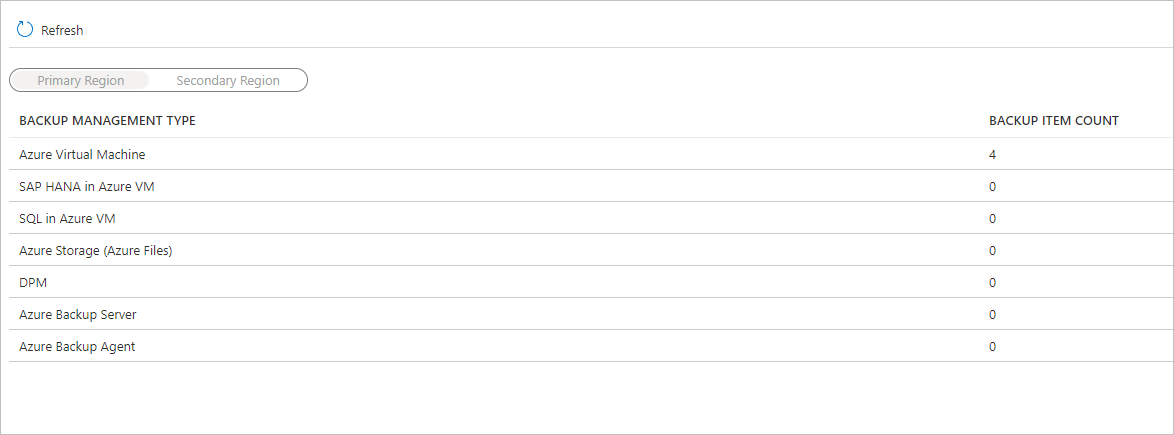
On the Backup Items tile, select Azure Virtual Machine.
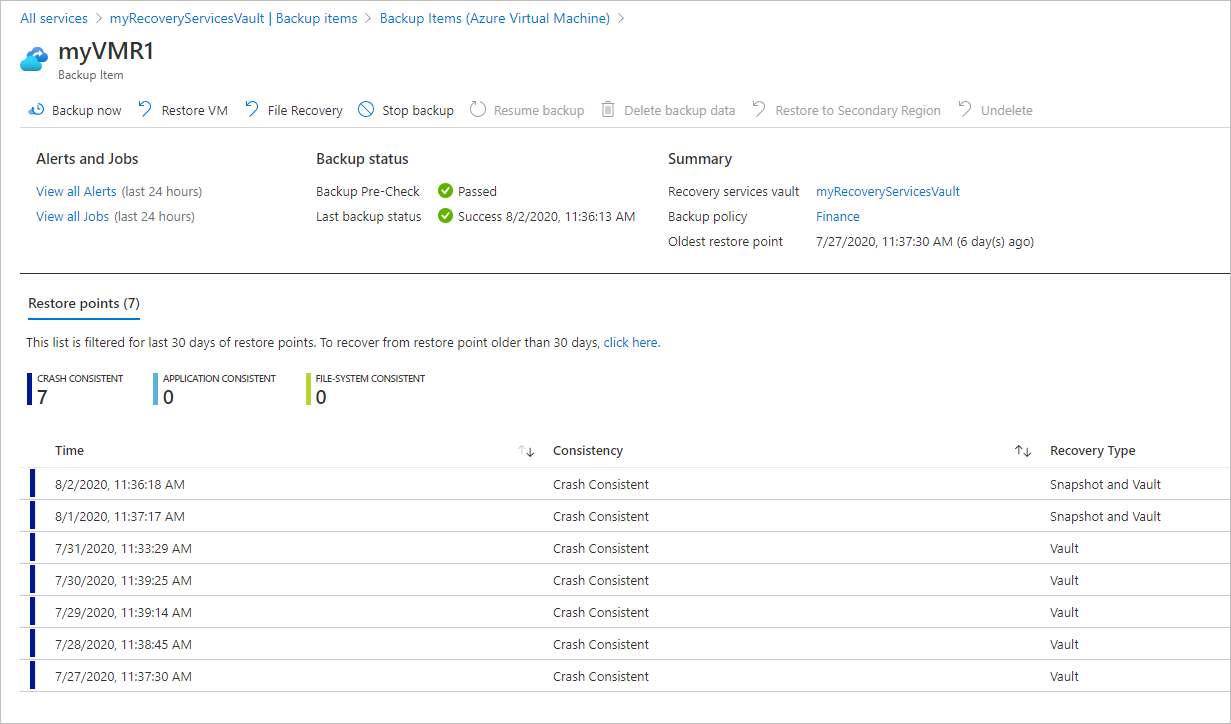
On the Backup Items pane, you can view the list of protected VMs. In this example, the vault protects one virtual machine: myVMR1.
From the vault item's dashboard, you can modify backup policies, run an on-demand backup, stop or resume protection of VMs, delete backup data, view restore points, and run a restore.
Manage backup policy for a VM
Modify backup policy
To modify an existing backup policy:
- Sign in to the Azure portal. Open the vault dashboard.
- From Manage > Backup policies, select the backup policy for the type Azure Virtual Machine.
- Select Modify and change the settings.
Switch backup policy
To manage a backup policy:
Sign in to the Azure portal. Open the vault dashboard.
On the Backup Items tile, select Azure Virtual Machine.
On the Backup Items pane, you can view the list of protected VMs and last backup status with latest restore points time.
From the vault item's dashboard, you can select a backup policy.
To switch policies, select a different policy and then select Save. The new policy is immediately applied to the vault.
Run an on-demand backup
You can run an on-demand backup of a VM after you set up its protection. Keep these details in mind:
- If the initial backup is pending, on-demand backup creates a full copy of the VM in the Recovery Services vault.
- If the initial backup is complete, an on-demand backup will only send changes from the previous snapshot to the Recovery Services vault. That is, later backups are always incremental.
- The retention range for an on-demand backup is the retention value that you specify when you trigger the backup.
Note
Azure Backup recommends four backups per day, for a VM - one scheduled backup as per the Backup policy, and three on-demand backups. However, to allow user retries in case of failed attempts, hard limit for on-demand backups is set to nine attempts.
To trigger an on-demand backup:
On the vault item dashboard, under Protected Item, select Backup Item.

From Backup Management Type, select Azure Virtual Machine. The Backup Item (Azure Virtual Machine) pane appears.
Select a VM and select Backup Now to create an on-demand backup. The Backup Now pane appears.
In the Retain Backup Till field, specify a date for the backup to be retained.
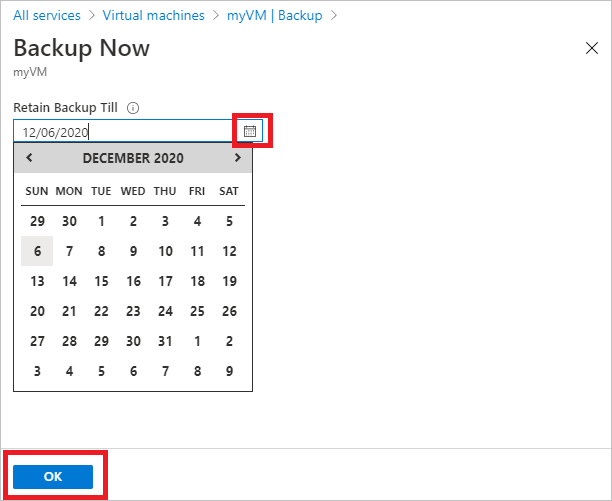
Select OK to run the backup job.
To track the job's progress, on the vault dashboard, select the Backup Jobs tile.
Stop protecting a VM
There are two ways to stop protecting a VM:
- Stop protection and retain backup data. This option will stop all future backup jobs from protecting your VM. However, Azure Backup service will retain the recovery points that have been backed up. You'll need to pay to keep the recovery points in the vault (see Azure Backup pricing for details). You'll be able to restore the VM if needed. If you decide to resume VM protection, then you can use Resume backup option.
- Stop protection and delete backup data. This option will stop all future backup jobs from protecting your VM and delete all the recovery points. You won't be able to restore the VM nor use Resume backup option.
Note
If you delete a data source without stopping backups, new backups will fail. Old recovery points will expire according to the policy, but the most recent recovery point will always be kept until you stop the backups and delete the data.
Stop protection and retain backup data
To stop protection and retain data of a VM:
On the vault item's dashboard, select Stop backup.
Choose Retain Backup Data, and confirm your selection as needed. Add a comment if you want. If you aren't sure of the item's name, hover over the exclamation mark to view the name.
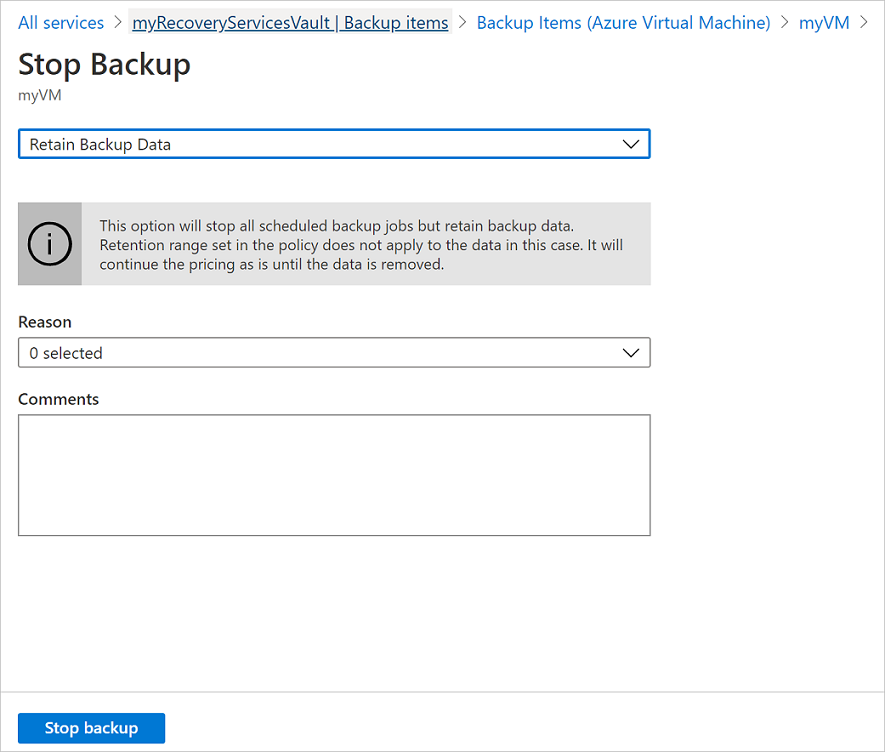
A notification lets you know that the backup jobs have been stopped.
Stop protection and delete backup data
To stop protection and delete data of a VM:
Note
For recovery points in archive that haven't stayed for a duration of 180 days in Archive Tier, deletion of those recovery points lead to early deletion cost. Learn more.
On the vault item's dashboard, select Stop backup.
Choose Delete Backup Data, and confirm your selection as needed. Enter the name of the backup item and add a comment if you want.

Note
After completing the delete operation the backed up data will be retained for 14 days in the soft deleted state.
In addition, you can also enable or disable soft delete.
Resume protection of a VM
If you chose Stop protection and retain backup data option during stop VM protection, then you can use Resume backup. This option isn't available if you choose Stop protection and delete backup data option or Delete backup data.
To resume protection for a VM:
On the vault item's dashboard, select Resume backup.
Follow the steps in Manage backup policies to assign the policy for the VM. You don't need to choose the VM's initial protection policy.
After you apply the backup policy to the VM, you see the following message:

Delete backup data
There are two ways to delete a VM's backup data:
From the vault item dashboard, select Stop backup and follow the instructions for Stop protection and delete backup data option.

From the vault item dashboard, select Delete backup data. This option is enabled if you had chosen to Stop protection and retain backup data option during stop VM protection.

On the vault item dashboard, select Delete backup data.
Type the name of the backup item to confirm that you want to delete the recovery points.

To delete the backup data for the item, select Delete. A notification message lets you know that the backup data has been deleted.
To protect your data, Azure Backup includes the soft delete feature. With soft delete, even after the backup (all the recovery points) of a VM is deleted, the backup data is retained for 14 additional days. For more information, see the soft delete documentation.
Note
When you delete backup data you delete all associated recovery points. You can't choose specific recovery points to delete.
Backup item where primary data source no longer exists
- If Azure VMs configured for Azure Backup are deleted or moved (to another resource group or subscription) without stopping protection, then both scheduled backup jobs and on-demand backup jobs will fail with the error UserErrorVmNotFoundV2. The backup pre-check will appear as critical only for failed on-demand backup jobs (failed scheduled jobs doesn't appear).
- These backup items remain active in the system adhering to the backup and retention policy set by the user. The backed-up data for these Azure VMs will be retained according to the retention policy. The expired recovery points (except the most recent recovery point) are cleaned according to the retention range set in the backup policy.
- To avoid any additional cost, we recommend deleting the backup items where the primary data source no longer exists. This is in a scenario where the backup item/data for the deleted resources is no longer required, since the most recent recovery point is retained forever and you're charged according to the applicable backup pricing.
Next steps
- Learn how to back up Azure VMs from the VM's settings.
- Learn how to restore VMs.
- Learn how to monitor Azure VM backups.
