Back up an Azure file share by using PowerShell
This article describes how to use Azure PowerShell to back up an Azure Files file share through an Azure Backup Recovery Services vault.
This article explains how to:
- Set up PowerShell and register the Recovery Services provider.
- Create a Recovery Services vault.
- Configure backup for an Azure file share.
- Run a backup job.
Before you start
Learn more about Recovery Services vaults.
Review the Az.RecoveryServices cmdlet reference reference in the Azure library.
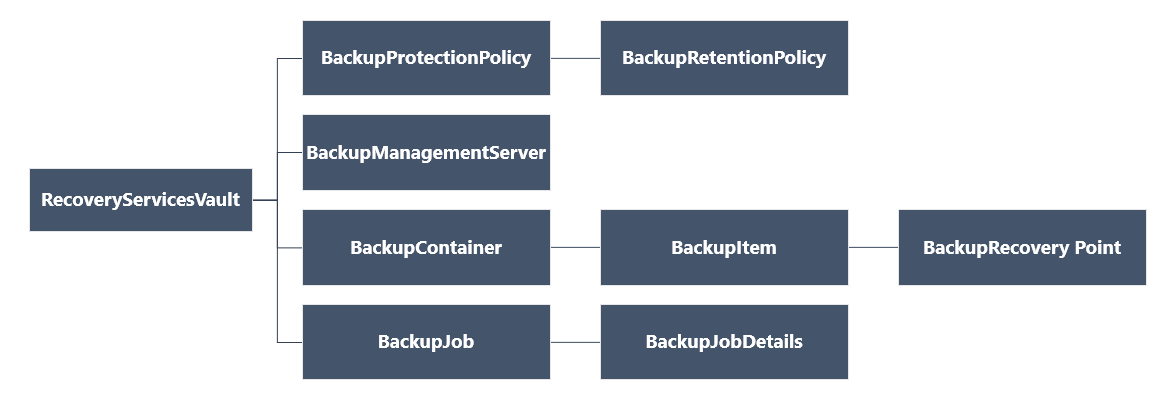
Review the following PowerShell object hierarchy for Recovery Services:

Set up PowerShell
Note
We recommend that you use the Azure Az PowerShell module to interact with Azure. To get started, see Install Azure PowerShell. To learn how to migrate to the Az PowerShell module, see Migrate Azure PowerShell from AzureRM to Az.
Note
Azure PowerShell currently doesn't support backup policies with hourly schedule. Please use Azure Portal to leverage this feature. Learn more
Set up PowerShell as follows:
Download the latest version of Azure PowerShell.
Note
The minimum PowerShell version required for backup of Azure file shares is Az.RecoveryServices 2.6.0. Using the latest version, or at least the minimum version, helps you avoid issues with existing scripts. Install the minimum version by using the following PowerShell command:
Install-module -Name Az.RecoveryServices -RequiredVersion 2.6.0Find the PowerShell cmdlets for Azure Backup by using this command:
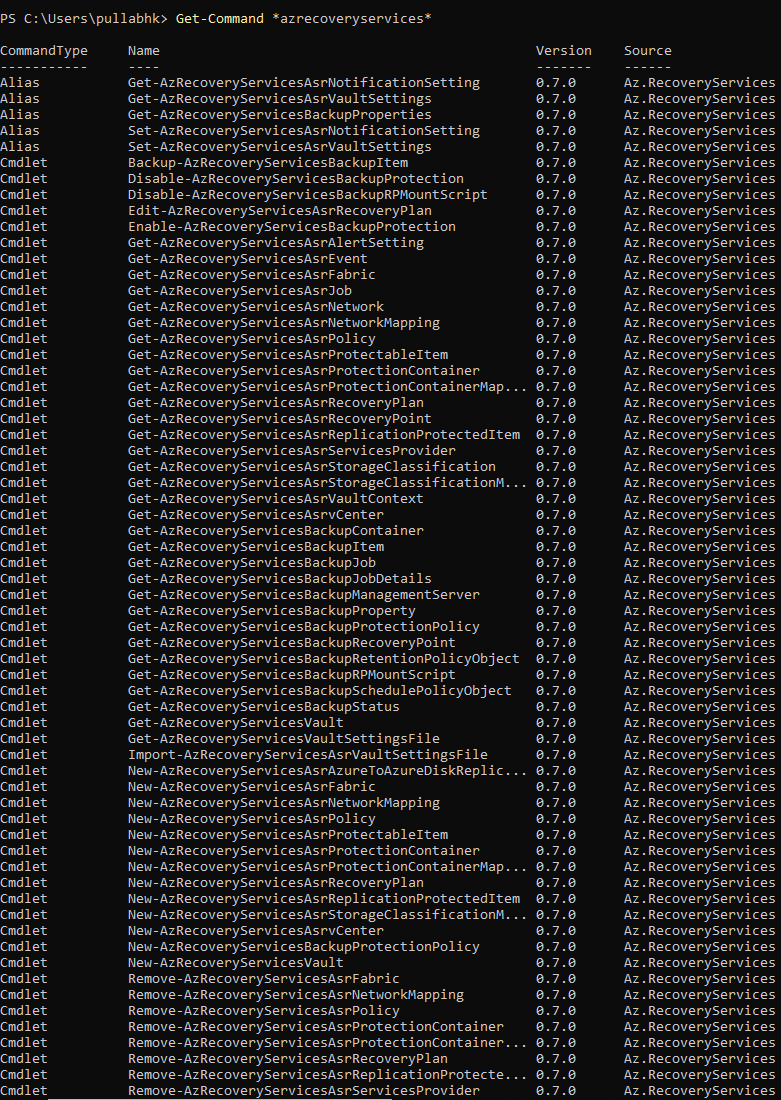
Get-Command *azrecoveryservices*Review the aliases and cmdlets for Azure Backup, Azure Site Recovery, and the Recovery Services vault. Here's an example of what you might see. It's not a complete list of cmdlets.

Sign in to your Azure account by using Connect-AzAccount.
On the webpage that appears, you're prompted to enter your account credentials.
Alternatively, you can include your account credentials as a parameter in the Connect-AzAccount cmdlet by using -Credential.
If you're a CSP partner working on behalf of a tenant, specify the customer as a tenant. Use their tenant ID or tenant primary domain name. An example is Connect-AzAccount -Tenant "fabrikam.com".
Associate the subscription that you want to use with the account, because an account can have several subscriptions:
Select-AzSubscription -SubscriptionName $SubscriptionNameIf you're using Azure Backup for the first time, use the Register-AzResourceProvider cmdlet to register the Azure Recovery Services provider with your subscription:
Register-AzResourceProvider -ProviderNamespace "Microsoft.RecoveryServices"Verify that the providers registered successfully:
Get-AzResourceProvider -ProviderNamespace "Microsoft.RecoveryServices"In the command output, verify that RegistrationState changes to Registered. If it doesn't, run the Register-AzResourceProvider cmdlet again.
Create a Recovery Services vault
The Recovery Services vault is a Resource Manager resource, so you must place it in a resource group. You can use an existing resource group, or you can create a resource group by using the New-AzResourceGroup cmdlet. When you create a resource group, specify the name and location for it.
Follow these steps to create a Recovery Services vault:
If you don't have an existing resource group, create a new one by using the New-AzResourceGroup cmdlet. In this example, we create a resource group in the West US region:
New-AzResourceGroup -Name "test-rg" -Location "West US"Use the New-AzRecoveryServicesVault cmdlet to create the vault. Specify the same location for the vault that you used for the resource group.
New-AzRecoveryServicesVault -Name "testvault" -ResourceGroupName "test-rg" -Location "West US"
View the vaults in a subscription
To view all vaults in the subscription, use Get-AzRecoveryServicesVault:
Get-AzRecoveryServicesVault
The output is similar to the following. Note that the output provides the associated resource group and location.
Name              : Contoso-vault
ID                : /subscriptions/1234
Type              : Microsoft.RecoveryServices/vaults
Location          : WestUS
ResourceGroupName : Contoso-docs-rg
SubscriptionId    : 1234-567f-8910-abc
Properties        : Microsoft.Azure.Commands.RecoveryServices.ARSVaultProperties
Set the vault context
Store the vault object in a variable, and set the vault context.
Many Azure Backup cmdlets require the Recovery Services vault object as an input, so it's convenient to store the vault object in a variable.
The vault context is the type of data protected in the vault. Set it by using Set-AzRecoveryServicesVaultContext. After the context is set, it applies to all subsequent cmdlets.
The following example sets the vault context for testvault:
Get-AzRecoveryServicesVault -Name "testvault" | Set-AzRecoveryServicesVaultContext
Fetch the vault ID
We plan to deprecate the vault context setting in accordance with Azure PowerShell guidelines. Instead, you can store or fetch the vault ID, and pass it to relevant commands. If you haven't set the vault context or you want to specify the command to run for a certain vault, pass the vault ID as -vaultID to all relevant commands as follows:
$vaultID = Get-AzRecoveryServicesVault -ResourceGroupName "Contoso-docs-rg" -Name "testvault" | select -ExpandProperty ID
New-AzRecoveryServicesBackupProtectionPolicy -Name "NewAFSPolicy" -WorkloadType "AzureFiles" -RetentionPolicy $retPol -SchedulePolicy $schPol -VaultID $vaultID
Configure a backup policy
A backup policy specifies the schedule for backups, and how long backup recovery points should be kept.
A backup policy is associated with at least one retention policy. A retention policy defines how long a recovery point is kept before it's deleted. You can configure backups with daily, weekly, monthly, or yearly retention. With multiple backups policy, you can also configure backups hourly retention.
Important
The following cmdlets are used for the Backup policies:
- View the default backup retention policy by using
Get-AzRecoveryServicesBackupRetentionPolicyObject. - View the default backup schedule policy by using
Get-AzRecoveryServicesBackupSchedulePolicyObject. - Create a new backup policy by using
New-AzRecoveryServicesBackupProtectionPolicy. Provide the schedule and retention policy objects as inputs.
To create a backup policy that configures multiple backups a day, follow these steps:
Fetch the schedule policy object using below cmdlet:
$schPol=Get-AzRecoveryServicesBackupSchedulePolicyObject -WorkloadType AzureFiles -BackupManagementType AzureStorage -ScheduleRunFrequency Hourly
$schPol
The output is similar to:
ScheduleRunFrequency    : Hourly
ScheduleRunDays         :
ScheduleRunTimes        :
ScheduleInterval        : 8
ScheduleWindowStartTime : 12/22/2021 8:00:00 AM
ScheduleWindowDuration  : 16
ScheduleRunTimeZone     : India Standard Time
Set the different parameters of the schedule as required.
$schpol.ScheduleInterval=4
$schpol.ScheduleWindowDuration=12
The previous configuration helps you schedule 4 backups a day in a window of 8 am – 8pm (8am+12hours). You can also set the timezone as mentioned in the following cmdlet:
$timeZone= $timeZone=Get-TimeZone -ListAvailable |Where-Object{$_.Id-match "Russia Time Zone 11"}
$schPol.ScheduleRunTimeZone=$timeZone.Id
To create a policy with daily schedule, run the following cmdlet:
$UtcTime = Get-Date -Date "2019-03-20 01:30:00Z"
$UtcTime = $UtcTime.ToUniversalTime()
$schpol.ScheduleRunTimes[0] = $UtcTime
Fetch the retention policy object using following cmdlet:
$retPol=Get-AzRecoveryServicesBackupRetentionPolicyObject -WorkloadType AzureFiles -BackupManagementType AzureStorage -ScheduleRunFrequency HourlySet the retention values as required.
$retPol.DailySchedule.DurationCountInDays=15Create a new backup policy using New-AzRecoveryServicesBackupProtectionPolicy.
You can pass the schedule and retention policy objects set previously as inputs.
New-AzRecoveryServicesBackupProtectionPolicy -Name "FilesPolicytesting" -WorkloadType AzureFiles -RetentionPolicy $retpol -SchedulePolicy $schpolThe output displays the policy configuration:
Name           WorkloadType   BackupManagementType ScheduleFrequency  BackupTime    WindowStartTime     Interval   WindowDuration TimeZone
                                                                     (UTC)                                         (Hours)
----          ------------    -------------------- -----------------  ------------  ---------------       -------- -------------- --------
FilesPolicy
testing        AzureFiles      AzureStorage         Hourly                          12/22/2021 8:00:00 AM     4        12         Russia Time Zone 11
Enable backup
After you define the backup policy, you can enable protection for the Azure file share by using the policy.
Retrieve a backup policy
You fetch the relevant policy object by using Get-AzRecoveryServicesBackupProtectionPolicy. Use this cmdlet to view the policies associated with a workload type, or to get a specific policy.
Retrieve a policy for a workload type
The following example retrieves policies for the workload type AzureFiles:
Get-AzRecoveryServicesBackupProtectionPolicy -WorkloadType "AzureFiles"
The output is similar to the following:
Name                 WorkloadType       BackupManagementType BackupTime                DaysOfWeek
----                 ------------       -------------------- ----------                ----------
dailyafs             AzureFiles         AzureStorage         1/10/2018 12:30:00 AM
Note
The time zone of the BackupTime field in PowerShell is in UTC. When the backup time is shown in the Azure portal, the time is adjusted to your local time zone.
Retrieve a specific policy
The following policy retrieves the backup policy named dailyafs:
$afsPol = Get-AzRecoveryServicesBackupProtectionPolicy -Name "dailyafs"
Enable protection and apply the policy
Enable protection by using Enable-AzRecoveryServicesBackupProtection. After the policy is associated with the vault, backups are triggered in accordance with the policy schedule.
The following example enables protection for the Azure file share testAzureFS in storage account testStorageAcct, with the policy dailyafs:
Enable-AzRecoveryServicesBackupProtection -StorageAccountName "testStorageAcct" -Name "testAzureFS" -Policy $afsPol
The command waits until the configure-protection job is finished and gives an output that's similar to the following example:
WorkloadName       Operation            Status                 StartTime                                                                                                         EndTime                   JobID
------------             ---------            ------               ---------                                  -------                   -----
testAzureFS       ConfigureBackup      Completed            11/12/2018 2:15:26 PM     11/12/2018 2:16:11 PM     ec7d4f1d-40bd-46a4-9edb-3193c41f6bf6
For more information on how to get a list of file shares for a storage account, see this article.
Important notice: Backup item identification
This section outlines an important change in backups of Azure file shares in preparation for general availability.
While enabling a backup for Azure file shares, the user gives the customer a file-share name as the entity name, and a backup item is created. The backup item's name is a unique identifier that the Azure Backup service creates. Usually the identifier is a user-friendly name. But to handle the scenario of soft delete, where a file share can be deleted and another file share can be created with the same name, the unique identity of an Azure file share is now an ID.
To know the unique ID of each item, run the Get-AzRecoveryServicesBackupItem command with the relevant filters for backupManagementType and WorkloadType to get all the relevant items. Then observe the name field in the returned PowerShell object/response.
We recommend that you list items and then retrieve their unique name from the name field in the response. Use this value to filter the items with the Name parameter. Otherwise, use the FriendlyName parameter to retrieve the item with its ID.
Important
Make sure that PowerShell is upgraded to the minimum version (Az.RecoveryServices 2.6.0) for backups of Azure file shares. With this version, the FriendlyName filter is available for the Get-AzRecoveryServicesBackupItem command.
Pass the name of the Azure file share to the FriendlyName parameter. If you pass the name of the file share to the Name parameter, this version throws a warning to pass the name to the FriendlyName parameter.
Not installing the minimum version might result in a failure of existing scripts. Install the minimum version of PowerShell by using the following command:
Install-module -Name Az.RecoveryServices -RequiredVersion 2.6.0
Trigger an on-demand backup
Use Backup-AzRecoveryServicesBackupItem to run an on-demand backup for a protected Azure file share:
- Retrieve the storage account from the container in the vault that holds your backup data by using Get-AzRecoveryServicesBackupContainer.
- To start a backup job, obtain information about the Azure file share by using Get-AzRecoveryServicesBackupItem.
- Run an on-demand backup by using Backup-AzRecoveryServicesBackupItem.
Run the on-demand backup as follows:
$afsContainer = Get-AzRecoveryServicesBackupContainer -FriendlyName "testStorageAcct" -ContainerType AzureStorage
$afsBkpItem = Get-AzRecoveryServicesBackupItem -Container $afsContainer -WorkloadType "AzureFiles" -FriendlyName "testAzureFS"
$job =  Backup-AzRecoveryServicesBackupItem -Item $afsBkpItem
The command returns a job with an ID to be tracked, as shown in the following example:
WorkloadName     Operation            Status               StartTime                 EndTime                   JobID
------------     ---------            ------               ---------                 -------                   -----
testAzureFS       Backup               Completed            11/12/2018 2:42:07 PM     11/12/2018 2:42:11 PM     8bdfe3ab-9bf7-4be6-83d6-37ff1ca13ab6
Azure file share snapshots are used while the backups are taken. Usually the job finishes by the time the command returns this output.
Next steps
- Learn about backing up Azure Files in the Azure portal.
- Refer to the sample script on GitHub for using an Azure Automation runbook to schedule backups.