Tutorial: Establish Azure Functions private site access
This tutorial shows you how to enable private site access with Azure Functions. By using private site access, you can require that your function code is only triggered from a specific virtual network.
Private site access is useful in scenarios when access to the function app needs to be limited to a specific virtual network. For example, the function app may be applicable to only employees of a specific organization, or services which are within the specified virtual network (such as another Azure Function, Azure Virtual Machine, or an AKS cluster).
If a Functions app needs to access Azure resources within the virtual network, or connected via service endpoints, then virtual network integration is needed.
In this tutorial, you learn how to configure private site access for your function app:
- Create a virtual machine
- Create an Azure Bastion service
- Create an Azure Functions app
- Configure a virtual network service endpoint
- Create and deploy an Azure Function
- Invoke the function from outside and within the virtual network
If you don’t have an Azure subscription, create a free account before you begin.
Topology
The following diagram shows the architecture of the solution to be created:

Prerequisites
For this tutorial, it's important that you understand IP addressing and subnetting. You can start with this article that covers the basics of addressing and subnetting. Many more articles and videos are available online.
Sign in to Azure portal
Sign in to the Azure portal.
Create a virtual machine
The first step in this tutorial is to create a new virtual machine inside a virtual network. The virtual machine will be used to access your function once you've restricted its access to only be available from within the virtual network.
Select the Create a resource button.
In the search field, type Windows Server, and select Windows Server in the search results.
Select Windows Server 2019 Datacenter from the list of Windows Server options, and press the Create button.
In the Basics tab, use the VM settings as specified in the table below the image:
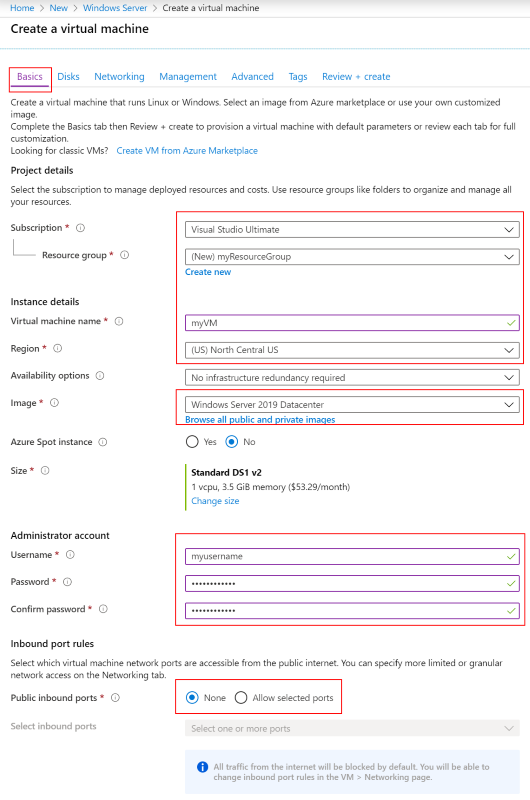
Setting Suggested value Description Subscription Your subscription The subscription under which your resources are created. Resource group myResourceGroup Choose the resource group to contain all the resources for this tutorial. Using the same resource group makes it easier to clean up resources when you're done with this tutorial. Virtual machine name myVM The VM name needs to be unique in the resource group Region (US) North Central US Choose a region near you or near the functions to be accessed. Public inbound ports None Select None to ensure there is no inbound connectivity to the VM from the internet. Remote access to the VM will be configured via the Azure Bastion service. Choose the Networking tab and select Create new to configure a new virtual network.
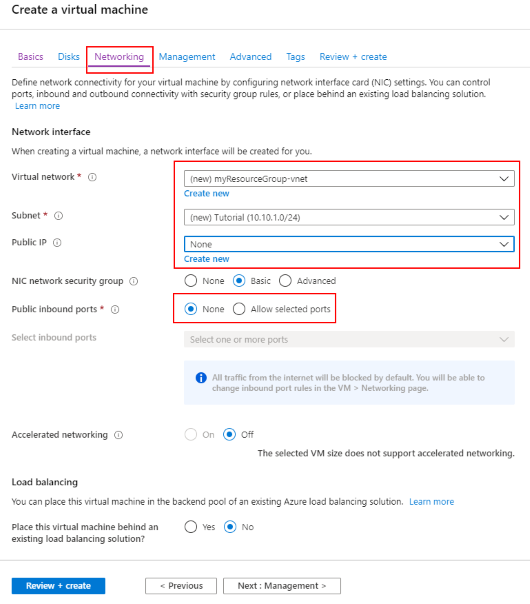
In Create virtual network, use the settings in the table below the image:
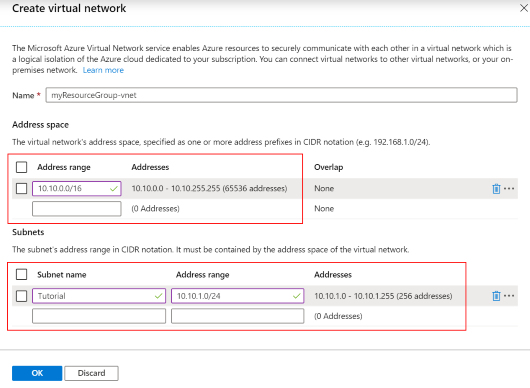
Setting Suggested value Description Name myResourceGroup-vnet You can use the default name generated for your virtual network. Address range 10.10.0.0/16 Use a single address range for the virtual network. Subnet name Tutorial Name of the subnet. Address range (subnet) 10.10.1.0/24 The subnet size defines how many interfaces can be added to the subnet. This subnet is used by the VM. A /24 subnet provides 254 host addresses. Select OK to create the virtual network.
Back in the Networking tab, ensure None is selected for Public IP.
Choose the Management tab, then in Diagnostic storage account, choose Create new to create a new Storage account.
Leave the default values for the Identity, Auto-shutdown, and Backup sections.
Select Review + create. After validation completes, select Create. The VM create process takes a few minutes.
Configure Azure Bastion
Azure Bastion is a fully managed Azure service which provides secure RDP and SSH access to virtual machines directly from the Azure portal. Using the Azure Bastion service removes the need to configure network settings related to RDP access.
In the portal, choose Add at the top of the resource group view.
In the search field, type Bastion.
Select Bastion in the search results.
Select Create to begin the process of creating a new Azure Bastion resource. You will notice an error message in the Virtual network section as there is not yet an AzureBastionSubnet subnet. The subnet is created in the following steps. Use the settings in the table below the image:
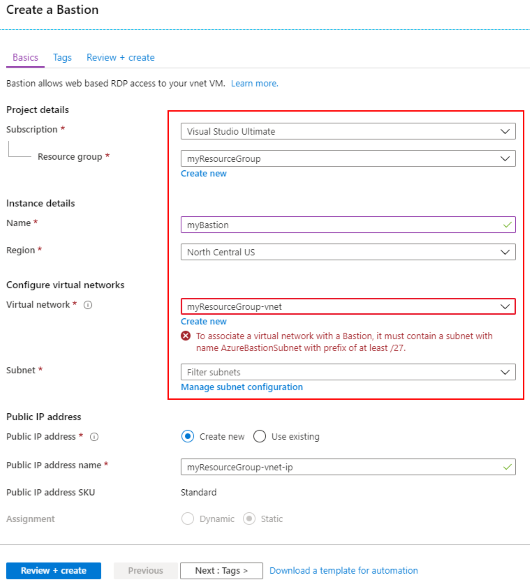
Setting Suggested value Description Name myBastion The name of the new Bastion resource Region North Central US Choose a region near you or near other services your functions access. Virtual network myResourceGroup-vnet The virtual network in which the Bastion resource will be created in Subnet AzureBastionSubnet The subnet in your virtual network to which the new Bastion host resource will be deployed. You must create a subnet using the name value AzureBastionSubnet. This value lets Azure know which subnet to deploy the Bastion resources to. You must use a subnet of at least /27 or larger (/27, /26, and so on). Note
For a detailed, step-by-step guide to creating an Azure Bastion resource, refer to the Create an Azure Bastion host tutorial.
Create a subnet in which Azure can provision the Azure Bastion host. Choosing Manage subnet configuration opens a new pane where you can define a new subnet. Choose + Subnet to create a new subnet.
The subnet must be of the name AzureBastionSubnet and the subnet prefix must be at least /27. Select OK to create the subnet.
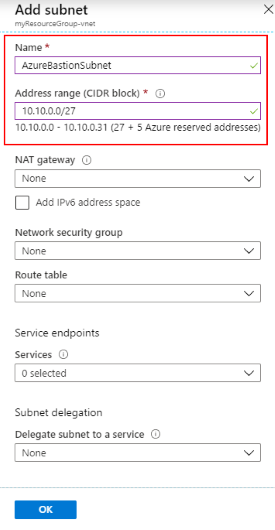
On the Create a Bastion page, select the newly created AzureBastionSubnet from the list of available subnets.
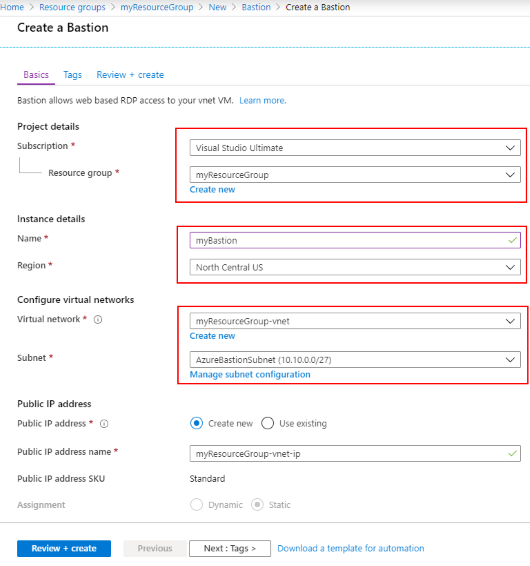
Select Review & Create. Once validation completes, select Create. It will take a few minutes for the Azure Bastion resource to be created.
Create an Azure Functions app
The next step is to create a function app in Azure using the Consumption plan. You deploy your function code to this resource later in the tutorial.
In the portal, choose Add at the top of the resource group view.
Select Compute > Function App
On the Basics section, use the function app settings as specified in the table below.
Setting Suggested value Description Resource Group myResourceGroup Choose the resource group to contain all the resources for this tutorial. Using the same resource group for the function app and VM makes it easier to clean up resources when you're done with this tutorial. Function App name Globally unique name Name that identifies your new function app. Valid characters are a-z (case insensitive), 0-9, and -. Publish Code Option to publish code files or a Docker container. Runtime stack Preferred language Choose a runtime that supports your favorite function programming language. Region North Central US Choose a region near you or near other services your functions access. Select the Next: Hosting > button.
For the Hosting section, select the proper Storage account, Operating system, and Plan as described in the following table.
Setting Suggested value Description Storage account Globally unique name Create a storage account used by your function app. Storage account names must be between 3 and 24 characters in length and may contain numbers and lowercase letters only. You can also use an existing account, which must meet the storage account requirements. Operating system Preferred operating system An operating system is pre-selected for you based on your runtime stack selection, but you can change the setting if necessary. Plan Consumption The hosting plan dictates how the function app is scaled and resources available to each instance. Select Review + Create to review the app configuration selections.
Select Create to provision and deploy the function app.
Configure access restrictions
The next step is to configure access restrictions to ensure only resources on the virtual network can invoke the function.
Private site access is enabled by creating an Azure Virtual Network service endpoint between the function app and the specified virtual network. Access restrictions are implemented via service endpoints. Service endpoints ensure only traffic originating from within the specified virtual network can access the designated resource. In this case, the designated resource is the Azure Function.
Within the function app, select the Networking link under the Settings section header.
The Networking page is the starting point to configure Azure Front Door, the Azure CDN, and also Access Restrictions.
Select Configure Access Restrictions to configure private site access.
On the Access Restrictions page, you see only the default restriction in place. The default doesn't place any restrictions on access to the function app. Select Add rule to create a private site access restriction configuration.
In the Add Access Restriction pane, provide a Name, Priority, and Description for the new rule.
Select Virtual Network from the Type drop-down box, then select the previously created virtual network, and then select the Tutorial subnet.
Note
It may take several minutes to enable the service endpoint.
The Access Restrictions page now shows that there is a new restriction. It may take a few seconds for the Endpoint status to change from Disabled through Provisioning to Enabled.
Important
Each function app has an Advanced Tool (Kudu) site that is used to manage function app deployments. This site is accessed from a URL like:
<FUNCTION_APP_NAME>.scm.azurewebsites.net. Enabling access restrictions on the Kudu site prevents the deployment of the project code from a local developer workstation, and then an agent is needed within the virtual network to perform the deployment.
Access the functions app
Return to the previously created function app. In the Overview section, copy the URL.

If you try to access the function app now from your computer outside of your virtual network, you'll receive an HTTP 403 page indicating that access is forbidden.
Return to the resource group and select the previously created virtual machine. In order to access the site from the VM, you need to connect to the VM via the Azure Bastion service.
Select Connect and then choose Bastion.
Provide the required username and password to log into the virtual machine.
Note
For enhanced security, you should require Microsoft Entra authentication to access your virtual machines in Azure.
Select Connect. A new browser window will pop up to allow you to interact with the virtual machine. It's possible to access the site from the web browser on the VM because the VM is accessing the site through the virtual network. While the site is only accessible from within the designated virtual network, a public DNS entry remains.
Create a function
The next step in this tutorial is to create an HTTP-triggered Azure Function. Invoking the function via an HTTP GET or POST should result in a response of "Hello, {name}".
Follow one of the following quickstarts to create and deploy your Azure Functions app.
When publishing your Azure Functions project, choose the function app resource that you created earlier in this tutorial.
Verify the function is deployed.
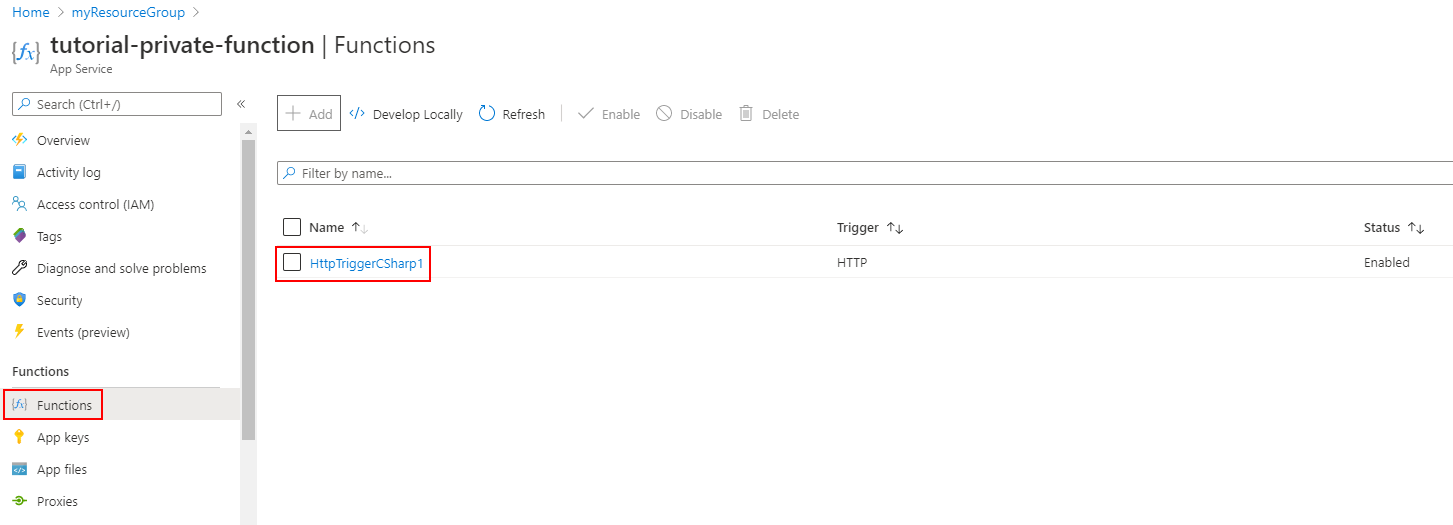
Invoke the function directly
In order to test access to the function, you need to copy the function URL. Select the deployed function, and then select Get Function Url. Then click the Copy button to copy the URL to your clipboard.

Paste the URL into a web browser. When you now try to access the function app from a computer outside of your virtual network, you receive an HTTP 403 response indicating access to the app is forbidden.
Invoke the function from the virtual network
Accessing the function via a web browser (by using the Azure Bastion service) on the configured VM on the virtual network results in success!
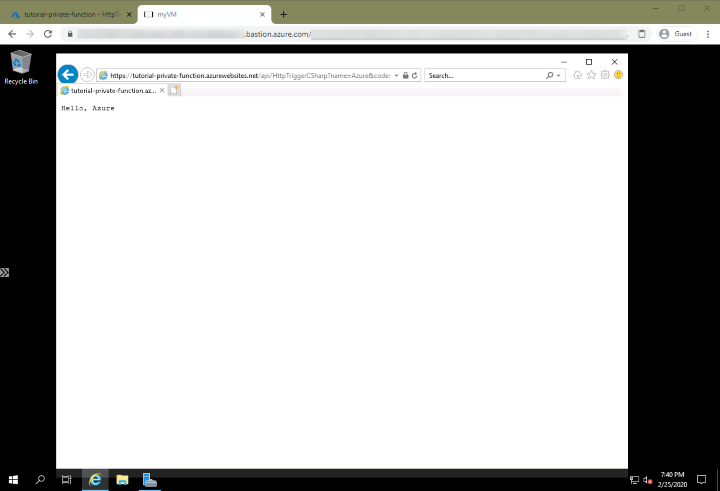
Clean up resources
In the preceding steps, you created Azure resources in a resource group. If you don't expect to need these resources in the future, you can delete them by deleting the resource group.
From the Azure portal menu or Home page, select Resource groups. Then, on the Resource groups page, select myResourceGroup.
On the myResourceGroup page, make sure that the listed resources are the ones you want to delete.
Select Delete resource group, type myResourceGroup in the text box to confirm, and then select Delete.