Caution
This article references CentOS, a Linux distribution that is End Of Life (EOL). Please consider your use and plan accordingly. For more information, see the CentOS End Of Life guidance.
This example scenario shows how to run Apache NiFi on Azure. NiFi provides a system for processing and distributing data.
Apache®, Apache NiFi®, and NiFi® are either registered trademarks or trademarks of the Apache Software Foundation in the United States and/or other countries. No endorsement by The Apache Software Foundation is implied by the use of these marks.
Architecture
Download a Visio file of this architecture.
Workflow
The NiFi application runs on VMs in NiFi cluster nodes. The VMs are in a virtual machine scale set that the configuration deploys across availability zones.
Apache ZooKeeper runs on VMs in a separate cluster. NiFi uses the ZooKeeper cluster for these purposes:
- To choose a cluster coordinator node
- To coordinate the flow of data
Azure Application Gateway provides layer-7 load balancing for the user interface that runs on the NiFi nodes.
Monitor and its Log Analytics feature collect, analyze, and act on telemetry from the NiFi system. The telemetry includes NiFi system logs, system health metrics, and performance metrics.
Azure Key Vault securely stores certificates and keys for the NiFi cluster.
Microsoft Entra ID provides single sign-on (SSO) and multifactor authentication.
Components
- NiFi provides a system for processing and distributing data.
- ZooKeeper is an open-source server that manages distributed systems.
- Virtual Machines is an infrastructure-as-a-service (IaaS) offer. You can use Virtual Machines to deploy on-demand, scalable computing resources. Virtual Machines provides the flexibility of virtualization but eliminates the maintenance demands of physical hardware.
- Azure Virtual Machine Scale Sets provide a way to manage a group of load-balanced VMs. The number of VM instances in a set can automatically increase or decrease in response to demand or a defined schedule.
- Availability zones are unique physical locations within an Azure region. These high-availability offerings protect applications and data from datacenter failures.
- Application Gateway is a load balancer that manages traffic to web applications.
- Monitor collects and analyzes data on environments and Azure resources. This data includes app telemetry, such as performance metrics and activity logs. For more information, see Monitoring considerations later in this article.
- Log Analytics is an Azure portal tool that runs queries on Monitor log data. Log Analytics also provides features for charting and statistically analyzing query results.
- Azure DevOps Services provides services, tools, and environments for managing coding projects and deployments.
- Key Vault securely stores and controls access to a system's secrets, such as API keys, passwords, certificates, and cryptographic keys.
- Microsoft Entra ID is a cloud-based identity service that controls access to Azure and other cloud apps.
Alternatives
- Azure Data Factory provides an alternative to this solution.
- Instead of Key Vault, you can use a comparable service to store system secrets.
- Apache Airflow. For more information, see How Airflow and NiFi are different.
- It is possible to use a supported enterprise NiFi alternative like Cloudera Apache NiFi. The Cloudera offering is available through the Azure Marketplace.
Scenario details
In this scenario, NiFi runs in a clustered configuration across Azure Virtual Machines in a scale set. But most of this article's recommendations also apply to scenarios that run NiFi in single-instance mode on a single virtual machine (VM). The best practices in this article demonstrate a scalable, high-availability, and secure deployment.
Potential use cases
NiFi works well for moving data and managing the flow of data:
- Connecting decoupled systems in the cloud
- Moving data in and out of Azure Storage and other data stores
- Integrating edge-to-cloud and hybrid-cloud applications with Azure IoT, Azure Stack, and Azure Kubernetes Service (AKS)
As a result, this solution applies to many areas:
Modern data warehouses (MDWs) bring structured and unstructured data together at scale. They collect and store data from various sources, sinks, and formats. NiFi excels at ingesting data into Azure-based MDWs for the following reasons:
- Over 200 processors are available for reading, writing, and manipulating data.
- The system supports Storage services such as Azure Blob Storage, Azure Data Lake Storage, Azure Event Hubs, Azure Queue Storage, Azure Cosmos DB, and Azure Synapse Analytics.
- Robust data provenance capabilities make it possible to implement compliant solutions. For information about capturing data provenance in the Log Analytics feature of Azure Monitor, see Reporting considerations later in this article.
NiFi can run on a standalone basis on small-footprint devices. In such cases, NiFi makes it possible to process edge data and move that data to larger NiFi instances or clusters in the cloud. NiFi helps filter, transform, and prioritize edge data in motion, ensuring reliable and efficient data flows.
Industrial IoT (IIoT) solutions manage the flow of data from the edge to the datacenter. That flow starts with data acquisition from industrial control systems and equipment. The data then moves to data management solutions and MDWs. NiFi offers capabilities that make it well suited for data acquisition and movement:
- Edge data processing functionality
- Support for protocols that IoT gateways and devices use
- Integration with Event Hubs and Storage services
IoT applications in the areas of predictive maintenance and supply chain management can make use of this functionality.
Recommendations
Keep the following points in mind when you use this solution:
Recommended versions of NiFi
When you run this solution on Azure, we recommend using version 1.13.2+ of NiFi. You can run other versions, but they might require different configurations from the ones in this guide.
To install NiFi on Azure VMs, it's best to download the convenience binaries from the NiFi downloads page. You can also build the binaries from source code.
Recommended versions of ZooKeeper
For this example workload, we recommend using versions 3.5.5 and later or 3.6.x of ZooKeeper.
You can install ZooKeeper on Azure VMs by using official convenience binaries or source code. Both are available on the Apache ZooKeeper releases page.
Considerations
These considerations implement the pillars of the Azure Well-Architected Framework, which is a set of guiding tenets that can be used to improve the quality of a workload. For more information, see Microsoft Azure Well-Architected Framework.
For information on configuring NiFi, see the Apache NiFi System Administrator's Guide. Also keep these considerations in mind when you implement this solution.
Cost optimization
Cost optimization is about looking at ways to reduce unnecessary expenses and improve operational efficiencies. For more information, see Overview of the cost optimization pillar.
- Use the Azure Pricing Calculator to estimate the cost of the resources in this architecture.
- For an estimate that includes all the services in this architecture except the custom alerting solution, see this sample cost profile.
VM considerations
The following sections provide a detailed outline of how to configure the NiFi VMs:
VM size
This table lists recommended VM sizes to start with. For most general-purpose data flows, Standard_D16s_v3 is best. But each data flow in NiFi has different requirements. Test your flow and resize as needed based on the flow's actual requirements.
Consider enabling Accelerated Networking on the VMs to increase network performance. For more information, see Networking for Azure virtual machine scale sets.
| VM size | vCPU | Memory in GB | Max uncached data disk throughput in I/O operations per second (IOPS) per MBps* | Max network interfaces (NICs) / Expected network bandwidth (Mbps) |
|---|---|---|---|---|
| Standard_D8s_v3 | 8 | 32 | 12,800/192 | 4/4,000 |
| Standard_D16s_v3** | 16 | 64 | 25,600/384 | 8/8,000 |
| Standard_D32s_v3 | 32 | 128 | 51,200/768 | 8/16,000 |
| Standard_M16m | 16 | 437.5 | 10,000/250 | 8/4,000 |
* Disable data disk write caching for all data disks that you use on NiFi nodes.
** We recommend this SKU for most general-purpose data flows. Azure VM SKUs with similar vCPU and memory configurations should also be adequate.
VM operating system (OS)
We recommend running NiFi in Azure on one of the following guest operating systems:
- Ubuntu 18.04 LTS or later
- CentOS 7.9
To meet the specific requirements of your data flow, it's important to adjust several OS-level settings including:
- Maximum forked processes.
- Maximum file handles.
- The access time,
atime.
After you adjust the OS to fit your expected use case, use Azure VM Image Builder to codify the generation of those tuned images. For guidance that's specific to NiFi, see Configuration Best Practices in the Apache NiFi System Administrator's Guide.
Storage
Store the various NiFi repositories on data disks and not on the OS disk for three main reasons:
- Flows often have high disk throughput requirements that a single disk can't meet.
- It's best to separate the NiFi disk operations from the OS disk operations.
- The repositories shouldn't be on temporary storage.
The following sections outline guidelines for configuring the data disks. These guidelines are specific to Azure. For more information on configuring the repositories, see State Management in the Apache NiFi System Administrator's Guide.
Data disk type and size
Consider these factors when you configure the data disks for NiFi:
- Disk type
- Disk size
- Total number of disks
Note
For up-to-date information on disk types, sizing, and pricing, see Introduction to Azure managed disks.
The following table shows the types of managed disks that are currently available in Azure. You can use NiFi with any of these disk types. But for high-throughput data flows, we recommend Premium SSD.
| Ultra Disk Storage (NVM Express (NVMe)) | Premium SSD | Standard SSD | Standard HDD | |
|---|---|---|---|---|
| Disk type | SSD | SSD | SSD | HDD |
| Max disk size | 65,536 GB | 32,767 GB | 32,767 GB | 32,767 GB |
| Max throughput | 2,000 MiB/s | 900 MiB/s | 750 MiB/s | 500 MiB/s |
| Max IOPS | 160,000 | 20,000 | 6,000 | 2,000 |
Use at least three data disks to increase throughput of the data flow. For best practices for configuring the repositories on the disks, see Repository configuration later in this article.
The following table lists the relevant size and throughput numbers for each disk size and type.
| Standard HDD S15 | Standard HDD S20 | Standard HDD S30 | Standard SSD S15 | Standard SSD S20 | Standard SSD S30 | Premium SSD P15 | Premium SSD P20 | Premium SSD P30 | |
|---|---|---|---|---|---|---|---|---|---|
| Disk size in GB | 256 | 512 | 1,024 | 256 | 512 | 1,024 | 256 | 512 | 1,024 |
| IOPS per disk | Up to 500 | Up to 500 | Up to 500 | Up to 500 | Up to 500 | Up to 500 | 1,100 | 2,300 | 5,000 |
| Throughput per disk | Up to 60 MBps | Up to 60 MBps | Up to 60 MBps | Up to 60 MBps | Up to 60 MBps | Up to 60 MBps | 125 MBps | 150 MBps | 200 MBps |
If your system hits VM limits, adding more disks might not increase throughput:
- IOPS and throughput limits depend on the size of the disk.
- The VM size that you choose places IOPS and throughput limits for the VM on all data disks.
For VM-level disk throughput limits, see Sizes for Linux virtual machines in Azure.
VM disk caching
On Azure VMs, the Host Caching feature manages disk write caching. To increase throughput in data disks that you use for repositories, turn off disk write caching by setting Host Caching to None.
Repository configuration
The best practice guidelines for NiFi are to use a separate disk or disks for each of these repositories:
- Content
- FlowFile
- Provenance
This approach requires a minimum of three disks.
NiFi also supports application-level striping. This functionality increases the size or performance of the data repositories.
The following excerpt is from the nifi.properties configuration file. This configuration partitions and stripes the repositories across managed disks that are attached to the VMs:
nifi.provenance.repository.directory.stripe1=/mnt/disk1/ provenance_repository
nifi.provenance.repository.directory.stripe2=/mnt/disk2/ provenance_repository
nifi.provenance.repository.directory.stripe3=/mnt/disk3/ provenance_repository
nifi.content.repository.directory.stripe1=/mnt/disk4/ content_repository
nifi.content.repository.directory.stripe2=/mnt/disk5/ content_repository
nifi.content.repository.directory.stripe3=/mnt/disk6/ content_repository
nifi.flowfile.repository.directory=/mnt/disk7/ flowfile_repository
For more information about designing for high-performance storage, see Azure premium storage: design for high performance.
Reporting
NiFi includes a provenance reporting task for the Log Analytics feature.
You can use this reporting task to offload provenance events to cost-effective, durable long-term storage. The Log Analytics feature provides a query interface for viewing and graphing the individual events. For more information on these queries, see Log Analytics queries later in this article.
You can also use this task with volatile, in-memory provenance storage. In many scenarios, you can then achieve a throughput increase. But this approach is risky if you need to preserve event data. Ensure that volatile storage meets your durability requirements for provenance events. For more information, see Provenance Repository in the Apache NiFi System Administrator's Guide.
Before using this process, create a Log Analytics workspace in your Azure subscription. It's best to set up the workspace in the same region as your workload.
To configure the provenance reporting task:
- Open the controller settings in NiFi.
- Select the reporting tasks menu.
- Select Create a new reporting task.
- Select Azure Log Analytics Reporting Task.
The following screenshot shows the properties menu for this reporting task:
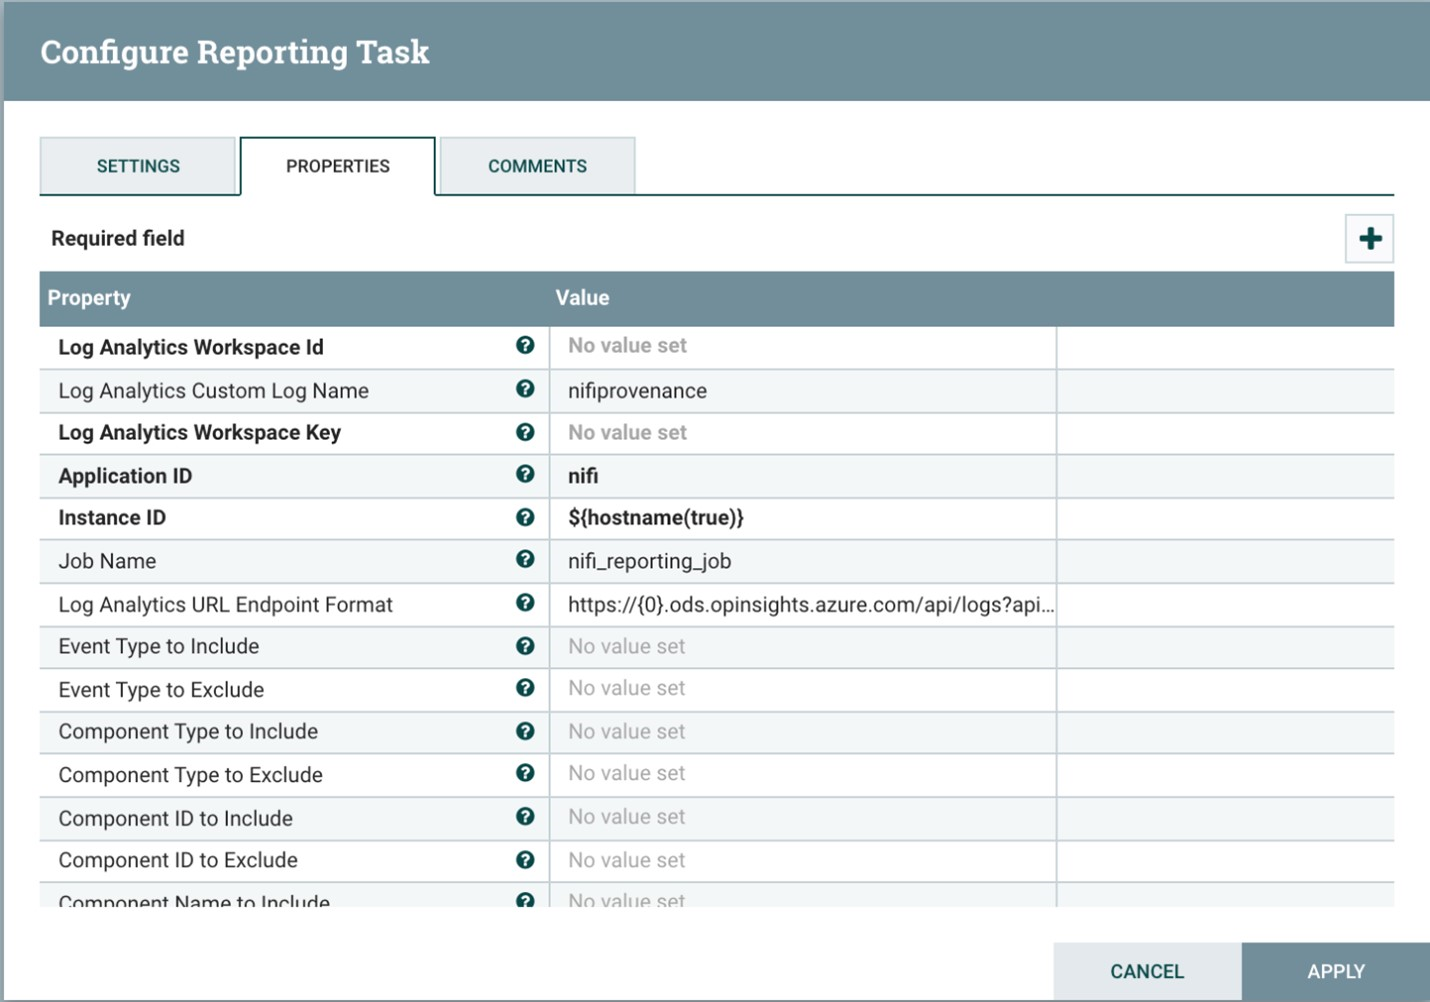
Two properties are required:
- The Log Analytics workspace ID
- The Log Analytics workspace key
You can find these values in the Azure portal by navigating to your Log Analytics workspace.
Other options are also available for customizing and filtering the provenance events that the system sends.
Security
Security provides assurances against deliberate attacks and the abuse of your valuable data and systems. For more information, see Overview of the security pillar.
You can secure NiFi from an authentication and authorization point of view. You can also secure NiFi for all network communication including:
- Within the cluster.
- Between the cluster and ZooKeeper.
See the Apache NiFi Administrators Guide for instructions on turning on the following options:
- Kerberos
- Lightweight Directory Access Protocol (LDAP)
- Certificate-based authentication and authorization
- Two-way Secure Sockets Layer (SSL) for cluster communications
If you turn on ZooKeeper secure client access, configure NiFi by adding related properties to its bootstrap.conf configuration file. The following configuration entries provide an example:
java.arg.18=-Dzookeeper.clientCnxnSocket=org.apache.zookeeper.ClientCnxnSocketNetty
java.arg.19=-Dzookeeper.client.secure=true
java.arg.20=-Dzookeeper.ssl.keyStore.location=/path/to/keystore.jks
java.arg.21=-Dzookeeper.ssl.keyStore.password=[KEYSTORE PASSWORD]
java.arg.22=-Dzookeeper.ssl.trustStore.location=/path/to/truststore.jks
java.arg.23=-Dzookeeper.ssl.trustStore.password=[TRUSTSTORE PASSWORD]
For general recommendations, see the Linux security baseline.
Network security
When you implement this solution, keep in mind the following points about network security:
Network security groups
In Azure, you can use network security groups to restrict network traffic.
We recommend a jumpbox for connecting to the NiFi cluster for administrative tasks. Use this security-hardened VM with just-in-time (JIT) access or Azure Bastion. Set up network security groups to control how you grant access to the jumpbox or Azure Bastion. You can achieve network isolation and control by using network security groups judiciously on the architecture's various subnets.
The following screenshot shows components in a typical virtual network. It contains a common subnet for the jumpbox, virtual machine scale set, and ZooKeeper VMs. This simplified network topology groups components into one subnet. Follow your organization's guidelines for separation of duties and network design.

Outbound internet access consideration
NiFi in Azure doesn't need access to the public internet to run. If the data flow doesn't need internet access to retrieve data, improve the cluster's security by following these steps to disable outbound internet access:
Create an additional network security group rule in the virtual network.
Use these settings:
- Source:
Any - Destination:
Internet - Action:
Deny
- Source:
With this rule in place, you can still access some Azure services from the data flow if you configure a private endpoint in the virtual network. Use Azure Private Link for this purpose. This service provides a way for your traffic to travel on the Microsoft backbone network while not requiring any other external network access. NiFi currently supports Private Link for the Blob Storage and Data Lake Storage processors. If a Network Time Protocol (NTP) server isn't available in your private network, allow outbound access to NTP. For detailed information, see Time sync for Linux VMs in Azure.
Data protection
It's possible to operate NiFi unsecured, without wire encryption, identity and access management (IAM), or data encryption. But it's best to secure production and public-cloud deployments in these ways:
- Encrypting communication with Transport Layer Security (TLS)
- Using a supported authentication and authorization mechanism
- Encrypting data at rest
Azure Storage provides server-side transparent data encryption. But starting with the 1.13.2 release, NiFi doesn't configure wire encryption or IAM by default. This behavior might change in future releases.
The following sections show how to secure deployments in these ways:
- Enable wire encryption with TLS
- Configure authentication that's based on certificates or Microsoft Entra ID
- Manage encrypted storage on Azure
Disk encryption
To improve security, use Azure disk encryption. For a detailed procedure, see Encrypt OS and attached data disks in a virtual machine scale set with the Azure CLI. That document also contains instructions on providing your own encryption key. The following steps outline a basic example for NiFi that work for most deployments:
To turn on disk encryption in an existing Key Vault instance, use the following the Azure CLI command:
az keyvault create --resource-group myResourceGroup --name myKeyVaultName --enabled-for-disk-encryptionTurn on encryption of the virtual machine scale set data disks with the following command:
az vmss encryption enable --resource-group myResourceGroup --name myScaleSet --disk-encryption-keyvault myKeyVaultID --volume-type DATAYou can optionally use a key encryption key (KEK). Use the following the Azure CLI command to encrypt with a KEK:
az vmss encryption enable --resource-group myResourceGroup --name  myScaleSet  \
--disk-encryption-keyvault myKeyVaultID \
--key-encryption-keyvault myKeyVaultID \
--key-encryption-key https://<mykeyvaultname>.vault.azure.net/keys/myKey/<version> \
--volume-type DATA
Note
If you configured your virtual machine scale set for manual update mode, run the update-instances command. Include the version of the encryption key that you stored in Key Vault.
Encryption in transit
NiFi supports TLS 1.2 for encryption in transit. This protocol offers protection for user access to the UI. With clusters, the protocol protects communication between NiFi nodes. It can also protect communication with ZooKeeper. When you enable TLS, NiFi uses mutual TLS (mTLS) for mutual authentication for:
- Certificate-based client authentication if you configured this type of authentication.
- All intracluster communication.
To enable TLS, take the following steps:
Create a keystore and a truststore for client–server and intracluster communication and authentication.
Configure
$NIFI_HOME/conf/nifi.properties. Set the following values:- Hostnames
- Ports
- Keystore properties
- Truststore properties
- Cluster and ZooKeeper security properties, if applicable
Configure authentication in
$NIFI_HOME/conf/authorizers.xml, typically with an initial user that has certificate-based authentication or another option.Optionally configure mTLS and a proxy read policy between NiFi and any proxies, load balancers, or external endpoints.
For a complete walkthrough, see Securing NiFi with TLS in the Apache project documentation.
Note
As of version 1.13.2:
- NiFi doesn't enable TLS by default.
- There's no out-of-the-box support for anonymous and single user access for TLS-enabled NiFi instances.
To enable TLS for encryption in transit, configure a user group and policy provider for authentication and authorization in $NIFI_HOME/conf/authorizers.xml. For more information, see Identity and access control later in this article.
Certificates, keys, and keystores
To support TLS, generate certificates, store them in Java KeyStore and TrustStore, and distribute them across a NiFi cluster. There are two general options for certificates:
- Self-signed certificates
- Certificates that certified authorities (CAs) sign
With CA-signed certificates, it's best to use an intermediate CA to generate certificates for nodes in the cluster.
KeyStore and TrustStore are the key and certificate containers in the Java platform. KeyStore stores the private key and certificate of a node in the cluster. TrustStore stores one of the following types of certificates:
- All trusted certificates, for self-signed certificates in KeyStore
- A certificate from a CA, for CA-signed certificates in KeyStore
Keep the scalability of your NiFi cluster in mind when you choose a container. For instance, you might want to increase or decrease the number of nodes in a cluster in the future. Choose CA-signed certificates in KeyStore and one or more certificates from a CA in TrustStore in that case. With this option, there's no need to update the existing TrustStore in the existing nodes of the cluster. An existing TrustStore trusts and accepts certificates from these types of nodes:
- Nodes that you add to the cluster
- Nodes that replace other nodes in the cluster
NiFi configuration
To enable TLS for NiFi, use $NIFI_HOME/conf/nifi.properties to configure the properties in this table. Ensure that the following properties include the hostname that you use to access NiFi:
nifi.web.https.hostornifi.web.proxy.host- The host certificate's designated name or subject alternative names
Otherwise, a hostname verification failure or an HTTP HOST header verification failure might result, denying you access.
| Property name | Description | Example values |
|---|---|---|
nifi.web.https.host |
Hostname or IP address to use for the UI and REST API. This value should be internally resolvable. We recommend not using a publicly accessible name. | nifi.internal.cloudapp.net |
nifi.web.https.port |
HTTPS port to use for the UI and REST API. | 9443 (default) |
nifi.web.proxy.host |
Comma-separated list of alternate hostnames that clients use to access the UI and REST API. This list typically includes any hostname that's specified as a subject alternative name (SAN) in the server certificate. The list can also include any hostname and port that a load balancer, proxy, or Kubernetes ingress controller uses. | 40.67.218.235, 40.67.218.235:443, nifi.westus2.cloudapp.com, nifi.westus2.cloudapp.com:443 |
nifi.security.keystore |
The path to a JKS or PKCS12 keystore that contains the certificate's private key. | ./conf/keystore.jks |
nifi.security.keystoreType |
The keystore type. | JKS or PKCS12 |
nifi.security.keystorePasswd |
The keystore password. | O8SitLBYpCz7g/RpsqH+zM |
nifi.security.keyPasswd |
(Optional) The password for the private key. | |
nifi.security.truststore |
The path to a JKS or PKCS12 truststore that contains certificates or CA certificates that authenticate trusted users and cluster nodes. | ./conf/truststore.jks |
nifi.security.truststoreType |
The truststore type. | JKS or PKCS12 |
nifi.security.truststorePasswd |
The truststore password. | RJlpGe6/TuN5fG+VnaEPi8 |
nifi.cluster.protocol.is.secure |
The status of TLS for intracluster communication. If nifi.cluster.is.node is true, set this value to true to enable cluster TLS. |
true |
nifi.remote.input.secure |
The status of TLS for site-to-site communication. | true |
The following example shows how these properties appear in $NIFI_HOME/conf/nifi.properties. Note that the nifi.web.http.host and nifi.web.http.port values are blank.
nifi.remote.input.secure=true
nifi.web.http.host=
nifi.web.http.port=
nifi.web.https.host=nifi.internal.cloudapp.net
nifi.web.https.port=9443
nifi.web.proxy.host=40.67.218.235, 40.67.218.235:443, nifi.westus2.cloudapp.com, nifi.westus2.cloudapp.com:443
nifi.security.keystore=./conf/keystore.jks
nifi.security.keystoreType=JKS
nifi.security.keystorePasswd=O8SitLBYpCz7g/RpsqH+zM
nifi.security.keyPasswd=
nifi.security.truststore=./conf/truststore.jks
nifi.security.truststoreType=JKS
nifi.security.truststorePasswd=RJlpGe6/TuN5fG+VnaEPi8
nifi.cluster.protocol.is.secure=true
ZooKeeper configuration
For instructions on enabling TLS in Apache ZooKeeper for quorum communications and client access, see the ZooKeeper Administrator's Guide. Only versions 3.5.5 or later support this functionality.
NiFi uses ZooKeeper for its zero-leader clustering and cluster coordination. Starting with version 1.13.0, NiFi supports secure client access to TLS-enabled instances of ZooKeeper. ZooKeeper stores cluster membership and cluster-scoped processor state in plain text. So it's important to use secure client access to ZooKeeper to authenticate ZooKeeper client requests. Also encrypt sensitive values in transit.
To enable TLS for NiFi client access to ZooKeeper, set the following properties in $NIFI_HOME/conf/nifi.properties. If you set nifi.zookeeper.client.secure true without configuring nifi.zookeeper.security properties, NiFi falls back to the keystore and truststore that you specify in nifi.securityproperties.
| Property name | Description | Example values |
|---|---|---|
nifi.zookeeper.client.secure |
The status of client TLS when connecting to ZooKeeper. | true |
nifi.zookeeper.security.keystore |
The path to a JKS, PKCS12, or PEM keystore that contains the private key of the certificate that's presented to ZooKeeper for authentication. | ./conf/zookeeper.keystore.jks |
nifi.zookeeper.security.keystoreType |
The keystore type. | JKS, PKCS12, PEM, or autodetect by extension |
nifi.zookeeper.security.keystorePasswd |
The keystore password. | caB6ECKi03R/co+N+64lrz |
nifi.zookeeper.security.keyPasswd |
(Optional) The password for the private key. | |
nifi.zookeeper.security.truststore |
The path to a JKS, PKCS12, or PEM truststore that contains certificates or CA certificates that are used to authenticate ZooKeeper. | ./conf/zookeeper.truststore.jks |
nifi.zookeeper.security.truststoreType |
The truststore type. | JKS, PKCS12, PEM, or autodetect by extension |
nifi.zookeeper.security.truststorePasswd |
The truststore password. | qBdnLhsp+mKvV7wab/L4sv |
nifi.zookeeper.connect.string |
The connection string to the ZooKeeper host or quorum. This string is a comma-separated list of host:port values. Typically the secureClientPort value isn't the same as the clientPort value. See your ZooKeeper configuration for the correct value. |
zookeeper1.internal.cloudapp.net:2281, zookeeper2.internal.cloudapp.net:2281, zookeeper3.internal.cloudapp.net:2281 |
The following example shows how these properties appear in $NIFI_HOME/conf/nifi.properties:
nifi.zookeeper.client.secure=true
nifi.zookeeper.security.keystore=./conf/keystore.jks
nifi.zookeeper.security.keystoreType=JKS
nifi.zookeeper.security.keystorePasswd=caB6ECKi03R/co+N+64lrz
nifi.zookeeper.security.keyPasswd=
nifi.zookeeper.security.truststore=./conf/truststore.jks
nifi.zookeeper.security.truststoreType=JKS
nifi.zookeeper.security.truststorePasswd=qBdnLhsp+mKvV7wab/L4sv
nifi.zookeeper.connect.string=zookeeper1.internal.cloudapp.net:2281,zookeeper2.internal.cloudapp.net:2281,zookeeper3.internal.cloudapp.net:2281
For more information about securing ZooKeeper with TLS, see the Apache NiFi Administration Guide.
Identity and access control
In NiFi, identity and access control is achieved through user authentication and authorization. For user authentication, NiFi has multiple options to choose from: Single User, LDAP, Kerberos, Security Assertion Markup Language (SAML), and OpenID Connect (OIDC). If you don't configure an option, NiFi uses client certificates to authenticate users over HTTPS.
If you're considering multifactor authentication, we recommend the combination of Microsoft Entra ID and OIDC. Microsoft Entra ID supports cloud-native single sign-on (SSO) with OIDC. With this combination, users can take advantage of many enterprise security features:
- Logging and alerting on suspicious activities from user accounts
- Monitoring attempts to access deactivated credentials
- Alerting on unusual account sign-in behavior
For authorization, NiFi provides enforcement that's based on user, group, and access policies. NiFi provides this enforcement through UserGroupProviders and AccessPolicyProviders. By default, providers include File, LDAP, Shell, and Azure Graph–based UserGroupProviders. With AzureGraphUserGroupProvider, you can source user groups from Microsoft Entra ID. You can then assign policies to these groups. For configuration instructions, see the Apache NiFi Administration Guide.
AccessPolicyProviders that are based on files and Apache Ranger are currently available for managing and storing user and group policies. For detailed information, see the Apache NiFi documentation and Apache Ranger documentation.
Application gateway
An application gateway provides a managed layer-7 load balancer for the NiFi interface. Configure the application gateway to use the virtual machine scale set of the NiFi nodes as its back-end pool.
For most NiFi installations, we recommend the following Application Gateway configuration:
- Tier: Standard
- SKU size: medium
- Instance count: two or more
Use a health probe to monitor the health of the web server on each node. Remove unhealthy nodes from the load balancer rotation. This approach makes it easier to view the user interface when the overall cluster is unhealthy. The browser only directs you to nodes that are currently healthy and responding to requests.
There are two key health probes to consider. Together they provide a regular heartbeat on the overall health of every node in the cluster. Configure the first health probe to point to the path /NiFi. This probe determines the health of the NiFi user interface on each node. Configure a second health probe for the path /nifi-api/controller/cluster. This probe indicates whether each node is currently healthy and joined to the overall cluster.
You have two options for configuring the application gateway front-end IP address:
- With a public IP address
- With a private subnet IP address
Only include a public IP address if users need to access the UI over the public internet. If public internet access for users isn't required, access the load balancer front end from a jumpbox in the virtual network or through peering to your private network. If you configure the application gateway with a public IP address, we recommend enabling client certificate authentication for NiFi and enabling TLS for the NiFi UI. You can also use a network security group in the delegated application gateway subnet to limit source IP addresses.
Diagnostics and health monitoring
Within the diagnostics settings of Application Gateway, there's a configuration option for sending metrics and access logs. By using this option, you can send this information from the load balancer to various places:
- A storage account
- Event Hubs
- A Log Analytics workspace
Turning on this setting is useful for debugging load-balancing issues and for gaining insight into the health of cluster nodes.
The following Log Analytics query shows cluster node health over time from an Application Gateway perspective. You can use a similar query to generate alerts or automated repair actions for unhealthy nodes.
AzureDiagnostics
| summarize UnHealthyNodes = max(unHealthyHostCount_d), HealthyNodes = max(healthyHostCount_d) by bin(TimeGenerated, 5m)
| render timechart
The following chart of the query results shows a time view of the health of the cluster:
Availability
When you implement this solution, keep in mind the following points about availability:
Load balancer
Use a load balancer for the UI to increase UI availability during node downtime.
Separate VMs
To increase availability, deploy the ZooKeeper cluster on separate VMs from the VMs in the NiFi cluster. For more information on configuring ZooKeeper, see State Management in the Apache NiFi System Administrator's Guide.
Availability zones
Deploy both the NiFi virtual machine scale set and the ZooKeeper cluster in a cross-zone configuration to maximize availability. When communication between the nodes in the cluster crosses availability zones, it introduces a small amount of latency. But this latency typically has a minimal overall effect on the throughput of the cluster.
Virtual machine scale sets
We recommend deploying the NiFi nodes into a single virtual machine scale set that spans availability zones where available. For detailed information on using scale sets in this way, see Create a virtual machine scale set that uses Availability Zones.
Monitoring
To monitor the health and performance of a NiFi cluster, use reporting tasks.
Reporting task–based monitoring
For monitoring, you can use a reporting task that you configure and run in NiFi. As Diagnostics and health monitoring discusses, Log Analytics provides a reporting task in the NiFi Azure bundle. You can use that reporting task to integrate the monitoring with Log Analytics and existing monitoring or logging systems.
Log Analytics queries
Sample queries in the following sections can help you get started. For an overview of how to query Log Analytics data, see Azure Monitor log queries.
Log queries in Monitor and Log Analytics use a version of the Kusto Query Language. But differences exist between log queries and Kusto queries. For more information, see Kusto query overview.
For more structured learning, see these tutorials:
Log Analytics reporting task
By default, NiFi sends metrics data to the nifimetrics table. But you can configure a different destination in the reporting task properties. The reporting task captures the following NiFi metrics:
| Metric type | Metric name |
|---|---|
| NiFi Metrics | FlowFilesReceived |
| NiFi Metrics | FlowFilesSent |
| NiFi Metrics | FlowFilesQueued |
| NiFi Metrics | BytesReceived |
| NiFi Metrics | BytesWritten |
| NiFi Metrics | BytesRead |
| NiFi Metrics | BytesSent |
| NiFi Metrics | BytesQueued |
| Port status metrics | InputCount |
| Port status metrics | InputBytes |
| Connection status metrics | QueuedCount |
| Connection status metrics | QueuedBytes |
| Port status metrics | OutputCount |
| Port status metrics | OutputBytes |
| Java virtual machine (JVM) Metrics | jvm.uptime |
| JVM Metrics | jvm.heap_used |
| JVM Metrics | jvm.heap_usage |
| JVM Metrics | jvm.non_heap_usage |
| JVM Metrics | jvm.thread_states.runnable |
| JVM Metrics | jvm.thread_states.blocked |
| JVM Metrics | jvm.thread_states.timed_waiting |
| JVM Metrics | jvm.thread_states.terminated |
| JVM Metrics | jvm.thread_count |
| JVM Metrics | jvm.daemon_thread_count |
| JVM Metrics | jvm.file_descriptor_usage |
| JVM Metrics | jvm.gc.runs jvm.gc.runs.g1_old_generation jvm.gc.runs.g1_young_generation |
| JVM Metrics | jvm.gc.time jvm.gc.time.g1_young_generation jvm.gc.time.g1_old_generation |
| JVM Metrics | jvm.buff_pool_direct_capacity |
| JVM Metrics | jvm.buff_pool_direct_count |
| JVM Metrics | jvm.buff_pool_direct_mem_used |
| JVM Metrics | jvm.buff_pool_mapped_capacity |
| JVM Metrics | jvm.buff_pool_mapped_count |
| JVM Metrics | jvm.buff_pool_mapped_mem_used |
| JVM Metrics | jvm.mem_pool_code_cache |
| JVM Metrics | jvm.mem_pool_compressed_class_space |
| JVM Metrics | jvm.mem_pool_g1_eden_space |
| JVM Metrics | jvm.mem_pool_g1_old_gen |
| JVM Metrics | jvm.mem_pool_g1_survivor_space |
| JVM Metrics | jvm.mem_pool_metaspace |
| JVM Metrics | jvm.thread_states.new |
| JVM Metrics | jvm.thread_states.waiting |
| Processor Level metrics | BytesRead |
| Processor Level metrics | BytesWritten |
| Processor Level metrics | FlowFilesReceived |
| Processor Level metrics | FlowFilesSent |
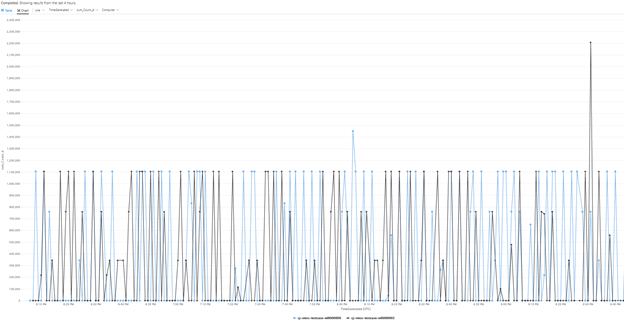
Here's a sample query for the BytesQueued metric of a cluster:
let table_name = nifimetrics_CL;
let metric = "BytesQueued";
table_name
| where Name_s == metric
| where Computer contains {ComputerName}
| project TimeGenerated, Computer, ProcessGroupName_s,  Count_d, Name_s
| summarize sum(Count_d) by bin(TimeGenerated, 1m),  Computer, Name_s
| render timechart
That query produces a chart like the one in this screenshot:
Note
When you run NiFi on Azure, you're not limited to the Log Analytics reporting task. NiFi supports reporting tasks for many third-party monitoring technologies. For a list of supported reporting tasks, see the Reporting Tasks section of the Apache NiFi Documentation index.
NiFi infrastructure monitoring
Besides the reporting task, install the Log Analytics VM extension on the NiFi and ZooKeeper nodes. This extension gathers logs, additional VM-level metrics, and metrics from ZooKeeper.
Custom logs for the NiFi app, user, bootstrap, and ZooKeeper
To capture more logs, follow these steps:
In the Azure portal, select Log Analytics workspaces, and then select your workspace.
Under Settings, select Custom logs.
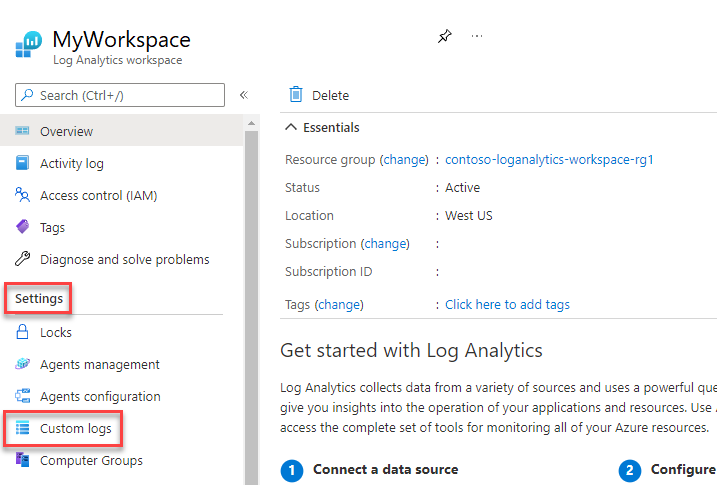
Select Add custom log.
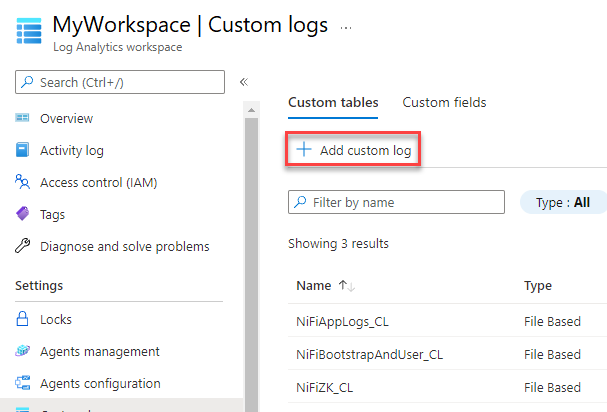
Set up a custom log with these values:
- Name:
NiFiAppLogs - Path type:
Linux - Path name:
/opt/nifi/logs/nifi-app.log
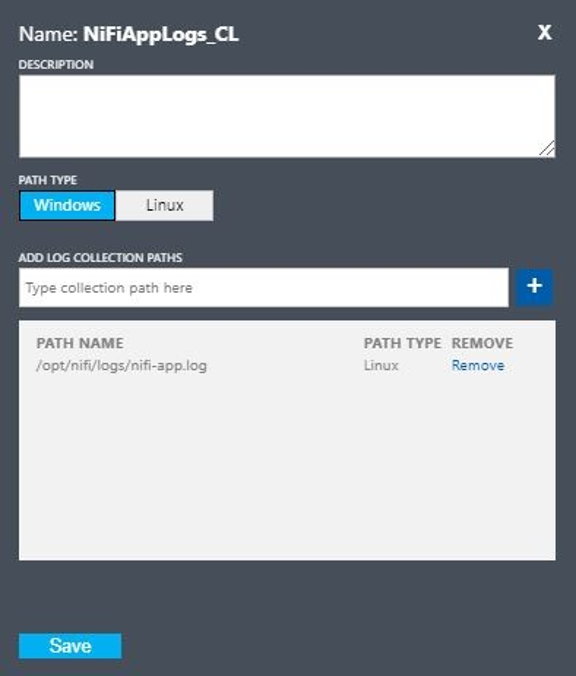
- Name:
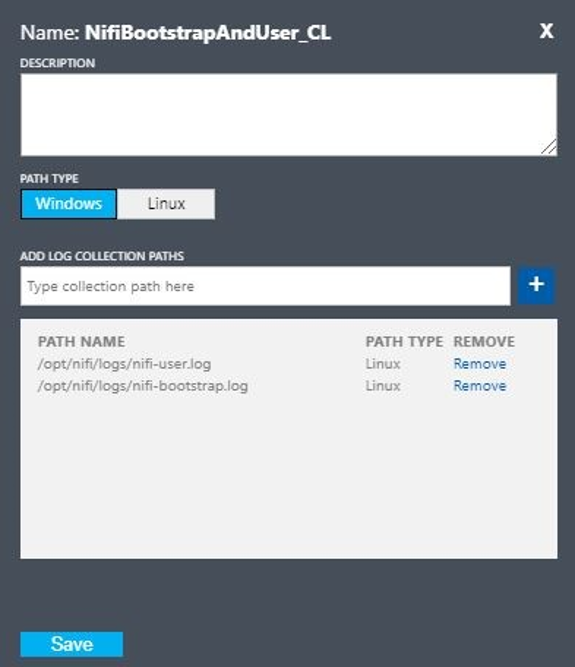
Set up a custom log with these values:
- Name:
NiFiBootstrapAndUser - First path type:
Linux - First path name:
/opt/nifi/logs/nifi-user.log - Second path type:
Linux - Second path name:
/opt/nifi/logs/nifi-bootstrap.log
- Name:
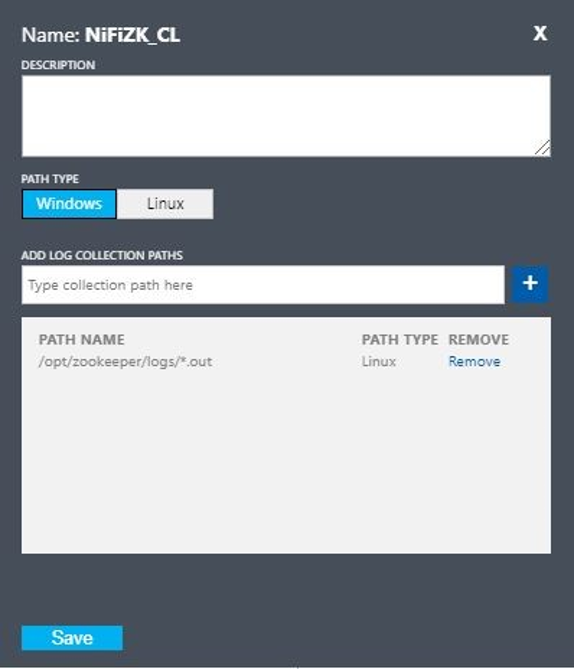
Set up a custom log with these values:
- Name:
NiFiZK - Path type:
Linux - Path name:
/opt/zookeeper/logs/*.out
- Name:
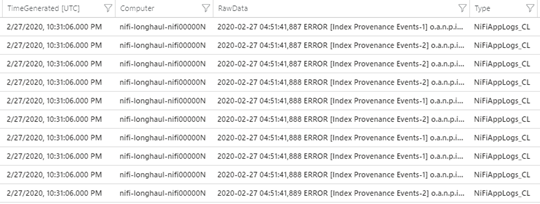
Here's a sample query of the NiFiAppLogs custom table that the first example created:
NiFiAppLogs_CL
| where TimeGenerated > ago(24h)
| where Computer contains {ComputerName} and RawData contains "error"
| limit 10
That query produces results similar to the following results:
Infrastructure log configuration
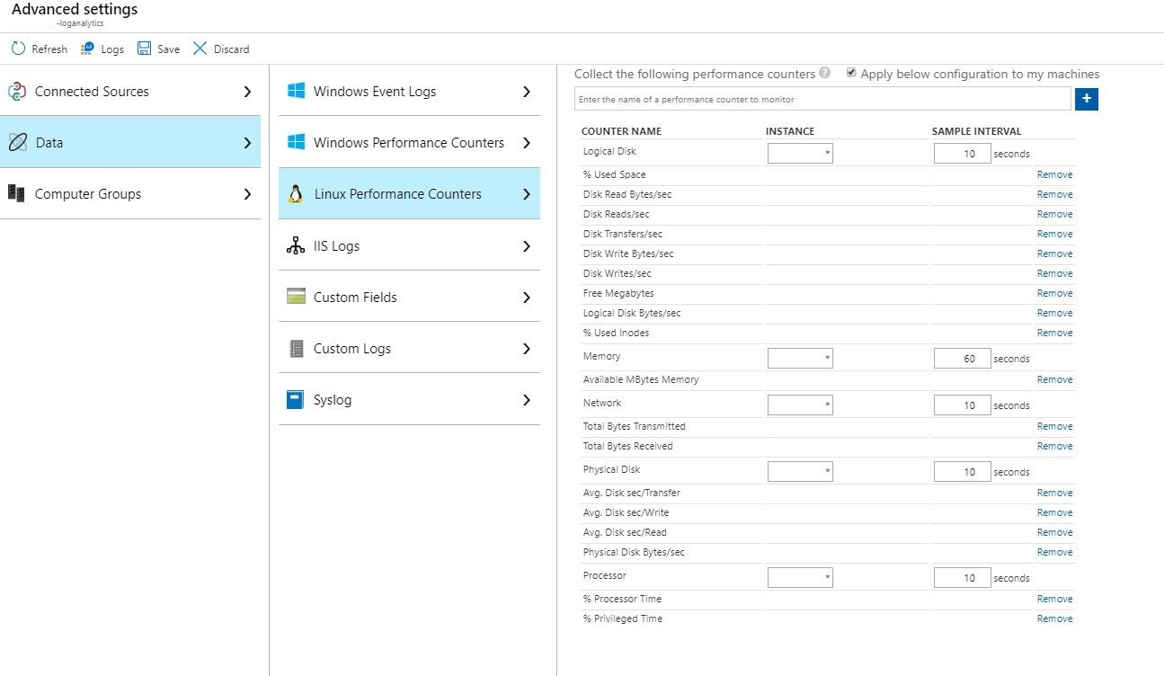
You can use Monitor to monitor and manage VMs or physical computers. These resources can be in your local datacenter or other cloud environment. To set up this monitoring, deploy the Log Analytics agent. Configure the agent to report to a Log Analytics workspace. For more information, see Log Analytics agent overview.
The following screenshot shows a sample agent configuration for NiFi VMs. The Perf table stores the collected data.
Here's a sample query for the NiFi app Perf logs:
let cluster_name = {ComputerName};
// The hourly average of CPU usage across all computers.
Perf
| where Computer contains {ComputerName}
| where CounterName == "% Processor Time" and InstanceName == "_Total"
| where ObjectName == "Processor"
| summarize CPU_Time_Avg = avg(CounterValue) by bin(TimeGenerated, 30m), Computer
That query produces a report like the one in this screenshot:
Alerts
Use Monitor to create alerts on the health and performance of the NiFi cluster. Example alerts include:
- The total queue count has exceeded a threshold.
- The
BytesWrittenvalue is under an expected threshold. - The
FlowFilesReceivedvalue is under a threshold. - The cluster is unhealthy.
For more information on setting up alerts in Monitor, see Overview of alerts in Microsoft Azure.
Configuration parameters
The following sections discuss recommended, non-default configurations for NiFi and its dependencies, including ZooKeeper and Java. These settings are suited for cluster sizes that are possible in the cloud. Set the properties in the following configuration files:
$NIFI_HOME/conf/nifi.properties$NIFI_HOME/conf/bootstrap.conf$ZOOKEEPER_HOME/conf/zoo.cfg$ZOOKEEPER_HOME/bin/zkEnv.sh
For detailed information about available configuration properties and files, see the Apache NiFi System Administrator's Guide and ZooKeeper Administrator's Guide.
NiFi
For an Azure deployment, consider adjusting properties in $NIFI_HOME/conf/nifi.properties. The following table lists the most important properties. For more recommendations and insights, see the Apache NiFi mailing lists.
| Parameter | Description | Default | Recommendation |
|---|---|---|---|
nifi.cluster.node.connection.timeout |
How long to wait when opening a connection to other cluster nodes. | 5 seconds | 60 seconds |
nifi.cluster.node.read.timeout |
How long to wait for a response when making a request to other cluster nodes. | 5 seconds | 60 seconds |
nifi.cluster.protocol.heartbeat.interval |
How often to send heartbeats back to the cluster coordinator. | 5 seconds | 60 seconds |
nifi.cluster.node.max.concurrent.requests |
What level of parallelism to use when replicating HTTP calls like REST API calls to other cluster nodes. | 100 | 500 |
nifi.cluster.node.protocol.threads |
Initial thread pool size for inter-cluster/replicated communications. | 10 | 50 |
nifi.cluster.node.protocol.max.threads |
Maximum number of threads to use for inter-cluster/replicated communications. | 50 | 75 |
nifi.cluster.flow.election.max.candidates |
Number of nodes to use when deciding what the current flow is. This value short-circuits the vote at the specified number. | empty | 75 |
nifi.cluster.flow.election.max.wait.time |
How long to wait on nodes before deciding what the current flow is. | 5 minutes | 5 minutes |
Cluster behavior
When you configure clusters, keep in mind the following points.
Timeout
To ensure the overall health of a cluster and its nodes, it can be beneficial to increase timeouts. This practice helps guarantee that failures don't result from transient network problems or high loads.
In a distributed system, the performance of individual systems varies. This variation includes network communications and latency, which usually affects inter-node, inter-cluster communication. The network infrastructure or the system itself can cause this variation. As a result, the probability of variation is very likely in large clusters of systems. In Java applications under load, pauses in garbage collection (GC) in the Java virtual machine (JVM) can also affect request response times.
Use properties in the following sections to configure timeouts to suit your system's needs:
nifi.cluster.node.connection.timeout and nifi.cluster.node.read.timeout
The nifi.cluster.node.connection.timeout property specifies how long to wait when opening a connection. The nifi.cluster.node.read.timeout property specifies how long to wait when receiving data between requests. The default value for each property is five seconds. These properties apply to node-to-node requests. Increasing these values helps alleviate several related problems:
- Being disconnected by the cluster coordinator because of heartbeat interruptions
- Failure to get the flow from the coordinator when joining the cluster
- Establishing site-to-site (S2S) and load-balancing communications
Unless your cluster has a very small scale set, such as three nodes or fewer, use values that are greater than the defaults.
nifi.cluster.protocol.heartbeat.interval
As part of the NiFi clustering strategy, each node emits a heartbeat to communicate its healthy status. By default, nodes send heartbeats every five seconds. If the cluster coordinator detects that eight heartbeats in a row from a node have failed, it disconnects the node. Increase the interval that's set in the nifi.cluster.protocol.heartbeat.interval property to help accommodate slow heartbeats and prevent the cluster from disconnecting nodes unnecessarily.
Concurrency
Use properties in the following sections to configure concurrency settings:
nifi.cluster.node.protocol.threads and nifi.cluster.node.protocol.max.threads
The nifi.cluster.node.protocol.max.threads property specifies the maximum number of threads to use for all-cluster communications such as S2S load balancing and UI aggregation. The default for this property is 50 threads. For large clusters, increase this value to account for the greater number of requests that these operations require.
The nifi.cluster.node.protocol.threads property determines the initial thread pool size. The default value is 10 threads. This value is a minimum. It grows as needed up to the maximum set in nifi.cluster.node.protocol.max.threads. Increase the nifi.cluster.node.protocol.threads value for clusters that use a large scale set at launch.
nifi.cluster.node.max.concurrent.requests
Many HTTP requests like REST API calls and UI calls need to be replicated to other nodes in the cluster. As the size of the cluster grows, an increasing number of requests get replicated. The nifi.cluster.node.max.concurrent.requests property limits the number of outstanding requests. Its value should exceed the expected cluster size. The default value is 100 concurrent requests. Unless you're running a small cluster of three or fewer nodes, prevent failed requests by increasing this value.
Flow election
Use properties in the following sections to configure flow election settings:
nifi.cluster.flow.election.max.candidates
NiFi uses zero-leader clustering, which means there isn't one specific authoritative node. As a result, nodes vote on which flow definition counts as the correct one. They also vote to decide which nodes join the cluster.
By default, the nifi.cluster.flow.election.max.candidates property is the maximum wait time that the nifi.cluster.flow.election.max.wait.time property specifies. When this value is too high, startup can be slow. The default value for nifi.cluster.flow.election.max.wait.time is five minutes. Set the maximum number of candidates to a non-empty value like 1 or greater to ensure that the wait is no longer than needed. If you set this property, assign it a value that corresponds to the cluster size or some majority fraction of the expected cluster size. For small, static clusters of 10 or fewer nodes, set this value to the number of nodes in the cluster.
nifi.cluster.flow.election.max.wait.time
In an elastic cloud environment, the time to provision hosts affects the application startup time. The nifi.cluster.flow.election.max.wait.time property determines how long NiFi waits before deciding on a flow. Make this value commensurate with the overall launch time of the cluster at its starting size. In initial testing, five minutes are more than adequate in all Azure regions with the recommended instance types. But you can increase this value if the time to provision regularly exceeds the default.
Java
We recommend using an LTS release of Java. Of these releases, Java 11 is slightly preferable to Java 8 because Java 11 supports a faster garbage collection implementation. However, it's possible to have a high-performance NiFi deployment by using either release.
The following sections discuss common JVM configurations to use when running NiFi. Set JVM parameters in the bootstrap configuration file at $NIFI_HOME/conf/bootstrap.conf.
Garbage collector
If you're running Java 11, we recommend using the G1 garbage collector (G1GC) in most situations. G1GC has improved performance over ParallelGC because G1GC reduces the length of GC pauses. G1GC is the default in Java 11, but you can configure it explicitly by setting the following value in bootstrap.conf:
java.arg.13=-XX:+UseG1GC
If you're running Java 8, don't use G1GC. Use ParallelGC instead. There are deficiencies in the Java 8 implementation of G1GC that prevent you from using it with the recommended repository implementations. ParallelGC is slower than G1GC. But with ParallelGC, you can still have a high-performance NiFi deployment with Java 8.
Heap
A set of properties in the bootstrap.conf file determines the configuration of the NiFi JVM heap. For a standard flow, configure a 32-GB heap by using these settings:
java.arg.3=-Xmx32g
java.arg.2=-Xms32g
To choose the optimal heap size to apply to the JVM process, consider two factors:
- The characteristics of the data flow
- The way that NiFi uses memory in its processing
For detailed documentation, see Apache NiFi in Depth.
Make the heap only as large as needed to fulfill the processing requirements. This approach minimizes the length of GC pauses. For general considerations for Java garbage collection, see the garbage collection tuning guide for your version of Java.
When adjusting JVM memory settings, consider these important factors:
The number of FlowFiles, or NiFi data records, that are active in a given period. This number includes back-pressured or queued FlowFiles.
The number of attributes that are defined in FlowFiles.
The amount of memory that a processor requires to process a particular piece of content.
The way that a processor processes data:
- Streaming data
- Using record-oriented processors
- Holding all data in memory at once
These details are important. During processing, NiFi holds references and attributes for each FlowFile in memory. At peak performance, the amount of memory that the system uses is proportional to the number of live FlowFiles and all the attributes that they contain. This number includes queued FlowFiles. NiFi can swap to disk. But avoid this option because it hurts performance.
Also keep in mind basic object memory usage. Specifically, make your heap large enough to hold objects in memory. Consider these tips for configuring the memory settings:
- Run your flow with representative data and minimal back pressure by starting with the setting
-Xmx4Gand then increasing memory conservatively as needed. - Run your flow with representative data and peak back pressure by starting with the setting
-Xmx4Gand then increasing cluster size conservatively as needed. - Profile the application while the flow is running by using tools such as VisualVM and YourKit.
- If conservative increases in heap don't improve performance significantly, consider redesigning flows, processors, and other aspects of your system.
Additional JVM parameters
The following table lists additional JVM options. It also provides the values that worked best in initial testing. Tests observed GC activity and memory usage and used careful profiling.
| Parameter | Description | JVM default | Recommendation |
|---|---|---|---|
InitiatingHeapOccupancyPercent |
The amount of heap that's in use before a marking cycle is triggered. | 45 | 35 |
ParallelGCThreads |
The number of threads that GC uses. This value is capped to limit the overall effect on the system. | 5/8 of the number of vCPUs | 8 |
ConcGCThreads |
The number of GC threads to run in parallel. This value is increased to account for capped ParallelGCThreads. | 1/4 of the ParallelGCThreads value |
4 |
G1ReservePercent |
The percentage of reserve memory to keep free. This value is increased to avoid to-space exhaustion, which helps avoid full GC. | 10 | 20 |
UseStringDeduplication |
Whether to try to identify and de-duplicate references to identical strings. Turning on this feature can result in memory savings. | - | present |
Configure these settings by adding the following entries to the NiFi bootstrap.conf:
java.arg.17=-XX:+UseStringDeduplication
java.arg.18=-XX:G1ReservePercent=20
java.arg.19=-XX:ParallelGCThreads=8
java.arg.20=-XX:ConcGCThreads=4
java.arg.21=-XX:InitiatingHeapOccupancyPercent=35
ZooKeeper
For improved fault tolerance, run ZooKeeper as a cluster. Take this approach even though most NiFi deployments put a relatively modest load on ZooKeeper. Turn on clustering for ZooKeeper explicitly. By default, ZooKeeper runs in single-server mode. For detailed information, see Clustered (Multi-Server) Setup in the ZooKeeper Administrator's Guide.
Except for the clustering settings, use default values for your ZooKeeper configuration.
If you have a large NiFi cluster, you might need to use a greater number of ZooKeeper servers. For smaller cluster sizes, smaller VM sizes and Standard SSD managed disks are sufficient.
Contributors
This article is maintained by Microsoft. It was originally written by the following contributors.
Principal author:
- Muazma Zahid | Principal PM Manager
To see non-public LinkedIn profiles, sign in to LinkedIn.
Next steps
The material and recommendations in this document came from several sources:
- Experimentation
- Azure best practices
- NiFi community knowledge, best practices, and documentation
For more information, see the following resources:
- Apache NiFi System Administrator's Guide
- Apache NiFi mailing lists
- Cloudera best practices for setting up a high-performance NiFi installation
- Azure premium storage: design for high performance
- Troubleshoot Azure virtual machine performance on Linux or Windows


