Develop and deploy WebJobs using Visual Studio
This article explains how to use Visual Studio to deploy a console app project to a web app in Azure App Service as an Azure WebJob. For information about how to deploy WebJobs by using the Azure portal, see Run background tasks with WebJobs in Azure App Service.
You can choose to develop a WebJob that runs as either a .NET Core app or a .NET Framework app. Version 3.x of the Azure WebJobs SDK lets you develop WebJobs that run as either .NET Core apps or .NET Framework apps, while version 2.x supports only the .NET Framework. The way that you deploy a WebJobs project is different for .NET Core projects than for .NET Framework projects.
You can publish multiple WebJobs to a single web app, provided that each WebJob in a web app has a unique name.
WebJobs as .NET Core console apps
With version 3.x of the Azure WebJobs SDK, you can create and publish WebJobs as .NET Core console apps. For step-by-step instructions to create and publish a .NET Core console app to Azure as a WebJob, see Get started with the Azure WebJobs SDK for event-driven background processing.
Note
.NET Core Web Apps and/or .NET Core WebJobs can't be linked with web projects. If you need to deploy your WebJob with a web app, create your WebJobs as a .NET Framework console app.
Deploy to Azure App Service
Publishing a .NET Core WebJob to Azure App Service from Visual Studio uses the same tooling as publishing an ASP.NET Core app.
In Solution Explorer, right-click the project and select Publish.
In the Publish dialog box, select Azure for Target, and then select Next.
Select Azure WebJobs for Specific target, and then select Next.
Above App Service instances select the plus (+) button to Create a new Azure WebJob.
In the App Service (Windows) dialog box, use the hosting settings in the following table.
Setting Suggested value Description Name Globally unique name Name that uniquely identifies your new function app. Subscription Choose your subscription The Azure subscription to use. Resource group myResourceGroup Name of the resource group in which to create your function app. Choose New to create a new resource group. Hosting Plan App Service plan An App Service plan specifies the location, size, and features of the web server farm that hosts your app. You can save money when hosting multiple apps by configuring the web apps to share a single App Service plan. App Service plans define the region, instance size, scale count, and SKU (Free, Shared, Basic, Standard, or Premium). Choose New to create a new App Service plan. Free and Basic tiers don't support the Always On option to keep your site running continuously. 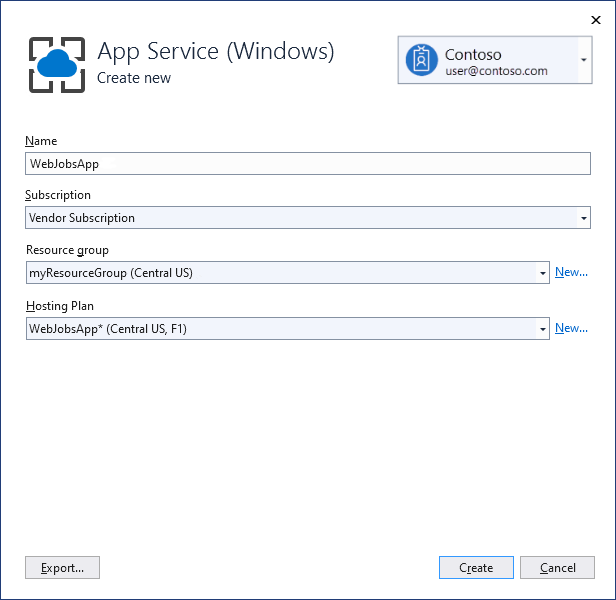
Select Create to create a WebJob and related resources in Azure with these settings and deploy your project code.
Select Finish to return to the Publish page.
WebJobs as .NET Framework console apps
If you use Visual Studio to deploy a WebJobs-enabled .NET Framework console app project, it copies runtime files to the appropriate folder in the web app (App_Data/jobs/continuous for continuous WebJobs and App_Data/jobs/triggered for scheduled or on-demand WebJobs).
Visual Studio adds the following items to a WebJobs-enabled project:
- The Microsoft.Web.WebJobs.Publish NuGet package.
- A webjob-publish-settings.json file that contains deployment and scheduler settings.

You can add these items to an existing console app project or use a template to create a new WebJobs-enabled console app project.
Deploy a project as a WebJob by itself, or link it to a web project so that it automatically deploys whenever you deploy the web project. To link projects, Visual Studio includes the name of the WebJobs-enabled project in a webjobs-list.json file in the web project.

Prerequisites
Install Visual Studio 2022 with the Azure development workload.
Enable WebJobs deployment for an existing console app project
You have two options:
Enable automatic deployment with a web project.
Configure an existing console app project so that it automatically deploys as a WebJob when you deploy a web project. Use this option when you want to run your WebJob in the same web app in which you run the related web application.
Enable deployment without a web project.
Configure an existing console app project to deploy as a WebJob by itself, without a link to a web project. Use this option when you want to run a WebJob in a web app by itself, with no web application running in the web app. You might want to do so to scale your WebJob resources independently of your web application resources.
Enable automatic WebJobs deployment with a web project
Right-click the web project in Solution Explorer, and then select Add > Existing Project as Azure WebJob.
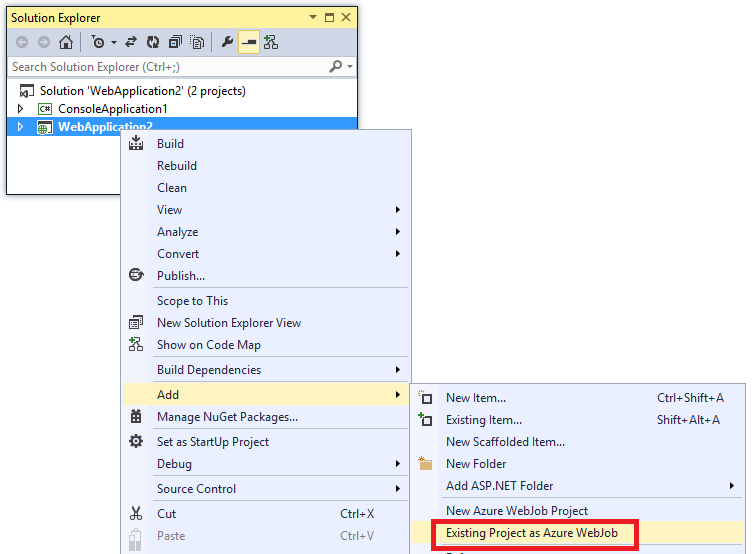
The Add Azure WebJob dialog box appears.
In the Project name drop-down list, select the console app project to add as a WebJob.
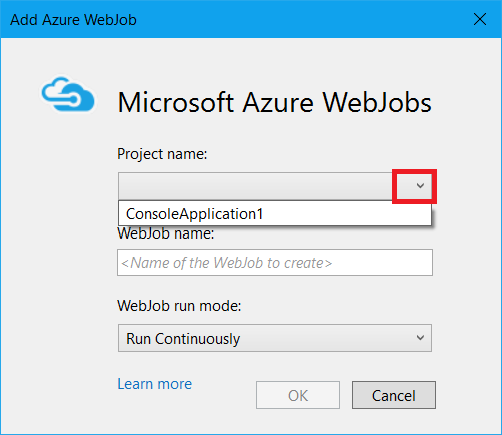
Complete the Add Azure WebJob dialog box, and then select OK.
Enable WebJobs deployment without a web project
Right-click the console app project in Solution Explorer, and then select Publish as Azure WebJob.
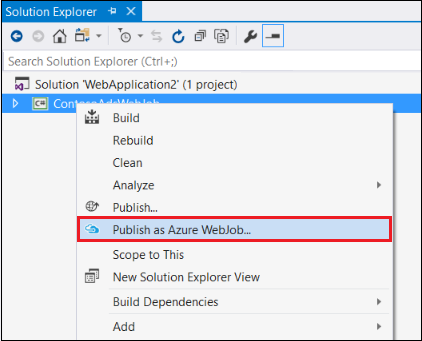
The Add Azure WebJob dialog box appears, with the project selected in the Project name box.
Complete the Add Azure WebJob dialog box, and then select OK.
The Publish Web wizard appears. If you don't want to publish immediately, close the wizard. The settings that you've entered are saved for when you do want to deploy the project.
Create a new WebJobs-enabled project
To create a new WebJobs-enabled project, use the console app project template and enable WebJobs deployment as explained in the previous section. As an alternative, you can use the WebJobs new-project template:
Use the WebJobs new-project template for an independent WebJob
Create a project and configure it to deploy by itself as a WebJob, with no link to a web project. Use this option when you want to run a WebJob in a web app by itself, with no web application running in the web app. You might want to do so to scale your WebJob resources independently of your web application resources.
Use the WebJobs new-project template for a WebJob linked to a web project
Create a project that is configured to deploy automatically as a WebJob when you deploy a web project in the same solution. Use this option when you want to run your WebJob in the same web app in which you run the related web application.
Note
The WebJobs new-project template automatically installs NuGet packages and includes code in Program.cs for the WebJobs SDK. If you don't want to use the WebJobs SDK, remove or change the host.RunAndBlock statement in Program.cs.
Use the WebJobs new-project template for an independent WebJob
Select File > New > Project. In the Create a new project dialog box, search for and select Azure WebJob (.NET Framework) for C#.
Follow the previous directions to make the console app project an independent WebJobs project.
Use the WebJobs new-project template for a WebJob linked to a web project
Right-click the web project in Solution Explorer, and then select Add > New Azure WebJob Project.
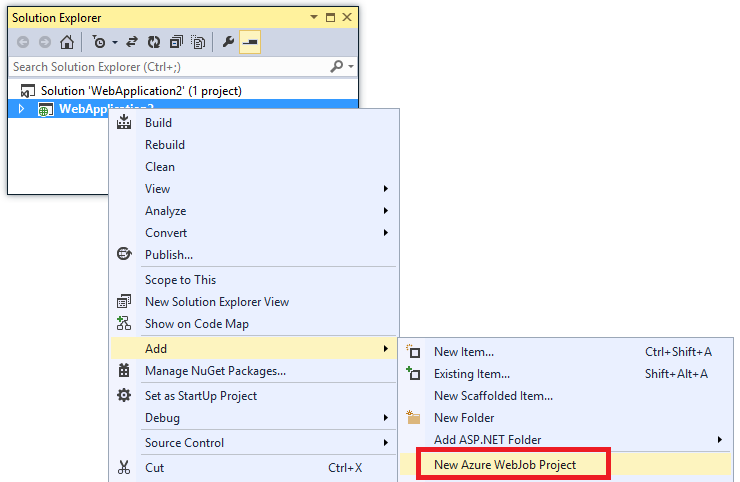
The Add Azure WebJob dialog box appears.
Complete the Add Azure WebJob dialog box, and then select OK.
webjob-publish-settings.json file
When you configure a console app for WebJobs deployment, Visual Studio installs the Microsoft.Web.WebJobs.Publish NuGet package and stores scheduling information in a webjob-publish-settings.json file in the project Properties folder of the WebJobs project. Here is an example of that file:
{
  "$schema": "http://schemastore.org/schemas/json/webjob-publish-settings.json",
  "webJobName": "WebJob1",
  "startTime": "null",
  "endTime": "null",
  "jobRecurrenceFrequency": "null",
  "interval": null,
  "runMode": "Continuous"
}
You can edit this file directly, and Visual Studio provides IntelliSense. The file schema is stored at https://schemastore.org and can be viewed there.
webjobs-list.json file
When you link a WebJobs-enabled project to a web project, Visual Studio stores the name of the WebJobs project in a webjobs-list.json file in the web project's Properties folder. The list might contain multiple WebJobs projects, as shown in the following example:
{
  "$schema": "http://schemastore.org/schemas/json/webjobs-list.json",
  "WebJobs": [
    {
      "filePath": "../ConsoleApplication1/ConsoleApplication1.csproj"
    },
    {
      "filePath": "../WebJob1/WebJob1.csproj"
    }
  ]
}
You can edit this file directly in Visual Studio, with IntelliSense. The file schema is stored at https://schemastore.org.
Deploy a WebJobs project
A WebJobs project that you've linked to a web project deploys automatically with the web project. For information about web project deployment, see How-to guides > Deploy the app in the left navigation.
To deploy a WebJobs project by itself, right-click the project in Solution Explorer and select Publish as Azure WebJob.

For an independent WebJob, the same Publish Web wizard that is used for web projects appears, but with fewer settings available to change.
Add Azure WebJob dialog box
The Add Azure WebJob dialog box lets you enter the WebJob name and the run mode setting for your WebJob.
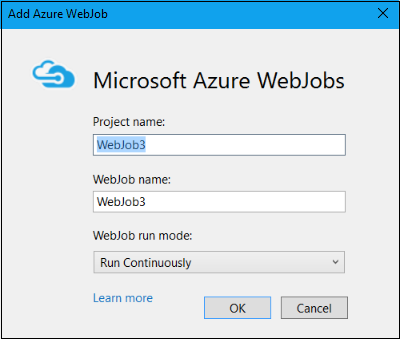
Some of the fields in this dialog box correspond to fields on the Add WebJob dialog box of the Azure portal. For more information, see Run background tasks with WebJobs in Azure App Service.
WebJob deployment information:
For information about command-line deployment, see Enabling Command-line or Continuous Delivery of Azure WebJobs.
If you deploy a WebJob, and then decide you want to change the type of WebJob and redeploy, delete the webjobs-publish-settings.json file. Doing so causes Visual Studio to redisplay the publishing options, so you can change the type of WebJob.
If you deploy a WebJob and later change the run mode from continuous to non-continuous or vice versa, Visual Studio creates a new WebJob in Azure when you redeploy. If you change other scheduling settings, but leave run mode the same or switch between Scheduled and On Demand, Visual Studio updates the existing job instead of creating a new one.
WebJob types
The type of a WebJob can be either triggered or continuous:
Triggered (default): A triggered WebJob starts based on a binding event, on a schedule, or when you trigger it manually (on demand). It runs on a single instance that the web app runs on.
Continuous: A continuous WebJob starts immediately when the WebJob is created. It runs on all web app scaled instances by default but can be configured to run as a single instance via settings.job.
Note
A web app can time out after 20 minutes of inactivity, and only requests to the actual web app can reset the timer. Viewing the app's configuration in the Azure portal or making requests to the advanced tools site (https://<app_name>.scm.azurewebsites.net) doesn't reset the timer. If you set the web app that hosts your job to run continuously, run on a schedule, or use event-driven triggers, enable the Always on setting on your web app's Azure Configuration page. The Always on setting helps to make sure that these kinds of WebJobs run reliably. This feature is available only in the Basic, Standard, and Premium pricing tiers.
Scheduling a triggered WebJob
When you publish a console app to Azure, Visual Studio sets the type of WebJob to Triggered by default, and adds a new settings.job file to the project. For triggered WebJob types, you can use this file to set an execution schedule for your WebJob.
Use the settings.job file to set an execution schedule for your WebJob. The following example runs every hour from 9 AM to 5 PM:
{
    "schedule": "0 0 9-17 * * *"
}
This file is located at the root of the WebJobs folder with your WebJob's script, such as wwwroot\app_data\jobs\triggered\{job name} or wwwroot\app_data\jobs\continuous\{job name}. When you deploy a WebJob from Visual Studio, mark your settings.job file properties in Visual Studio as Copy if newer.
If you create a WebJob from the Azure portal, the settings.job file is created for you.
CRON expressions
WebJobs uses the same CRON expressions for scheduling as the timer trigger in Azure Functions. To learn more about CRON support, see Timer trigger for Azure Functions.
Note
The default time zone used to run CRON expressions is Coordinated Universal Time (UTC). To have your CRON expression run based on another time zone, create an app setting for your function app named WEBSITE_TIME_ZONE. To learn more, see NCRONTAB time zones.
settings.job reference
The following settings are supported by WebJobs:
| Setting | Type | Description |
|---|---|---|
is_in_place |
All | Allows the WebJob to run in place without first being copied to a temporary folder. For more information, see WebJob working directory. |
is_singleton |
Continuous | Only run the WebJob on a single instance when scaled out. For more information, see Set a continuous job as singleton. |
schedule |
Triggered | Run the WebJob on a CRON-based schedule. For more information, see NCRONTAB expressions. |
stopping_wait_time |
All | Allows control of the shutdown behavior. For more information, see Graceful shutdown. |
Continuous execution
If you enable Always on in Azure, you can use Visual Studio to change the WebJob to run continuously:
If you haven't already done so, publish the project to Azure.
In Solution Explorer, right-click the project and select Publish.
In the Settings section, choose Show all settings.
In the Profile settings dialog box, choose Continuous for WebJob Type, and then choose Save.
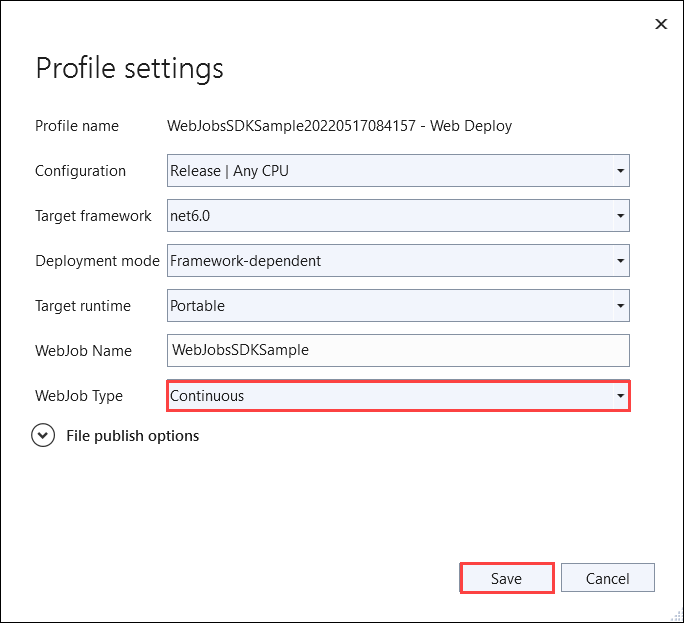
Select Publish in the Publish tab to republish the WebJob with the updated settings.