Tutorial: Flow authentication from App Service through back-end API to Microsoft Graph
Learn how to create and configure a backend App service to accept a frontend app's user credential, then exchange that credential for a downstream Azure service. This allows a user to sign in to a frontend App service, pass their credential to a backend App service, then access an Azure service with the same identity.
In this tutorial, you learn how to:
- Configure the backend authentication app to provide a token scoped for the downstream Azure service
- Use JavaScript code to exchange the signed-in user's access token for a new token for downstream service.
- Use JavaScript code to access downstream service.
Prerequisites
Complete the previous tutorial, Access Microsoft Graph from a secured JavaScript app as the user, before starting this tutorial but don't remove the resources at the end of the tutorial. This tutorial assumes you have the two App services and their corresponding authentication apps.
The previous tutorial used the Azure Cloud Shell as the shell for the Azure CLI. This tutorial continues that usage.
Architecture
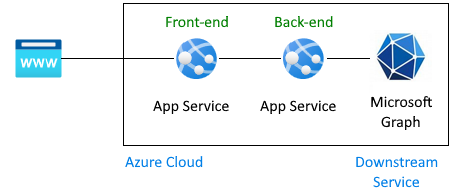
The tutorial shows how to pass the user credential provided by the frontend app to the backend app then on to an Azure service. In this tutorial, the downstream service is Microsoft Graph. The user's credential is used to get their profile from Microsoft Graph.

Authentication flow for a user to get Microsoft Graph information in this architecture:
Previous tutorial covered:
- Sign in user to a frontend App service configured to use Active Directory as the identity provider.
- The frontend App service passes user's token to backend App service.
- The backend App is secured to allow the frontend to make an API request. The user's access token has an audience for the backend API and scope of
user_impersonation. - The backend app registration already has the Microsoft Graph with the scope
User.Read. This is added by default to all app registrations. - At the end of the previous tutorial, a fake profile was returned to the frontend app because Graph wasn't connected.
This tutorial extends the architecture:
- Grant admin consent to bypass the user consent screen for the back-end app.
- Change the application code to convert the access token sent from the front-end app to an access token with the required permission for Microsoft Graph.
- Provide code to have backend app exchange token for new token with scope of downstream Azure service such as Microsoft Graph.
- Provide code to have backend app use new token to access downstream service as the current authenticate user.
- Redeploy backend app with
az webapp up. - At the end of this tutorial, a real profile is returned to the frontend app because Graph is connected.
This tutorial doesn't:
- Change the frontend app from the previous tutorial.
- Change the backend authentication app's scope permission because
User.Readis added by default to all authentication apps.
1. Configure admin consent for the backend app
In the previous tutorial, when the user signed in to the frontend app, a pop-up displayed asking for user consent.
In this tutorial, in order to read user profile from Microsoft Graph, the back-end app needs to exchange the signed-in user's access token for a new access token with the required permissions for Microsoft Graph. Because the user isn't directly connected to the backend app, they can't access the consent screen interactively. You must work around this by configuring the back-end app's app registration in Microsoft Entra ID to grant admin consent. This is a setting change typically done by an Active Directory administrator.
Open the Azure portal and search for your research for the backend App Service.
Find the Settings -> Authentication section.
Select the identity provider to go to the authentication app.
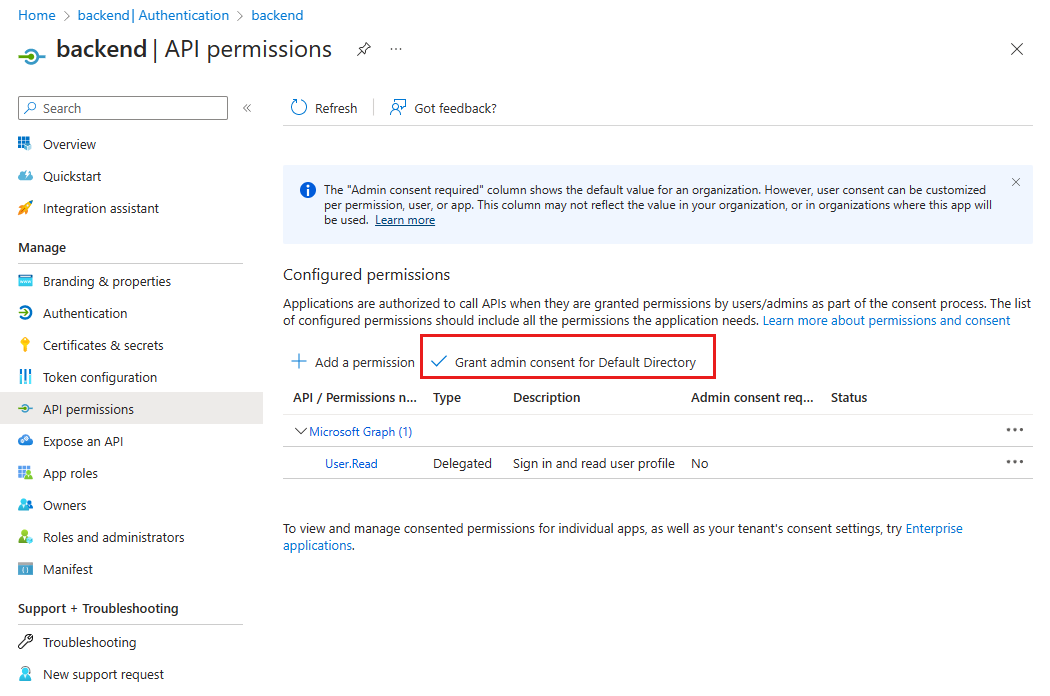
In the authentication app, select Manage -> API permissions.
Select Grant admin consent for Default Directory.

In the pop-up window, select Yes to confirm the consent.
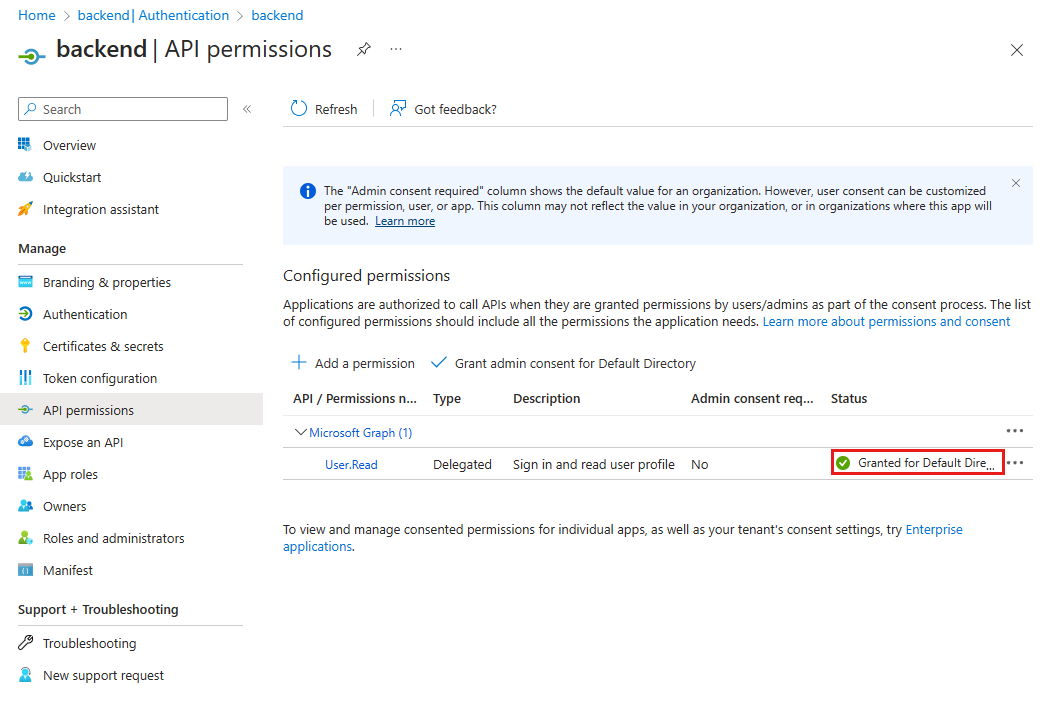
Verify the Status column says Granted for Default Directory. With this setting, the back-end app is no longer required to show a consent screen to the signed-in user and can directly request an access token. The signed-in user has access to the
User.Readscope setting because that is the default scope with which the app registration is created.
2. Install npm packages
In the previous tutorial, the backend app didn't need any npm packages for authentication because the only authentication was provided by configuring the identity provider in the Azure portal. In this tutorial, the signed-in user's access token for the back-end API must be exchanged for an access token with Microsoft Graph in its scope. This exchange is completed with two libraries because this exchange doesn't use App Service authentication anymore, but Microsoft Entra ID and MSAL.js directly.
- @azure/MSAL-node - exchange token
- @microsoft/microsoft-graph-client - connect to Microsoft Graph
Open the Azure Cloud Shell and change into the sample directory's backend app:
cd js-e2e-web-app-easy-auth-app-to-app/backendInstall the Azure MSAL npm package:
npm install @azure/msal-nodeInstall the Microsoft Graph npm package:
npm install @microsoft/microsoft-graph-client
3. Add code to exchange current token for Microsoft Graph token
The source code to complete this step is provided for you. Use the following steps to include it.
Open the
./src/server.jsfile.Uncomment the following dependency at the top of the file:
import { getGraphProfile } from './with-graph/graph';In the same file, uncomment the
graphProfilevariable:let graphProfile={};In the same file, uncomment the following
getGraphProfilelines in theget-profileroute to get the profile from Microsoft Graph:// where did the profile come from profileFromGraph=true; // get the profile from Microsoft Graph graphProfile = await getGraphProfile(accessToken); // log the profile for debugging console.log(`profile: ${JSON.stringify(graphProfile)}`);Save the changes: Ctrl + s.
Redeploy the backend app:
az webapp up --resource-group myAuthResourceGroup --name <back-end-app-name>
4. Inspect backend code to exchange backend API token for the Microsoft Graph token
In order to change the backend API audience token for a Microsoft Graph token, the backend app needs to find the Tenant ID and use that as part of the MSAL.js configuration object. Because the backend app with configured with Microsoft as the identity provider, the Tenant ID and several other required values are already in the App service app settings.
The following code is already provided for you in the sample app. You need to understand why it's there and how it works so that you can apply this work to other apps you build that need this same functionality.
Inspect code for getting the Tenant ID
Open the
./backend/src/with-graph/auth.jsfile.Review the
getTenantId()function.export function getTenantId() { const openIdIssuer = process.env.WEBSITE_AUTH_OPENID_ISSUER; const backendAppTenantId = openIdIssuer.replace(/https:\/\/sts\.windows\.net\/(.{1,36})\/v2\.0/gm, '$1'); return backendAppTenantId; }This function gets the current tenant ID from the
WEBSITE_AUTH_OPENID_ISSUERenvironment variable. The ID is parsed out of the variable with a regular expression.
Inspect code to get Graph token using MSAL.js
Still in the
./backend/src/with-graph/auth.jsfile, review thegetGraphToken()function.Build the MSAL.js configuration object, use the MSAL configuration to create the clientCredentialAuthority. Configure the on-behalf-off request. Then use the acquireTokenOnBehalfOf to exchange the backend API access token for a Graph access token.
// ./backend/src/auth.js
// Exchange current bearerToken for Graph API token
// Env vars were set by App Service
export async function getGraphToken(backEndAccessToken) {

    const config = {
        // MSAL configuration
        auth: {
            // the backend's authentication CLIENT ID
            clientId: process.env.WEBSITE_AUTH_CLIENT_ID,
            // the backend's authentication CLIENT SECRET
            clientSecret: process.env.MICROSOFT_PROVIDER_AUTHENTICATION_SECRET,
            // OAuth 2.0 authorization endpoint (v2)
            // should be: https://login.microsoftonline.com/BACKEND-TENANT-ID
            authority: `https://login.microsoftonline.com/${getTenantId()}`
        },
        // used for debugging
        system: {
            loggerOptions: {
                loggerCallback(loglevel, message, containsPii) {
                    console.log(message);
                },
                piiLoggingEnabled: true,
                logLevel: MSAL.LogLevel.Verbose,
            }
        }
    };

    const clientCredentialAuthority = new MSAL.ConfidentialClientApplication(config);

    const oboRequest = {
        oboAssertion: backEndAccessToken,
        // this scope must already exist on the backend authentication app registration
        // and visible in resources.azure.com backend app auth config
        scopes: ["https://graph.microsoft.com/.default"]
    }

    // This example has App service validate token in runtime
    // from headers that can't be set externally

    // If you aren't using App service's authentication,
    // you must validate your access token yourself
    // before calling this code
    try {
        const { accessToken } = await clientCredentialAuthority.acquireTokenOnBehalfOf(oboRequest);
        return accessToken;
    } catch (error) {
        console.log(`getGraphToken:error.type = ${error.type}  ${error.message}`);
    }
}
5. Inspect backend code to access Microsoft Graph with the new token
To access Microsoft Graph as a user signed in to the frontend application, the changes include:
- Configuration of the Active Directory app registration with an API permission to the downstream service, Microsoft Graph, with the necessary scope of
User.Read. - Grant admin consent to bypass the user consent screen for the back-end app.
- Change the application code to convert the access token sent from the front-end app to an access token with the required permission for the downstream service, Microsoft Graph.
Now that the code has the correct token for Microsoft Graph, use it to create a client to Microsoft Graph then get the user's profile.
Open the
./backend/src/graph.jsIn the
getGraphProfile()function, get the token, then the authenticated client from the token then get the profile.// import graph from "@microsoft/microsoft-graph-client"; import { getGraphToken } from "./auth.js"; // Create client from token with Graph API scope export function getAuthenticatedClient(accessToken) { const client = graph.Client.init({ authProvider: (done) => { done(null, accessToken); } }); return client; } export async function getGraphProfile(accessToken) { // exchange current backend token for token with // graph api scope const graphToken = await getGraphToken(accessToken); // use graph token to get Graph client const graphClient = getAuthenticatedClient(graphToken); // get profile of user const profile = await graphClient .api('/me') .get(); return profile; }
6. Test your changes
Use the frontend web site in a browser. The URL is in the format of
https://<front-end-app-name>.azurewebsites.net/. You may need to refresh your token if it's expired.Select
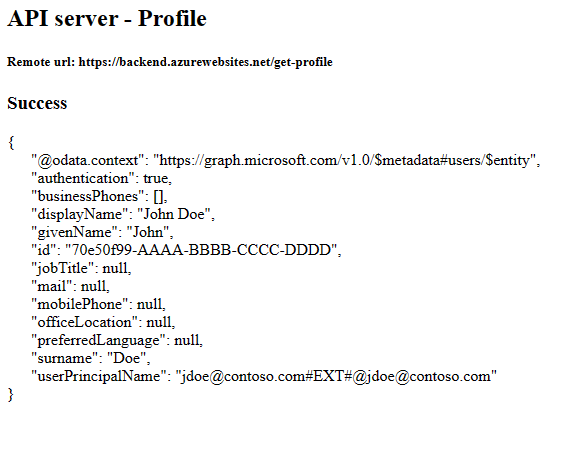
Get user's profile. This passes your authentication in the bearer token to the backend.The backend end responds with the real Microsoft Graph profile for your account.

7. Clean up
In the preceding steps, you created Azure resources in a resource group.
Delete the resource group by running the following command in the Cloud Shell. This command may take a minute to run.
az group delete --name myAuthResourceGroupUse the authentication apps' Client ID, you previously found and made note of in the
Enable authentication and authorizationsections for the backend and frontend apps.Delete app registrations for both frontend and backend apps.
# delete app - do this for both frontend and backend client ids
az ad app delete <client-id>
Frequently asked questions
I got an error 80049217, what does it mean?
This error, CompactToken parsing failed with error code: 80049217, means the backend App service isn't authorized to return the Microsoft Graph token. This error is caused because the app registration is missing the User.Read permission.
I got an error AADSTS65001, what does it mean?
This error, AADSTS65001: The user or administrator has not consented to use the application with ID \<backend-authentication-id>. Send an interactive authorization request for this user and resource, means the backend authentication app hasn't been configured for Admin consent. Because the error shows up in the log for the backend app, the frontend application can't tell the user why they didn't see their profile in the frontend app.
How do I connect to a different downstream Azure service as user?
This tutorial demonstrates an API app authenticated to Microsoft Graph, however, the same general steps can be applied to access any Azure service on behalf of the user.
- No change to the frontend application. Only changes to the backend's authentication app registration and backend app source code.
- Exchange the user's token scoped for backend API for a token to the downstream service you want to access.
- Use token in downstream service's SDK to create the client.
- Use downstream client to access service functionality.