Configure Azure AI services virtual networks
Azure AI services provide a layered security model. This model enables you to secure your Azure AI services accounts to a specific subset of networks. When network rules are configured, only applications that request data over the specified set of networks can access the account. You can limit access to your resources with request filtering, which allows requests that originate only from specified IP addresses, IP ranges, or from a list of subnets in Azure Virtual Networks.
An application that accesses an Azure AI services resource when network rules are in effect requires authorization. Authorization is supported with Microsoft Entra ID credentials or with a valid API key.
Important
Turning on firewall rules for your Azure AI services account blocks incoming requests for data by default. To allow requests through, one of the following conditions needs to be met:
- The request originates from a service that operates within an Azure Virtual Network on the allowed subnet list of the target Azure AI services account. The endpoint request that originated from the virtual network needs to be set as the custom subdomain of your Azure AI services account.
- The request originates from an allowed list of IP addresses.
Requests that are blocked include those from other Azure services, from the Azure portal, and from logging and metrics services.
Note
We recommend that you use the Azure Az PowerShell module to interact with Azure. To get started, see Install Azure PowerShell. To learn how to migrate to the Az PowerShell module, see Migrate Azure PowerShell from AzureRM to Az.
Scenarios
To secure your Azure AI services resource, you should first configure a rule to deny access to traffic from all networks, including internet traffic, by default. Then, configure rules that grant access to traffic from specific virtual networks. This configuration enables you to build a secure network boundary for your applications. You can also configure rules to grant access to traffic from select public internet IP address ranges and enable connections from specific internet or on-premises clients.
Network rules are enforced on all network protocols to Azure AI services, including REST and WebSocket. To access data by using tools such as the Azure test consoles, explicit network rules must be configured. You can apply network rules to existing Azure AI services resources, or when you create new Azure AI services resources. After network rules are applied, they're enforced for all requests.
Supported regions and service offerings
Virtual networks are supported in regions where Azure AI services are available. Azure AI services support service tags for network rules configuration. The services listed here are included in the CognitiveServicesManagement service tag.
- Anomaly Detector
- Azure OpenAI
- Content Moderator
- Custom Vision
- Face
- Language Understanding (LUIS)
- Personalizer
- Speech service
- Language
- QnA Maker
- Translator
Note
If you use Azure OpenAI, LUIS, Speech Services, or Language services, the CognitiveServicesManagement tag only enables you to use the service by using the SDK or REST API. To access and use the Azure AI Foundry portal, LUIS portal, Speech Studio, or Language Studio from a virtual network, you need to use the following tags:
AzureActiveDirectoryAzureFrontDoor.FrontendAzureResourceManagerCognitiveServicesManagementCognitiveServicesFrontEndStorage(Speech Studio only)
For information on Azure AI Foundry portal configurations, see the Azure AI Foundry documentation.
Change the default network access rule
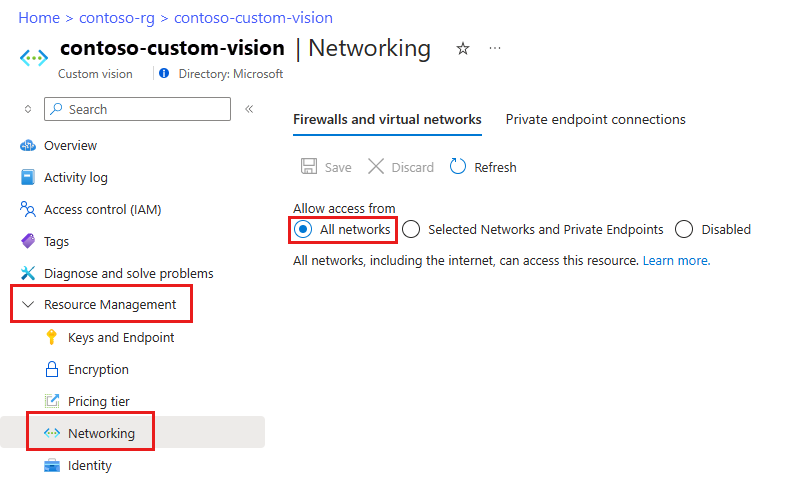
By default, Azure AI services resources accept connections from clients on any network. To limit access to selected networks, you must first change the default action.
Warning
Making changes to network rules can impact your applications' ability to connect to Azure AI services. Setting the default network rule to deny blocks all access to the data unless specific network rules that grant access are also applied.
Before you change the default rule to deny access, be sure to grant access to any allowed networks by using network rules. If you allow listing for the IP addresses for your on-premises network, be sure to add all possible outgoing public IP addresses from your on-premises network.
Manage default network access rules
You can manage default network access rules for Azure AI services resources through the Azure portal, PowerShell, or the Azure CLI.
Go to the Azure AI services resource you want to secure.
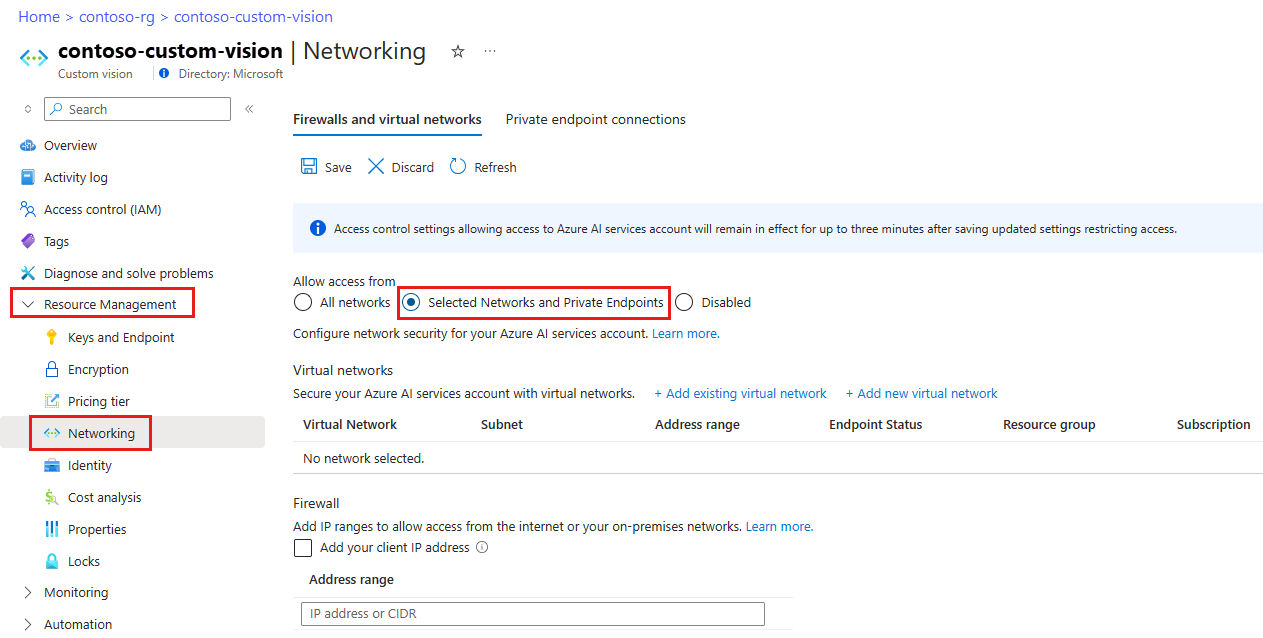
Select Resource Management to expand it, then select Networking.
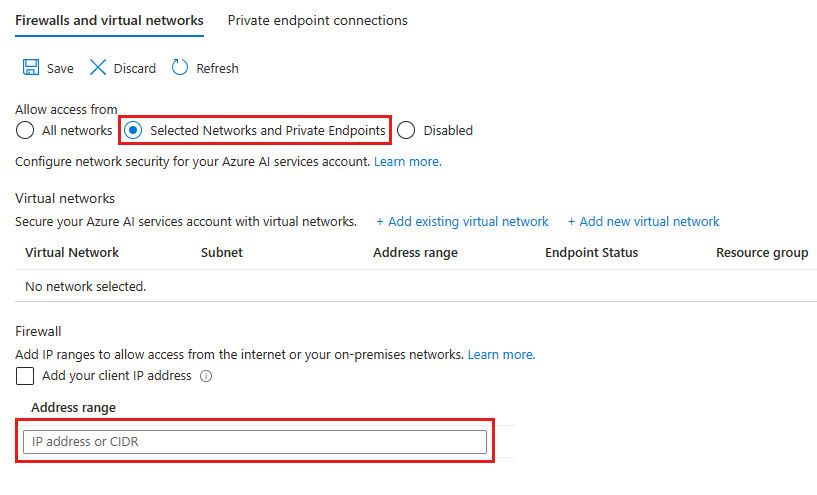
To deny access by default, under Firewalls and virtual networks, select Selected Networks and Private Endpoints.
With this setting alone, unaccompanied by configured virtual networks or address ranges, all access is effectively denied. When all access is denied, requests that attempt to consume the Azure AI services resource aren't permitted. The Azure portal, Azure PowerShell, or the Azure CLI can still be used to configure the Azure AI services resource.
To allow traffic from all networks, select All networks.
Select Save to apply your changes.
Grant access from a virtual network
You can configure Azure AI services resources to allow access from specific subnets only. The allowed subnets might belong to a virtual network in the same subscription or in a different subscription. The other subscription can belong to a different Microsoft Entra tenant. When the subnet belongs to a different subscription, the Microsoft.CognitiveServices resource provider needs to be also registered for that subscription.
Enable a service endpoint for Azure AI services within the virtual network. The service endpoint routes traffic from the virtual network through an optimal path to the Azure AI service. For more information, see Virtual Network service endpoints.
The identities of the subnet and the virtual network are also transmitted with each request. Administrators can then configure network rules for the Azure AI services resource to allow requests from specific subnets in a virtual network. Clients granted access by these network rules must continue to meet the authorization requirements of the Azure AI services resource to access the data.
Each Azure AI services resource supports up to 100 virtual network rules, which can be combined with IP network rules. For more information, see Grant access from an internet IP range later in this article.
Set required permissions
To apply a virtual network rule to an Azure AI services resource, you need the appropriate permissions for the subnets to add. The required permission is the default Contributor role or the Cognitive Services Contributor role. Required permissions can also be added to custom role definitions.
The Azure AI services resource and the virtual networks that are granted access might be in different subscriptions, including subscriptions that are part of a different Microsoft Entra tenant.
Note
Configuration of rules that grant access to subnets in virtual networks that are a part of a different Microsoft Entra tenant are currently supported only through PowerShell, the Azure CLI, and the REST APIs. You can view these rules in the Azure portal, but you can't configure them.
Configure virtual network rules
You can manage virtual network rules for Azure AI services resources through the Azure portal, PowerShell, or the Azure CLI.
To grant access to a virtual network with an existing network rule:
Go to the Azure AI services resource you want to secure.
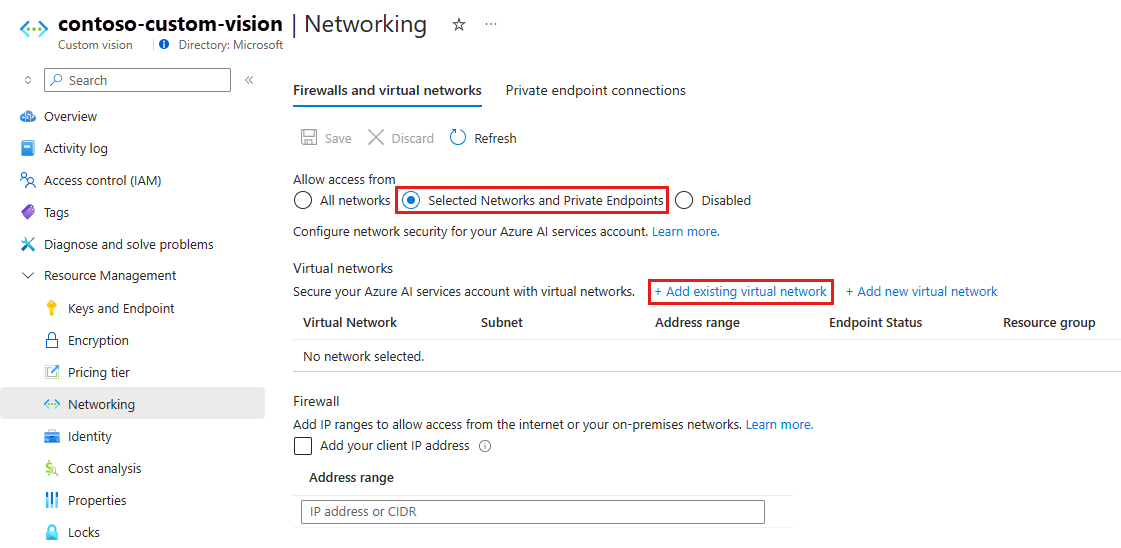
Select Resource Management to expand it, then select Networking.
Confirm that you selected Selected Networks and Private Endpoints.
Under Allow access from, select Add existing virtual network.
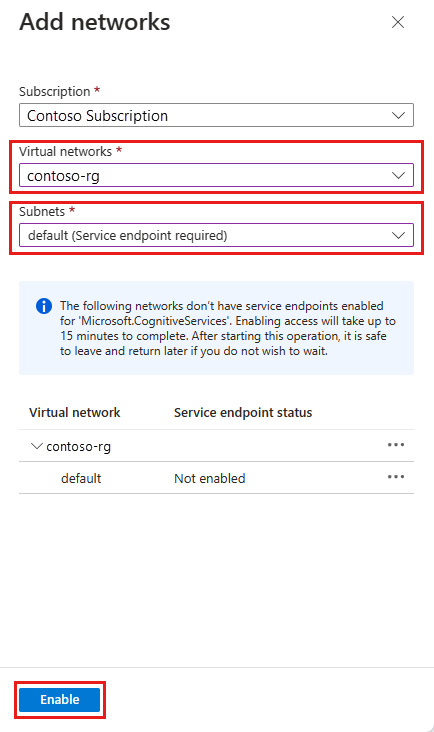
Select the Virtual networks and Subnets options, and then select Enable.
Note
If a service endpoint for Azure AI services wasn't previously configured for the selected virtual network and subnets, you can configure it as part of this operation.
Currently, only virtual networks that belong to the same Microsoft Entra tenant are available for selection during rule creation. To grant access to a subnet in a virtual network that belongs to another tenant, use PowerShell, the Azure CLI, or the REST APIs.
Select Save to apply your changes.
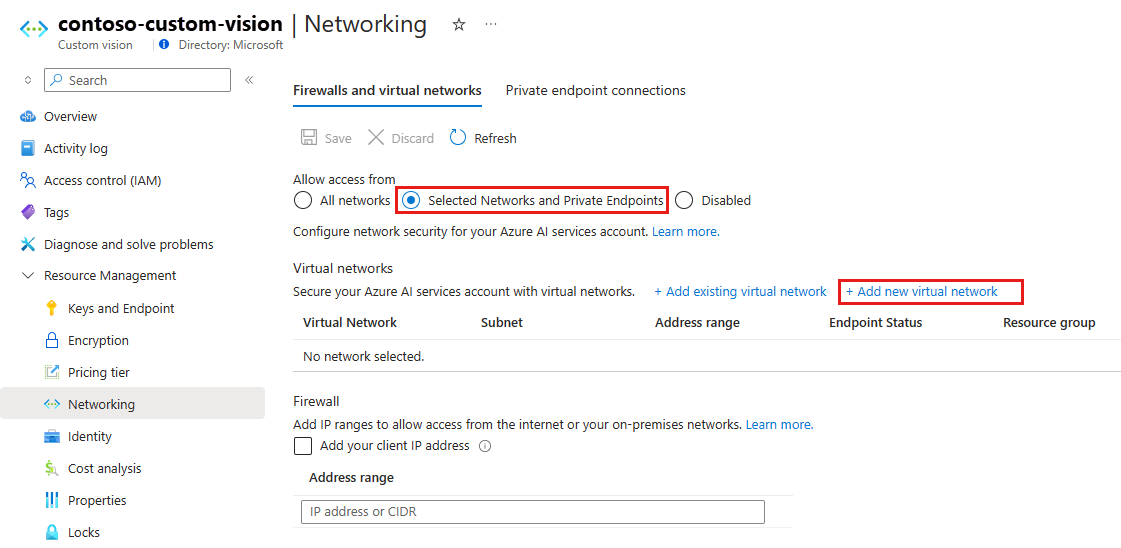
To create a new virtual network and grant it access:
On the same page as the previous procedure, select Add new virtual network.
Provide the information necessary to create the new virtual network, and then select Create.
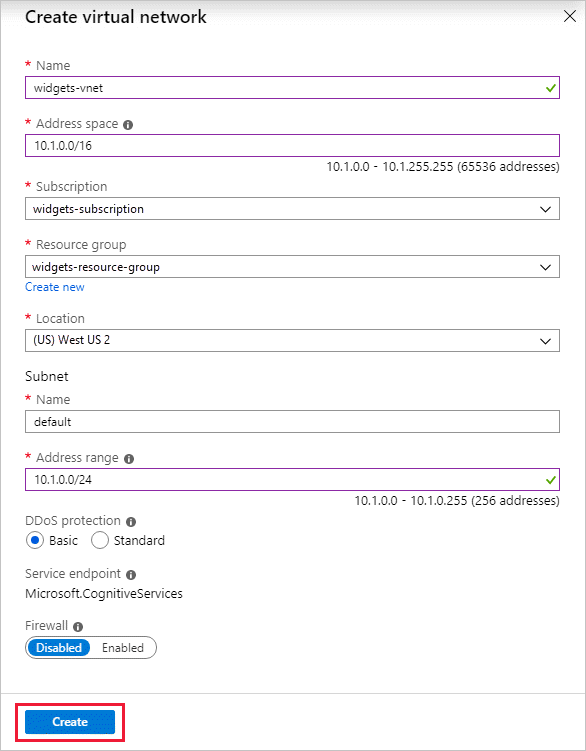
Select Save to apply your changes.
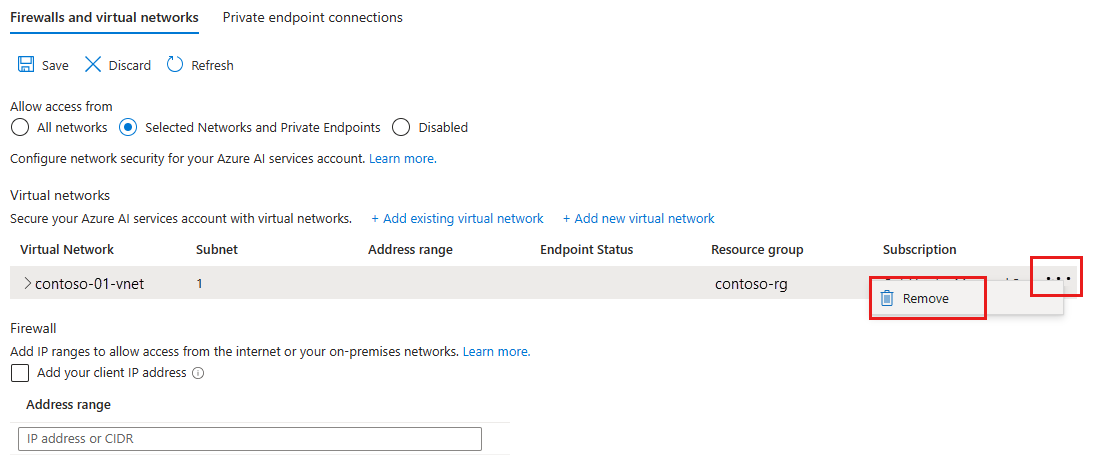
To remove a virtual network or subnet rule:
Important
Be sure to set the default rule to deny, or network rules have no effect.
Grant access from an internet IP range
You can configure Azure AI services resources to allow access from specific public internet IP address ranges. This configuration grants access to specific services and on-premises networks, which effectively block general internet traffic.
You can specify the allowed internet address ranges by using CIDR format (RFC 4632) in the form 192.168.0.0/16 or as individual IP addresses like 192.168.0.1.
Tip
Small address ranges that use /31 or /32 prefix sizes aren't supported. Configure these ranges by using individual IP address rules.
IP network rules are only allowed for public internet IP addresses. IP address ranges reserved for private networks aren't allowed in IP rules. Private networks include addresses that start with 10.*, 172.16.* - 172.31.*, and 192.168.*. For more information, see Private Address Space (RFC 1918).
Currently, only IPv4 addresses are supported. Each Azure AI services resource supports up to 100 IP network rules, which can be combined with virtual network rules.
Configure access from on-premises networks
To grant access from your on-premises networks to your Azure AI services resource with an IP network rule, identify the internet-facing IP addresses used by your network. Contact your network administrator for help.
If you use Azure ExpressRoute on-premises for Microsoft peering, you need to identify the NAT IP addresses. For more information, see What is Azure ExpressRoute.
For Microsoft peering, the NAT IP addresses that are used are either customer provided or supplied by the service provider. To allow access to your service resources, you must allow these public IP addresses in the resource IP firewall setting.
Managing IP network rules
You can manage IP network rules for Azure AI services resources through the Azure portal, PowerShell, or the Azure CLI.
Go to the Azure AI services resource you want to secure.
Select Resource Management to expand it, then select Networking.
Confirm that you selected Selected Networks and Private Endpoints.
Under Firewalls and virtual networks, locate the Address range option. To grant access to an internet IP range, enter the IP address or address range (in CIDR format). Only valid public IP (nonreserved) addresses are accepted.
To remove an IP network rule, select the trash can icon next to the address range.
Select Save to apply your changes.
Important
Be sure to set the default rule to deny, or network rules have no effect.
Use private endpoints
You can use private endpoints for your Azure AI services resources to allow clients on a virtual network to securely access data over Azure Private Link. The private endpoint uses an IP address from the virtual network address space for your Azure AI services resource. Network traffic between the clients on the virtual network and the resource traverses the virtual network and a private link on the Microsoft Azure backbone network, which eliminates exposure from the public internet.
Private endpoints for Azure AI services resources let you:
- Secure your Azure AI services resource by configuring the firewall to block all connections on the public endpoint for the Azure AI service.
- Increase security for the virtual network, by enabling you to block exfiltration of data from the virtual network.
- Securely connect to Azure AI services resources from on-premises networks that connect to the virtual network by using Azure VPN Gateway or ExpressRoutes with private-peering.
Understand private endpoints
A private endpoint is a special network interface for an Azure resource in your virtual network. Creating a private endpoint for your Azure AI services resource provides secure connectivity between clients in your virtual network and your resource. The private endpoint is assigned an IP address from the IP address range of your virtual network. The connection between the private endpoint and the Azure AI service uses a secure private link.
Applications in the virtual network can connect to the service over the private endpoint seamlessly. Connections use the same connection strings and authorization mechanisms that they would use otherwise. The exception is Speech Services, which require a separate endpoint. For more information, see Private endpoints with the Speech Services in this article. Private endpoints can be used with all protocols supported by the Azure AI services resource, including REST.
Private endpoints can be created in subnets that use service endpoints. Clients in a subnet can connect to one Azure AI services resource using private endpoint, while using service endpoints to access others. For more information, see Virtual Network service endpoints.
When you create a private endpoint for an Azure AI services resource in your virtual network, Azure sends a consent request for approval to the Azure AI services resource owner. If the user who requests the creation of the private endpoint is also an owner of the resource, this consent request is automatically approved.
Azure AI services resource owners can manage consent requests and the private endpoints through the Private endpoint connection tab for the Azure AI services resource in the Azure portal.
Specify private endpoints
When you create a private endpoint, specify the Azure AI services resource that it connects to. For more information on creating a private endpoint, see:
- Create a private endpoint by using the Azure portal
- Create a private endpoint by using Azure PowerShell
- Create a private endpoint by using the Azure CLI
Connect to private endpoints
Note
Azure OpenAI Service uses a different private DNS zone and public DNS zone forwarder than other Azure AI services. For the correct zone and forwarder names, see Azure services DNS zone configuration.
Clients on a virtual network that use the private endpoint use the same connection string for the Azure AI services resource as clients connecting to the public endpoint. The exception is the Speech service, which requires a separate endpoint. For more information, see Use private endpoints with the Speech service in this article. DNS resolution automatically routes the connections from the virtual network to the Azure AI services resource over a private link.
By default, Azure creates a private DNS zone attached to the virtual network with the necessary updates for the private endpoints. If you use your own DNS server, you might need to make more changes to your DNS configuration. For updates that might be required for private endpoints, see Apply DNS changes for private endpoints in this article.
Use private endpoints with the Speech service
See Use Speech service through a private endpoint.
Apply DNS changes for private endpoints
When you create a private endpoint, the DNS CNAME resource record for the Azure AI services resource is updated to an alias in a subdomain with the prefix privatelink. By default, Azure also creates a private DNS zone that corresponds to the privatelink subdomain, with the DNS A resource records for the private endpoints. For more information, see What is Azure Private DNS.
When you resolve the endpoint URL from outside the virtual network with the private endpoint, it resolves to the public endpoint of the Azure AI services resource. When it's resolved from the virtual network hosting the private endpoint, the endpoint URL resolves to the private endpoint's IP address.
This approach enables access to the Azure AI services resource using the same connection string for clients in the virtual network that hosts the private endpoints and clients outside the virtual network.
If you use a custom DNS server on your network, clients must be able to resolve the fully qualified domain name (FQDN) for the Azure AI services resource endpoint to the private endpoint IP address. Configure your DNS server to delegate your private link subdomain to the private DNS zone for the virtual network.
Tip
When you use a custom or on-premises DNS server, you should configure your DNS server to resolve the Azure AI services resource name in the privatelink subdomain to the private endpoint IP address. Delegate the privatelink subdomain to the private DNS zone of the virtual network. Alternatively, configure the DNS zone on your DNS server and add the DNS A records.
For more information on configuring your own DNS server to support private endpoints, see the following resources:
Grant access to trusted Azure services for Azure OpenAI
You can grant a subset of trusted Azure services access to Azure OpenAI, while maintaining network rules for other apps. These trusted services will then use managed identity to authenticate your Azure OpenAI service. The following table lists the services that can access Azure OpenAI if the managed identity of those services have the appropriate role assignment.
| Service | Resource provider name |
|---|---|
| Azure AI Services | Microsoft.CognitiveServices |
| Azure Machine Learning | Microsoft.MachineLearningServices |
| Azure AI Search | Microsoft.Search |
You can grant networking access to trusted Azure services by creating a network rule exception using the REST API or Azure portal:
Using the Azure CLI
accessToken=$(az account get-access-token --resource https://management.azure.com --query "accessToken" --output tsv)
rid="/subscriptions/<your subscription id>/resourceGroups/<your resource group>/providers/Microsoft.CognitiveServices/accounts/<your Azure AI resource name>"

curl -i -X PATCH https://management.azure.com$rid?api-version=2023-10-01-preview \
-H "Content-Type: application/json" \
-H "Authorization: Bearer $accessToken" \
-d \
'
{
    "properties":
    {
        "networkAcls": {
            "bypass": "AzureServices"
        }
    }
}
'
To revoke the exception, set networkAcls.bypass to None.
To verify if the trusted service has been enabled from the Azure portal,
Use the JSON View from the Azure OpenAI resource overview page
Choose your latest API version under API versions. Only the latest API version is supported,
2023-10-01-preview.
Using the Azure portal
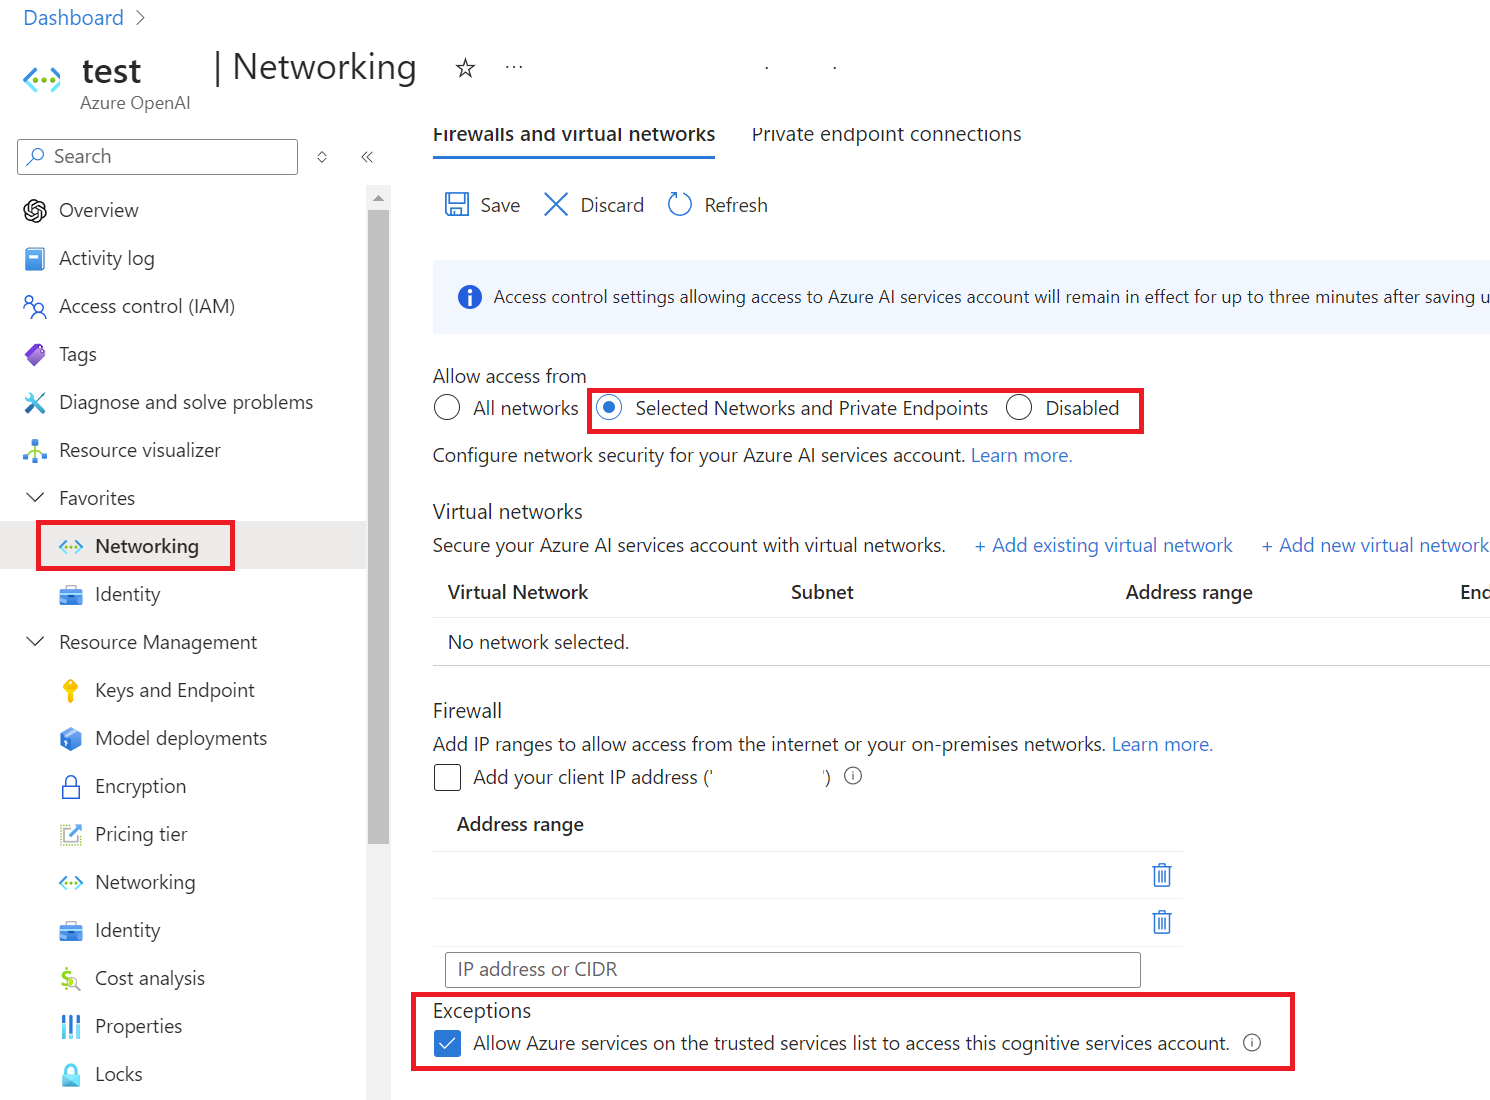
Navigate to your Azure OpenAI resource, and select Networking from the navigation menu.
Under Exceptions, select Allow Azure services on the trusted services list to access this cognitive services account.
Tip
You can view the Exceptions option by selecting either Selected networks and private endpoints or Disabled under Allow access from.
Pricing
For pricing details, see Azure Private Link pricing.
Next steps
- Explore the various Azure AI services
- Learn more about Virtual Network service endpoints
