Übung: Aktualisierung und Versionsverwaltung einer Vorlagenspezifikation
Ihre Azure Cosmos DB-Vorlagenspezifikation wird jetzt in Ihrer gesamten Organisation verwendet, um viele neue Azure Cosmos DB-Konten bereitzustellen. Dementsprechend sind alle so konfiguriert, dass fortlaufende Sicherungen verwendet werden.
Ihr Sicherheitsteam hat vor Kurzem die Sicherheitsfunktionen von Azure Cosmos DB überprüft. Es wurde entschieden, dass neue Konten die Microsoft Entra-Authentifizierung und die rollenbasierte Zugriffssteuerung von Azure Cosmos DB verwenden sollten.
In dieser Übung aktualisieren Sie Ihre Vorlagenspezifikation mit einer neuen Version, welche die aktualisierte Authentifizierungskonfiguration enthält.
In dem Prozess gehen Sie wie folgt vor:
- Aktualisieren Sie Ihre Vorlage, um die Sicherungsrichtlinie neu zu konfigurieren.
- Veröffentlichen Sie eine neue Version Ihrer Vorlagenspezifikation.
- Überprüfen Sie, ob die Vorlagenspezifikation aktualisiert wurde.
- Testen Sie die neue Version Ihrer Vorlagenspezifikation, indem Sie ein weiteres Azure Cosmos DB-Konto bereitstellen.
Aktualisieren der Vorlage
Öffnen Sie in Visual Studio Code die Datei azuredeploy.json.
Aktualisieren Sie die azuredeploy.json-Datei, sodass sie die folgenden Änderungen enthält:
{
  "$schema": "https://schema.management.azure.com/schemas/2019-04-01/deploymentTemplate.json#",
  "contentVersion": "1.0.0.0",
  "parameters": {
    "location": {
      "type": "string",
      "defaultValue": "[resourceGroup().location]",
      "metadata": {
        "description": "The Azure region into which the Cosmos DB resources should be deployed."
      }
    },
    "cosmosDBAccountName": {
      "type": "string",
      "defaultValue": "[concat('toy-', uniqueString(resourceGroup().id))]",
      "maxLength": 44,
      "minLength": 3,
      "metadata": {
        "description": "The name of the Cosmos DB account. This name must be globally unique, and it must only include lowercase letters, numbers, and hyphens."
      }
    },
    "roleDefinitionFriendlyName": {
      "type": "string",
      "defaultValue": "Read and Write",
      "metadata": {
        "description": "A descriptive name for the role definition."
      }
    },
    "roleDefinitionDataActions": {
      "type": "array",
      "defaultValue": [
        "Microsoft.DocumentDB/databaseAccounts/readMetadata",
        "Microsoft.DocumentDB/databaseAccounts/sqlDatabases/containers/items/*"
      ],
      "metadata": {
        "description": "The list of actions that the role definition permits."
      }
    },
    "roleAssignmentPrincipalId": {
      "type": "string",
      "metadata": {
        "description": "The object ID of the Azure AD principal that should be granted access using the role definition."
      }
    }
  },
  "variables": {
    "roleDefinitionName": "[guid('sql-role-definition', resourceId('Microsoft.DocumentDB/databaseAccounts', parameters('cosmosDBAccountName')))]",
    "roleAssignmentName": "[guid('sql-role-assignment', resourceId('Microsoft.DocumentDB/databaseAccounts', parameters('cosmosDBAccountName')))]"
  },
  "resources": [
    {
      "type": "Microsoft.DocumentDB/databaseAccounts",
      "apiVersion": "2021-04-15",
      "name": "[parameters('cosmosDBAccountName')]",
      "kind": "GlobalDocumentDB",
      "location": "[parameters('location')]",
      "properties": {
        "consistencyPolicy": {
          "defaultConsistencyLevel": "Session"
        },
        "locations": [
          {
            "locationName": "[parameters('location')]",
            "failoverPriority": 0,
            "isZoneRedundant": false
          }
        ],
        "databaseAccountOfferType": "Standard",
        "enableAutomaticFailover": false,
        "enableMultipleWriteLocations": false,
        "backupPolicy": {
          "type": "Continuous"
        }
      }
    },
    {
      "type": "Microsoft.DocumentDB/databaseAccounts/sqlRoleDefinitions",
      "apiVersion": "2021-04-15",
      "name": "[format('{0}/{1}', parameters('cosmosDBAccountName'), variables('roleDefinitionName'))]",
      "properties": {
        "roleName": "[parameters('roleDefinitionFriendlyName')]",
        "type": "CustomRole",
        "assignableScopes": [
          "[resourceId('Microsoft.DocumentDB/databaseAccounts', parameters('cosmosDBAccountName'))]"
        ],
        "permissions": [
          {
            "dataActions": "[parameters('roleDefinitionDataActions')]"
          }
        ]
      },
      "dependsOn": [
        "[resourceId('Microsoft.DocumentDB/databaseAccounts', parameters('cosmosDBAccountName'))]"
      ]
    },
    {
      "type": "Microsoft.DocumentDB/databaseAccounts/sqlRoleAssignments",
      "apiVersion": "2021-04-15",
      "name": "[format('{0}/{1}', parameters('cosmosDBAccountName'), variables('roleAssignmentName'))]",
      "properties": {
        "roleDefinitionId": "[resourceId('Microsoft.DocumentDB/databaseAccounts/sqlRoleDefinitions', parameters('cosmosDBAccountName'), variables('roleDefinitionName'))]",
        "principalId": "[parameters('roleAssignmentPrincipalId')]",
        "scope": "[resourceId('Microsoft.DocumentDB/databaseAccounts', parameters('cosmosDBAccountName'))]"
      },
      "dependsOn": [
        "[resourceId('Microsoft.DocumentDB/databaseAccounts', parameters('cosmosDBAccountName'))]",
        "[resourceId('Microsoft.DocumentDB/databaseAccounts/sqlRoleDefinitions', parameters('cosmosDBAccountName'), variables('roleDefinitionName'))]"
      ]
    }
  ]
}
Speichern Sie die Datei .
Öffnen Visual Studio Code die Datei main.bicep.
Aktualisieren Sie die main.bicep-Datei so, dass sie die folgenden Änderungen enthält:
@description('The Azure region into which the Cosmos DB resources should be deployed.')
param location string = resourceGroup().location

@description('The name of the Cosmos DB account. This name must be globally unique, and it must only include lowercase letters, numbers, and hyphens.')
@minLength(3)
@maxLength(44)
param cosmosDBAccountName string = 'toy-${uniqueString(resourceGroup().id)}'

@description('A descriptive name for the role definition.')
param roleDefinitionFriendlyName string = 'Read and Write'

@description('The list of actions that the role definition permits.')
param roleDefinitionDataActions array = [
  'Microsoft.DocumentDB/databaseAccounts/readMetadata'
  'Microsoft.DocumentDB/databaseAccounts/sqlDatabases/containers/items/*'
]

@description('The object ID of the Azure AD principal that should be granted access using the role definition.')
param roleAssignmentPrincipalId string

var roleDefinitionName = guid('sql-role-definition', cosmosDBAccount.id)
var roleAssignmentName = guid('sql-role-assignment', cosmosDBAccount.id)

resource cosmosDBAccount 'Microsoft.DocumentDB/databaseAccounts@2021-04-15' = {
  name: cosmosDBAccountName
  kind: 'GlobalDocumentDB'
  location: location
  properties: {
    consistencyPolicy: {
      defaultConsistencyLevel: 'Session'
    }
    locations: [
      {
        locationName: location
        failoverPriority: 0
        isZoneRedundant: false
      }
    ]
    databaseAccountOfferType: 'Standard'
    enableAutomaticFailover: false
    enableMultipleWriteLocations: false
  }
}

resource roleDefinition 'Microsoft.DocumentDB/databaseAccounts/sqlRoleDefinitions@2021-04-15' = {
  parent: cosmosDBAccount
  name: roleDefinitionName
  properties: {
    roleName: roleDefinitionFriendlyName
    type: 'CustomRole'
    assignableScopes: [
      cosmosDBAccount.id
    ]
    permissions: [
      {
        dataActions: roleDefinitionDataActions
      }
    ]
  }
}

resource roleAssignment 'Microsoft.DocumentDB/databaseAccounts/sqlRoleAssignments@2021-04-15' = {
  parent: cosmosDBAccount
  name: roleAssignmentName
  properties: {
    roleDefinitionId: roleDefinition.id
    principalId: roleAssignmentPrincipalId
    scope: cosmosDBAccount.id
  }
}
Speichern Sie die Datei .
Veröffentlichen einer neuen Version der Vorlagenspezifikation
Veröffentlichen Sie die Vorlagenspezifikation mithilfe dieses Azure PowerShell-Cmdlets im Visual Studio Code-Terminal:
New-AzTemplateSpec `
  -ResourceGroupName <rgn>[sandbox resource group name]</rgn> `
  -Name ToyCosmosDBAccount `
  -Version '2.0' `
  -VersionDescription 'Adds Cosmos DB role-based access control.' `
  -TemplateFile main.bicep
New-AzTemplateSpec `
  -ResourceGroupName <rgn>[sandbox resource group name]</rgn> `
  -Name ToyCosmosDBAccount `
  -Version '2.0' `
  -VersionDescription 'Adds Cosmos DB role-based access control.' `
  -TemplateFile azuredeploy.json
Veröffentlichen Sie die Vorlagenspezifikation mithilfe dieses Azure-CLI-Befehls im Visual Studio Code-Terminal:
az ts create \
  --name ToyCosmosDBAccount \
  --version 2.0 \
  --version-description "Adds Cosmos DB role-based access control." \
  --template-file main.bicep
az ts create \
  --name ToyCosmosDBAccount \
  --version 2.0 \
  --version-description "Adds Cosmos DB role-based access control." \
  --template-file azuredeploy.json
Überprüfen der Vorlagenspezifikation
Navigieren Sie in Ihrem Browser zum Azure-Portal zurück. Wechseln Sie zu Ihrer Ressourcengruppe.
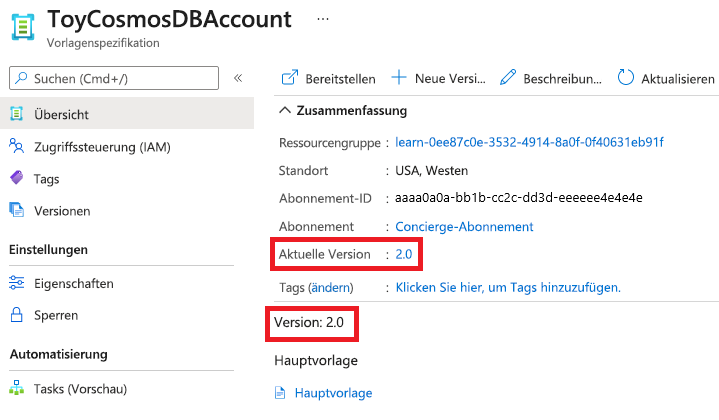
Wählen Sie die Vorlagenspezifikation aus. Beachten Sie, dass die neueste Version jetzt als 2.0aufgeführt ist.

Wählen Sie das Menüelement Versionen aus. Beachten Sie, dass jetzt beide Versionen aufgeführt sind.

Mit Versionen von Vorlagenspezifikationen können Sie zu früheren Versionen Ihrer Vorlagenspezifikation zurückkehren, wenn dies erforderlich ist.
Bereitstellen der neuen Version der Vorlagenspezifikation
Rufen Sie die Ressourcen-ID der neuen Version der Vorlagenspezifikation ab, indem Sie den folgenden Azure PowerShell-Befehl ausführen:
$templateSpecVersionResourceId = ( `
   Get-AzTemplateSpec `
      -ResourceGroupName <rgn>[sandbox resource group name]</rgn> `
      -Name ToyCosmosDBAccount `
      -Version 2.0 `
   ).Versions[0].Id
Beachten Sie, dass Sie die
Versions-Eigenschaft verwenden, um die Ressourcen-ID der Vorlagenspezifikationsversion abzurufen.Ihre neue Version der Vorlagenspezifikation verfügt über einen Parameter für die Benutzerprinzipal-ID. Verwenden Sie die folgenden Befehle, um die Prinzipal-ID Ihres eigenen Benutzerkontos abzurufen:
$token = (Get-AzAccessToken -ResourceUrl "https://graph.windows.net/").Token
$userObjectId = (Invoke-RestMethod -Uri 'https://graph.windows.net/me?api-version=1.6' -Headers @{ 'Authorization' = "Bearer $token"}).objectID
Die Befehle verwenden die Microsoft Graph-API, um Ihr eigenes Benutzerprofil abzufragen.
Stellen Sie die Vorlagenspezifikation mithilfe dieses Azure PowerShell-Befehls im Visual Studio Code-Terminal bereit:
New-AzResourceGroupDeployment `
  -TemplateSpecId $templateSpecVersionResourceId `
  -roleAssignmentPrincipalId $userObjectId
Rufen Sie die Ressourcen-ID der Vorlagenspezifikation ab, indem Sie den folgenden Azure CLI-Befehl ausführen:
id=$(az ts show \
 --name ToyCosmosDBAccount \
 --resource-group "<rgn>[sandbox resource group name]</rgn>" \
 --version "2.0" \
 --query "id")
Stellen Sie die Vorlagenspezifikation mithilfe dieses Azure-CLI-Befehls im Visual Studio Code-Terminal bereit:
az deployment group create \
 --template-spec $id \
 --parameters roleAssignmentPrincipalId="d68d19b3-d7ef-4ae9-9ee4-90695a4e417d"
Die Bereitstellung dauert bis zum Abschluss ein bis zwei Minuten.
Überprüfen der Bereitstellung
Navigieren Sie in Ihrem Browser zum Azure-Portal zurück. Wechseln Sie zu Ihrer Ressourcengruppe.
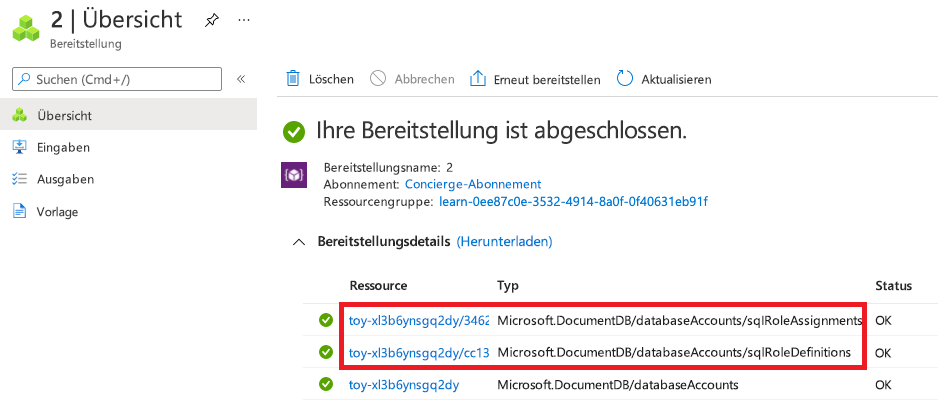
Wählen Sie neben Bereitstellungen die Option 2 Erfolgreich aus.

Wählen Sie die aktuellste Bereitstellung aus.

Wählen Sie Bereitstellungsdetails aus, um die Angaben zu erweitern. Stellen Sie sicher, dass die Ressourcen für die rollenbasierte Zugriffssteuerung von Azure Cosmos DB bereitgestellt werden.
