Writing step-by-step instructions
Follow these guidelines to help you create clear, easy-to-follow instructions, whether you're writing simple, single-step procedures or complex procedures that consist of multiple steps.
See also
Formatting text in instructions
Formatting punctuation
Complex procedures
Complex instructions often consist of multiple steps formatted as a numbered list. For multiple-step procedures in numbered lists:
Format procedures consistently so customers can find them easily by scanning.
Consider using a heading to help customers find instructions quickly. Use the heading to tell customers what the instructions will help them do.
Examples
To add an account
Add an accountChoose one phrasing style for the headings, and write them all the same way (in parallel structure).
Use a separate numbered entry for each step. It's OK to combine short steps that occur in the same place in the UI.
Most of the time, include actions that finalize a step, such as OK or Apply buttons.
Use complete sentences.
Use imperative verb forms. In instructions, customers really want you to tell them what to do.
Use consistent sentence structures. For example, always use a phrase when you need to tell the customer where to start. The rest of the time, start each sentence with a verb.
Examples
On the ribbon, go to the Design tab.
Open Photos.
For Alignment, choose Left.Capitalize the first word in each step.
Use a period after each step.
Exception
When instructing customers to type input that doesn't include end punctuation, don’t use a period. Try to format the text so that the user input appears on a new line.Limit a procedure to seven steps, and preferably fewer. Try to fit all the steps on the same screen.
ExamplesTo create a group of tiles
- On the Start screen, select the tiles you want to group together.
- Drag them to an open space. When a gray bar appears behind them, release the tiles to create the new group.
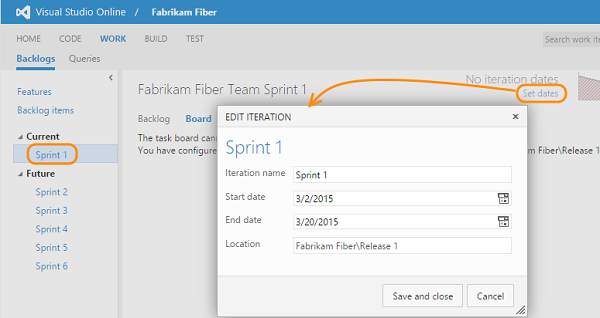
To schedule sprints
- In the Backlogs view, select the first sprint under Current. Or, open your sprint backlog from the following URL:
https://AccountName/DefaultCollection/TeamProjectName/\_backlogs/iteration
Several predefined sprints are listed under Current and Future. Actual sprint titles vary based on the process template used to create your team project. However, calendar dates haven’t been assigned. - To set the calendar dates, select the first sprint under Current, and select dates.

Single-step procedures
If you're using a consistent format for step-by-step instructions,
use the same format for single-step instructions, but replace the
number with a bullet.
Example
To move a group of tiles
- On the Start screen, zoom out and drag the group where you want.
Tips for writing steps
Make sure the customer knows where the action should take place before you describe the action.
If the instruction appears in the same UI where the action occurs, it’s usually not necessary to provide location details.
If you need to make sure the customer begins in the right place, provide a brief phrase at the beginning of the step.
Example
On the Design tab, select Header Row.If there’s a chance of confusion, provide an introductory step.
Example
On the ribbon, go to the Design tab.
Simple instructions with right angle brackets
Abbreviate simple sequences by using right angle brackets. Include a space before and after each bracket, and don't make the brackets bold.
Example
Select Accounts > Other accounts > Add an account.
Accessibility tip Screen readers may skip over brackets and read instructions such as Menu > Go To > Folders as Menu Go To Folders, which might confuse customers. Check with an accessibility expert before using this approach.