Hinweis
Für den Zugriff auf diese Seite ist eine Autorisierung erforderlich. Sie können versuchen, sich anzumelden oder das Verzeichnis zu wechseln.
Für den Zugriff auf diese Seite ist eine Autorisierung erforderlich. Sie können versuchen, das Verzeichnis zu wechseln.
In diesem Artikel wird beschrieben, wie Sie ImageBrush-, DrawingBrush- und VisualBrush-Objekte nutzen, um einen Bereich mit einem Bild, Drawing oder Visual zu zeichnen.
Voraussetzungen
Um dieses Thema zu verstehen, sollten Sie mit den verschiedenen Pinseltypen von Windows Presentation Foundation (WPF) und ihren grundlegenden Features vertraut sein. Eine Einführung finden Sie unter Übersicht über WPF-Pinsel.
Zeichnen eines Bereichs mit einem Bild
ImageBrush zeichnet einen Bereich mit ImageSource. Der gebräuchlichste Typ von ImageSource, der mit ImageBrush verwendet wird, ist BitmapImage und beschreibt eine Bitmapgrafik. Sie können ein DrawingImage verwenden, um mit einem Drawing-Objekt zu malen, aber es ist einfacher, stattdessen ein DrawingBrush zu verwenden. Weitere Informationen über ImageSource-Objekte finden Sie in der Übersicht über Bildverarbeitung.
Um mit einem ImageBrush zu malen, erstellen Sie ein BitmapImage und verwenden Sie es, um den Bitmap-Inhalt zu laden. Verwenden Sie dann BitmapImage, um die ImageSource-Eigenschaft von ImageBrush festzulegen. Wenden Sie schließlich die ImageBrush auf das Objekt an, das Sie zeichnen möchten. In der Extensible Application Markup Language (XAML) können Sie auch einfach die ImageSource-Eigenschaft von ImageBrush mit dem Pfad des zu ladenden Bildes festlegen.
Wie alle Brush Objekte kann ein ImageBrush zum Zeichnen von Objekten wie Formen, Panels, Steuerelementen und Text verwendet werden. Die folgende Abbildung zeigt einige Effekte, die mit ImageBrush erreicht werden können.
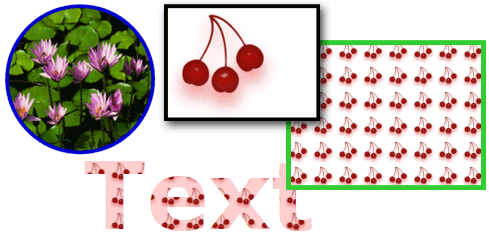
Von einem ImageBrush gezeichnete Objekte
In der Standardeinstellung wird ein Bild mithilfe von ImageBrush gestreckt, um den zu zeichnenden Bereich vollständig auszufüllen. Dabei wird das Bild möglicherweise verzerrt, wenn der gezeichnete Bereich ein anderes Seitenverhältnis als das Bild aufweist. Sie können dieses Verhalten ändern, indem Sie die Stretch-Eigenschaft vom Standardwert Fill auf None, Uniformoder UniformToFilländern. Da ImageBrush eine Art von TileBrushist, können Sie genau angeben, wie ein Bildpinsel den Ausgabebereich ausfüllt und sogar Muster erstellt. Weitere Informationen über erweiterte TileBrush-Features finden Sie in der TileBrush-Übersicht.
Beispiel: Zeichnen eines Objekts mit einem Bitmapbild
Das folgende Beispiel verwendet ImageBrush, um Background von Canvas zu malen.
<Page
  xmlns="http://schemas.microsoft.com/winfx/2006/xaml/presentation"
  xmlns:x="http://schemas.microsoft.com/winfx/2006/xaml"
  x:Class="Microsoft.Samples.BrushExamples.ImageBrushExample"
  WindowTitle="ImageBrush Example"
  Background="White">

  <StackPanel>

    <Canvas
      Height="200" Width="300">
      <Canvas.Background>
        <ImageBrush ImageSource="sampleImages\Waterlilies.jpg" />
      </Canvas.Background>
    </Canvas>


  </StackPanel>
</Page>
using System;
using System.Windows;
using System.Windows.Controls;
using System.Windows.Media;
using System.Windows.Media.Imaging;

namespace Microsoft.Samples.BrushExamples
{

    public class ImageBrushExample : Page
    {

        public ImageBrushExample()
        {

            StackPanel mainPanel = new StackPanel();
            canvasBackgroundExample(mainPanel);
            this.Content = mainPanel;
        }

        private void canvasBackgroundExample(Panel mainPanel)
        {

            BitmapImage theImage = new BitmapImage
                (new Uri("sampleImages\\Waterlilies.jpg", UriKind.Relative));

            ImageBrush myImageBrush = new ImageBrush(theImage);

            Canvas myCanvas = new Canvas();
            myCanvas.Width = 300;
            myCanvas.Height = 200;
            myCanvas.Background = myImageBrush;

            mainPanel.Children.Add(myCanvas);
        }
    }
}
Imports System.Windows
Imports System.Windows.Controls
Imports System.Windows.Media
Imports System.Windows.Media.Imaging

Namespace Microsoft.Samples.BrushExamples

    Public Class ImageBrushExample
        Inherits Page

        Public Sub New()

            Dim mainPanel As New StackPanel()
            canvasBackgroundExample(mainPanel)
            Me.Content = mainPanel

        End Sub


        Private Sub canvasBackgroundExample(ByVal mainPanel As Panel)

            Dim theImage As New BitmapImage(New Uri("sampleImages\Waterlilies.jpg", UriKind.Relative))

            Dim myImageBrush As New ImageBrush(theImage)

            Dim myCanvas As New Canvas()
            myCanvas.Width = 300
            myCanvas.Height = 200
            myCanvas.Background = myImageBrush

            mainPanel.Children.Add(myCanvas)


        End Sub

    End Class

End Namespace
Bemalen eines Bereichs mit einer Zeichnung
DrawingBrush ermöglicht es Ihnen, einen Bereich mit Formen, Text, Bildern und Videos zu zeichnen. Die Formen innerhalb des Zeichenpinsels können selbst mit einer Volltonfarbe, einem Farbverlauf, einem Bild oder sogar mit einem weiteren DrawingBrush gezeichnet sein. Die folgende Abbildung veranschaulicht einige Verwendungsmöglichkeiten von DrawingBrush.
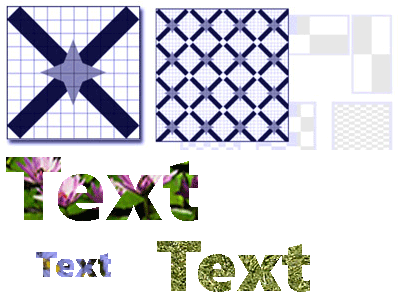
Von DrawingBrush gezeichnete Objekte
Ein DrawingBrush-Objekt zeichnet einen Bereich mit einem Drawing-Objekt. Ein Drawing-Objekt beschreibt sichtbaren Inhalt, z. B. eine Form, eine Bitmap, ein Video oder eine Textzeile. Verschiedene Arten von Zeichnungen beschreiben unterschiedliche Arten von Inhalten. Es folgt eine Liste der verschiedenen Arten von Zeichnungsobjekten.
GeometryDrawing – Zeichnet eine Form.
ImageDrawing – Zeichnet ein Bild.
GlyphRunDrawing – Zeichnet Text.
VideoDrawing – Gibt eine Audio- oder Videodatei wieder.
DrawingGroup – Zeichnet andere Zeichnungen. Verwenden Sie eine Zeichnungsgruppe, um andere Zeichnungen in einer einzigen zusammengesetzten Zeichnung zu kombinieren.
Weitere Informationen zu Drawing-Objekten finden Sie unter Übersicht über Zeichnungsobjekte.
Wie ein ImageBrush, DrawingBrush streckt sein Drawing, um seinen Ausgabebereich zu füllen. Sie können dieses Verhalten außer Kraft setzen, indem Sie die Stretch-Eigenschaft von der Standardeinstellung auf Fill ändern. Weitere Informationen finden Sie in den Ausführungen zur Stretch-Eigenschaft.
Beispiel: Ein Objekt mit einer Zeichnung bemalen
Das folgende Beispiel zeigt, wie ein Objekt mit einer Zeichnung von drei Ellipsen gemalt wird. GeometryDrawing wird verwendet, um die Ellipsen zu beschreiben.
<Button Content="A Button">
  <Button.Background>
    <DrawingBrush>
      <DrawingBrush.Drawing>
        <GeometryDrawing Brush="LightBlue">
          <GeometryDrawing.Geometry>
            <GeometryGroup>
              <EllipseGeometry RadiusX="12.5" RadiusY="25" Center="25,50" />
              <EllipseGeometry RadiusX="12.5" RadiusY="25" Center="50,50" />
              <EllipseGeometry RadiusX="12.5" RadiusY="25" Center="75,50" />
            </GeometryGroup>
          </GeometryDrawing.Geometry>
          <GeometryDrawing.Pen>
            <Pen Thickness="1" Brush="Gray" />
          </GeometryDrawing.Pen>
        </GeometryDrawing>
      </DrawingBrush.Drawing>
    </DrawingBrush>
  </Button.Background>
</Button>
// Create a DrawingBrush.
DrawingBrush myDrawingBrush = new DrawingBrush();

// Create a drawing.
GeometryDrawing myGeometryDrawing = new GeometryDrawing();
myGeometryDrawing.Brush = Brushes.LightBlue;
myGeometryDrawing.Pen = new Pen(Brushes.Gray, 1);
GeometryGroup ellipses = new GeometryGroup();
ellipses.Children.Add(new EllipseGeometry(new Point(25,50), 12.5, 25));
ellipses.Children.Add(new EllipseGeometry(new Point(50,50), 12.5, 25));
ellipses.Children.Add(new EllipseGeometry(new Point(75,50), 12.5, 25));

myGeometryDrawing.Geometry = ellipses;
myDrawingBrush.Drawing = myGeometryDrawing;

Button myButton = new Button();
myButton.Content = "A Button";

// Use the DrawingBrush to paint the button's background.
myButton.Background = myDrawingBrush;
' Create a DrawingBrush.
Dim myDrawingBrush As New DrawingBrush()

' Create a drawing.
Dim myGeometryDrawing As New GeometryDrawing()
myGeometryDrawing.Brush = Brushes.LightBlue
myGeometryDrawing.Pen = New Pen(Brushes.Gray, 1)
Dim ellipses As New GeometryGroup()
ellipses.Children.Add(New EllipseGeometry(New Point(25,50), 12.5, 25))
ellipses.Children.Add(New EllipseGeometry(New Point(50,50), 12.5, 25))
ellipses.Children.Add(New EllipseGeometry(New Point(75,50), 12.5, 25))

myGeometryDrawing.Geometry = ellipses
myDrawingBrush.Drawing = myGeometryDrawing

Dim myButton As New Button()
myButton.Content = "A Button"

' Use the DrawingBrush to paint the button's background.
myButton.Background = myDrawingBrush
Zeichnen eines Bereichs mit einem visuellen Element
Der vielseitigste und leistungsstärkste aller Pinsel, VisualBrush, malt eine Fläche mit Visual. Ein Visual ist ein grafischer Typ auf niedriger Ebene, der als Vorgänger vieler nützlicher grafischer Komponenten dient. Beispielsweise sind die Klassen Window, FrameworkElementund Control alle Typen von Visual Objekten. Mit VisualBrush können Sie Bereiche mit fast jedem grafischen Objekt von Windows Presentation Foundation (WPF) malen.
Anmerkung
Obwohl VisualBrush ein Freezable-Objekttyp ist, kann es nicht fixiert (schreibgeschützt) werden, wenn seine Visual-Eigenschaft auf einen anderen Wert als null festgelegt ist.
Es gibt zwei Möglichkeiten, den Visual-Inhalt einer VisualBrush anzugeben.
Erstellen Sie eine neue Visual, und verwenden Sie sie, um die Visual-Eigenschaft des VisualBrush festzulegen. Ein Beispiel finden Sie unter Beispiel: Zeichnen eines Objekts mit einem visuellen Element im folgenden Abschnitt.
Verwenden Sie ein vorhandenes Visual, wodurch ein Duplikat des Visual-Ziels erstellt wird. Anschließend können Sie die VisualBrush verwenden, um interessante Effekte wie Spiegelung und Vergrößerung zu erzeugen. Ein Beispiel finden Sie unter Beispiel: Erstellen einer Spiegelung.
Wenn Sie ein neues Visual für ein VisualBrush und Visual als UIElement definieren (z. B. ein Bedienfeld oder ein Steuerelement), wird das Layoutsystem auf dem UIElement und seinen untergeordneten Elementen ausgeführt, wenn die AutoLayoutContent-Eigenschaft auf true gesetzt ist. Das Stamm-UIElement ist jedoch im Grunde vom Rest des Systems isoliert: Stile und externes Layout können diese Abgrenzung nicht durchdringen. Daher sollten Sie explizit die Größe des Stamm-UIElement angeben, zumal VisualBrush sein einziges übergeordnetes Objekt ist und es sich deshalb nicht automatisch an den gezeichneten Bereich anpassen kann. Weitere Informationen zum Layout in Windows Presentation Foundation (WPF) finden Sie im Layout.
Wie ImageBrush und DrawingBrush streckt VisualBrush seinen Inhalt, um seinen Ausgabebereich zu füllen. Sie können dieses Verhalten außer Kraft setzen, indem Sie die Stretch-Eigenschaft von der Standardeinstellung auf Fill ändern. Weitere Informationen finden Sie in den Ausführungen zur Stretch-Eigenschaft.
Beispiel: Zeichnen eines Objekts mit einem visuellen Element
Im folgenden Beispiel werden mehrere Steuerelemente und ein Panel verwendet, um ein Rechteck zu zeichnen.
<Rectangle Width="150" Height="150" Stroke="Black" Margin="5,0,5,0">
  <Rectangle.Fill>
    <VisualBrush>
      <VisualBrush.Visual>
        <StackPanel Background="White">
          <Rectangle Width="25" Height="25" Fill="Red" Margin="2" />
          <TextBlock FontSize="10pt" Margin="2">Hello, World!</TextBlock>
          <Button Margin="2">A Button</Button>
        </StackPanel>
      </VisualBrush.Visual>
    </VisualBrush>
  </Rectangle.Fill>
</Rectangle>
VisualBrush myVisualBrush = new VisualBrush();

// Create the visual brush's contents.
StackPanel myStackPanel = new StackPanel();
myStackPanel.Background = Brushes.White;

Rectangle redRectangle = new Rectangle();
redRectangle.Width = 25;
redRectangle.Height =25;
redRectangle.Fill = Brushes.Red;
redRectangle.Margin = new Thickness(2);
myStackPanel.Children.Add(redRectangle);

TextBlock someText = new TextBlock();
FontSizeConverter myFontSizeConverter = new FontSizeConverter();
someText.FontSize = (double)myFontSizeConverter.ConvertFrom("10pt");
someText.Text = "Hello, World!";
someText.Margin = new Thickness(2);
myStackPanel.Children.Add(someText);

Button aButton = new Button();
aButton.Content = "A Button";
aButton.Margin = new Thickness(2);
myStackPanel.Children.Add(aButton);

// Use myStackPanel as myVisualBrush's content.
myVisualBrush.Visual = myStackPanel;

// Create a rectangle to paint.
Rectangle myRectangle = new Rectangle();
myRectangle.Width = 150;
myRectangle.Height = 150;
myRectangle.Stroke = Brushes.Black;
myRectangle.Margin = new Thickness(5,0,5,0);

// Use myVisualBrush to paint myRectangle.
myRectangle.Fill = myVisualBrush;
Dim myVisualBrush As New VisualBrush()

' Create the visual brush's contents.
Dim myStackPanel As New StackPanel()
myStackPanel.Background = Brushes.White

Dim redRectangle As New Rectangle()
With redRectangle
    .Width = 25
    .Height = 25
    .Fill = Brushes.Red
    .Margin = New Thickness(2)
End With
myStackPanel.Children.Add(redRectangle)

Dim someText As New TextBlock()
Dim myFontSizeConverter As New FontSizeConverter()
someText.FontSize = CDbl(myFontSizeConverter.ConvertFrom("10pt"))
someText.Text = "Hello, World!"
someText.Margin = New Thickness(2)
myStackPanel.Children.Add(someText)

Dim aButton As New Button()
aButton.Content = "A Button"
aButton.Margin = New Thickness(2)
myStackPanel.Children.Add(aButton)

' Use myStackPanel as myVisualBrush's content.
myVisualBrush.Visual = myStackPanel

' Create a rectangle to paint.
Dim myRectangle As New Rectangle()
With myRectangle
    .Width = 150
    .Height = 150
    .Stroke = Brushes.Black
    .Margin = New Thickness(5, 0, 5, 0)
End With

' Use myVisualBrush to paint myRectangle.
myRectangle.Fill = myVisualBrush
Beispiel: Erstellen einer Spiegelung
Im vorherigen Beispiel wurde gezeigt, wie Sie eine neue Visual für die Verwendung als Hintergrund erstellen. Sie können auch eine VisualBrush verwenden, um ein vorhandenes visuelles Element anzuzeigen; Mit dieser Funktion können Sie interessante visuelle Effekte wie Spiegelungen und Vergrößerungen erzeugen. Das folgende Beispiel verwendet VisualBrush, um eine Spiegelung von Border zu erstellen, die mehrere Elemente enthält. In der folgenden Abbildung ist die von diesem Beispiel erstellte Ausgabe dargestellt.
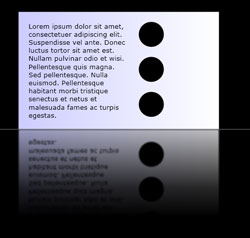
Ein gespiegeltes Visual-Objekt
using System;
using System.Windows;
using System.Windows.Data;
using System.Windows.Controls;
using System.Windows.Media;
using System.Windows.Media.Effects;
using System.Windows.Media.Imaging;
using System.IO;
using System.Collections.ObjectModel;
using System.Windows.Shapes;
namespace SDKSample
{
    public partial class ReflectionExample : Page
    {
        public ReflectionExample()
        {
            // Create a name scope for the page.
            NameScope.SetNameScope(this, new NameScope());

            this.Background = Brushes.Black;
            StackPanel myStackPanel = new StackPanel();
            myStackPanel.Margin = new Thickness(50);

            Border myReflectedBorder = new Border();
            this.RegisterName("ReflectedVisual", myReflectedBorder);

            // Create a gradient background for the border.
            GradientStop firstStop = new GradientStop();
            firstStop.Offset = 0.0;
            Color firstStopColor = new Color();
            firstStopColor.R = 204;
            firstStopColor.G = 204;
            firstStopColor.B = 255;
            firstStopColor.A = 255;
            firstStop.Color = firstStopColor;
            GradientStop secondStop = new GradientStop();
            secondStop.Offset = 1.0;
            secondStop.Color = Colors.White;

            GradientStopCollection myGradientStopCollection = new GradientStopCollection();
            myGradientStopCollection.Add(firstStop);
            myGradientStopCollection.Add(secondStop);

            LinearGradientBrush myLinearGradientBrush = new LinearGradientBrush();
            myLinearGradientBrush.StartPoint = new Point(0, 0.5);
            myLinearGradientBrush.EndPoint = new Point(1, 0.5);
            myLinearGradientBrush.GradientStops = myGradientStopCollection;

            myReflectedBorder.Background = myLinearGradientBrush;

            // Add contents to the border.
            StackPanel borderStackPanel = new StackPanel();
            borderStackPanel.Orientation = Orientation.Horizontal;
            borderStackPanel.Margin = new Thickness(10);

            TextBlock myTextBlock = new TextBlock();
            myTextBlock.TextWrapping = TextWrapping.Wrap;
            myTextBlock.Width = 200;
            myTextBlock.Text = "Lorem ipsum dolor sit amet, consectetuer adipiscing elit." +
                               " Suspendisse vel ante. Donec luctus tortor sit amet est." +
                               " Nullam pulvinar odio et wisi." +
                               " Pellentesque quis magna. Sed pellentesque." +
                               " Nulla euismod." +
                               "Pellentesque habitant morbi tristique senectus et netus et malesuada fames ac turpis egestas.";

            borderStackPanel.Children.Add(myTextBlock);

            StackPanel ellipseStackPanel = new StackPanel();

            Ellipse ellipse1 = new Ellipse();
            ellipse1.Margin = new Thickness(10);
            ellipse1.Height = 50;
            ellipse1.Width = 50;
            ellipse1.Fill = Brushes.Black;
            ellipseStackPanel.Children.Add(ellipse1);
            Ellipse ellipse2 = new Ellipse();
            ellipse2.Margin = new Thickness(10);
            ellipse2.Height = 50;
            ellipse2.Width = 50;
            ellipse2.Fill = Brushes.Black;
            ellipseStackPanel.Children.Add(ellipse2);
            Ellipse ellipse3 = new Ellipse();
            ellipse3.Margin = new Thickness(10);
            ellipse3.Height = 50;
            ellipse3.Width = 50;
            ellipse3.Fill = Brushes.Black;
            ellipseStackPanel.Children.Add(ellipse3);
            borderStackPanel.Children.Add(ellipseStackPanel);

            myReflectedBorder.Child = borderStackPanel;

            // Create divider rectangle
            Rectangle dividerRectangle = new Rectangle();
            dividerRectangle.Height = 1;
            dividerRectangle.Fill = Brushes.Gray;
            dividerRectangle.HorizontalAlignment = HorizontalAlignment.Stretch;

            // Create the object to contain the reflection.
            Rectangle reflectionRectangle = new Rectangle();

            // Bind the height of the rectangle to the border height.
            Binding heightBinding = new Binding();
            heightBinding.ElementName = "ReflectedVisual";
            heightBinding.Path = new PropertyPath(Rectangle.HeightProperty);
            BindingOperations.SetBinding(reflectionRectangle, Rectangle.HeightProperty, heightBinding);

            // Bind the width of the rectangle to the border width.
            Binding widthBinding = new Binding();
            widthBinding.ElementName = "ReflectedVisual";
            widthBinding.Path = new PropertyPath(Rectangle.WidthProperty);
            BindingOperations.SetBinding(reflectionRectangle, Rectangle.WidthProperty, widthBinding);

            // Creates the reflection.
            VisualBrush myVisualBrush = new VisualBrush();
            myVisualBrush.Opacity = 0.75;
            myVisualBrush.Stretch = Stretch.None;
            Binding reflectionBinding = new Binding();
            reflectionBinding.ElementName = "ReflectedVisual";
            BindingOperations.SetBinding(myVisualBrush, VisualBrush.VisualProperty, reflectionBinding);

            ScaleTransform myScaleTransform = new ScaleTransform();
            myScaleTransform.ScaleX = 1;
            myScaleTransform.ScaleY = -1;
            TranslateTransform myTranslateTransform = new TranslateTransform();
            myTranslateTransform.Y = 1;

            TransformGroup myTransformGroup = new TransformGroup();
            myTransformGroup.Children.Add(myScaleTransform);
            myTransformGroup.Children.Add(myTranslateTransform);

            myVisualBrush.RelativeTransform = myTransformGroup;

            reflectionRectangle.Fill = myVisualBrush;

            // Create a gradient background for the border.
            GradientStop firstStop2 = new GradientStop();
            firstStop2.Offset = 0.0;
            Color c1 = new Color();
            c1.R = 0;
            c1.G = 0;
            c1.B = 0;
            c1.A = 255;
            firstStop2.Color = c1;
            GradientStop secondStop2 = new GradientStop();
            secondStop2.Offset = 0.5;
            Color c2 = new Color();
            c2.R = 0;
            c2.G = 0;
            c2.B = 0;
            c2.A = 51;
            firstStop2.Color = c2;
            GradientStop thirdStop = new GradientStop();
            thirdStop.Offset = 0.75;
            Color c3 = new Color();
            c3.R = 0;
            c3.G = 0;
            c3.B = 0;
            c3.A = 0;
            thirdStop.Color = c3;

            GradientStopCollection myGradientStopCollection2 = new GradientStopCollection();
            myGradientStopCollection2.Add(firstStop2);
            myGradientStopCollection2.Add(secondStop2);
            myGradientStopCollection2.Add(thirdStop);

            LinearGradientBrush myLinearGradientBrush2 = new LinearGradientBrush();
            myLinearGradientBrush2.StartPoint = new Point(0.5, 0);
            myLinearGradientBrush2.EndPoint = new Point(0.5, 1);
            myLinearGradientBrush2.GradientStops = myGradientStopCollection2;

            reflectionRectangle.OpacityMask = myLinearGradientBrush2;

            BlurBitmapEffect myBlurBitmapEffect = new BlurBitmapEffect();
            myBlurBitmapEffect.Radius = 1.5;

            reflectionRectangle.BitmapEffect = myBlurBitmapEffect;

            myStackPanel.Children.Add(myReflectedBorder);
            myStackPanel.Children.Add(dividerRectangle);
            myStackPanel.Children.Add(reflectionRectangle);
            this.Content = myStackPanel;
        }
        /*
    <Rectangle
      Height="{Binding Path=ActualHeight, ElementName=ReflectedVisual}"
      Width="{Binding Path=ActualWidth, ElementName=ReflectedVisual}">

      <Rectangle.OpacityMask>
        <LinearGradientBrush StartPoint="0.5,0" EndPoint="0.5,1">
          <GradientStop Color="#FF000000" Offset="0.0" />
          <GradientStop Color="#33000000" Offset="0.5" />
          <GradientStop Color="#00000000" Offset="0.75" />
        </LinearGradientBrush>
      </Rectangle.OpacityMask>

      <Rectangle.BitmapEffect>
        <BlurBitmapEffect Radius="1.5" />
      </Rectangle.BitmapEffect>

    </Rectangle>
  </StackPanel>
</Page>

*/
    }
}
Imports System.Windows
Imports System.Windows.Data
Imports System.Windows.Controls
Imports System.Windows.Media
Imports System.Windows.Media.Effects
Imports System.Windows.Media.Imaging
Imports System.IO
Imports System.Collections.ObjectModel
Imports System.Windows.Shapes
Namespace SDKSample
    Partial Public Class ReflectionExample
        Inherits Page
        Public Sub New()
            ' Create a name scope for the page.
            NameScope.SetNameScope(Me, New NameScope())

            Me.Background = Brushes.Black
            Dim myStackPanel As New StackPanel()
            myStackPanel.Margin = New Thickness(50)

            Dim myReflectedBorder As New Border()
            Me.RegisterName("ReflectedVisual", myReflectedBorder)

            ' Create a gradient background for the border.
            Dim firstStop As New GradientStop()
            firstStop.Offset = 0.0
            Dim firstStopColor As New Color()
            firstStopColor.R = 204
            firstStopColor.G = 204
            firstStopColor.B = 255
            firstStopColor.A = 255
            firstStop.Color = firstStopColor
            Dim secondStop As New GradientStop()
            secondStop.Offset = 1.0
            secondStop.Color = Colors.White

            Dim myGradientStopCollection As New GradientStopCollection()
            myGradientStopCollection.Add(firstStop)
            myGradientStopCollection.Add(secondStop)

            Dim myLinearGradientBrush As New LinearGradientBrush()
            myLinearGradientBrush.StartPoint = New Point(0, 0.5)
            myLinearGradientBrush.EndPoint = New Point(1, 0.5)
            myLinearGradientBrush.GradientStops = myGradientStopCollection

            myReflectedBorder.Background = myLinearGradientBrush

            ' Add contents to the border.
            Dim borderStackPanel As New StackPanel()
            borderStackPanel.Orientation = Orientation.Horizontal
            borderStackPanel.Margin = New Thickness(10)

            Dim myTextBlock As New TextBlock()
            myTextBlock.TextWrapping = TextWrapping.Wrap
            myTextBlock.Width = 200
            myTextBlock.Text = "Lorem ipsum dolor sit amet, consectetuer adipiscing elit." & " Suspendisse vel ante. Donec luctus tortor sit amet est." & " Nullam pulvinar odio et wisi." & " Pellentesque quis magna. Sed pellentesque." & " Nulla euismod." & "Pellentesque habitant morbi tristique senectus et netus et malesuada fames ac turpis egestas."

            borderStackPanel.Children.Add(myTextBlock)

            Dim ellipseStackPanel As New StackPanel()

            Dim ellipse1 As New Ellipse()
            ellipse1.Margin = New Thickness(10)
            ellipse1.Height = 50
            ellipse1.Width = 50
            ellipse1.Fill = Brushes.Black
            ellipseStackPanel.Children.Add(ellipse1)
            Dim ellipse2 As New Ellipse()
            ellipse2.Margin = New Thickness(10)
            ellipse2.Height = 50
            ellipse2.Width = 50
            ellipse2.Fill = Brushes.Black
            ellipseStackPanel.Children.Add(ellipse2)
            Dim ellipse3 As New Ellipse()
            ellipse3.Margin = New Thickness(10)
            ellipse3.Height = 50
            ellipse3.Width = 50
            ellipse3.Fill = Brushes.Black
            ellipseStackPanel.Children.Add(ellipse3)
            borderStackPanel.Children.Add(ellipseStackPanel)

            myReflectedBorder.Child = borderStackPanel

            ' Create divider rectangle
            Dim dividerRectangle As New Rectangle()
            dividerRectangle.Height = 1
            dividerRectangle.Fill = Brushes.Gray
            dividerRectangle.HorizontalAlignment = HorizontalAlignment.Stretch

            ' Create the object to contain the reflection.
            Dim reflectionRectangle As New Rectangle()

            ' Bind the height of the rectangle to the border height.
            Dim heightBinding As New Binding()
            heightBinding.ElementName = "ReflectedVisual"
            heightBinding.Path = New PropertyPath(Rectangle.HeightProperty)
            BindingOperations.SetBinding(reflectionRectangle, Rectangle.HeightProperty, heightBinding)

            ' Bind the width of the rectangle to the border width.
            Dim widthBinding As New Binding()
            widthBinding.ElementName = "ReflectedVisual"
            widthBinding.Path = New PropertyPath(Rectangle.WidthProperty)
            BindingOperations.SetBinding(reflectionRectangle, Rectangle.WidthProperty, widthBinding)

            ' Creates the reflection.
            Dim myVisualBrush As New VisualBrush()
            myVisualBrush.Opacity = 0.75
            myVisualBrush.Stretch = Stretch.None
            Dim reflectionBinding As New Binding()
            reflectionBinding.ElementName = "ReflectedVisual"
            BindingOperations.SetBinding(myVisualBrush, VisualBrush.VisualProperty, reflectionBinding)

            Dim myScaleTransform As New ScaleTransform()
            myScaleTransform.ScaleX = 1
            myScaleTransform.ScaleY = -1
            Dim myTranslateTransform As New TranslateTransform()
            myTranslateTransform.Y = 1

            Dim myTransformGroup As New TransformGroup()
            myTransformGroup.Children.Add(myScaleTransform)
            myTransformGroup.Children.Add(myTranslateTransform)

            myVisualBrush.RelativeTransform = myTransformGroup

            reflectionRectangle.Fill = myVisualBrush

            ' Create a gradient background for the border.
            Dim firstStop2 As New GradientStop()
            firstStop2.Offset = 0.0
            Dim c1 As New Color()
            c1.R = 0
            c1.G = 0
            c1.B = 0
            c1.A = 255
            firstStop2.Color = c1
            Dim secondStop2 As New GradientStop()
            secondStop2.Offset = 0.5
            Dim c2 As New Color()
            c2.R = 0
            c2.G = 0
            c2.B = 0
            c2.A = 51
            firstStop2.Color = c2
            Dim thirdStop As New GradientStop()
            thirdStop.Offset = 0.75
            Dim c3 As New Color()
            c3.R = 0
            c3.G = 0
            c3.B = 0
            c3.A = 0
            thirdStop.Color = c3

            Dim myGradientStopCollection2 As New GradientStopCollection()
            myGradientStopCollection2.Add(firstStop2)
            myGradientStopCollection2.Add(secondStop2)
            myGradientStopCollection2.Add(thirdStop)

            Dim myLinearGradientBrush2 As New LinearGradientBrush()
            myLinearGradientBrush2.StartPoint = New Point(0.5, 0)
            myLinearGradientBrush2.EndPoint = New Point(0.5, 1)
            myLinearGradientBrush2.GradientStops = myGradientStopCollection2

            reflectionRectangle.OpacityMask = myLinearGradientBrush2

            Dim myBlurBitmapEffect As New BlurBitmapEffect()
            myBlurBitmapEffect.Radius = 1.5

            reflectionRectangle.BitmapEffect = myBlurBitmapEffect

            myStackPanel.Children.Add(myReflectedBorder)
            myStackPanel.Children.Add(dividerRectangle)
            myStackPanel.Children.Add(reflectionRectangle)
            Me.Content = myStackPanel

        End Sub
    End Class
End Namespace
<Page
  xmlns="http://schemas.microsoft.com/winfx/2006/xaml/presentation"
  xmlns:x="http://schemas.microsoft.com/winfx/2006/xaml"
  Background="Black">


  <StackPanel Margin="50">

    <!-- The object to reflect. -->
    <Border Name="ReflectedVisual" Width="400">
      <Border.Background>
        <LinearGradientBrush StartPoint="0,0.5" EndPoint="1,0.5">
          <GradientStop Offset="0.0" Color="#CCCCFF" />
          <GradientStop Offset="1.0" Color="White" />
        </LinearGradientBrush>
      </Border.Background>
      <StackPanel Orientation="Horizontal" Margin="10">
        <TextBlock TextWrapping="Wrap" Width="200" Margin="10">
          Lorem ipsum dolor sit amet, consectetuer adipiscing elit.
          Suspendisse vel ante. Donec luctus tortor sit amet est.
          Nullam pulvinar odio et wisi.
          Pellentesque quis magna. Sed pellentesque.
          Nulla euismod.
          Pellentesque habitant morbi tristique senectus et netus et malesuada fames ac turpis egestas.
        </TextBlock>
        <StackPanel>
          <Ellipse Margin="10" Height="50" Width="50" Fill="Black" />
          <Ellipse Margin="10" Height="50" Width="50" Fill="Black" />
          <Ellipse Margin="10" Height="50" Width="50" Fill="Black" />
        </StackPanel>
      </StackPanel>
    </Border>

    <Rectangle Height="1" Fill="Gray" HorizontalAlignment="Stretch" />

    <!-- The object to contain the reflection.-->
    <Rectangle
      Height="{Binding Path=ActualHeight, ElementName=ReflectedVisual}"
      Width="{Binding Path=ActualWidth, ElementName=ReflectedVisual}">
      <Rectangle.Fill>

        <!-- Creates the reflection. -->
        <VisualBrush
          Opacity="0.75" Stretch="None"
          Visual="{Binding ElementName=ReflectedVisual}">
          <VisualBrush.RelativeTransform>

            <!-- Flip the reflection. -->
            <TransformGroup>
              <ScaleTransform ScaleX="1" ScaleY="-1" />
              <TranslateTransform  Y="1" />
            </TransformGroup>
          </VisualBrush.RelativeTransform>
        </VisualBrush>
      </Rectangle.Fill>

      <Rectangle.OpacityMask>
        <LinearGradientBrush StartPoint="0.5,0" EndPoint="0.5,1">
          <GradientStop Color="#FF000000" Offset="0.0" />
          <GradientStop Color="#33000000" Offset="0.5" />
          <GradientStop Color="#00000000" Offset="0.75" />
        </LinearGradientBrush>
      </Rectangle.OpacityMask>

      <Rectangle.BitmapEffect>
        <BlurBitmapEffect Radius="1.5" />
      </Rectangle.BitmapEffect>

    </Rectangle>
  </StackPanel>
</Page>
Weitere Beispiele zum Vergrößern von Teilen des Bildschirms und zum Erstellen von Spiegelungen finden Sie im VisualBrush-Beispiel-.
TileBrush-Funktionen
ImageBrush, DrawingBrushund VisualBrush sind Typen von TileBrush Objekten. TileBrush-Objekte bieten Ihnen gute Steuerungsmöglichkeiten für das Malen eines Bilds, einer Zeichnung oder eines visuellen Objekts in einem Bereich. Anstatt beispielsweise nur einen Bereich mit einem einzelnen gestreckten Bild zu zeichnen, können Sie einen Bereich mit einer Reihe von Bildkacheln zeichnen, die ein Muster erstellen.
TileBrush verfügt über drei primäre Komponenten: Inhalt, Kacheln und Ausgabebereich.
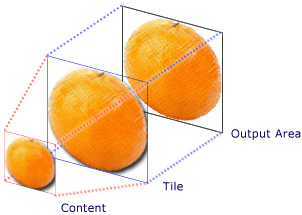
Komponenten von TileBrush mit einer einzelnen Kachel
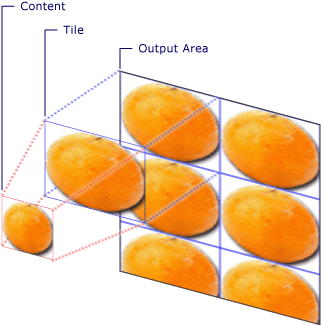
Komponente von TileBrush mit mehreren Kacheln
Weitere Informationen über die Kachelfunktionen von TileBrush-Objekten finden Sie in der TileBrush-Übersicht.
Weitere Informationen
.NET Desktop feedback
