Integrating Facebook authentication in Universal Windows apps
When it comes to develop a mobile application, a common requirement is the integration with third-party services: one of the most used is Facebook, which allows to integrate the social network experience into our application, by offering to the user the chance to authenticate himself, to share a content on his timeline or to retrieve information about his profile and his friends.
Facebook authentication (and, generally speaking, many other third party services, like Twitter or Google) relies on a protocol called OAuth, which improves the security and the privacy for the final user: thanks to this approach, the user won’t have to insert his credentials directly in the application (giving the chance, to a malicious developer, to steal them), but he will always perform the authentication procedure using a secure web page that is provided directly by the owner of the service. As developers, the only information we’ll get is an access token, that is a special key (which is anonymous and that can’t be used to retrieve the real user’s credentials) that we’ll need to use to authenticate all the other operations we’re going to perform with the service.
During this post we’re going to see how, thanks to the Facebook SDK for .NET library and the WebAuthenticationBroker class, we can integrate Facebook inside a Windows Store app for Windows and Windows Phone in an easy way: after that the user is successfully logged in, we’ll be able to use the Graph APIs provided by Facebook to perform additional operations, like retrieving his profile or publish a post on his timeline.
The procedure requires different steps to be completed, in order to allow our Windows Store app to talk with the Facebook services:
- Facebook has its own developer’s portal, where all the applications that interact with their services needs to be registered. Consequently, in this post, we’re going to see how to do it and how to properly setup it.
- The procedure to integrate Facebook in an application requires a different configuration according to the target platform. To complete this step, by linking the Facebook app to a Windows Store app, we need an information (called Package SID) that is provided by the Windows dashboard when we submit our application on the Store. In this post we’re going to see how to register the application and how to retrieve the Package SID.
- After we’ve collected all these information and we’ve properly setup the application both on the Windows dashboard and on the Facebook developer’s portal, we are ready to write some code: in the last part of this post we’re going to see how to use the WebAuthenticationBroker class provided by the Windows Runtime to perform the authentication and to interact with the Graph APIs.
The first step: registering the application on the Store
To correctly perform the authentication, the first required step is to register the application on the Windows Store, by reserving a name. This procedure is used to link your application to an unique name, that will be exclusive: no other applications will be able to use it. If you’ve already performed this procedure (for example, because the application is already published on the Store and you’re implementing Facebook authentication in an update), you can skip the following steps; otherwise, you can perform the association by right clicking on your Windows or Windows Phone project in Visual Studio, choosing Store and then clicking on the Associate App with Store option. Visual Studio will start a wizard, that will display a list of names you’ve already reserved or it will give you the chance to reserve a new one. In both cases, the procedure will take take care of updating the manifest file of your project, in order to replace the temporary information (like the application’s name or the package identifier) with the real ones.
Once the application has been registered, you’ll need to login to the Windows dashboard (https://appdev.microsoft.com/StorePortals/Home/Index) to continue the procedure. Attention! It’s important to highlight that this step is required regardless if you’re publishing a Windows or Windows Phone application. In fact, at the moment of writing, the information we need to proceed with the configuration can be retrieved only from the Windows dashboard, even if you’re going to publish just the Windows Phone app. Consequently, you’ll have to proceed and associate both applications with the same name, like if you’re going to publish a Universal Windows app (two applications, one for Windows and one for Windows Phone, that share the same name and identity, as explained in the following document https://msdn.microsoft.com/library/windows/apps/dn646927.aspx).
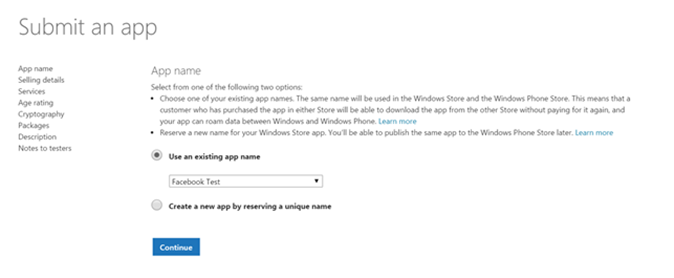
Once you’ve logged into your Windows dashboard using your developer account, you need to start the procedure to submit a new application (or to submit an update for an existing one, in case you want to integrate Facebook in an already published application). The submission procedure is made by different steps: in this post we’re not going to cover all of them, since we’re not going to effectively publish the application on the Store. However, to move on and unlock the access to the all the other steps, we need to complete at least the first one, called App name: in this step we will have to choose the name of the application. Since we’ve already reserved one in Visual Studio, we can just choose it from the dropdown menu.
After you’ve completed this step, by pressing the Continue button, you’ll be redirected to the list of required steps to complete the submission procedure: we can directly skip to the one called Services, which is the third one from the top, as you can see in the following picture.
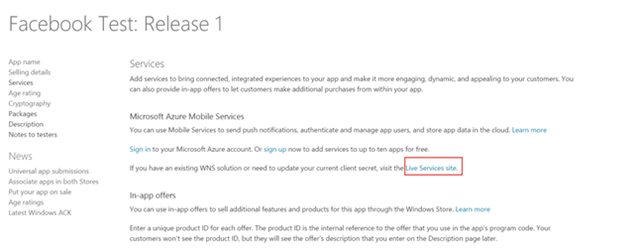
By clicking on it, you’ll be redirected to the following page:
In the image I’ve highlighted the link you’ll need to click to continue the procedure, which is called Live Services site: you’ll be redirected to a new page, that will display a set of information that are required for some scenarios (like implementing push notifications). The information we need to properly set up the Facebook authentication is called Package SID, which is highlighted in the following image: save it somewhere, because you’re going to need it later.
The second step: register the application on Facebook
The second step is to register the application on the Facebook Developer portal (https://developers.facebook.com): it’s the website where all the developers can register all their applications that needs to interact with the social network, no matter if they are mobile apps, web apps, desktop apps, etc. The registration, in fact, gives you access to a set of credentials that are required to successfully authenticate your application in a secure way. The first step, after performing the login with your Facebook credentials, is to register a new application, by choosing from the dropdown menu called My apps the Add a new app option.
Facebook will ask you, as first information, the target platform: for the moment, choose Advanced platform, since Windows and Windows Phone won’t be immediately available in the list. The next step will open a pop-up like the following one:
Just fill all the required information (name and category), then proceed with the creation of the app by pressing the Create App ID button.
Once the setup is completed, you’ll have to fill a set of required information. The first part of the configuration is made in the Settings section, which can be found in the menu on the left. In this page, you’ll have to:
- Fill the Contact email field with a real e-mail address. Without this information, you won’t be able to make your Facebook application public and, consequently, your Windows Store app won’t be able to interact with it.
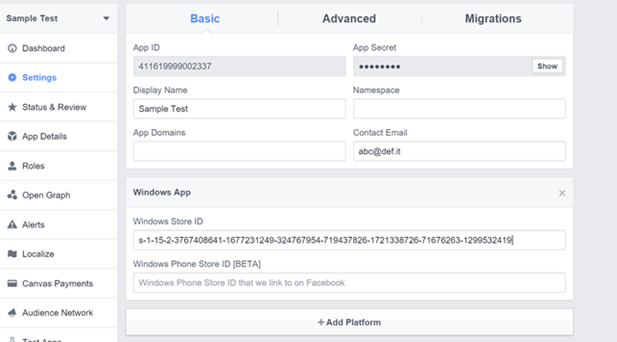
- Click on the Add platform button, in order to add support to a new platform: in the list, this time, you’ll find also the Windows logo, which will add a new section in the page with two fields, called Windows Store ID and Windows Phone Store ID [BETA] . In this post, we’re going to use the WebAuthenticationBroker class to perform the authentication: consequently, we just need to fill the field called Windows Store ID, which will be valid both for the Windows and Windows Phone version of the app. In this field we need to insert the value of the Package SID that we’ve retrieved in the first step from the Windows dashboard. Important! We need to remove the ms-app:/// protocol from the Package SID, before inserting it into the Windows Store ID field, like in the following image:
What is the purpose of the Windows Phone Store ID [BETA] field? We can use it in case we want to perform the authentication using the native Facebook app for Windows Phone, instead of relying on a web page like we’re going to in this post. The advantage of this approach is that it’s simpler for the user, since he won’t have to fill his credentials if he’s already authenticated in the Facebook app. However, there are two downsides:
- This approach works only if the user has installed the Facebook application on his phone.
- This approach doesn’t fit very well the Universal Windows app model, since it’s available only on Windows Phone: integrated authentication isn’t supported by the Facebook app for Windows.
If you want to know more about this approach, you can read the following article: https://developers.facebook.com/docs/facebook-login/login-for-windows-phone
Now that we have properly configured the Facebook app, we can make it public: move to the Status & Review section and set to Yes the switch near the option Do you want to make this app and all its live features available to the general public? , as displayed in the following image.
The third step: integrate Facebook in the app
Now that the application has been properly configured both in the Windows dashboard and in the Facebook Developers’ portal, we can start writing some code and integrate the authentication in the application. As already mentioned in the beginning of the post, Facebook offers a set of REST APIs called Graph APIs, that can be consumed simply by performing HTTP requests using the standard commands provided by the protocol (like GET, POST, etc.). However, this approach would required to write a lot of code, since we would need to prepare the request (with all the correct headers and parameters) and to manually parse the JSON response, in order to extract the information we need. Luckily, we can find on NuGet a 3rd party library called Facebook C# SDK, which we need to add to both projects of our Universal Windows app (Windows and Windows Phone). As we’re going to see later in the post, thanks to the FacebookClient class included in this library, it will be easier to interact with the Graph APIs from a .NET based application.
Then, we’re going to use a Windows Runtime class called WebAuthenticationBroker to perform the authentication: the purpose of this class is to simplify the authentication’s flow with services that rely on OAuth as a security protocol. Typically, when you work with OAuth, as developers you have to manually manage a set of operations, like:
- Generate the authentication’s URL.
- Add a WebView inside the application, to display the authentication’s page provided by the third party service.
- Once the user has completed the login, we need to intercept the URL returned by the service and parse it to retrieve the access token.
The WebAuthenticationBroker class takes care of all these steps for you: we just need to configure it by setting the authentication’s URL and parameters, then it will take care of generating for us the WebView and to return to the application the status of the operation and, eventually, the access token. The procedure to set up the WebAuthenticationBroker class is in common between Windows and Windows Phone. However, the real usage of the class is different in the two platforms, so the post will treat them in a separate way.
The configuration
The following code shows how to properly setup the WebAuthenticationBroker class:
 private async Task Login()
{
    //Facebook app id
    var clientId = "1531845183735056";
    //Facebook permissions
    var scope = "public_profile, email";

    var redirectUri = WebAuthenticationBroker.GetCurrentApplicationCallbackUri().ToString();
    var fb = new FacebookClient();
    Uri loginUrl = fb.GetLoginUrl(new
    {
        client_id = clientId,
        redirect_uri = redirectUri,
        response_type = "token",
        scope = scope
    });

    Uri startUri = loginUrl;
    Uri endUri = new Uri(redirectUri, UriKind.Absolute);
}
In the beginning, we define two important variables
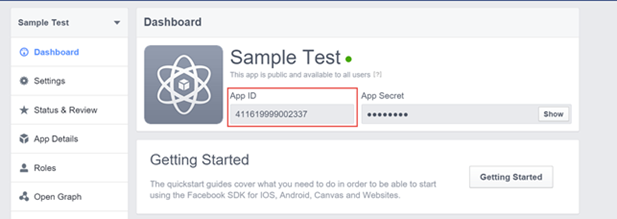
- clientid is the unique identifier of the Facebook application, which can be retrieved in the Facebook Developer’s portal from the section called Dashboard, as you can see in the following image:
- scope is a string which collects all the Facebook permissions we want to use (the complete list is available on https://developers.facebook.com/docs/facebook-login/permissions/v2.2). In the sample, we ask the permission to access to the mail address of the user (email) and to the information published on his public profile (public_profile).
The next step is to retrieve the callback URL that is invoked by Facebook once the login procedure is completed: this URL is the Package SID we’ve previously retrieved from the Windows dashboard. However, if we have properly linked our application on the Store using the Visual Studio option described at the beginning of this post, we won’t have to specify it manually: the WebAuthenticationBroker class, in fact, is able to return the URL for us simply by calling the GetCurrrentApplicationCallbackUri() method.
In the end, we can create a new instance of the FacebookClient class (which is part of the Facebook SDK we’ve installed with NuGet) and call the GetLoginUrl() method, passing as parameter a generic object with all the required information for the authentication, which are:
- the client_id, which is the unique identifier of the Facebook application.
- the redirect_uri, which is the callback URL.
- the response_type, which is a fixed value and it needs to be set to token.
- the scope, which are the Facebook permissions we’ve detailed before.
The GetLoginUrl() method will return the URL to call to start the authentication procedure: it’s now time to split the rest of the post since, as mentioned before, the procedure is different if we’re developing a Windows Store app for Windows or Windows Phone
Performing authentication in Windows 8.1
Managing the authentication in Windows 8.1 is very easy, since the operating system is able to keep multiple applications running at the same time. Here is the code to use:
 private async Task Login()
{
    //Facebook app id
    var clientId = "1531845183735056";
    //Facebook permissions
    var scope = "public_profile, email";

    var redirectUri = WebAuthenticationBroker.GetCurrentApplicationCallbackUri().ToString();
    var fb = new FacebookClient();
    var loginUrl = fb.GetLoginUrl(new
    {
        client_id = clientId,
        redirect_uri = redirectUri,
        response_type = "token",
        scope = scope
    });

    Uri startUri = loginUrl;
    Uri endUri = new Uri(redirectUri, UriKind.Absolute);

    WebAuthenticationResult result = await WebAuthenticationBroker.AuthenticateAsync(WebAuthenticationOptions.None, startUri, endUri);
    await ParseAuthenticationResult(result);

}
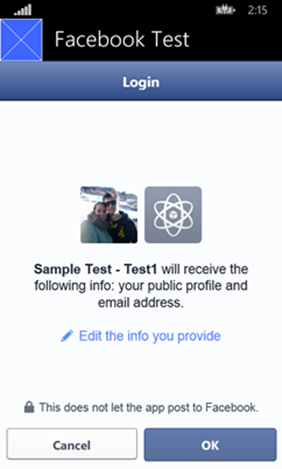
You just have to call the AuthenticateAsync() method of the WebAuthenticationBroker class, passing as parameter the authentication’s type (it’s enough to use the None value of the WebAuthenticationOptions enumerator, in this case) and the two URLs we’ve previously defined (the authentication’s URL and the callback’s URL). The method will return a WebAuthenticationResult object, with the information about the status of the operation and the URL returned by Facebook. We’re going to see later the purpose of the ParseAuthenticationResult() method and how we can detect the status the operation and retrieve the access token. The following image shows the WebView that is automatically generated in a Windows Store app for Windows.
Performing authentication in Windows Phone 8.1
Managing the authentication in a Windows Phone app is slightly more difficult, since the operating system, unlike in Windows, is not able to keep multiple applications running at the same time, but it needs to suspend the main one when it opens the WebView generated by the service. Thanks to this approach, Windows Phone is able to perform well and to offer great performances also on low end devices, which usually have less RAM memory than high end devices. Consequently, instead of calling the AuthenticateAsync() method, we need to invoke the AuthenticateAndContinue() one, like in the following sample:
 private async Task Login()
{
    //Facebook app id
    var clientId = "1531845183735056";
    //Facebook permissions
    var scope = "public_profile, email";

    var redirectUri = WebAuthenticationBroker.GetCurrentApplicationCallbackUri().ToString();
    var fb = new FacebookClient();
    var loginUrl = fb.GetLoginUrl(new
    {
        client_id = clientId,
        redirect_uri = redirectUri,
        response_type = "token",
        scope = scope
    });

    Uri startUri = loginUrl;
    Uri endUri = new Uri(redirectUri, UriKind.Absolute);

    //Avvio l'operazione di autenticazione
    WebAuthenticationBroker.AuthenticateAndContinue(startUri, endUri, null, WebAuthenticationOptions.None);

}
As you can see, the biggest difference with the Windows code is that we don’t directly receive the outcome of the authentication: by calling the AuthenticateAndContinue() method our application will be suspended and the WebView will be opened.
The next step is to include, inside our project, a class called ContinuationManager, which has been created by Microsoft to simplify this scenario. The definition of this class can be found in the MSDN documentation (https://msdn.microsoft.com/library/windows/apps/xaml/dn631755.aspx) or in the sample project that is connected to this post.
Once you have added this class to your project, you need to manage the application’s activation and suspension inside the App class, which is declared in the App.xaml.cs file.
 public sealed partial class App : Application
{
    public static ContinuationManager ContinuationManager { get; private set; }


    public App()
    {
        this.InitializeComponent();
        this.Suspending += this.OnSuspending;
        ContinuationManager = new ContinuationManager();
    }


    private void OnSuspending(object sender, SuspendingEventArgs e)
    {
        var deferral = e.SuspendingOperation.GetDeferral();

        ContinuationManager.MarkAsStale();

        deferral.Complete();
    }

    protected override void OnActivated(IActivatedEventArgs args)
    {
        if (args.Kind == ActivationKind.WebAuthenticationBrokerContinuation)
        {
            var continuationEventArgs = args as IContinuationActivatedEventArgs;
            if (continuationEventArgs != null)
            {
                ContinuationManager.Continue(continuationEventArgs);
                ContinuationManager.MarkAsStale();
            }

        }
    }
}
Compared to a standard App class definition, here is what’s changed:
- We have a new property, which type is ContinuationManager.
- In the App class constructor, we create a new instance of the property.
- Inside the OnActivated() method, we check if the application has been activated by the WebAuthenticationBroker that has completed his task: in this case, the Kind property will have, as value, ActivationKind.WebAuthenticationBrokerContinuation. We call the Continue() method of the ContinuationManager class, passing the OnActivated() ’s event parameter. In the end, we call the MarkAsStale() method, which makes sure to delete all the data that it has already been used and that it’s not needed anymore.
- For the same reason, we call the MarkAsStale() method also in the OnSuspending() event, which is triggered when the application is suspended because the WebAuthenticationBroker needs to display the WebView.
When we call the Continue() method of the ContinuationManager class, the user is brought back to the page that invoked the AuthenticateAndContinue() method of the WebAuthenticationBroker class: the next step, consequently, is to implement, in the code behind of the page, the IWebAuthenticationContinuable interface, which will force us to define the ContinueWebAuthentication() method. It’s the method that is invoked when the page is opened after that the authentication procedure is completed and it will contain the result of the operation.
 public sealed partial class MainPage : Page, IWebAuthenticationContinuable
{

    public MainPage()
    {
        this.InitializeComponent();

        this.NavigationCacheMode = NavigationCacheMode.Required;
    }

   public void ContinueWebAuthentication(WebAuthenticationBrokerContinuationEventArgs args)
   {
       await ParseAuthenticationResult(args.WebAuthenticationResult);
   }
}
Now we can end the operation and, inside the ContinueWebAuthentication() method, parse the result of the operation, which is stored in a property called WebAuthenticationResult.
Parsing the result of the authentication
No matter which approach we’ve used and which is our target platform, in the end we’ll get a WebAuthenticationResult object, with the result of the operation. The following sample code shows how to parse it in order to retrieve the information we need:
 public async Task ParseAuthenticationResult(WebAuthenticationResult result)
{
    switch (result.ResponseStatus)
    {
        case WebAuthenticationStatus.ErrorHttp:
            Debug.WriteLine("Error");
            break;
        case WebAuthenticationStatus.Success:
            var pattern = string.Format("{0}#access_token={1}&expires_in={2}", WebAuthenticationBroker.GetCurrentApplicationCallbackUri(), "(?<access_token>.+)", "(?<expires_in>.+)");
            var match = Regex.Match(result.ResponseData, pattern);

            var access_token = match.Groups["access_token"];
            var expires_in = match.Groups["expires_in"];

            AccessToken = access_token.Value;
            TokenExpiry = DateTime.Now.AddSeconds(double.Parse(expires_in.Value));

            break;
        case WebAuthenticationStatus.UserCancel:
            Debug.WriteLine("Operation aborted");
            break;
        default:
            break;
    }
}
The WebAuthenticationResult object contains a property called ResponseStatus, with the outcome of the operation: only if we get Success as value, it means that user has correctly authenticated and Facebook has returned a valid access token, which we can use for the next operations. The previous sample code shows how to parse the callback URL (using a regular expression) in order to retrieve the access token and its expire date (after that, we’ll need to retrieve a new one). A good approach, once we have the access token, is to store it permanently in a secure way, so that we can use it for all the next interaction with the Facebook services. A good approach to save sensible data (like the access token) is to use the PasswordVault class offered by the Windows Runtime, which is able to automatically encrypt the stored information. You can find more information about using it in the following article: https://msdn.microsoft.com/library/windows/apps/xaml/hh465069.aspx
Once we have the access token, we can use the APIs provided by the Facebook SDK to interact with the social network, like in the following sample:
 private async Task ShowUserInfo()
{
    FacebookClient client = new FacebookClient(AccessToken);
    dynamic user = await client.GetTaskAsync("me");
    MyName.Text = user.name;
}
We’re going to use again the FacebookClient class: the difference is that, this time, we can pass as parameter the access token we’ve previously retrieved, so that we can perform authenticated operations. Now we are able to interact with the Graph APIs provided by Facebook, which offer a set of REST APIs to perform the most common operations (you can find a list of all the available methods on https://developers.facebook.com/docs/graph-api/reference). The FacebookClient class works like the HttpClient one included in the Windows Runtime, since it exposes a series of methods to perform the most common operations offered by the HTTP protocol, like GET, POST, etc.
For example, if we want to retrieve the information about the current logged user, we need to perform a GET operation using the GetTaskAsync() method, passing as parameter the Graph API’s command to execute (in this case, it’s called me). We’ll get in return an object, which contains all the response’s parameters: the simplest way to manage it is to treat it as dynamic object, by using the dynamic keyword, which we can use to easily work with a not strongly typed object. The downside of this approach is that we won’t be able to use the IntelliSense provided by Visual Studio, since the user object doesn’t implement a specific class, but we’ll be able to access to its properties simply by specifying their name. In this scenario, the Facebook documentation is very helpful, since it provides a list of all the properties returned by a Graph API’s call: for example, if we analyze the documentation of the user object (https://developers.facebook.com/docs/graph-api/reference/v2.2/user) we discover that the name of the user is stored in a property called name, which is the one we use in the code.
Otherwise, if we would have needed to publish some content in the user’s timeline, we would have performed a POST operation: in this case, we would have used the PostTaskAsync() method offered by the FacebookClient class.
Managing the authentication in a Universal Windows app
The samples code we’ve seen so far took into account that you were dealing with two different classes and pages to manage the authentication, due to the different usage of the WebAuthenticationBroker class in Windows and Windows Phone. In case you want to support the authentication in a shared class between the two projects, you’ll have to use the conditional compilation symbols, in order to avoid compilation errors.
This operation is required since not all the methods are available on both platforms: for example, on Windows, the AuthenticateAndContinue() method is missing; or, in the OnActivated() method in the App class in Windows, the ActivationKind.WebAuthenticationBrokerContinuation value is not available. Consequently, if you want your code to compile successfully, you’ll need to use the WINDOWS_APP and WINDOWS_PHONE_APP symbols to invoke the specific code only on the target platform.
The following sample code shows how to change the login method, in order to support both platforms:
 private async Task Login()
{
    //Client ID of the Facebook App (retrieved from the Facebook Developers portal)
    var clientId = "your app id";
    //Required permissions
    var scope = "public_profile, email";

    var redirectUri = WebAuthenticationBroker.GetCurrentApplicationCallbackUri().ToString();
    var fb = new FacebookClient();
    var loginUrl = fb.GetLoginUrl(new
    {
        client_id = clientId,
        redirect_uri = redirectUri,
        response_type = "token",
        scope = scope
    });

    Uri startUri = loginUrl;
    Uri endUri = new Uri(redirectUri, UriKind.Absolute);


#if WINDOWS_PHONE_APP
    WebAuthenticationBroker.AuthenticateAndContinue(startUri, endUri, null, WebAuthenticationOptions.None);
#endif

#if WINDOWS_APP
WebAuthenticationResult result = await WebAuthenticationBroker.AuthenticateAsync(WebAuthenticationOptions.None, startUri, endUri);
await ParseAuthenticationResult(result);
#endif

}
In case the code is executed on Windows Phone, we call the AuthenticateAndContinue() method of the WebAuthenticationBroker class; otherwise, we call the AuthenticateAsync() one and we immediately parse the results of the operation. The sample code linked to this post uses this approach to properly support both platforms.
Wrapping up
In this blog post we’ve seen how to integrate Facebook in our Windows Store app for Windows and Windows Phone, starting from the configuration side (both on the Windows dashboard and on the Facebook developers’ portal) to the real code required to perform the authentication. You can download a sample project from GitHub (https://github.com/qmatteoq/FacebookSample-Universal): just remember that you’ll need to replace the fake security information (like the client id) with the real ones of your application.
Follow the Windows Store Developer Solutions team on Twitter @wsdevsol. Comments are welcome, both below and on twitter.
Comments
Anonymous
February 17, 2015
Awesome article, thank you.Anonymous
March 06, 2015
Your article gives a very good and complete overview of the whole integration. Thanks!Anonymous
April 22, 2015
But how to use existing facebook app that's installed on user's phone, like we did on WP8.0?Anonymous
May 24, 2015
Thank you for this article, it really helped me.Anonymous
June 08, 2015
Good article, might want to include the step of associating the application with the store via Visual Studio? That proved to be a stumbling point for my application.Anonymous
August 13, 2015
Can i test this locally without having to register the application on windows store?Anonymous
December 09, 2015
Excuse Me, Do you have article about invite friend App windows phone 8.1 universal ?Anonymous
January 03, 2016
Using Azure mobile services, you can also ensure Facebook authetification : code.msdn.microsoft.com/Facebook-authentification-bceea645 Best of luck my friends!Anonymous
January 11, 2016
Thanks you @Chourouk
