Building a Simple Forms Application using the Silverlight Tools for Visual Studio 2010 and WCF RIA Services
The final release of Silverlight 4 Tools for Visual Studio 2010 has recently shipped. Silverlight 4 Tools brings together Visual Studio 2010, Silverlight 4 and WCF RIA Services 1.0. This great combination of runtime and tooling makes it easier than ever to build LOB applications using Silverlight. In this walkthrough, I'll demonstrate this by using the Silverlight 4 tools to create a simple master-details product catalog application that reads and writes data from a SQL Server database.
Table of Contents
- Getting Started
- Implement data access in the web application
- Silverlight Application
- Summary
- Resources
- Comments
What You Will Need
- Visual Studio 2010 RTM Version
- Silverlight 4 Tools for Visual Studio 2010, and WCF RIA Services - you can get the final release version of both the Silverlight Tools and WCF RIA Services, at www.silverlight.net/getstarted. The easiest way to install is to use the Web Platform Installer link on that page. (Note: need to make sure you have any pre-release versions of the tools uninstalled first.)
- Silverlight Toolkit – Latest release is available on Codeplex at https://silverlight.codeplex.com/
- The project I use, which is in a ZIP archive, is attached to the bottom of this blog post. There are copies of the project in both its initial and final states, in both C# and VB, in the ZIP archive.
Note: many of the new designer features work well with WPF as well as Silverlight projects, so this download is definitely recommended for Visual Studio 2010 WPF designer users too.
Let's get started!
Here's what the final application will look like:

Getting Started
Once you have Visual Studio 2010 Tools for Silverlight 4, you can follow along by downloading and opening this sample. After opening the solution file, you'll see that it consists of a Silverlight client project and an ASP.Net web project. As you can see I have the basics of our form laid out. The next step is to expose the data from the data base via a web service and wire it into the UI.

Implement data access in the web application
RIA Services, which is part of the Visual Studio 2010 Tools for Silverlight 4 installation, makes it easy to expose the application data and business logic as a web service.
I start by creating an Entity Data Model in the Web project. I right click on the web project in solution explorer and add a new ADO.NET Entity Data Model item to the project:

I name it ProductsModel.

Once I click "Add", I'll see the Entity Data Model Wizard. The wizard makes it easy to identify my database and the tables I want to use. In this case I'm using the AdventureWorksLT SQL Server database from https://www.codeplex.com/MSFTDBProdSamples, which is included in the archive of this article for your convenience.
I just want the Product table, so I check it and then press "Finish." I then build my project to make sure the rest of the solution is aware of the new model I created.

Adding a Domain Service Class
The Domain Service Class is a key part of the new RIA Services product. Once I've added my data model I can add a Domain Service for consumption over the web by my Silverlight application. I build the project and then right click on the web project in solution explorer and add a Domain Service Class – calling it ProductDomainService:

This pops up a dialog that lets me configure the Domain Service class that will be generated. I select the Product table and the "Enable editing" option.

This generates a ProductDomainService class and a ProductDomainService metadata class:
C# |
Visual Basic |
|
|
The ProductDomainService class contains the code to list, insert, update and delete products. For example here is the method to get the list of products. These methods are automatically exposed as a web service.
C#
 public IQueryable<Product> GetProducts() {
    return this.ObjectContext.Products;
}
Visual Basic
 Public Function GetProducts() As IQueryable(Of Product)
    Return Me.ObjectContext.Products
End Function
The ProductDomainService metadata class also allows you to record additional information about your entities. For example I've added this declaration for the ListPrice field:
C#
 [Required]
[Display(Name = "List ($)", Order = 3)]
[Range(100, 10000, ErrorMessage = "Value for {0} must be between {1} and {2}.")]
public decimal ListPrice { get; set; }
Visual Basic
 <Required()>
<Display(Name:="List ($)", Order:=3)>
<Range(10, 1000, ErrorMessage:="Value for {0} must be between {1} and {2}.")>
Public Property ListPrice As Decimal
These declarations state that ListPrice:
- is a required field
- should be displayed with the Label "List ($)"
- should be displayed third in any list of fields (all fields must have the Order attribute specified for this to work)
- should have a value between 100 and 10000
We'll see how this information gets used later on.
Once I've added my metadata for each property, I can go to the Silverlight project and start creating the UI to display the product catalog.
Silverlight Application
When I go back to MainPage.xaml in the Silverlight project, the data sources window (which I can access from the Data Menu, by selecting "show data sources", automatically detects the new Domain Service and displays it. Note that the Display Order metadata I entered in the previous step is used to sort the properties:

Create and Populate a Master ListBox
I can now simply drag and drop from the Data Sources window to create my UI. Creating a DataGrid has been done to death so I'm going to be a little more adventurous and use a ListBox!
I can use the customize option in the Data Sources window drop down for the Product table, to select ListBox from the available controls:


I can now drag and drop Product from the Data Sources Window to the left side of the form. This creates a ListBox and a DomainDataSource control that is configured to call the GetProductsQuery on the Domain Service. The ListBox's ItemsSource is set to a Binding that points to the DomainDataSource – this is the XAML that is created:
 <riaControls:DomainDataSource
    AutoLoad="True" Height="0" LoadedData="productDomainDataSource_LoadedData" Name="productDomainDataSource"
    QueryName="GetProductsQuery" Width="0">
    <riaControls:DomainDataSource.DomainContext>
        <my:ProductDomainContext />
    </riaControls:DomainDataSource.DomainContext>
</riaControls:DomainDataSource>
<ListBox
    Grid.Row="1" ItemsSource="{Binding ElementName=productDomainDataSource, Path=Data}"
    Name="productListBox"/>
DomainDataSource is a control that takes care of the plumbing of loading, filtering, grouping, sorting and saving data via the domain service. Rather than having to write this boiler plate code to load and save my data myself I can simply use the DomainDataSource to do it for me.
You can also see that the Data Sources window has automatically created a d:DesignData entry in my XAML. This informs the designer of the type that the DomainDataSource will return at runtime. The designer can then use that information to populate the data binding picker.
At this point you should notice that with the new Silverlight 4 Tools for Visual Studio 2010, I now get a Data Sources Selector (also known as the "data can") at the bottom left hand side of the form.
This gives me a convient way to select the non-visual data components such as CollectionViewSource and DomainDataSource so I can edit them:
|
|
Once I've added the ListBox, I use the Reset Layout…All right-click option to resize it so it fills the whole Grid cell that it is located in:

Creating a Basic DataTemplate for ListBox
Next I need to add an ItemTemplate so the ListBox knows how to display the data from its ItemsSource property. I'll start with a basic one and improve on it after we get sample data hooked up.
Find this XAML:
 <ListBox
    Grid.Row="1" ItemsSource="{Binding ElementName=productDomainDataSource, Path=Data}"
    Name="productListBox"/>
Add a simple ItemTemplate to it, so it looks like this:
 <ListBox
    Grid.Row="1" ItemsSource="{Binding ElementName=productDomainDataSource, Path=Data}"
    Name="productListBox">
    <ListBox.ItemTemplate>
        <DataTemplate>
            <Grid>
                <TextBlock Text="{Binding Path=Name}"  />
            </Grid>
        </DataTemplate>
    </ListBox.ItemTemplate>
</ListBox>
At this point I can hit F5 and see the populated list box – the DomainDataSource automatically calls the domain service GetProducts query (note - this may take a while to populate the first time you run it on development machine, because the first hit will spin up the database server – subsequent requests will usually be faster):

As the figure shows, I have data flowing, but the visual I have are not very exciting, so I'm going to need to create a more interesting DataTemplate. In addition, there is no indication that the application is working whilst it retrieves the data, so we'll have to fix that too.
Adding Sample data
While I'm designing the improved DataTemplate, I really want to be able to see what it will look like at runtime. Sample data, a feature added in Visual Studio 2010 that is significantly simpler to use in the new Silverlight 4 Tools release, makes this possible. I can plug in some representative sample data and see what the Data Template will look like with data whilst I am designing it.
The first thing I need to do is to add a utility collection class, EntityList, to act as a container for my sample data (as a convenience I have provided this class in the Utils Folder of the starter project for this post):
C#
 using System;
using System.ServiceModel.DomainServices.Client;
using System.Collections.Generic;

namespace ProductCatalog.Utils {

    public class EntityList : List<Entity> { }
}
VB.NET
 Imports System
Imports System.ServiceModel.DomainServices.Client
Imports System.Collections.Generic

Namespace Utils
    Public Class EntityList
        Inherits List(Of Entity)

    End Class
End Namespace
Next I need to create a sample data XAML file. The simplest way to do this it to add a new Silverlight Resource Dictionary file to the project:

and then set the build action of this XAML file to "DesignData":

I can then add my sample data to that XAML file. I replace the entire contents of the file (<ResourceDictionary> tags and all) with the following contents:
 <local:EntityList
    xmlns:local="clr-namespace:ProductCatalog.Utils"
    xmlns:data="clr-namespace:ProductCatalog.Web">
    <data:Product
        Name="Test Product #1" Color="Red" ListPrice="34.99" StandardCost="23.45"
        ProductNumber="7654321" Size="60" Weight="1016.04"/>
    <data:Product
        Name="Test Product #2" Color="Blue" ListPrice="24.99" StandardCost="23.45"
        ProductNumber="1234567" Size="60" Weight="1016.04"/>
    <data:Product
        Name="Test Product #3" Color="Green" ListPrice="14.99" StandardCost="23.45"
        ProductNumber="473893" Size="60" Weight="1016.04"/>
    <data:Product
        Name="Test Product #4" Color="Yellow" ListPrice="19.99" StandardCost="23.45"
        ProductNumber="9324823" Size="60" Weight="1016.04"/>
    <data:Product
        Name="Test Product #5" Color="Yellow" ListPrice="19.99" StandardCost="23.45"
        ProductNumber="9324823" Size="60" Weight="1016.04"/>
    <data:Product
        Name="Test Product #6" Color="Yellow" ListPrice="19.99" StandardCost="23.45"
        ProductNumber="9324823" Size="60" Weight="1016.04"/>
    <data:Product
        Name="Test Product #7" Color="Yellow" ListPrice="19.99" StandardCost="23.45"
        ProductNumber="9324823" Size="60" Weight="1016.04"/>
    <data:Product
        Name="Test Product #8" Color="Yellow" ListPrice="19.99" StandardCost="23.45"
        ProductNumber="9324823" Size="60" Weight="1016.04"/>
    <data:Product
        Name="Test Product #9" Color="Yellow" ListPrice="19.99" StandardCost="23.45"
        ProductNumber="9324823" Size="60" Weight="1016.04"/>
    <data:Product
        Name="Test Product #10" Color="Yellow" ListPrice="19.99" StandardCost="23.45"
        ProductNumber="9324823" Size="60" Weight="2016.11"/>
</local:EntityList>
Note: I get full XAML intellisense support when typing in sample data values just like I do in the designer:
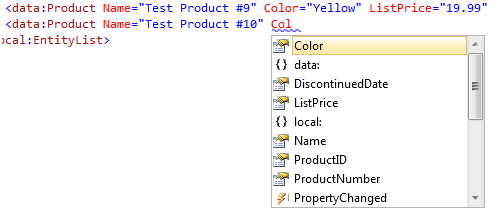
Once I've added my sample data I need to update the d:DesignData property of the DomainDataSource to point its Source property to the sample data file I created:
 <riaControls:DomainDataSource
    AutoLoad="True"
    d:DesignData="{d:DesignData Source=ProductsSampleData.xaml}"
    Height="0" Name="ProductDomainDataSource"
    QueryName="GetProductsQuery" Width="0">
    <riaControls:DomainDataSource.DomainContext>
        <my:ProductDomainContext />
    </riaControls:DomainDataSource.DomainContext>
</riaControls:DomainDataSource>
Markup extension intellisense, added in Visual Studio 2010, helps me do this, as the sequence below illustrates:
|
And now when I look at the design surface, I can see my sample data at design time:

Enhancing the DataTemplate for ListBox
Now that I can actually see the results as I edit the DataTemplate, I can customize my ItemTemplate much more easily. I want to have much more information displayed for each item in the ListBox. To achieve this I add a TextBlock and an Image control to the XAML for the DataTemplate I constructed for the ListBox:
 <ListBox
    Grid.Row="1" ItemsSource="{Binding ElementName=ProductDomainDataSource, Path=Data}"
    Name="ProductListBox">
    <ListBox.ItemTemplate>
        <DataTemplate>
            <Grid>
                <Grid.RowDefinitions>
                    <RowDefinition Height="Auto" />
                    <RowDefinition Height="Auto" />
                </Grid.RowDefinitions>
                <Grid.ColumnDefinitions>
                    <ColumnDefinition Width="Auto" />
                    <ColumnDefinition Width="10" />
                    <ColumnDefinition Width="Auto" />
                    <ColumnDefinition Width="*" />
                </Grid.ColumnDefinitions>

                <TextBlock
                    Text="{Binding Path=Name}" FontSize="14"  Grid.Column="2" Grid.ColumnSpan="2" />
                <TextBlock
                    FontSize="10" Grid.Column="3" Grid.Row="1" Text="{Binding Path=ProductNumber}" />
                <Image
                    Stretch="UniformToFill" Grid.RowSpan="2"
                    />
            </Grid>
        </DataTemplate>
    </ListBox.ItemTemplate>
</ListBox>
Now I need to add bindings for the extra TextBlock and Image control I've added to the template. Even though I am editing a DataTemplate in the XAML editor, I can still take advantage of the Data Binding Builder in the Properties window (which was added in Visual Studio 2010). Not only does this often make things quicker but it helps me avoid those difficult-to-track-down typos in my Bindings. For example when I click inside the second TextBlock in the XAML editor, the Properties window shows the properties for that TextBlock. I can now select the Text property and click on its property marker to choose "Apply Binding".
Notice several things:
- The Binding Builder has correctly picked up the DataContext within the ListBox and provided the correct Product fields for selection.
- The designer is showing live updates as you pick fields in the builder that have sample data.
- Document outline, designer, XAML view and Properties are all in sync.

I can do the same thing again with the Image control's Source property, selecting ThumbNailPhoto as the Path.

Things are a little more complex here, because the image is a GIF stored as a binary blob in the database, so just binding it to the Source property won't result in an image being displayed. However, using the converter pane in the Binding builder, I can hook up a converter to achieve the necessary type conversion. My converter makes use of the GIFDecoder library from Joe Stegman, available as a sample at https://blogs.msdn.com/jstegman/ , which is included for convenience in the project archive for this blog.
The Converter tab in the Binding builder shows all the converters that are available in my project. My ImageValueConverter is shown because it implements the IValueConverter interface:

From here, I can click the "Create New" link to create a new image converter resource. I can either accept the defaults or enter my own values:

My Data Template XAML now looks like this:
 <ListBox
    Grid.Row="1" ItemsSource="{Binding ElementName=ProductDomainDataSource, Path=Data}"
    Name="ProductListBox">
    <ListBox.ItemTemplate>
        <DataTemplate>
            <Grid>
                <Grid.RowDefinitions>
                    <RowDefinition Height="Auto" />
                    <RowDefinition Height="Auto" />
                </Grid.RowDefinitions>
                <Grid.ColumnDefinitions>
                    <ColumnDefinition Width="Auto" />
                    <ColumnDefinition Width="10" />
                    <ColumnDefinition Width="Auto" />
                    <ColumnDefinition Width="*" />
                </Grid.ColumnDefinitions>

                <TextBlock
                    Text="{Binding Path=Name}" FontSize="14"  Grid.Column="2" Grid.ColumnSpan="2" />
                <TextBlock
                    FontSize="10" Grid.Column="3" Grid.Row="1" Text="{Binding Path=ProductNumber}" />
                <Image
                    Stretch="UniformToFill" Grid.RowSpan="2"
                    Source="{Binding Path=ThumbNailPhoto, Converter={StaticResource ImageValueConverter1}}" />
            </Grid>
        </DataTemplate>
    </ListBox.ItemTemplate>
</ListBox>
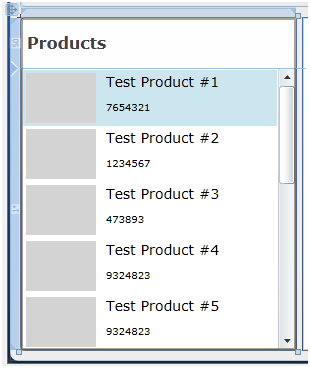
The sample data does not contain any images but the ImageValueConverter code supplies a placeholder image at design time so that's OK:
C#:
 //At design time there won't be an image so show a place holder
if (DesignerProperties.IsInDesignTool) {
    Rectangle rect = new Rectangle();
    rect.Width = 70d;
    rect.Height = 50d;
    rect.Fill = new SolidColorBrush(Colors.LightGray);
    WriteableBitmap bmp = new WriteableBitmap(rect, null);
    return bmp;
}
VB.NET
 If DesignerProperties.IsInDesignTool Then
    Dim rect As New Rectangle
    With rect
        .Width = 70D
        .Height = 50D
        .Fill = New SolidColorBrush(Colors.LightGray)
    End With
    Dim bmp As New WriteableBitmap(rect, New MatrixTransform)
    Return bmp
End If
With the new Data Template and sample data in place my ListBox now looks like this:
Create a details area on the form
My next task is to create the details area on my form. Again I'll use the Data Sources window to create the UI and Bindings for me by dragging and dropping a details view on to my form:


Notice how I immediately get sample data for the details view:
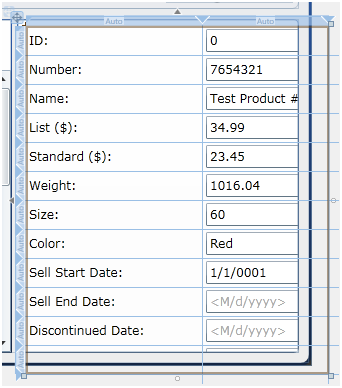
Also notice that the metadata we defined on the ProductDomainService metadata class earlier has been used by the data sources window to generate the labels for the fields (for example "List ($)" for ListPrice) and to order the fields in the details view.
I can now use the brand new Grid row and column editing features, which were added in the Silverlight 4 Tools Release, to edit the output of the data sources window. I can easily move and delete rows in the Grid and insert new rows.
For example I want to delete the ID row:

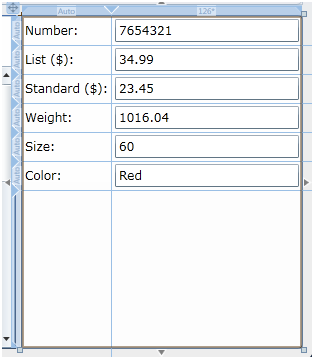
After I have deleted the rows I don't want and adjusted the column sizes a little, my details form now looks like this:
Next I want to add a Header row to match the one in the left hand side of the form. I can insert a new empty row above the Number row:

I can select that new Grid Row in the document outline and set its height to 50 to match the other header row:

Once I have space I can add a Rectangle and TextBlock to complete the header row.

I can use the new Margin editor which was added in Silverlight 4 Tools for Visual Studio 2010, to adjust the position of the TextBlock:

I then drag and drop from the data source window on to the TextBlock to set up the Binding to Name:

The List and Standard fields should display their values as currency. I can multiple select those fields and then use the new StringFormat option in Silverlight 4, exposed in the Silverlight 4 Tools Data Binding Picker, to achieve this:

Thanks to sample data, I can see the results of this action right away on my designer, without having to hit F5 and run the application:

Finally I can replace the Color TextBox with a Rectangle control that I'll bind up to display the color of the current item:

Once I have all my bindings set up my form looks like this:

Improving the Look and Feel of the Application using Styles and Resources
I've got all of my bindings set up – now I want to improve the way my form appears. First, I want to add a background highlight to Master/Detail headings. I can use the Brush editor in the Properties window (added in Visual Studio 2010) to set the Fill property of the Rectangle in the header area to a LinearGradientBrush:

Once I've created this Brush and am happy with it, I want to apply the same Brush to the other heading area. I can do this using the "Extract Value to Resource" feature (added in Visual Studio 2010) to create a resource and so I can then apply that resource to the second rectangle:

I can use the Create Resource dialog to name this new resource and put it in App.xaml:

This is the Brush XAML that is extracted to App.xaml:
 <LinearGradientBrush x:Key="TitleBorderBackgroundBrush" EndPoint="0.5,1" StartPoint="0.5,0">
    <GradientStop Color="Transparent" Offset="0" />
    <GradientStop Color="#19000000" Offset="1" />
</LinearGradientBrush>
Also notice that during the resource creation step, the original brush on the control was updated to use this resource:
<Rectangle Name="rectangle1" RadiusX="2" RadiusY="2" Margin="2" Fill="{StaticResource TitleBorderBackgroundBrush}" />
I can now find and apply this newly created resource to the other Header rectangle using "Apply Resource" – also added in Visual Studio 2010:

The Visual Studio 2010 resource picker allows me to see all the resources which match the current property on the selected control:

The picker also provides a search capability. I can use this to find what I'm looking for quickly. This is particularly handy when I have many resources in my application, as is often the case in production scale applications:

OK so I have the headers sorted out, now I'd like to make those TextBoxes look a little better by applying a style. We can select all the TextBoxes and apply a style, once again using the resource picker:

The foreground color for this style does not look correct and needs adjusting. I can use the Silverlight 4 Tools' Go to Value Definition feature to go directly to the style in question:

This takes us directly to the style in app.xaml, where we can use the style IntelliSense feature, also new in the Silverlight 4 Tools, to add a Setter for Foreground:
|
While I am in app.xaml, I notice the improved our outlining support which has been added in Silverlight 4 Tools - this displays the contents of the first line of collapsed regions. This makes navigating large resource dictionaries much easier; I can collapse the XAML and still see the resource key of each resource in the file.
For example:

My final step in making the form look better is to provide an image for the top form. To do this, I going to set an ImageBrush on the Background property of the Border control.

I use the "Select Image" button to select the image you want. The Visual Studio 2010 Image Picker allows me to select images that are in the project and also lets me use the "Add" button to browse to external images add them to my project automatically.

And here's the result:

Saving Changes and Giving the user Feedback
Now I want to add a Save button. Once I've added the Button to my form I can simply use the Data Binding Picker to bind it to the SubmitChangesCommand on the DomainDataSource and I'm done:
Select productDomainDataSource by ElementName:
Pick the SubmitChangesCommand from it, and you're done!
|
Yes, saving changes really is as simple as that!
Finally, I want give my users some feedback when the form is busy loading or saving data. To do that I am going to use the BusyIndicator control from the Silverlight 4 Toolkit. I can add the BusyIndicator control to the form and use the Data Binding Picker to bind its IsBusy property to the DomainDataSource. Then, whenever the DomainDataSource is waiting for the result from a web service call it sets IsBusy to true and the BusyIndicator will display "please wait" UI.

I now have a much better experience for my users at almost no development cost.
Running the Application
Now I can press F5 and see my form in action, complete with Busy Indication:


As soon as I make changes the Save button is enabled and the validation rules I added to the ProductDomainService metadata class right at the beginning of the article are applied to any changes. For example entering 31 for ListPrice is not valid – recall the code we used on the ProductDomainService to define this:
C#:
 [Required]
[Display(Name = "List ($)", Order = 3)]
[Range(100, 10000, ErrorMessage = "Value for {0} must be between {1} and {2}.")]
public decimal ListPrice { get; set; }
VB:
 <Required()>
<Display(Name:="List ($)", Order:=3)>
<Range(10, 1000, ErrorMessage:="Value for {0} must be between {1} and {2}.")>
Public Property ListPrice As Decimal
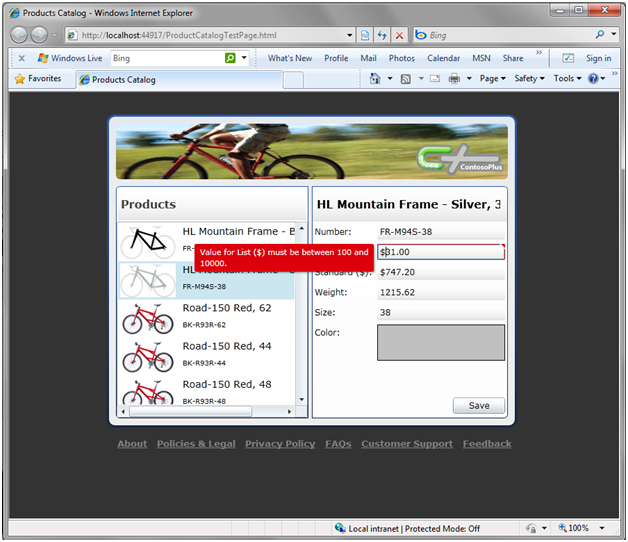
That metadata flowed from the server right through the UI generation process and into the running app.
Once the error is corrected I can press Save and the changes are saved to the server – again the Busy indicator shows gives feedback to the user that their changes are being saved to the server:

Summary
This post has shown you how the Silverlight 4 Tools for Visual Studio 2010 bring together Visual Studio 2010, Silverlight 4 and WCF RIA Services. This great combination of runtime and tooling makes it easier than ever before to build LOB applications using Silverlight.
Please Note: many of the new designer features work well with WPF as well as Silverlight projects, so the Silverlight 4 Tools are definitely recommended for Visual Studio 2010 WPF designer users too.
Resources
- For more information on RIA Services, check out this Silverlight.tv video and whitepaper
- Check out this Silverlight.tv video which shows most of the new Designer features introduced in Silverlight 4 Tools for Visual Studio 2010 in action.
Comments
Microsoft values your opinion about our products and documentation. In addition to your general feedback it is very helpful to understand:
- How the above features enable your workflow
- What is missing from the above feature that would be helpful to you
Thank you for your feedback and have a great day,
Mark Wilson-Thomas
Visual Studio Cider Team
Comments
Anonymous
June 17, 2010
This covers all of the bases that we needed to see for VS2010 and makes life MUCH easier than than the old RIA Services in VS2008. Wonderful post, thank you very much!Anonymous
July 06, 2010
Thank you Rod, we're glad you liked it. We always love to hear from you and other readers with any and all feedback you may have about using the WPF/Silverlight Designer in Visual Studio. You can post any comments here, or over on our Forums at social.msdn.microsoft.com/.../threads Thanks! MarkAnonymous
July 12, 2010
Great article! It's nice seeing everything laid out like this. I'm not seeing the "data can" on my designer, though; is there some option that I need to enable somewhere?Anonymous
July 12, 2010
Mike, The Data Can shows up when you have a CollectionViewSource or DomainDataSource in the XAML file. Do you have the latest drop of the Silverlight Tools? It was refreshed on 6/14/2010 - www.microsoft.com/.../details.aspx Please let us know if you have the correct Silverlight Tools and it still does not show up. Cheers, KarlAnonymous
July 13, 2010
Thanks, Karl. I installed the latest drop and the data can is now visible.Anonymous
July 13, 2010
Mike, Great news. Have a super day, Karl


