Web based Test Hub in TFS Update2 (TFS2012.2) and Team Foundation Service
One of the new features coming in the next update wave for Team Foundation Server (TFS2012.2) and for Team Foundation Service (available now) is the ability to work with manual test cases from the web through a new web based Test Hub.
Why? you may well ask. Well in many instances tests are executed in environments under the control of Dev/Test where running tools like Microsoft Test Manager (MTM) is not problematic. In many organisations however (and at different stages of the lifecycle for different organisations) tests are needed to be run from an environment not under the control of Dev/Test. In these situations it can be harder and in many cases not possible to get permission to install MTM into those environments.
This is where Test Case Management and Test Execution being able to be worked on from a web browser with zero deployment comes into it’s own.
I thought I’d take a look at the feature (in my case from TFS2012.2 on-premise), but largely this is the same (if not simpler) currently in the version deployed to Team Foundation Service.
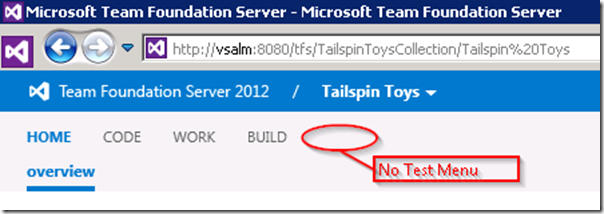
At first I wondered how to get to this feature as it seems a small issue resides in the current CTP for TFS2012.2 that doesn’t allow you to access the Test Hub in the same way you can in Team Foundation Service. As you can see below there is no “TEST” menu item that we would expect to see:
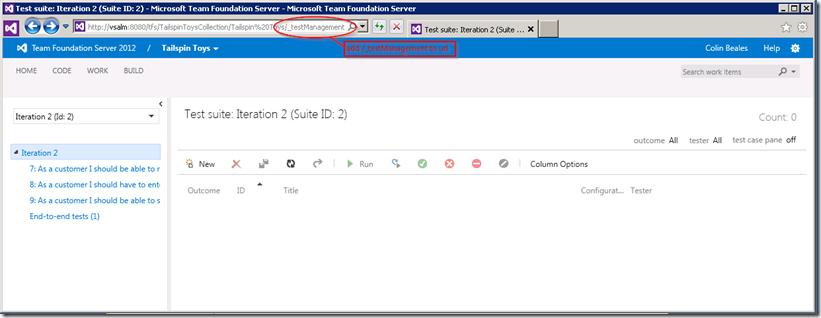
Not to be defeated you can still access this feature from the CTP of TFS2012.2, but you have to know the URL and then you are in (NOTE: Team Foundation Service has the menu item and is simpler therefore to get to. This is the only difference I have spotted between the two implementations).
If to your URL you add “/_testManagement” like the below image shows you should get into the Test Hub without trouble:
Looking at the image below the left hand side of the screen is our “Test Plan" Explorer”. This enables you to see all the test plans defined in MTM and within this plan see the suites (Requirement Suite, Query Suite or Suite) defined with the test plan. If any of the suites are selected then the test cases in the suite are listed. Test cases can be listed more than once (Test Points) if they are setup to be executed within different Test Configurations (environments etc.. think of this as one way to build out your test matrix for any test cases):
You can see for each test case (Test Point) listed each has a value of the latest test run outcome which in this diagram shows two as passed and two as failed. Other outcomes can be set active (ready to run), blocked and not-applicable.
In a requirement based suite like the one shown in the above screenshot all these test cases relate to a requirement in TFS and so the requirement (Requirement ID: 7 in the example) is linked by a hyper-link that can bring up the requirement that all of these test cases relate to.
The user is free to add/delete test cases from a suite using the first buttons in the toolbar very usefully additional columns can be configured for the view using the column options button.
In the image below you can see that each line in the list has a small context window and on here is a context menu for that entry allowing the Open/Delete/Running of this test case in addition to setting test outcome or as shown, the ability to set an owner.
Should you choose to open/edit a new or existing test case then it will open and you can make changes to author the test case, which you can see in the below image. The test case item allows you do simple edits to the test steps inputting action and expected result entries. Whilst not show in the image you can scroll down the test case item and edit the values for existing parameter values, however you cannot at this time add new ones.
If you like to view your test cases alongside your test list the UI allows you to do this by changing the “test case panel” option in the UI as shown in the image below. This option also you to either place the test case panel at the bottom, or to the right depending on your preference. If you want a bit more screen space on the left you can collapse the Test Plan Explorer at any stage you want.
Of course at some point you probably want to execute a test for a given configuration, In order to do this, you can select the run button either from the ribbon or the context menu. In the image below you can see this pressed from the ribbon menu.
When you are running a test a new window will appear as below showing the Test Runner view used to execute manually the steps from the test case and check the expected results after each appropriate action. Whilst this window is resizable, like its MTM equivalent it starts in a tall thin layout to sit at the side of any other existing application windows. In the image below in the test runner you can see the test step laid out as the tester passes steps 1 to 4.
In step 6 we can see this test case was parameterized with test data. Each of the values for the current case iteration provided to the tester. Any steps with expected steps are shown as we can see in step 9, finally at the bottom of the window we can see the configuration for this test run.
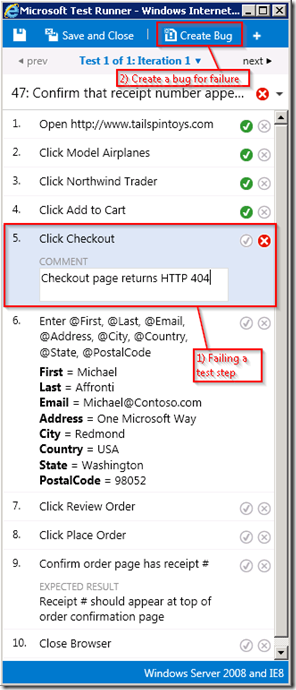
If we find a problem in our testing we certainly need to mark our test run as failed and the step and reason for us failing the test, so we have this for the history of our test results. Quite possibly as well we want to raise this as a bug for development to look at so you can see in the image below I am citing the reason for the failed test, failing the test step and the whole test case iteration. After I have this done I can click the Create Bug button at the top.
Because of the context of the test run we are on, like MTM the web view is able to create a bug work item within TFS that is very rich in data. You can see in the example bug raised for this example and shown in the image below our steps to reproduce can be automatically filled in along with out failure reason and a log of which steps passed and failed en-route to the problem. Not shown in the image below is the data row for the parameters in the current issue so that the bug owner can see exactly what data was being entered to reproduce the problem.
As the bug is just a TFS work item the tester can edit any of the other fields (add a tag – another new TFS2012.2 feature for search/filtering) and save the work in TFS for working on.
I’m really pleased with the experience of the test tools available in the web from TFS2012.2. Of course if you can use a installed client there are many additional benefits running in Microsoft Test Manager (MTM), however I hope for those scenarios where MTM usage can’t be used that this provides our customers with a great way to continue to work in a similar way to MTM and have some of the great integration features into TFS (bugs, test results etc..) that our test communities really love.
If you want to try this for yourself the CTP for TFS2012.2 is available (not for production use yet) here: https://www.microsoft.com/en-us/download/details.aspx?id=36508
If you don’t have a non-production TFS install to work with, try the same features out from Team Foundation Service (free for projects with 5 or less users)which has this all running on their production servers from the cloud ready for you to use in your projects: https://tfs.visualstudio.com
Colin
Comments
Anonymous
February 05, 2013
Good stuff!Anonymous
May 27, 2013
Good explanation


