Step-by-Step Guide for AAD Connect Custom installation + Federation with AD FS
When setting up an Office 365 environment and you want to use your own Active Directory domain you definitely need to setup synchronization services with Azure AD. Where we needed to setup DirSync in the past we now need to install and configure the successor Azure AD Sync or the Azure AD Connect synchronization service. You can do this by downloading this tool or by downloading Microsoft Azure Active Directory Connect a really great job in simplifying the setup process. Let’s have a look.
Overview of AAD Connect
Azure AD Connect is a single wizard that performs following steps automatically
- Install pre-requisites like the Azure Active Directory PowerShell Module and Microsoft Online Services Sign-In Assistant.
- Install and configure Azure AD Sync, as the sync engine, and enable directory synchronization in the customer's Azure tenant
- Configures either password sync or AD FS, depending on which sign-on option the customer prefers, and includes any required configuration in Azure
Different Synchronization Tools
With the release of Azure AD Connect we now have three tools that will provide directory synchronization to Azure AD / Office 365.
- Microsoft Azure Active Directory Sync tool (DirSync) – This sync tool will eventually retire but there is no ETA at this time.
- Azure AD Sync – The “stand alone” version of this tool will retire when Azure AD Connect goes GA.
- Azure AD Connect – This sync tool will be the only tool available once DirSync is retired. It includes Azure AD Sync as the synchronization engine.
Azure AD Connect with additional sync options, seamless migration from DirSync,
There will no longer be separate releases of Azure AD Sync and Azure AD Connect. And we have no future releases of DirSync planned. Azure AD Connect is now your one stop shop for sync, sign on and all combinations of hybrid connections.
When stating the setup the Microsoft Azure Active Directory Connect tool assist you by installing the prerequisites that are needed to be able to synchronize users and groups from your on premise AD to Azure AD. It will automatically install the following products if they do not exist;
- Microsoft Online Services Sign-In Assistant for IT Professionals
- Windows Azure Active Directory Module for Windows PowerShell
- Microsoft Visual C++ 2013 Redistributable Package
Install the prereqs
After getting the prerequisites ready the Azure AD Connect synchronization service will be installed. Azure AD Connect synchronization service needs a SQL database, you can configure an existing one or a SQL Express version will be automatically installed. Next we need to provide the username of a Azure AD user that is a member of the Global Administrator role.
Connect to Azure AD
After the synchronization service installed and connected with Azure AD we are able to customize the configuration of Azure AD Connect synchronization service, and more So if we do not choose to use the express settings as shown below we are able to
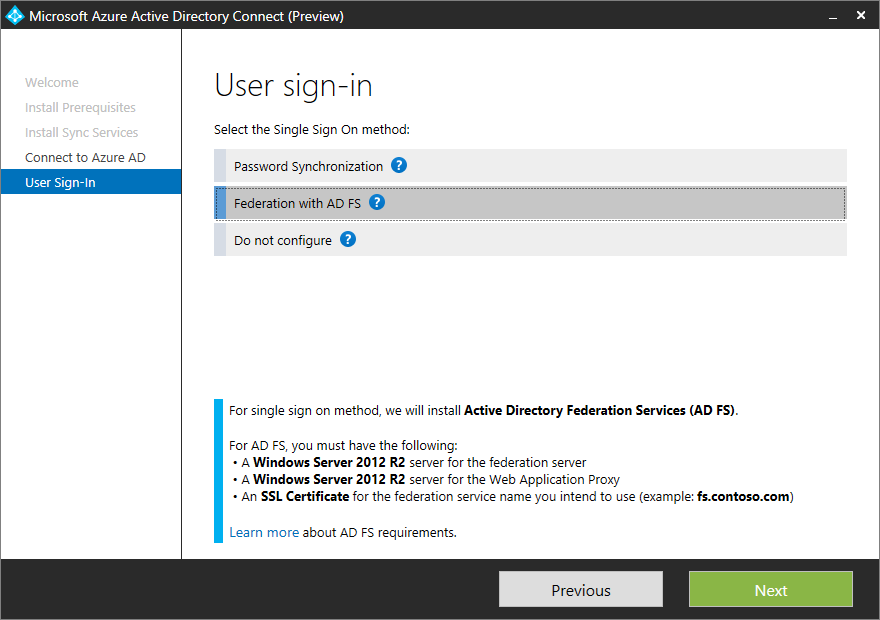
configure Single Sign On via Password Synchronization, Federation with AD FS.
Use customize option
Custom options
I will choose Federation with AD FS and connect my Active Directory. Microsoft Azure Active Directory Connect allows you to synchronize more than one directory, which is really cool if you ask me.
Add your on premise AD
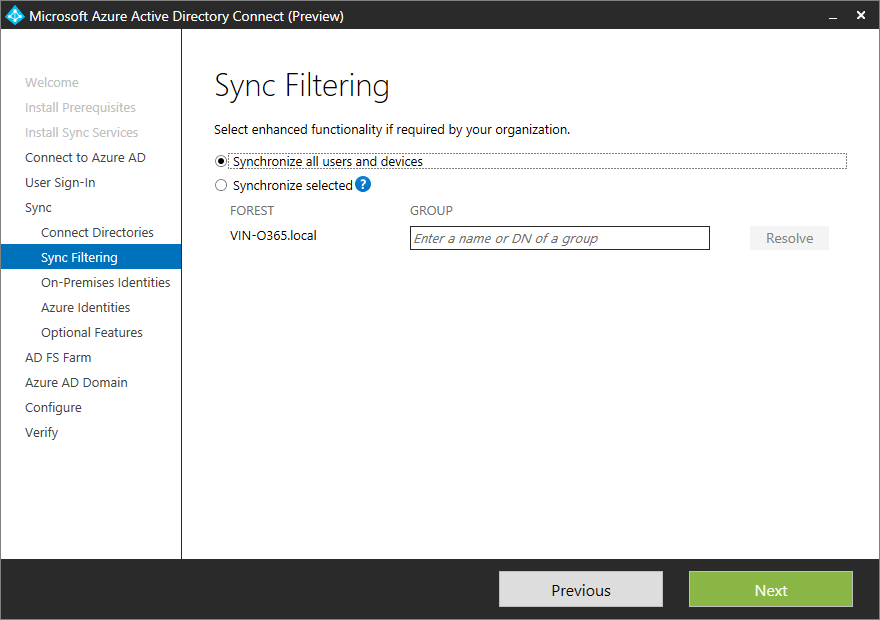
The next step is that you are able to filter users and groups by DN or Group Membership. So no hacking in FIM (which is not part of this solution anymore) anymore.

Filter or synchronize everything
Next you need configure how the user in on premise directories is identified. Is a user represented only once across multiple directories or does user identities exist across multiple directories. Based on attributes you are able to configure how a user must be matched. If you only use one Active Directory as a source, you can easily use the defaults as shown below.
Select the attributes
As you see the Microsoft Azure Active Directory Connect tool assist you heavily in setting up the synchronization service. But is does more, optionally you are able to configure the following features:
Exchange hybrid deployment
The Exchange hybrid deployment features allows co-existence of Exchange mailboxes on both on premises as in Azure by synchronizing a specific set of attributes from Azure AD back to your own Active Directory.
Password write back
If the password changes in Azure AD, it will be written back to your own Active Directory.
User write back
If a user is created in Azure AD, it will be written back to your own Active Directory.
And:
- Azure AD app and attribute filtering
- Group writeback
- Device writebrack
- Device Sync
- Directory extension attribute sync
Selecting two options as shown below allows us to configure the writeback location in the on premise Active Directory.
Additional options
Next you need to configure a new AD FS Farm Windows server 2012 R2. Specify the SSL certificate used to secure the communication between clients and AD FS. The certificate file should be in pfx.
Certificates
Since ADFS leverages SSL, we need to have a SSL certificate. You could try three options, but only one will work:
- Self-signed certificate
- Certificate issued from internal PKI
- Certificate from 3rd party public CA
Office 365 needs to see a valid Service Communication Certificate on your ADFS infrastructure, so you are going to have to buy a certificate from a public CA. Office 365 will not trust a service communication certificate that is either self-signed or from your internal CA, which results in tears. We can use self-signed certificates for the Token Decrypting and Token Signing Certificate. These are separate from the service communication cert.
Please follow the documentation from your chosen CA to request, install and complete the certificate. The steps required vary from vendor to vendor and also over time. Make sure you are not missing any updated intermediate certificates! How would you know? Follow their process!!
For the purposes of this post we shall deploy the initial ADFS server, and in the future add another ADFS server for redundancy.
Add Federation Servers On Windows Server 2012 R2, specify where to install AD FS services
Add Proxy servers On Windows Server 2012 R2, specify where to install Web Application proxy servers name
Next specify proxy trust credentials. The web application proxy requires credentials to request a certificate from federation server.
It is possible to use a GMSA as the ADFS service account. GMSA will automatically update the service account’s credentials and administrators will also be oblivious as to its password.
In this case a standard service account was used.
Select the Azure AD domain to federate with your on-premises Directory. The managed domain will be converted into a federated domain
The Final step in the really great wizard is to install and configure the synchronization services, AD FS and WAP servers.

Configure!
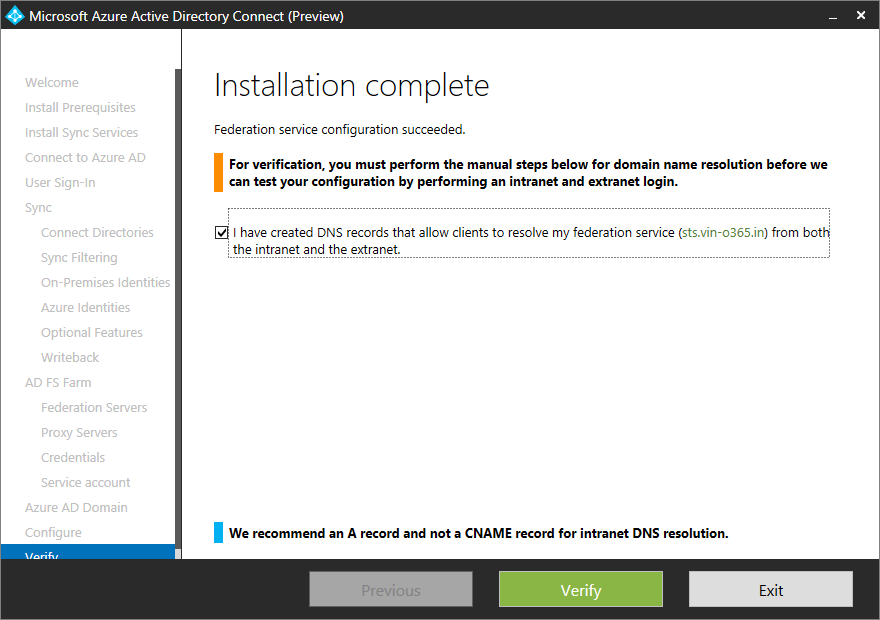
At this time please make sure that you have created DNS records that allow clients to resolve your federation services from both internal and external.

All done,
Additional Steps
This topic covers additional steps to configure AD FS after you install the first federation server, including:
- Opening the ADFS Management Snap-in
- Configuring Name Resolution for AD FS Services
- Adding nodes to the farm
- Adding a Web Application Proxy
- Enabling Device Registration Service
For more information about how to deploy AD FS, see How to deploy AD FS in Windows Server 2012 R2.
Verify Federation Service Metadata
Open Internet Explorer and navigate to your ADFS server’s federation metadata URL.
This will be something like the below, just change the FQDN to match your environment.
https://sts.vin-o365.in/federationmetadata/2007-06/federationmetadata.xml
The result should show this:
Verify ADFS Sign-In Page
Browse to the ADFS sign-in page and test that you are able to authenticate.
The URL will be similar to the below, again change the FQDN to match your organisation’s.
https://sts.vin-o365.in/adfs/ls/idpinitiatedsignon.htm
Comments
Anonymous
June 26, 2015
Thanks a lot excellent walkthroughAnonymous
June 28, 2015
Thanks for this, it's really helpful, especially as AADC is so new. It's not quite clear to me what names I need in the certificate. The subject name should be the ADFS farm name, but what do I need as the Subject Alternative names? The ADFS farm again, the physical name of the ADFS server, and what else? The Web Application Proxy server name too? Anything else? Any direction you could give here would be great. Thanks againAnonymous
June 29, 2015
@TiDu - There's no need of SAN certificate for ADFS. SSL certificate with single name (example - sts.domain.com) is good enough.Anonymous
June 29, 2015
@iVinayak - Great, thank you!Anonymous
July 06, 2015
Thanks for the helpful articel, I have only one question. After the installation of the ADFS server and the WAP server we don't have room (virtual and licenses) for a new server for AAD Connect. Is it possible and supported to install the AAD Connect on the ADFS server or a domain controller?Anonymous
July 06, 2015
@GeorgeK- AAD Connect can be installed with ADFS server or a domain controller.Anonymous
July 06, 2015
@iVinayak - thank you for your repley.Anonymous
July 07, 2015
The comment has been removedAnonymous
July 09, 2015
The comment has been removedAnonymous
July 13, 2015
Hello iVinayak, this federation setup is for one domain, but i have 2 domains. For example contoso.com and fabricam.com. How should you suggest to handle this with AAD Connect? Setup contoso.com via the AAD Connect setup and the fabricam domain via Powershell?Anonymous
July 14, 2015
@SJansen - Yes. Adding additional domains will be an additional re-entrant task in the wizard in the next feature update may release to AAD Connect.Anonymous
July 20, 2015
What happens when ADFS and WAP is already installed in the organization.Anonymous
July 22, 2015
@ToddL - ADFS and WAP is already installed, you can express settings or skip AD FS deploymentAnonymous
August 07, 2015
The comment has been removedAnonymous
September 17, 2015
If I installed AADConnect with Express settings, then want to use it to configure ADFS, it does not look possible? Is configuring ADFS a one time option only available if you selected "custom" during the initial install?Anonymous
September 18, 2015
+1 Scott - I don't need to add ADFS to the mix but want to change other settings that were captured at install time for AAD Connect. Where's the documentation for changing ALL the settings after install? It doesn't seem possible from the gui. p.s. I despise the forced wizard flow for the post-install gui.Anonymous
September 20, 2015
@Scott,Shawn, Change Sign-In method will be coming in our next release. For now, you will have to do it outside the wizard by a) Setting up ADFS outside the wizard b) Converting the domain from managed to federated via AAD PSHAnonymous
September 29, 2015
for use password write back i need a azure premium license?Anonymous
September 30, 2015
- Yes Password writeback is premium feature. AADP license us must !!
Anonymous
November 11, 2015
Best Write up I've read so far. Thank you !Anonymous
November 16, 2015
@iVinayak: is a public certificate really a requirement? No way to use an internal certificate? Thanks.Anonymous
November 16, 2015
For ADFS Public certificate is mandatory. blogs.msdn.com/.../how-to-update-certificates-for-ad-fs-3-0.aspxAnonymous
November 30, 2015
I installed AAD Connect on the server I had DirSync installed on, the install performed an upgrade and did not give me the option to setup ADFS. Is there a write up on how to configure ADFS after AAD Connect has been installed?Anonymous
November 30, 2015
Would I be able to uninstall AAD Connect and be able to complete the ADFS steps when reinstalling?Anonymous
January 08, 2016
The comment has been removedAnonymous
January 14, 2016
I asked the tool to use my ADFS 3.0 existing farm and it does not work. It ends up saying something about ADFS 2.0 instead... any ideas?Anonymous
January 20, 2016
Having made it all the way thru to the 'Configure' stage of the AzureAD Connect Wizard, The wizard fails with the Error below. I have used the account it specifies as Access denied to log in to the Office 365 portal as Global admin as well as Azure AD Management portal and can see the account listed in AzureAD as a Service Administrator. Some forums seem to indicate that it is an issue with an incorrect password based on the Error Code: 51 but the credentials work. Any ideas? Thanks [09:21:12.693] [ 21] [INFO ] Creating new azure service account for sync installation 6f020e58b50f4f4cbe411378f6549a5c using global tenant admin azuread@**********.onmicrosoft.com. Exception Data (Raw): Microsoft.Azure.ActiveDirectory.Synchronization.ProvisioningWebServiceAdapter.AzureADServiceAccountException: Unable to create synchronization service account. ---> Microsoft.Online.Coexistence.ProvisionRetryException: An error occurred. Error Code: 51. Error Description: Access to Azure Active Directory has been denied. Contact Technical Support. Tracking ID: 1a0a00ae-9824-4533-af00-a84ecfc66a8c Server Name: . at Microsoft.Online.Coexistence.ProvisionHelper.AdminWebServiceFaultHandler(FaultException`1 adminwebFault)Anonymous
April 04, 2016
Does anyone know if you can use a letsencrypt certificate?Anonymous
May 03, 2016
Excellent articlesAnonymous
May 13, 2016
Hello Vinayak,please help to configure device registration policy in adfs.- Anonymous
May 23, 2016
@Pradeep - Please take a look at this - https://blog.auth360.net/2013/09/13/first-impressions-ad-fs-and-windows-server-2012-r2-part-i/
- Anonymous
Anonymous
October 18, 2016
If you have already installed using the Express method and wanted to change to the custom method to configure sync options based on a security group for example, how could this be achieved?thanks.Anonymous
March 09, 2017
Is there any guide available how to configure the ADFS part manually? We already have a working ADFS farm used by multiple applications. I'm not that keen on having a wizard mess around in it not knowing what it will do. Please provide a guide how to setup the Relying Party Trust manually.Anonymous
March 31, 2017
Please update this blog with newer version. This is 2015 blog.


