Silverlight - Gadgets, Web Slices and More! (Part 2)
In this part of the Silverlight article, we’ll be going through IE8 Web Slices – what they are, how they work and how we can put our Silverlight application in them.
What are Web Slices?
A Web Slice is a new feature within IE8 that allows a user to subscribe (favourite) just a portion of that web page. It behaves just like RSS, but for just that portion of the web page. This means, you can put images, text and Rich Internet Applications like Silverlight in them.
How do they work?
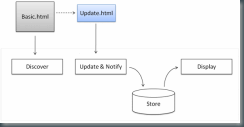
A Web Slice is some really simple HTML that can easily be added to any existing code on your web pages. There are two versions you can have – a piece from an entire page, or a special display page that can constantly be updated (sort of like an RSS page). This looks like:
Here, the Basic.html is where the Web Slice is embedded. You “discover” the Web Slice at that location. It then refers to the Update.html file, which is where it updates and provides notification. This is then stored and displayed in your Web Slice.
Implementing Web Slices
Now we get to the good part – implementing our Silverlight application in to a Web Slice. First, we need to create our two files, Basic.html and Update.html.
Basic.html Code
<!DOCTYPE html PUBLIC "-//W3C//DTD XHTML 1.0 Transitional//EN" "https://www.w3.org/TR/xhtml1/DTD/xhtml1-transitional.dtd">
<html xmlns="https://www.w3.org/1999/xhtml">
<head>
<title>Silverlight Application</title>
</head>
<body>
<div class="hslice" id="SilverlightApplication">
<span class="entry-title">Silverlight Application</span>
<a rel=”entry-content” href="Update.html"/>
</div>
</body>
</html>
Explanation
As you can see, we have some “special” class tags. The class tag “hslice” is the class used by Internet Explorer to register a Web Slice. It uses the hAtom micro format. To ensure the Web Slice works correctly, we need to assign it a unique ID. Inside this <div> element, we have the title of the Web Slice – “entry-title”. We also have our Update page, Update.html, which will display our Silverlight application and other display logic for our Web Slice.
Now let’s add our Update.html page.
Update.html Code
<!DOCTYPE html PUBLIC "-//W3C//DTD XHTML 1.0 Transitional//EN" "https://www.w3.org/TR/xhtml1/DTD/xhtml1-transitional.dtd">
<html xmlns="https://www.w3.org/1999/xhtml" >
<head>
<title>StudentZine</title>
<style type="text/css">
html, body {
height: 100%;
overflow: auto;
}
body {
padding: 0;
margin: 0;
}
#silverlightControlHost {
height: 100%;
text-align:center;
}
</style>
<script type="text/javascript" src="Silverlight.js"></script>
<script type="text/javascript">
function onSilverlightError(sender, args) {
var appSource = "";
if (sender != null && sender != 0) {
appSource = sender.getHost().Source;
}
var errorType = args.ErrorType;
var iErrorCode = args.ErrorCode;
if (errorType == "ImageError" || errorType == "MediaError") {
return;
}
var errMsg = "Unhandled Error in Silverlight Application " + appSource + "\n" ;
errMsg += "Code: "+ iErrorCode + " \n";
errMsg += "Category: " + errorType + " \n";
errMsg += "Message: " + args.ErrorMessage + " \n";
if (errorType == "ParserError") {
errMsg += "File: " + args.xamlFile + " \n";
errMsg += "Line: " + args.lineNumber + " \n";
errMsg += "Position: " + args.charPosition + " \n";
}
else if (errorType == "RuntimeError") {
if (args.lineNumber != 0) {
errMsg += "Line: " + args.lineNumber + " \n";
errMsg += "Position: " + args.charPosition + " \n";
}
errMsg += "MethodName: " + args.methodName + " \n";
}
throw new Error(errMsg);
}
</script>
</head>
<body>
<form id="form1" runat="server" style="height:100%">
<div id="silverlightControlHost">
<object data="data:application/x-silverlight-2," type="application/x-silverlight-2" width="100" height="100">
<param name="initParams" value="environment=WebSlice" />
<param name="source" value="ClientBin/StudentZine.xap"/>
<param name="onError" value="onSilverlightError" />
<param name="background" value="white" />
<param name="minRuntimeVersion" value="3.0.40624.0" />
<param name="autoUpgrade" value="true" />
<a href="https://go.microsoft.com/fwlink/?LinkID=149156&v=3.0.40624.0" style="text-decoration:none">
<img src="https://go.microsoft.com/fwlink/?LinkId=108181" alt="Get Microsoft Silverlight" style="border-style:none"/>
</a>
</object><iframe id="_sl_historyFrame" style="visibility:hidden;height:0px;width:0px;border:0px"></iframe></div>
</form>
</body>
</html>
Explanation
As you can see, this is a huge chunk of code, but really… it’s only displaying some HTML data. It is pretty much the same HTML page as any default pages that have been put in when generating the project file by Visual Studio. The key to this would be the following line:
<param name="initParams" value="environment=WebSlice" />
If you remember from the Parameters article last month, this lets our Silverlight application know it’s in the Web Slice. As such, we can ensure that it displays correctly within a Web Slice with the same Silverlight application code.
Important Note
There are some very slight limitations with Web Slices. The size of the Web Slice is something to take in to consideration. You can resize them, but they initially drop down with a size of 320x240 – which is certainly a design element to take in to consideration. No-one wants to have to resize the Web Slice just to see some content, when the whole idea is to have that information displayed presentably and quickly.
Result
The end result is that you should now have an application that looks a little bit like this:
Basic.html
Web Slice (Update.html)
As you can see, we now have a green outline around our web slice code. I added the Silverlight application to the Basic.html inside the <div class=”hslice” id=”SilverlightApplication”> tags, underneath the <a rel=””> tag. You can add anything you like within the tag.
We now also have a fully working Web Slice, which adds a link to your Favourites bar. If you click on it, you’ll have the drop down box with our Web Slice Silverlight button! It also provides a link to the page it’s on.
Next time, we’ll be looking at the Windows Gadget framework and how to put a Silverlight application in there!


