Visual Studio Code and the AI Extension with Azure Machine Learning Work Bench
Guest blog by Rudraksh Shankaran Microsoft Student Partner at University College London
About Me:
Hello! I’m Rudraksh Shankaran and I’m a 1st year Computer Science student at UCL. I’ve been very passionate about technology since middle school. I’m not a programming expert as I’m only a 1st year but have aspirations, however, I’m an avid tech quizzer and I love learning about anything and everything that is related to technology. Other than that, I’m a foodie and absolutely love travelling and exploring new things. Find me on LinkedIn
Introduction to Artificial Intelligence and Machine Language:
Very often the terms Artificial Intelligence and Machine learning are used interchangeably however, they’re not quite the same thing. Artificial Intelligence is a branch of Computer Science that builds machines that display humanlike intelligence and are capable of making complex decisions. On the other hand, Machine Learning is a field which gives computers the ability to act, learn and improve without being explicitly programmed to do so.
In this blog, we will use sample data sets from the Cortana Intelligence Gallery to create a model, generate a prediction and represent it through a graph. We can also publish it to a web server using the Azure ML workbench.
Prerequisites:
· Visual Studio Code with version 1.16.1 or more (https://code.visualstudio.com/download)
· Azure Machine Learning Workbench(/en-gb/azure/machine-learning/preview/quickstart-installation)
· Azure Account and Azure Machine Learning Preview Account
Getting Started:
o Creating an Azure Machine Learning Preview Account
· First sign into your Azure portal.
· Use the Azure portal to provision Azure Machine Learning accounts:
1. Select the New button (+) in the upper-left corner of the portal.
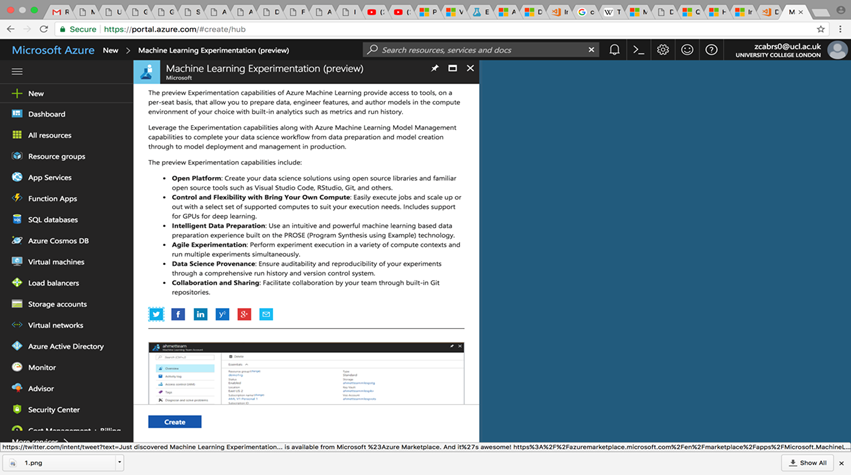
2. Enter Machine Learning Experimentation in the search bar. Select the search result. Then click on create to configure a new Machine Learning Experimentation account. The detailed form opens. Fill out the details and select the DEVTEST option for the Model Management pricing tier
Image 1: Click on create to create a ML account
o Installing Visual Studio Code Tools for AI
· The Tools for AI is an extension to build, test, and deploy Deep Learning / AI solutions. It can easily be integrated with the Azure Machine Learning Workbench for robust experimentation capabilities. It can be clubbed with deep learning frameworks like Microsoft Cognitive Toolkit, CNTK, TensorFlow and many more.
· Open Visual Studio Code and search for ‘Visual Studio Code Tools For AI’ under the Extensions panel.
· Install and reload the window to start it.
o Installing Azure Machine Learning Workbench
· Follow the link above and follow instructions to download Azure Machine Learning Workbench for Windows or Mac.
· Finish the installation by following the on-screen instructions.
· The installer downloads all the necessary dependent components such as Python and other related libraries. The installation may take around half an hour to finish all the components.
Image 2: Installing Azure Machine Learning Workbench
Build Your First Project:
Visual Studio Code Tools for AI comes with a Sample project explorer. The samples explorer makes it easy to discover sample data and codes and allows the user to try them with only a few clicks. To open the explorer, do as follow:
1. Launch Visual Studio Code then open the command palette (View > Command Palette or Ctrl(Cmd)+Shift+P).
2. Enter "AI Sample".
3. You get a recommendation for "AI: Open Azure ML Sample Explorer", select it and press enter.
Image 3: This image shows The Extensions Tab and the Samples explorer
- Let’s select the ‘Classifying Iris example’. Click on install. Enter a name for the project, for example "irissample".
- Select an account then Select an existing workspace and press enter.
- It then tells you to select the installation folder and then press enter.
After pressing the enter key, you’ll see the instructions being performed in the terminal tab. After being created, the window reloads with the contents of the sample project folder on the left.
Running the Files:
1. Right click on the executable(.py) files in the side menu then click on AI: Submit Job.
2. The code can be executed locally or on the cloud so here it asks you where to run the program. Select your job configuration "Docker-Python" and press enter.
After submission, the embedded terminal shows the progress of the job.
Reviewing job performance and details:
Once the jobs are submitted, you can list the jobs from the run history.
1. In the AI explorer on the side bar menu, right click on “docker-python”.
2. Select “Show job list”. A new window opens with the names of all the jobs processed.
3. Click on any job to get a detailed view of how it performed.
Image 5: The job list is on the left and job detail view is on the right
References:
· Setting up the Machine Learning Workbench: /en-us/azure/machine-learning/preview/quickstart-installation
· Running Jobs: /en-us/azure/machine-learning/preview/quickstart-visual-studio-tools ,
Overview of VS Code tools for AI extension https://marketplace.visualstudio.com/items?itemName=ms-toolsai.vscode-ai#overview
Comments
- Anonymous
November 02, 2017
Vavv. Very useful information. I want to try that today Thanks


