How to build your first Xamarin app
Guest Blog by Carmen Livia Ibanescu, Microsoft Student Partner at University College London
A little bit about myself
My name is Carmen-Livia Ibanescu. I am currently a Computer Science Student at UCL and on the fall I will start my second year here. I am from Romania and I have been programming since high-school. Choosing to study in London has been one of the best decision I have ever made since it is a great place to find opportunities, grow my network and attend many activities such as hackathons, tech conferences, workshops or talks.
I believe that the best part about programming is the fact that it can be integrated to any field from medicine, psychology, mathematics or even bio-chemistry. I am eager to learn more and I mostly enjoy making mobile apps or solving algorithmic problems since I can develop my logical skills. I am not afraid to challenge myself and I make the most of any opportunity to gain any additional knowledge. As for now, I know C/C++, Java, Haskell, JavaScript (alongside with CSS and HTML) and a bit of C#. In the future, I am looking forward to learn the R language for Data Science as well as do some courses on Machine Learning.
You can find me on my Linkedin profile or on my Github.
Introduction
In the following post, you will be able to learn how to build your first Xamarin Android app using C#.
The main goals of this little tutorials are
· Build your first mobile app
· Understand the key functionalities that a mobile app must have and how to structure it
· Get familiar with C#
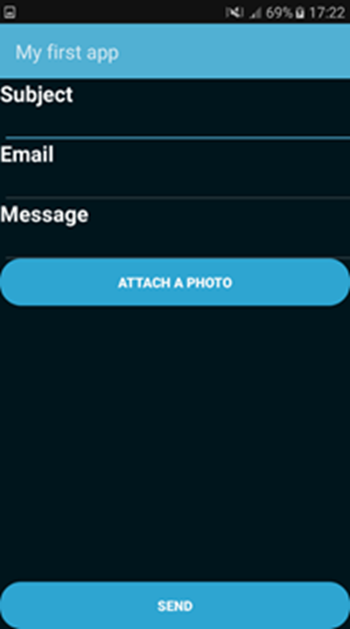
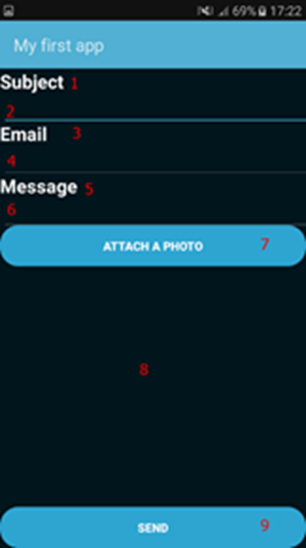
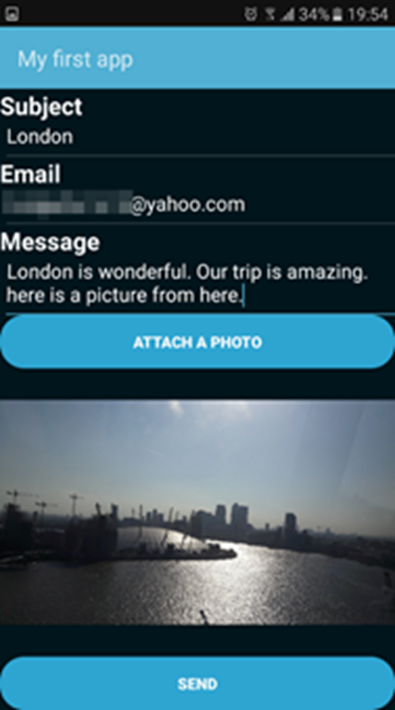
The app we are going to build is a mailing app that allows the user to attach images to the e-mails. The editor we are going to use is the Visual Studio Community 2016. The source code of this project can be found on this link. The mobile app will work as following:
1. The user opens the application
2. The user fills in the input fields with the data needed (Subject, recipient and text message of the e-mail)
3. The user can attach a picture to the e-mail (in this case, the gallery will automatically open and the user needs to select an image; after the user chooses the image, it will be displayed on the page of the app)
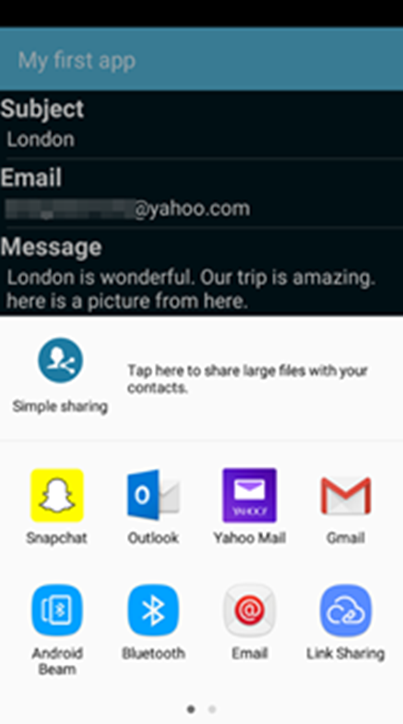
4. The user presses send. After that, the users must choose the mailing provider to be used.
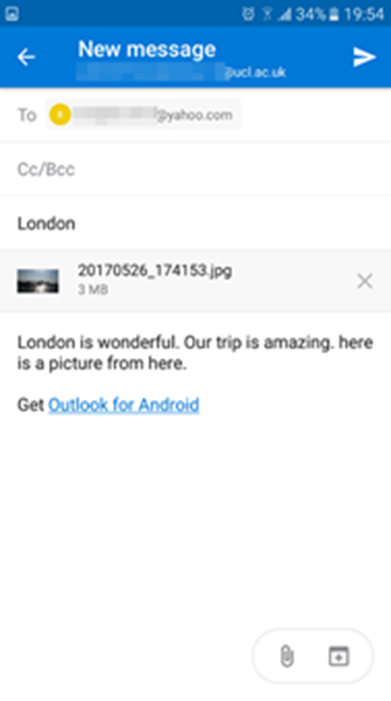
Figure 1 How the app will look like
Why choose Xamarin to make your first mobile app?
Xamarin is one of the best cross-platforms mobile development framework. If you are looking forward to develop you C# skills doing something fun, Xamarin is the answer. The performance is very good and comparable to native and covers all major mobile platforms like Android, iOS and Windows. The documentation of Xamarin is large and well structured, so it is easy to find everything you need in there. Moreover, while working with Xamarin on Visual Studio, you can test out your app to see if there are any bugs or exceptions you did not cover. You can easily deploy your app on Google play or Apple store.
Building the app
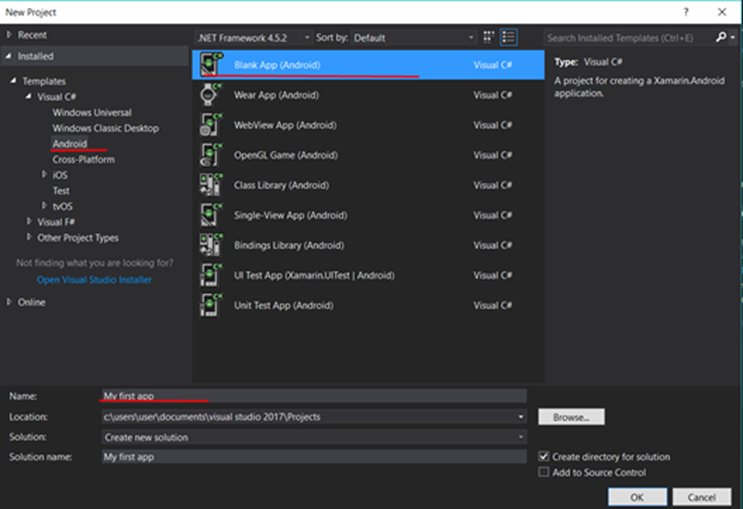
Start out by creating a new Blank App Android project. Name it as “My first app”.
Figure 2 Getting started
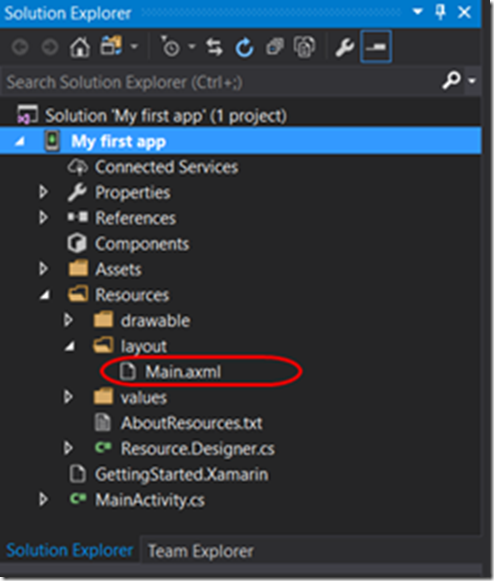
The files of the app will appear on the right. We will start by opening the Main.axml file. It is in the Resources/layout folder. This is the default user interface layout file for an application.
Figure 3 How to locate the Main.axml file
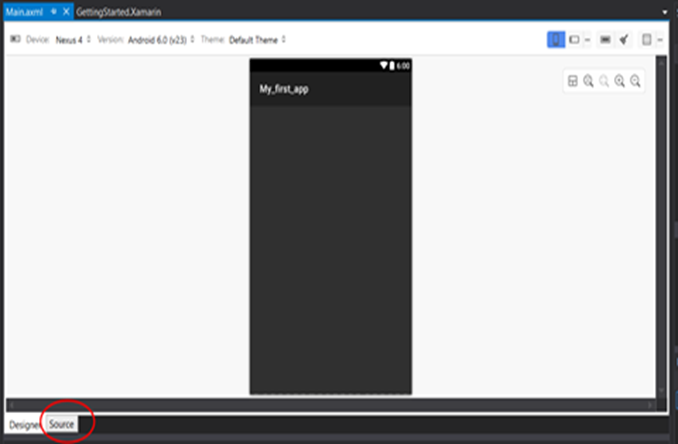
On the bottom left, click on “source” .
Figure 4 Getting to the source code
Now we will start adding some code. Start by deleting the backslash from the code.
Figure 5 Where to start adding some code
We need to add the elements of the app here. The app will have 9 UI widgets: TextView, EditText, Button and ImageView. The “TextView” elements will show only some simple text (user will not be able to modify it; it is used only to display some simple text). The “TextView” elements are 1,3 and 5. “EditText” are the input fields that need to be filled in by the user. When the user presses on that space, the keyboard will automatically pop up. The “EditText” Elements available are 2,4 and 6. “Buttons” are important elements of the app. When they are pressed, an action will happen. In our application, one button is used to select an image to attach in the e-mail (no 7 ), while the other button ( no 9 ) will ask the user what mail app to use. “ImageView” will display the image chosen on the page.
Figure 6 The 9 UI widgets of the app
Each of these UI widgets will have a unique id. We can think the id’s to be a “bridge” between the main.axml file ( where the UI elements are ) and the MainActivity.cs file ( where basically all the back-end code is). In order to better understand the key functionalities of each element, we will analyses the code of one button.
    1: <Button
    2: android:text="Attach a photo"
    3: android:layout_width="match_parent"
    4: android:layout_height="wrap_content"
    5: android:id="@+id/button1"
    6: android:textStyle="bold"
    7: android:background="@android:drawable/toast_frame"
    8: android:backgroundTint="#ff33b5e5" />
android:text will display some text on the button (what the button does). In order to make the text bold, we have added the android:textStyle attribute. android:backgroundTint and android:background are responsible for the background of the button. android:layout_width and android:layout_height will set the size of the button. All of these are customizable and easy to understand. The button has an id ( android:id="@+id/button1 ) and we will use it in the MainActivity.cs in order to set it an action when it is pressed.
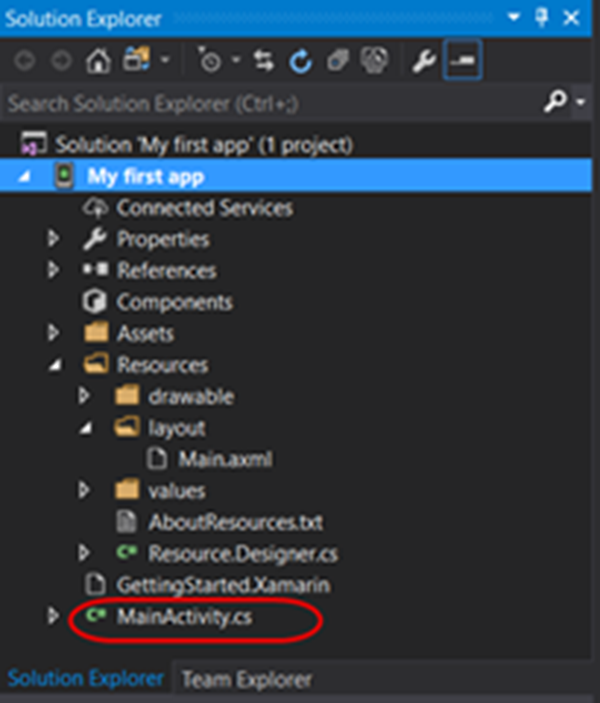
Now we need to go make these buttons and input text work. In order to do that, open the “MainaActivity.cs” file.
Figure 7 Locating the MainActiviy.cs file
In order to better understand the code, we will need to see what is going to be the flow of the application. As far as we know so far, we have some input fields, 2 buttons and one ImageView box.
Let’s start with the first button, the “Attach the button”. When this button is pressed, the application will need to perform some action: the image gallery will open and the user must select a picture. When the picture is chosen, the mobile app will get the location (each file have a location. An image for example is located in the gallery folder or on a SD card) of the image and display it in the ImageView box.
The next button is “Send”. When it is pressed, it will take all the text from the fields “Subject”, “E-mail” and “Message” as well as the location of the image the user wants to be attached to the e-mail. (It is not necessary for the e-mail to have an attachment). After that, it will ask the user to choose a webmail provider. Supposing the user chose “Outlook” as its webmail provider, the Outlook app will open, and it will have the subject, recipient’s name, the message and the attachment added.
There are 2 global variables. There is the imageView variable that will display the image while the other one is a string that will hold the location of the image selected.
    1: ImageView imageView;
    2: System.String uris;
We will work with some variables. The first three (subject, to, message) are just some strings of texts. They are the data needed for an e-mail. Then there are the two buttons. We will need them I order to set some events to happen when they are selected. A method “FindViewById” is called for each variable. This method finds a view that was identified by the id attribute from the XML file.
    1: var subject = FindViewById<EditText>(Resource.Id.editText1);
    2: var to = FindViewById<EditText>(Resource.Id.editText2);
    3: var message = FindViewById<EditText>(Resource.Id.editText3);
    4: var btnCamera = FindViewById<Button>(Resource.Id.button1);
    5: var btnSend = FindViewById<Button>(Resource.Id.button2);
    6: imageView = FindViewById<ImageView>(Resource.Id.imageView);
Now, we want to write down what event we want to happen when the “Attach button” is pressed. As a result, when the btnCamera is pressed, we want some operation to happen. As a result, we will use “Intent”. It is used to launch external applications with the intent to do something. In our case, we plan the gallery to appear in order for the user to select an image. Intent is part of the Android.Content namespace (One important feature of the C# language is the usage of the Namespaces. A namespace is a set of related objects and within a namespace, a user can declare classes, interfaces or another namespace.) which contains classes for accessing and publishing data on a device.
    1: btnCamera.Click += (s, e) =>
    2: {
    3: var imageIntent = new Android.Content.Intent();
    4: imageIntent.SetType("image/*");
    5: imageIntent.SetAction(Android.Content.Intent.ActionGetContent);
    6: StartActivityForResult(
    7: Android.Content.Intent.CreateChooser(imageIntent, "Select photo"), 0);
    8: };
This block of code will only help us to open the gallery. However, we still need to display the image chosen on the ImageView box and get the location of the image. For that, we will need to override the OnActivityResult Method. It is called when an activity launched exits (in this case, when the image was chosen). The method takes a requestCode of the activity which started it with, the resultCode it returned, and any additional data from it. We will override this method in order to display the image in the ImageView block as well as to get the location of the image. After it had displayed the image (imageView.SetImageURI (data.Data); ), uris will be a string that holds the location of the image ( it was globally declared) . The Data.data is an uri (uniform resource identifier) and is a compact representation of a resource available to your application on the intranet or Internet. Data.data basically holds the image selected.
    1: protected override void OnActivityResult(int requestCode,
    2: [Android.Runtime.GeneratedEnum] Result resultCode, Android.Content.Intent data)
    3:     {
    4:         base.OnActivityResult(requestCode, resultCode, data);
    5:         if (resultCode == Result.Ok)
    6:     {
    7:         var imageView =
    8:         FindViewById<ImageView>(Resource.Id.imageView);
    9:         imageView.SetImageURI(data.Data);
   10:         uris = GetPathToImage(data.Data);
   11:     }
   12: }
We will need to create a method that returns the location of the image. The method will return the location as a string. The function will take one parameter which is the uri to the image selected. An image can exist in 3 possible folders: the gallery (Media Storage), SD card (External Storage) or download folder. The function will get the path and return it as a string.
    1: private string GetPathToImage(Android.Net.Uri uri)
    2:         {
    3:             string doc_id = "";
    4:             using (var c1 = ContentResolver.Query(uri, null, null, null, null))
    5:             {
    6:                 c1.MoveToFirst();
    7:                 System.String document_id = c1.GetString(0);
    8:                 doc_id = document_id.Substring(document_id.LastIndexOf(":") + 1);
    9:             }
   10:
   11:             string path = null;
   12:
   13:
   14:             string selection = Android.Provider.MediaStore.Images.Media.InterfaceConsts.Id + " =? ";
   15:             using (var cursor = ContentResolver.Query(Android.Provider.MediaStore.Images.Media.ExternalContentUri, null, selection, new string[] { doc_id }, null))
   16:             {
   17:                 if (cursor == null) return path;
   18:                 var columnIndex = cursor.GetColumnIndexOrThrow(Android.Provider.MediaStore.Images.Media.InterfaceConsts.Data);
   19:                 cursor.MoveToFirst();
   20:                 path = cursor.GetString(columnIndex);
   21:
   22:             }
   23:             return path;
   24:         }
Now, we need to write what will happen when the “Send” button is pressed. Our plan is the following: get the data that was filled in in the input fields “Subject”, “E-mail” and “Message” and the image selected, choose a mail provider and send all of these data to the other application. We will work again with “intent”, but this time we create our own kind of intent named email(we create the email variable of type intent). Using “ActionSend” with the email intent we make sure that we will deliver some data to the other mailing app.
    1: btnSend.Click += (s, e) =>
    2:             {
    3:
    4:
    5:                 Android.Content.Intent email = new Android.Content.Intent(Android.Content.Intent.ActionSend);
    6:
    7:
    8:                 email.PutExtra(Android.Content.Intent.ExtraEmail, new string[] { to.Text.ToString() });
    9:                 email.PutExtra(Android.Content.Intent.ExtraSubject, subject.Text.ToString());
   10:                 email.PutExtra(Android.Content.Intent.ExtraText, message.Text.ToString());
   11:
   12:                 if (uris != null)
   13:                 {
   14:
   15:
   16:                     var filePath = System.IO.Path.Combine(uris, "");
   17:                     var File = new Java.IO.File(filePath);
   18:                     var path = Android.Net.Uri.FromFile(File);
   19:
   20:                     email.PutExtra(Android.Content.Intent.ExtraStream, path);
   21:                 }
   22:                 email.SetType("message/rfc822");
   23:
   24:                 StartActivity(Android.Content.Intent.CreateChooser(email, "Send Email Via"));
   25:
   26:
   27:             };
After that, we need to check if the user attached any image. As we know, the string uris holds the location of the image. If an image was selected, then we need to attach the image to the e-mail. First of all, we need to convert the string to a path( System.IO.Path.Combine combines the string uri with “” and creates a path). After that, we convert the path to a file ( we actually want to attach a file, not a location ). Finally, we attached the file to the e-mail.
After all of these have been done, we make sure to encapsulate everything into a message (email.SetType("message/rfc822"); ) and make the user to pick another mail application than the default ( StartActivity(Android.Content.Intent.CreateChooser(email, "Send Email Via")); ).
How the app works
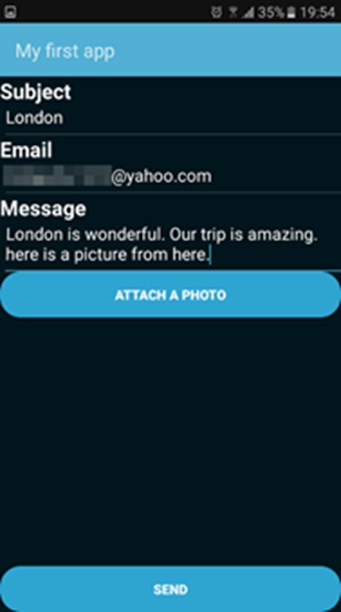
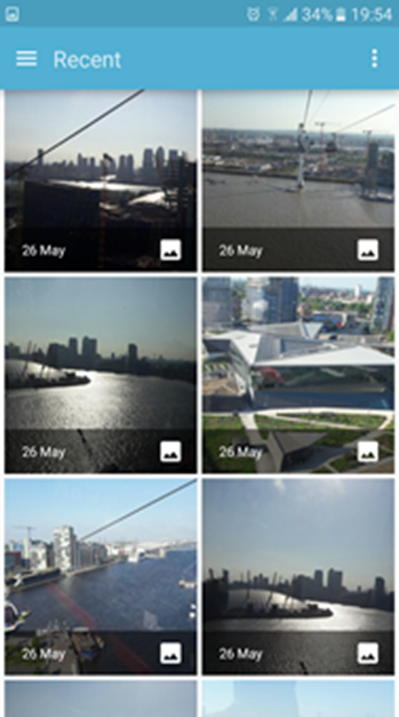
Here are some screenshots of how the app will work.
Figure 8 The first page of the app. Filling in the fields with some data
Figure 9 Attach a photo button was pressed. The gallery is opened
Figure 10 After the photo was chosen, it is displayed on the page
Figure 11 The "Send" Button was pressed. The user is asked to choose another mailing app
Figure 12 The text, subject, recipient and the photo were added to the e-mail
Other resources
If you are looking to find out more about some features of Xamarin, I prepared for you some extra materials
Xamarin Microsoft Virtual Academy Course https://mva.microsoft.com/colleges/xamarin
Text Fields for Xamarin.Android
Take a picture and save it using the Camera – you can try to modify the original code of the app by allowing the user to attach a picture taken by the camera
Launch a phone Dialer - good for understanding better Intent
