Getting Data into Azure Notebooks–Jupyter in the classroom
Jupyter provides the basis of the Azure Notebooks user experience. There are many ways to get your data in your notebooks ranging from using curl or leveraging the Azure package to access a variety of data all while working from a Jupyter Notebook.
Here are some of the most popular ways
Use curl to retrieve a file from GitHub
We can call bash commands by starting our line with a !. In this way we can just curl a file down from the internet, like this csv about oil prices.
In [1]:
!curl https://raw.githubusercontent.com/petroleum101/figures/db46e7f48b8aab67a0dfe31696f6071fb7a84f1e/oil_price/oil_price.csv -o oil_price.csv
   % Total    % Received % Xferd  Average Speed   Time    Time     Time  Current
                                 Dload  Upload   Total   Spent    Left  Speed
100  5190  100  5190    0     0  30005      0 --:--:-- --:--:-- --:--:-- 30174
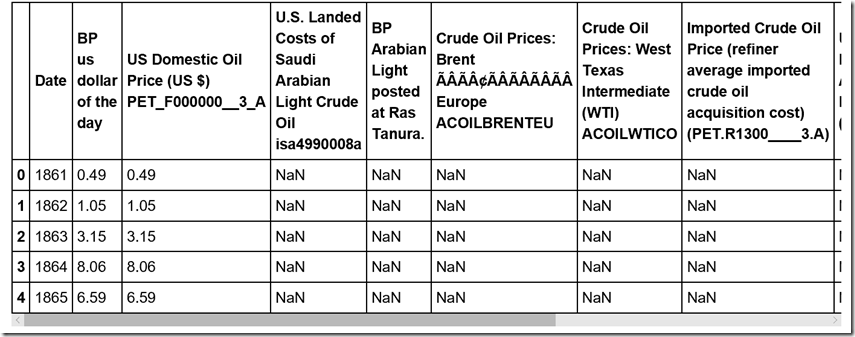
Then, if we wanted to do something with it, we might choose to load it into pandas.
In [2]:
 import pandas
dataframe = pandas.read_csv('oil_price.csv')
dataframe.head()
Out[2]:
Interacting with Azure Blobs
We can also use Azure Storage to store our data. It also makes it pretty straightforward to keep our data private or public. The below code shows using private keys first. Then, in the shared access section a shared access signature for read-only access is created.
Before we can do anything though, we need an Azure Storage Account. Read the documentation article on creating storage accounts or create a storage account using the Azure SDK.
You can put content into blobs using AzCopy or by using the Python Azure SDK as shown in the example below.
Once you retrieve your account and key, you can enter them below. This code will create a container and blob in the azure storage you provide. Then we will read that blob back.
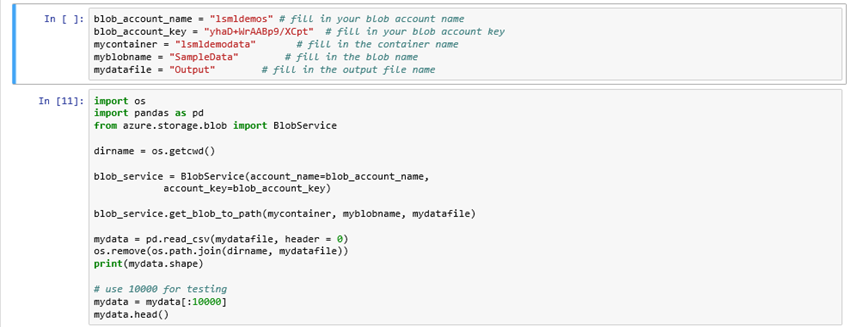
Within your Jupyter Notebook you now need to define the connection parameters, So in a code block create the following and take the details from your Azure Account.
Example of Notebooks setup
So Code Block is where we define the connection
blob_account_name = "" # fill in your blob account name
blob_account_key = "" # fill in your blob account key
mycontainer = "" # fill in the container name
myblobname = "" # fill in the blob name
mydatafile = "" # fill in the output file name
The Azure storage account provides a unique namespace to store and access your Azure Storage data objects. All objects in a storage account are billed together as a group. By default, the data in your account is available only to you, the account owner.
There are two types of storage accounts:
In a new code block create your connection and query strings
import os # import OS dependant functionality
import pandas as pd #import data analysis library required
from azure.storage.blob import BlobServicedirname = os.getcwd()
blob_service = BlobService(account_name=blob_account_name,
account_key=blob_account_key)blob_service.get_blob_to_path(mycontainer, myblobname, mydatafile)
mydata = pd.read_csv(mydatafile, header = 0)
os.remove(os.path.join(dirname, mydatafile))
print(mydata.shape)
Another way is as follows
In [3]:
 azure_storage_account_name = None
azure_storage_account_key = None

if azure_storage_account_name is None or azure_storage_account_key is None:
    raise Exception("You must provide a name and key for an Azure Storage account")
In [4]:
!pip install azure-storage==0.32.0
 Requirement already satisfied (use --upgrade to upgrade): azure-storage==0.32.0 in /home/nbcommon/anaconda3_23/lib/python3.4/site-packages
Requirement already satisfied (use --upgrade to upgrade): azure-nspkg in /home/nbcommon/anaconda3_23/lib/python3.4/site-packages (from azure-storage==0.32.0)
Requirement already satisfied (use --upgrade to upgrade): azure-common in /home/nbcommon/anaconda3_23/lib/python3.4/site-packages (from azure-storage==0.32.0)
Requirement already satisfied (use --upgrade to upgrade): python-dateutil in /home/nbcommon/anaconda3_23/lib/python3.4/site-packages (from azure-storage==0.32.0)
Requirement already satisfied (use --upgrade to upgrade): requests in /home/nbcommon/anaconda3_23/lib/python3.4/site-packages (from azure-storage==0.32.0)
Requirement already satisfied (use --upgrade to upgrade): six>=1.5 in /home/nbcommon/anaconda3_23/lib/python3.4/site-packages (from python-dateutil->azure-storage==0.32.0)
You are using pip version 8.1.1, however version 8.1.2 is available.
You should consider upgrading via the 'pip install --upgrade pip' command.
In [6]:
 from azure.storage.blob import BlockBlobService

# First, we need to connect to our blob via the BlobService
blob_service = BlockBlobService(azure_storage_account_name, azure_storage_account_key)

# Once we are in the account we can create a container
blob_service.create_container('azure-notebooks-data')

# Insider a container we can create other containers or a blob
blob_service.create_blob_from_text('azure-notebooks-data', 'sample.txt', 'your text file content would go here')

# There are also methods to list containers and blobs
containers = blob_service.list_containers()
blobs = blob_service.list_blobs('azure-notebooks-data')

# We can also read our blob from azure and get the text.
blob_service.get_blob_to_path('azure-notebooks-data', 'sample.txt', 'sample.txt')

!cat sample.txt
your text file content would go here
Using Azure Table Storage
Azure Table Storage can be used in much the same way as Blob Storage. Below you will find creating a table in a storage account, adding rows, removing rows, and querying for data.
In [7]:
 from azure.storage.table import TableService
import IPython

# We start by connecting to our table
table_service = TableService(azure_storage_account_name, azure_storage_account_key)

# Creating a table in Azure Storage is straightforward
table_name = 'azurenotebookstesttable'
table_service.create_table(table_name)

# You can insert entities to the table
entity = {'PartitionKey': 'testItems', 'RowKey': '0', 'age':1}
table_service.insert_entity(table_name, entity)
table_service.insert_entity(table_name, {'PartitionKey': 'testItems', 'RowKey': '10', 'age':2, 'eyecolor':'blue'})

# To query for entities you can use the following code
queried_entities = table_service.query_entities(table_name, filter="PartitionKey eq 'testItems'")
print('=== Queried rows after inserts ===')
IPython.display.display_pretty([i for i in queried_entities])

# You can delete an entity by using its partition and row key.

table_service.delete_entity(table_name, 'testItems', '0')

# We can query to show we have removed the entity
queried_entities = table_service.query_entities(table_name, filter="PartitionKey eq 'testItems'")
print('=== Queried rows after delete ===')
IPython.display.display_pretty([i for i in queried_entities])
=== Queried rows after inserts ===
 [{'PartitionKey': 'testItems',
  'RowKey': '0',
  'Timestamp': datetime.datetime(2016, 5, 20, 17, 26, 9, 531793, tzinfo=tzlocal()),
  'age': 1,
  'etag': 'W/"datetime\'2016-05-20T17%3A26%3A09.5317932Z\'"'},
 {'PartitionKey': 'testItems',
  'RowKey': '10',
  'Timestamp': datetime.datetime(2016, 5, 20, 17, 26, 9, 569828, tzinfo=tzlocal()),
  'age': 2,
  'etag': 'W/"datetime\'2016-05-20T17%3A26%3A09.5698289Z\'"',
  'eyecolor': 'blue'}]
=== Queried rows after delete ===
 [{'PartitionKey': 'testItems',
  'RowKey': '10',
  'Timestamp': datetime.datetime(2016, 5, 20, 17, 26, 9, 569828, tzinfo=tzlocal()),
  'age': 2,
  'etag': 'W/"datetime\'2016-05-20T17%3A26%3A09.5698289Z\'"',
  'eyecolor': 'blue'}]
Providing Read Only Access to Azure Storage through Shared Access Signatures
Sometimes you want to share your data but you don't want to give them the ability to edit the dataset. Shared Access Signatures allow you to share your data and provide whatever level of control you want to the receiver. A common use case is to provide read only access to a user so they can read your data but not edit it.
Below, we create a shared access signature for our table (this also works with blobs) with read permissions. We show that we can read the table but we show that we can't write. With tables you also need to provide permission to query.
Creating a Shared Access Signature
In [8]:
 from azure.storage.blob.models import BlobPermissions
from datetime import datetime, timedelta

sas_token = blob_service.generate_blob_shared_access_signature(
    'azure-notebooks-data',
    'sample.txt',
    BlobPermissions.READ,
    datetime.utcnow() + timedelta(hours=1)
)

sas_token
Out[8]:
'se=2016-05-20T18%3A25%3A13Z&sig=rskxaKrEtnWcvVzfjW2rdofv5gWV9NVLgixH6HbkrK4%3D&sp=r&sv=2015-07-08&sr=b'
Using a Shared Access Signature
In [9]:
 # Create a service and use the SAS
sas_blob_service = BlockBlobService(
    account_name=azure_storage_account_name,
    sas_token=sas_token,
)

sas_blob_service.get_blob_to_text('azure-notebooks-data', 'sample.txt').content
Out[9]:
'your text file content would go here'
Cleaning up our blobs and tables
In [10]:
 # Finally, let's clean up the resources created.
# Delete the blob, container, and table we created
blob_service.delete_blob('azure-notebooks-data', 'sample.txt')
blob_service.delete_container('azure-notebooks-data')
table_service.delete_table('azurenotebookstesttable')
Out[10]:
True
Using SQL
With the assistance of the pyodbc library we can access our SQL Servers in Microsoft Azure. To create a SQL Server you can see the documentation for Creating and Using Azure SQL Documentation.
In [ ]:
!pip install pyodbc
In [ ]:
 import pyodbc

server = 'yourserver.database.windows.net'
database = 'yourdatabase'
username = 'yourusername'
password = 'yourpassword'

driver= '{ODBC Driver 13 for SQL Server}'
cnxn = pyodbc.connect('DRIVER='+driver+';PORT=1433;SERVER='+server+';PORT=1443;DATABASE='+database+';UID='+username+';PWD='+ password)
cursor = cnxn.cursor()
cursor.execute("select @@VERSION")
row = cursor.fetchone()
if row:
    print row
In [ ]:
 #PYMSSQL --> NOTE the connection parameter settings for pymssql are different from pyodbc above.
#pymssql.connect("xxx.database.windows.net", "username@xxx", "password", "db_name")
#see details : https://pymssql.org/en/latest/azure.html

import pymssql
conn = pymssql.connect("yourserver.database.windows.net", "yourusername@yourserver", "yourpassword", "yourdatabase")
cursor2 = conn.cursor()
cursor2.execute("select @@VERSION")
row = cursor2.fetchone()
if row:
    print( row)
Using OneDrive
You can download files from OneDrive by viewing the file in the web UI. You can get the download id and authkey from viewing the 'embed' code. Change the link slightly to go to 'download' instead of 'embed' and use the requests library.
The HTML provided by embed contains a source link that just needs to be changed to use /download instead of /embed.
<iframe src="https://onedrive.live.com/embed?cid=72087E967DE94E66&resid=72087E967DE94E66%21107&authkey=AB1cjNae6IB1Bm4" width="98" height="120" frameborder="0" scrolling="no"></iframe>
https://onedrive.live.com/download?cid=72087E967DE94E66&resid=72087E967DE94E66%21107&authkey=AB1cjNae6IB1Bm4
You can then use requests or curl to get the file.
In [ ]:
 # Option 1: curl
!curl "https://onedrive.live.com/download?cid=72087E967DE94E66&resid=72087E967DE94E66%21107&authkey=AB1cjNae6IB1Bm4" -L -o a_text_file.txt
In [9]:
 # Option 2: requests in Python 3

import requests

def download_file_using_requests(url, disk_location):
    r = requests.get(url, stream=True)
    if r.status_code == 200:
        with open(disk_location, 'wb') as f:
            for chunk in r.iter_content(1024):
                f.write(chunk)

onedrive_url = "https://onedrive.live.com/download?cid=72087E967DE94E66&resid=72087E967DE94E66%21107&authkey=AB1cjNae6IB1Bm4"
download_file_using_requests(onedrive_url, 'a_text_file.txt')
Using Dropbox
You can download files from Dropbox by clicking the 'Share' button in the Dropbox UI and get a link.
You can use that link to download the file using curl. or upload the file using Data –> Choose from Dropbox
Or use Curl
In [ ]:
!curl "https://www.dropbox.com/s/lvn3qoz8o03a5a1/Python-3-vs-Python-2-Converging.png?dl=0" -L -o Py3-vs-Py2.png
Using Local Files
To do this simply select Data –> Upload and upload the necessary data files to the Notebook
Other Resources
Copy Wizard for Azure Data Factory
Using External Storage Data https://blogs.msdn.microsoft.com/uk_faculty_connection/2017/07/20/using-external-data-with-azure-jupyter-notebooks/
Using Local Data https://blogs.msdn.microsoft.com/uk_faculty_connection/2017/07/04/how-to-implement-the-backpropagation-using-python-and-numpy/


