Configure SharePoint with Kerberos and SSL for use with Team Foundation Server (TFS)
This article gives the step by step instructions to configure SharePoint with Kerberos and SSL for use with Team Foundation Server (TFS).
It involves the following steps, explained further in detail.
1. Configure SharePoint Foundation 2010 on SharePoint Server.
2. Configure Kerberos for SharePoint 2010.
3. Set SPNs.
4. Create a Web application on the SharePoint central administration site.
5. Configure SSL for SharePoint 2010 Foundation.
6. Configure SharePoint extensions on SharePoint Server.
7. Download and Install SharePoint Foundation 2010 on Web Front End 1 and Web Front End 2.
8. Add the SharePoint information In TFS Admin console.
9. Configure SharePoint Server 2010 for Dashboard Compatibility with TFS 2010.
10. Configure Secure Store Service.
11. Configuring TFS
1. Configure SharePoint Foundation 2010 on SharePoint Server
Step: 1
Download SharePoint Foundation 2010 : https://www.microsoft.com/en-us/download/details.aspx?id=24983 . Install it.
Step: 2
Start the configuration wizard in SharePoint
SharePoint Server 2010 Application file, system will show the above screen, under Install > click Install Software prerequisites.
Click Next.
Step : 3
Once all the pre requisites are installed, choose the "Install SharePoint Server" option from the menu.
Step : 4
Choose the "Server Farm" option in the SharePoint server. Give the name of the SQL Server in the next step.
Enter the name of SharePoint Configuration (Default: SharePoint_Config)
System will start the Installation progress.
Step: 5
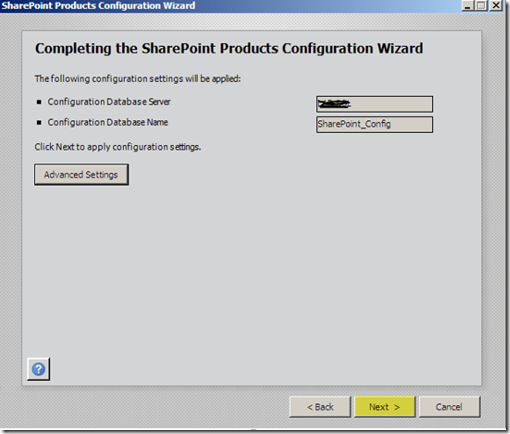
Run your Configuration wizard and click next. Click on Yes to start IIS and SharePoint Timer service.
Step:6
System will launch the Share Point Central Administration Page
NOTE:
**Create a Service account for Share Point. Add this account as the Local administrator in the Share Point server.
Let this account have sysadmn credentials on the SQL server where the SharePoint databases will be stored.
2. How to configure Kerberos for SharePoint 2010
Step : 1
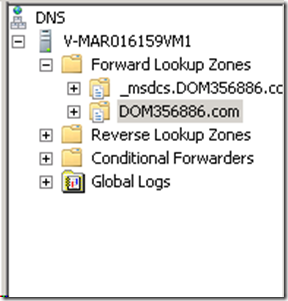
Open the DNS management in the Administrative Tools on a DNS server and Click on the Forward Lookup Zone.
Step : 2
Right click on the zone (domain name) and click on new host (A or AAAA).
Step : 3
Type the name of the Share Point server and the IP Address
Click OK. Make sure the host has been created.
Step : 4
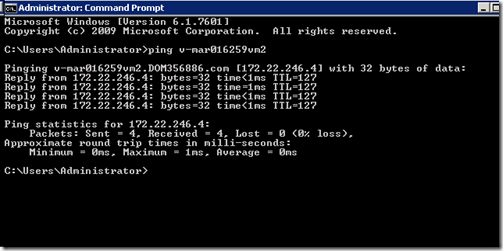
Ping the Share Point server. You can see that Name resolution has been done.
3. How to set SPN?
Open command prompt as administrator and run the below commands:
setspn -S HTTP/mywebappurl domain\serviceaccount (hit enter)
Now we also have to add an SPN for the FQDN, type:
setspn -S HTTP/mywebappurl.domain.com domain\serviceaccount (hit enter)
Listing the SPN’s now should list all the SPNs:
setspn -L domain\serviceaccount (hit enter)
Note: HTTP can be upper or lowercase, does not matter.
Eg:
Setspn -S http/v-mar016259vm2.Dom356886.com DOM356886\SPAdmin
Setspn -S http/v-mar016259vm2 DOM356886\SPADmin
Setspn -l DOM356886\SPADmin
Run the command klist purge : It helps to delete all the old Kerberos tickets stored in the cache.
4. Create a Web application on the Share Point central administration site:
Step 1:
Go to Central Administration > Manage Web application
Step 2 :
Create a new Web application.
Select Kerberos as Authentication Provider for the Web application and create the Web application
Step 3 :
Open Internet Information Service (IIS). Click on the Web application you just created. Go to Authentication.
Click on windows Authentication > Advanced Settings > Enable kernel mode authentication > OK.
5. How to configure SSL for Share Point 2010 Foundation
Step : 1
Create a Self-Signed Certificate for Share Point from IIS.
Go to IIS > Server Certificates > Create a self-signed certificate and click Ok.
Step : 2
Once the certificate has been created. Export the certificate.
Step : 3
Open MMC and add this certificate to the Trusted Root Certificate Authorities and the SharePoint Node
Step : 4
Go to IIS > Click on the Web application > Bindings > Add > Select type as https > Select the SSL Certificate >OK
Step : 5
Go to Share Point Central Administration > System Settings > manage Alternate access Mapping
Select the Web application which you created and Click on Edit Public URL.
Edit the url and make it such that it shows : https://<ServerName.Domainname.com> and make it as default.
Eg:
6. Configure Share Point extensions on Share Point Server.
Download and install SharePoint Extensions for Team foundation server on the SharePoint server.
Configure the SharePoint extensions.
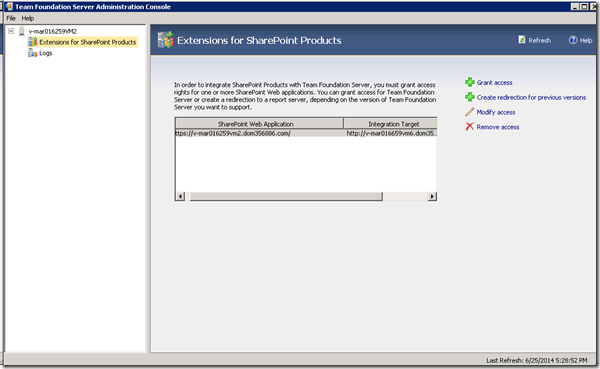
Click on Grant Access. Enter the URL for Team Foundation Server. Share Point Select the Web Application. Click Ok.
The Web application will be added in the extensions for SharePoint products
Eg:
7. Download and Install Share Point Foundation 2010 on Web Front End 1 and Web Front End 2.
Step : 1
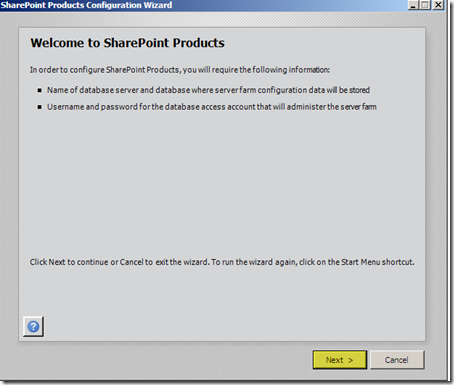
Start the “SharePoint 2010 Products Configuration Wizard” from the "Microsoft SharePoint 2010 Products" menu option under "All Programs"
Press “Next”
Click Yes.
Step : 2
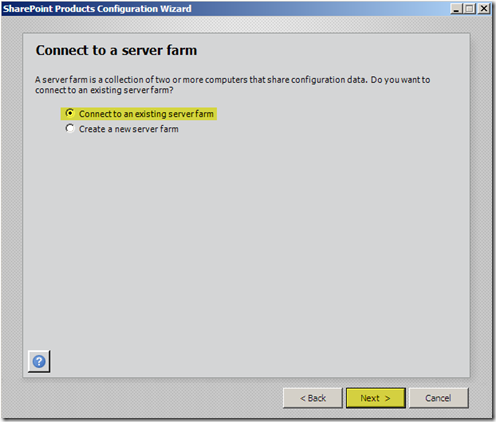
While configuring the SharePoint, select the option : Connect to an existing Farm. Follow the instructions.
Type the database Server name and retrieve the database name of SharePoint.
Enter the Passphrase which you had given while configuring the farm in the SharePoint server
Click Next
Wait for the configuration to complete
Click Finish once it's done.
Open IIS.
Follow the same steps while adding SSL to the web application in IIS. (Make sure you have the exported certificate, you don't have to create a new one). (From Step 3 and 4 from How to configure SSL for Share Point 2010 Foundation )
Install Extension for SharePoint on Team Foundation server on both the web front ends and open the TFS Admin console. Click refresh.
The extensions should be added here.
8. Add the Share Point information In TFS Admin console
Go to the TFS Server. Open Admin Console.
Step : 1
Go to Share Point. Add the Central Admin URL and the Web application URL.
Step : 2
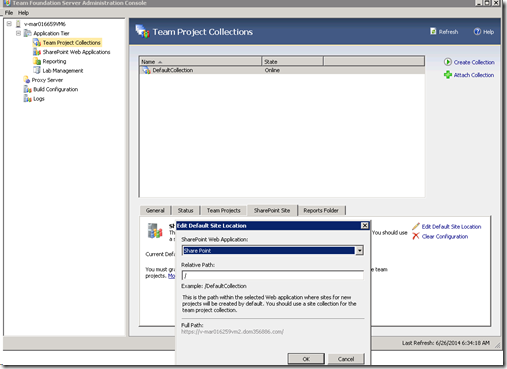
Click on Application Tier > SharePoint (Default Collection) > Configure > Add the path for site collection.
SharePoint is thus configured with Kerberos and SSL. (Tada!)
9. Configuring SharePoint Server 2010 for Dashboard Compatibility with TFS 2010
Step : 1
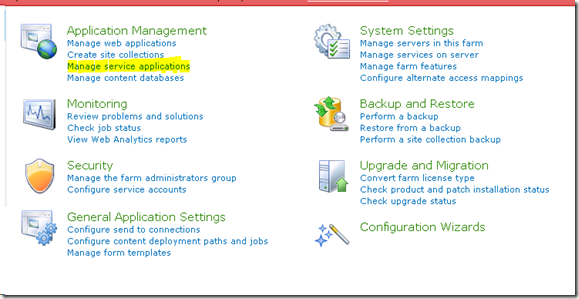
Go to the central administration home page, and click on “Manage service applications” under Application Management
Step : 2
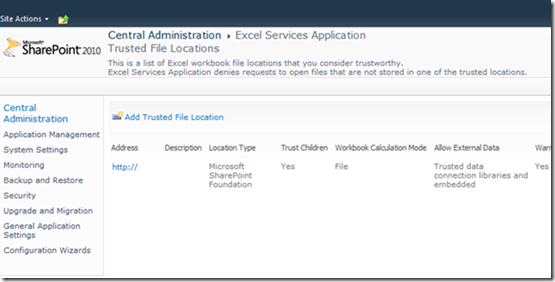
Click on Excel Services application > Trusted File Locations.
By default, SharePoint creates a trusted file location of “https://” when you first configure Excel Services, which makes any path under the root a trusted location; you can change this if you wish, but make sure that the path maps to a location under which you want to place your TFS team project SharePoint portals, and that Trust Children is set to true. Click on the address of the trusted file location that will be used for TFS to edit it.
Step : 3
Click on the default Address. Change the address as per your settings.
Scroll down on the form and find the Warn on Refresh option, and uncheck the checkbox. If you leave this option checked, users visiting the TFS dashboards on SharePoint will constantly be asked whether they want to refresh the Excel web parts. Click OK.
10. Configure Secure Store Service
Configuring Secure Store Service is optional, but recommended if you don’t want to manually give credentials in SQL Reporting Services to everyone who is accessing the portal and/or your SharePoint server is on a separate machine from your Team Foundation Server, and you need to solve the double-hop authentication issue.
Step : 1
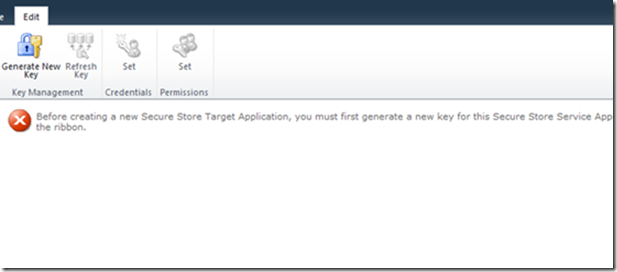
Go to the central administration home page, click on “Manage service applications” under Application Management, and then click on Secure Store Service.
On the resulting page, SharePoint will tell you that you need to generate a key if you haven’t done so already:
Step : 2
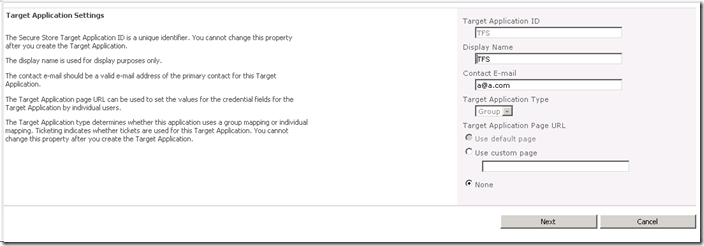
Click on Generate New Key on the ribbon if this is the case. Once you’ve got a key, click New on the ribbon to create a new Secure Store Target Application for TFS. Fill out the appropriate fields, and take a note of the value you specify for the Target Application ID, as you’ll need this later (I used tfs in the example below). Select Group for the Target Application Type:
Step : 3
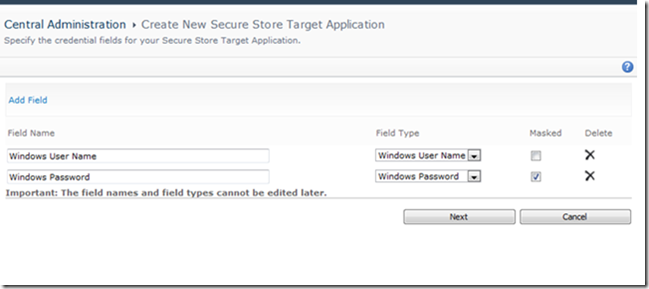
Enter the Windows User Name and Password
Step : 4
Add the Administrator groups and Users
Step : 5
11. Configuring TFS ( Add enterprise Application Definition in all the web front ends and the Sharepoint server).
Now onto configuring TFS. If you haven’t already installed/configured TFS, do so now, following the instructions in the install guide to enable TFS integration with SharePoint. Once you have installed/configured TFS, open up your TFS admin console on the machine where SharePoint is installed. Select the “Extensions for SharePoint Products” node and select the mapping to TFS and click Modify. In the Enterprise Application Definition field, enter in the value that you specified earlier for the Target Application ID when configuring Secure Store Service (I used tfs above and below).
Still with us? Great! You have successfully configured SharePoint (With Kerberos Authentication) to be integrated with TFS.
Cheers!
Content created by – Aparna Chinya Ramachandra
Content reviewed by – Romit Gulati


![clip_image001[1] clip_image001[1]](https://msdntnarchive.z22.web.core.windows.net/media/MSDNBlogsFS/prod.evol.blogs.msdn.com/CommunityServer.Blogs.Components.WeblogFiles/00/00/01/26/82/metablogapi/5852.clip_image0011_thumb_23FAA426.png)


