Change the service accounts used by TFS, SQL, Reporting Services and SharePoint
The steps and screenshots included in the article are for the following product versions:
- Team Foundation Server – 2013
- SQL Server – 2012
- SharePoint – 2013
Apart from minor UI changes, there are no major changes in the way in which these commands are run, in other product versions as well.
Change the service account for TFS
The service account for TFS can be changed either from the Administration console or from the command prompt.
Required permissions
You must be a member of the Administrators group on the Team Foundation application-tier server and a member of the sysadmin group on the server and instance of SQL Server that hosts the configuration database for Team Foundation
Use the Administration Console to change the account:
-
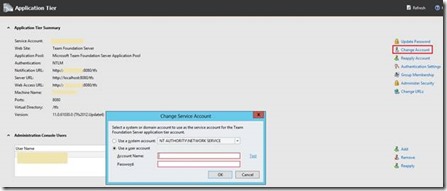
- Open the administration console for Team Foundation on the server that hosts the application tier.
- In the console, expand the server name and choose Application Tier.
- In the Application Tier pane, choose Change Account
- The Change Service Account window opens.
-
- Choose Use a system account if you are planning to use a system account (does not require password), else choose Use a user account, enter the account name and password and click OK.
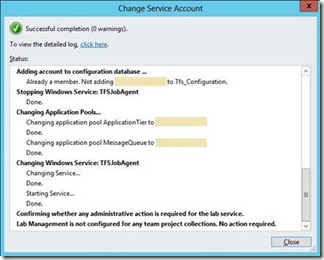
- Wait for the status messages to complete and then click Close.
To use the TFSConfigutility to change the service account
-
- On the application-tier server, open a Command Prompt window and change directories to the directory that contains the TFSConfig utility.
- By default, this utility is located in Drive:\Program Files\Microsoft Team Foundation Server 12.0\Tools.
- At the command line, type TFSConfig Accounts /change /accountType:ApplicationTier /account:AccountName /password:NewPassword, and then choose ENTER.
- Wait for the status messages to complete and verify the account change.
For details on the permissions required for the service accounts, refer the below link: https://msdn.microsoft.com/en-us/library/ms253149.aspx
Change the Report Reader account for TFS
The report reader account for TFS can be changed either from the Administration console.
Required permissions
You must be a member of the Administrators group on the Team Foundation application-tier server and a member of the sysadmin group on the server and instance of SQL Server that hosts the configuration database for Team Foundation
Steps to change the account
-
- Open the administration console for Team Foundation on the server that hosts the application tier.
- In the console, expand the server name and choose Application Tier.
- In the Application Tier pane, scroll down to the Reporting Services Summary section at the bottom of the screen and click on Change Account
-
- The Change Service Account window opens.
-
- Enter the account name and password and click OK. The status messages for changing the account is displayed on the screen.
Change service account for SQL and Analysis server
The service accounts used for SQL server and Analysis server instances can be changed from the SQL Server Configuration Manager.
Permissions required
-
- The user account that is performing this procedure should be a member of the Administrators group on the computer that is running SQL Server
- The account must also be the domain account that SQL Server uses if the Database Engine is configured to run under a domain account.
Steps to change the account
-
- Navigate to SQL Server Configuration Manager from the Start menu
- In the navigation pane of the Configuration Manager, expand SQL Server Configuration Manager (Local), and then click SQL Server Services.
-
- In the details pane, right-click the name of the SQL Server instance for which you want to change the service account password, and then click Properties.
- In the SQL Server <instancename> Properties dialog box, click the Log On tab, type the new password in the Password and Confirm password boxes.
-
- After you change the password, click OK.
- A message asks whether you want to restart the SQL Server service.
- Click Yes, and then close SQL Server Configuration Manager.
Change service account for Reporting Server
Always use the Reporting Services Configuration Tool to change the service account for Reporting Services. Service identity information is stored internally in multiple locations. Using the tool ensures that all references are updated accordingly whenever you change the account or password
Steps to change the account
-
- Open the Reporting Services Configuration Manager form Start à Programs
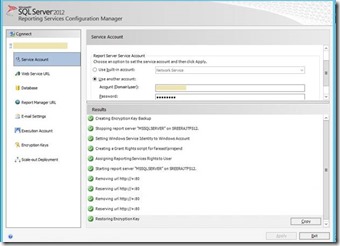
- Navigate to the Service Account tab and choose one of the available system accounts, or provide a domain account as the new service account and click Apply
-
- It will prompt you to backup the Encryption Key. Specify a location to store the Encryption Key file and provide the password and click OK
-
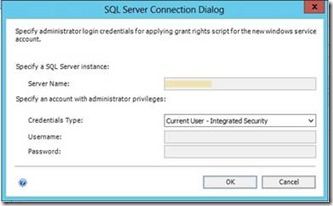
- You will get a prompt to choose the administrator account for granting access rights to the new service account. Enter the account and click OK
-
- The service account will now be changed to the new account and the list of activities done during the account change will be displayed on the Results window
For more information on choosing and changing the account for Reporting Services, refer this article
Change service accounts for SharePoint
The service accounts for SharePoint can be changed from the Central Administration Site. You will have to choose one of the already registered managed accounts, or register a new account and then use the account for the intended service.
Steps to change the service account
-
- Navigate to the central administration page for the SharePoint server and click on Configure service accounts under the Security tab.
-
- Select the service for which you are planning to change the account, from the drop down. All the services are listed here, including the Web Application Pools and the Farm Account.
-
- If you are planning to change the account one of the already existing managed accounts, choose the account from the drop down, else register a new managed account. Provide the name and password of the account for the new account and click OK.
-
- Once you register the account, choose the account from the Select an account for this component drop down and click OK.
For details on the permissions required for the accounts running different services, refer this link.
Content created by – Sreeraj Rajendran
Content reviewed by – Romit Gulati


