Step-By-Step: Migrating Physical Servers to Virtual Machines - Blain Barton -
Modernizing Your Infrastructure with Hybrid Cloud – Migrating Physical Servers to Virtual Machines (Part 18)
Physical to Virtual (P2V) Conversions
Using Disk2VHD to migrate your Physical Server to a Virtual Machine
Creating a new VM from your P2V .vhd on your bare-metal Hyper-V host
Adding your migrated .VHD to the System Center
Physical to Virtual (P2V) Conversions
Update – Microsoft Virtual Machine Converter (MVMC) 3.0 is here https://www.microsoft.com/en-us/download/details.aspx?id=42497
Rest of Article -
___________________________________________________________________________________________________________________________________________________
First, the good news is that Microsoft announced the Microsoft Virtual Machine Converter (MVMC) 3.0 providing Physical to Virtual (P2V) machine conversion for supported versions of Windows and is posted above.
The MVMC is a Microsoft-supported, stand-alone solution for IT Pros or Solution Providers who wants to convert virtual machines and virtual disks from VMware hosts to Hyper-V® hosts and Microsoft Azure™. For more information about the MVMC 2.0 solution including how to download, visit here.
Just so you understand, the MVMC never had P2V functionality, rather it was offered only in System Center 2012 SP1 Virtual Machine Manager (and earlier). Microsoft stated that P2V had been deprecated, but they were referring to the latest System Center 2012 R2 Virtual Machine Manager (SCVMM), which only offers Virtual-to-Virtual (V2V) like the current MVMC 2.0. With the MVMC 3.0 release coming up this fall, P2V will once again be available which will be a huge addition to conversion and migration capabilities.
One of the tools of choice for me when doing P2V migrations is Disk2vhd.
Disk2vhd is a utility that creates .VHD (Virtual Hard Disk) a virtual disk version of physical “bare-metal” disk or disks for use in Microsoft Hyper-V, System Center Virtual machine Manager, AppController and Microsoft Azure.
The difference between Disk2vhd and other physical-to-virtual tools is that you can run Disk2vhd on a system that’s online. Disk2vhd uses Windows' Volume Snapshot capabilities to create consistent “point-in-time” snapshots of the volumes you want to include in your conversion. You can even have Disk2vhd create VHDs on local volumes, even ones being converted. Performance is better when the VHD is on a disk different from the one it’s being converted on.
To better understand the differences in the terminology, I built this table:
A virtual machine runs the operating system that you choose when you create the VM and creates the .vhd file for you. Microsoft Azure stores a virtual machine's operating system in a virtual hard disk format or .vhd file. Hyper-V hosts can use both .vhd and .vhdx.
An image is a .vhd of an operating system that has been prepared for duplication for other like systems so it is required that it be generalized using the System Preparation Tool. This is because it’s going to be imaged to be used on other like systems, so the “Windows Welcome” otherwise known as the “Out of Box Experience or OOBE” has to be rolled back or reset per licensing requirements.
A Disk is used to create new Virtual Machines. If used in a single instance or a “one-off” you do not need to generalize it using Sysprep.
Using Disk2VHD to migrate your Physical Server to a Virtual Machine
Below is the download for the Utility-
We’ll take a “Step-by-Step” approach to how you can use the Disk2vhd Utility. After we migrate a physical hard drive to a virtual machine, we’ll then bring it into Hyper-V Manager as a virtual machine. You can also add it to Microsoft Azure or by using the Microsoft Azure Pack on your Windows Server 2012 R2 host machine.
Start with unzipping the extracted files for disk2vhd.exe
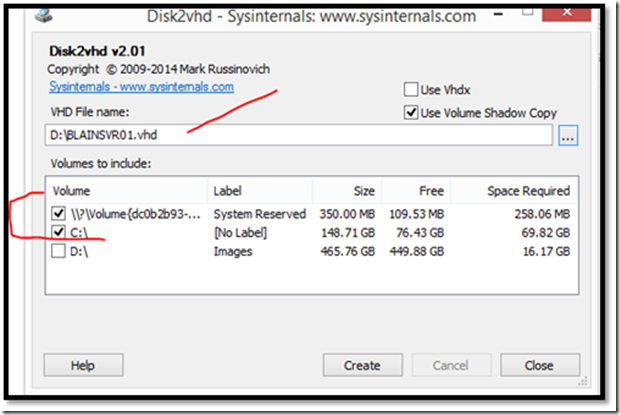
When the tools starts, you can see that it has an Administrator share, but you can change this to something friendly, and remember that .VHDX files are not supported in Microsoft Azure.
Upload only fixed VHD’s (not dynamic, and not .VHDX). When using Microsoft Azure PowerShell cmdlets you can use Add-AzureVHD to automatically convert dynamic VHD’s to fixed VHD’s while uploading them to Microsoft Azure, but many other tools do not have that capability. Here is where you’re going to uncheck Use Vhdx, which will change the path to .VHD format.
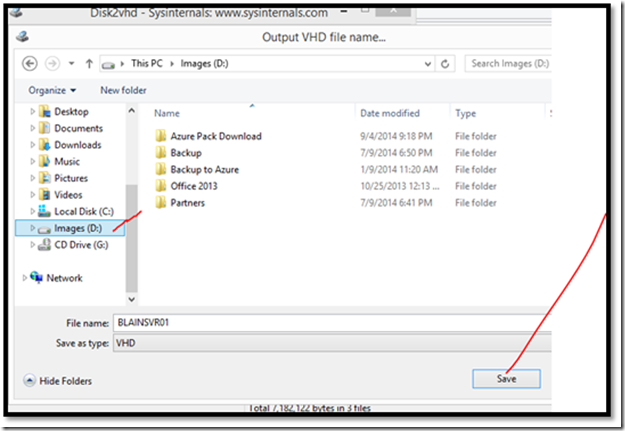
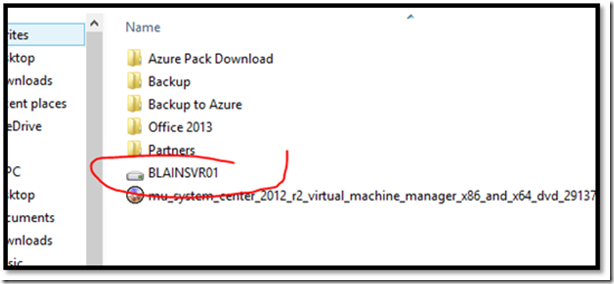
So I’ve unchecked the Use vhdx and unchecked my D:\Images as I do not want this Volume in my .VHD file when it’s being created. I also pick the location to copy the .VHD to, which is D:\BLAINSVR01.vhd which will be approximately 70GB in size.
Note – The maximum .VHD size is 127GB for OS Disks and 1023GB for data disks.
The Utility will create one VHD for each disk on which selected volumes reside and include your boot information! It preserves the partitioning information of the disk, but only copies the data contents for volumes on the disks that are selected. This enables you to capture just system volumes and exclude data volumes.
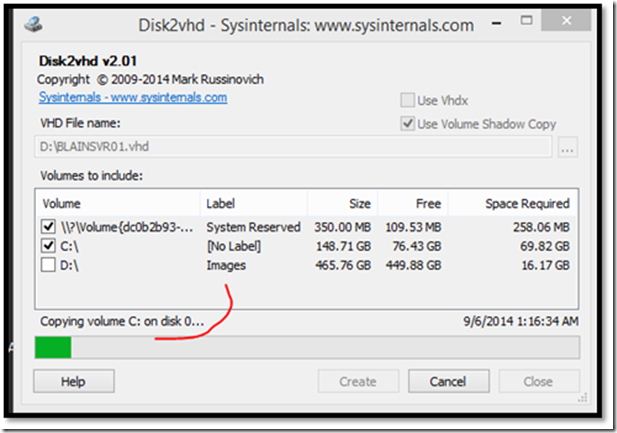
Once everything is configured, I can click on Create.
The speed will depend on the size of the physical disks / partitions you have selected or the destination location for storing the converted VHD file if it is the same as the source. Since Disk2vhd.exe performs I/O operations it will be much slower. It’s recommended to specify the VHD file path to a location other than the volumes you have selected. In my case I’m copying it to my secondary bay drive D:\.
.VHD is being created.
To use VHDs produced by Disk2vhd, create a VM with the desired characteristics and add the .VHD to the VM's configuration as IDE disks.
On first boot, a VM booting a captured copy of Windows will detect the VM's hardware and automatically install drivers, if present in the image. If the required drivers are not present, install them via Hyper-V integration components. You can also attach to VHDs using Windows Server Disk Management or Diskpart utilities.
Caution: do not attach to VHDs on the same system on which you created them if you plan on booting from them. If you do so, Windows will assign the VHD a new disk signature to avoid a collision with the signature of the VHD’s source disk. Windows references disks in the boot configuration database (BCD) by disk signature, so when that happens Windows booted in a VM will fail to locate the boot disk.
Using the Command-Line Interface
Disk2vhd includes command-line options that enable you to script the creation of VHDs. Specify the volumes you want included in a snapshot by drive letter (e.g. c:) or use "*" to include all volumes.
Example: `` disk2vhd.exe * D:\BLAINSVR01.vhd
So to convert your C: drive to a VHD file, use the following command and store on D:\
Disk2vhd.exe <Source Drive Letter> <VHD file name with path>
Example: `` disk2vhd.exe C: D:\BLAINSVR01.vhd
Creating a new VM from your P2V .vhd on your bare-metal Hyper-V host
Now that we’ve went through the P2V conversion from the Physical Disk to a Virtual Disk, we can now add it to a Hyper-V host. Make sure and use a Hyper-V host different from the one you created the virtual hard disk from and/or change your networking to support this. If you want to use the .VHD as an image, Sysprep it to make sure it is generalized.
Open Hyper-V Manager on your “bare-metal” host and click New – Virtual Machine …
Read the Wizard Pane and then click Next
Typically I put my VM’s in my own default storage location. If you want to hard code a path to keep your VHD’s and VM’s in, go to Hyper-V Settings and change the default paths.
Next, Specify Name and Location. Here I put in a name for my VM and my default path where I want to VM’s to be created and reside.
Specify Generation, in this case we created a .VHD so we will select Generation 1, instead Generation 2
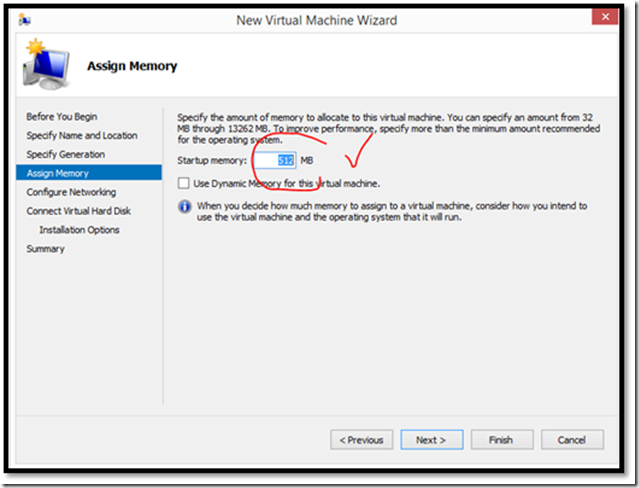
Assign Memory , click next
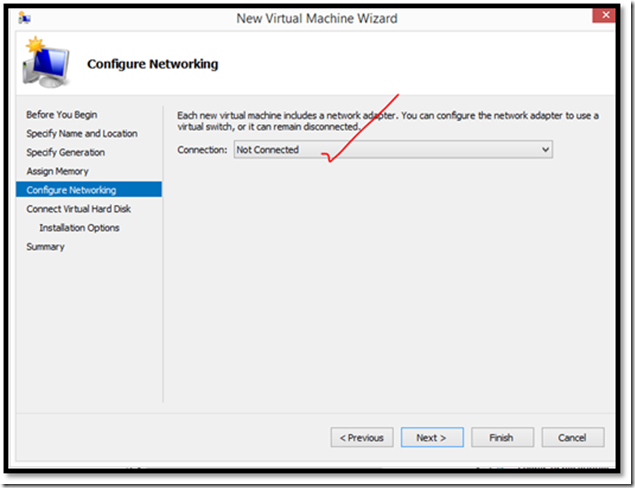
Configure Networking, I choose Not Connected for now. I can then move this VM to another Hyper-V Host or to Microsoft Azure to run it.
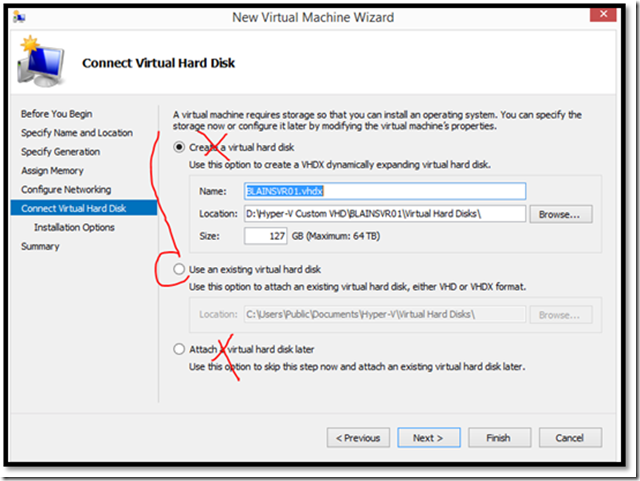
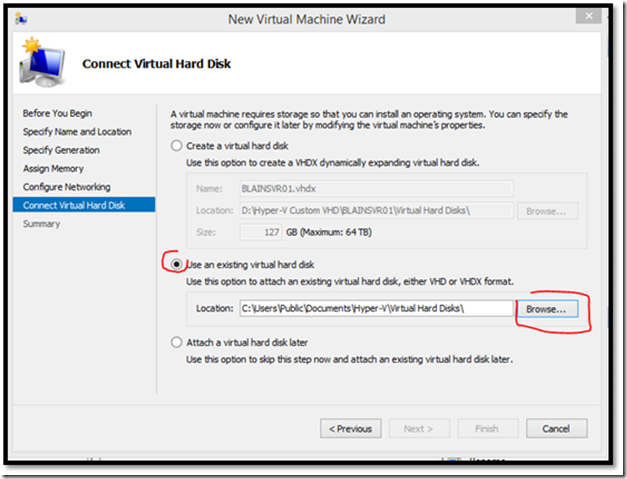
On the Connect Virtual Hard Disk pane, do not select Create a virtual hard disk or Attach a virtual hard disk later, but select Use an existing virtual hard disk, the .VHD that you convert and go to the path and select it.
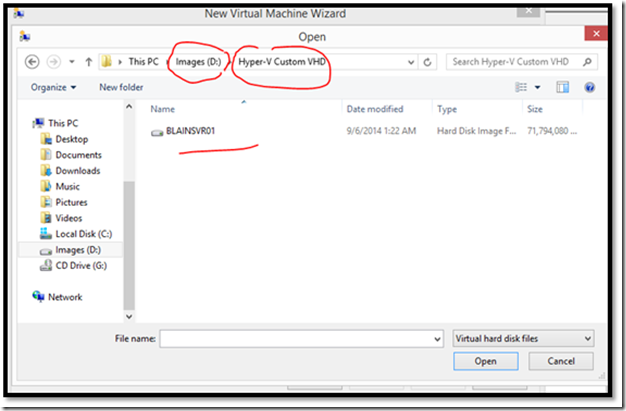
Browse to the folder where your .VHD resides,
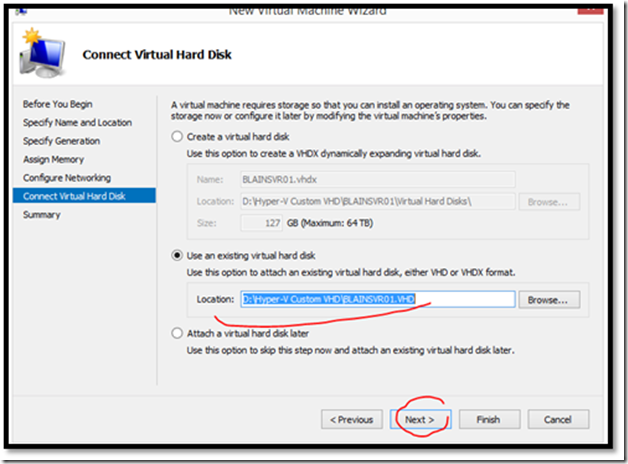
Select the .VHD, click Next, then Finish. The virtual machine will be created .
Click Next
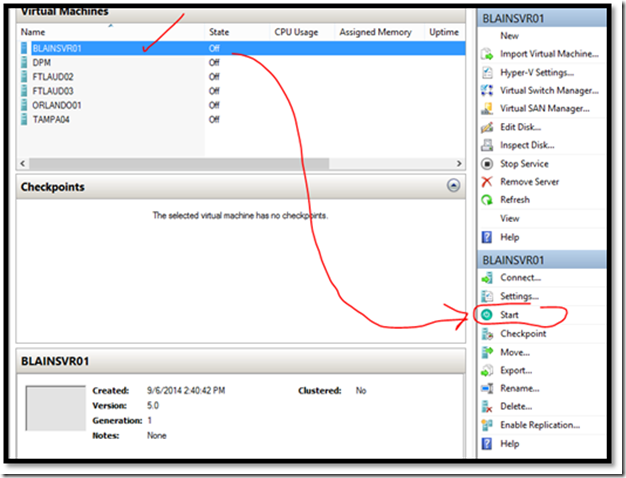
Next go to your local “bare metal” host and open Hyper-V Manager and you will see your new virtual machine under Virtual Machines.
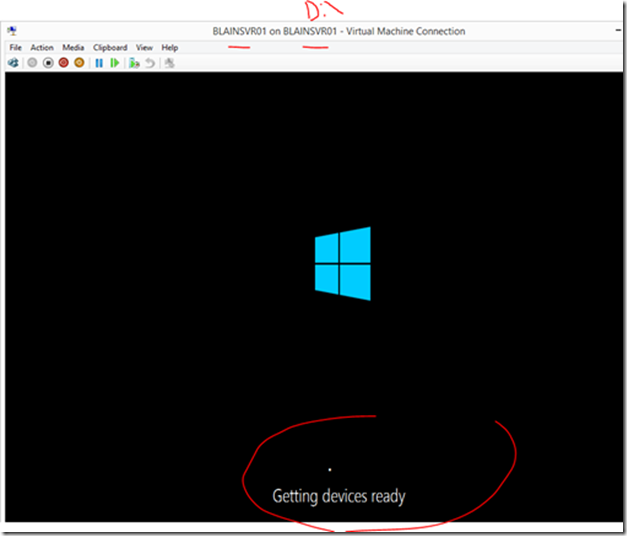
Right-click or on in the Actions pane, select Start
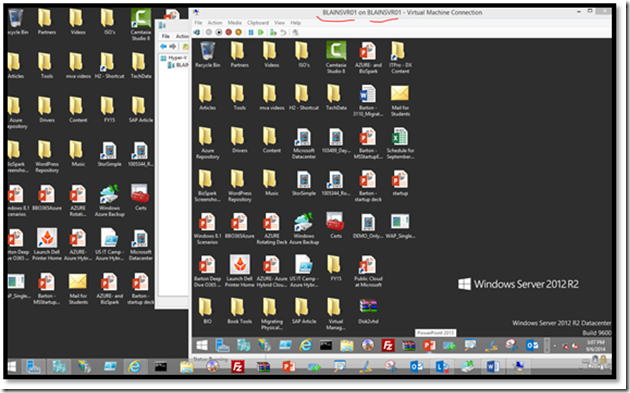
Here's a screenshot of my Windows Server 2012 R2 Hyper-V system running in a virtual machine on top of the system it was created from running from.
This .VHD file can now be used with other Hyper-V hosts, I suggest you put this on another Hyper-V host or the two VM’s will conflict as they have the same setting and configuration.
The .VHD can also be used with System Center Virtual Machine Manager as well as uploaded to Microsoft Azure using the Add-AzureVHD Azure PowerShell cmdletor by using the Microsoft Azure Pack from a bare metal host on your private cloud integrated with Microsoft Azure Portal in the public cloud.
Adding your migrated .VHD to the System Center
You can create a Virtual Machine from this .VHD within System Center Virtual Machine Manager.
You can also create a VM Template as well form the .VHD you created.
You can also install AppController to manage these migrated virtual machines Private and Public Clouds from a single pane of glass.
In Part 21 of the “Modernizing Your Infrastructure with Hybrid Cloud”, I’ll be covering “Using Custom VM Images and Resource Group Templates” and will show the steps for uploading your P2V .VHD up to Microsoft Azure.
