Remote Desktop Services (RDS) 2012 session deployment scenarios “Standard Deployment”
Hello AskPerf! Jason here again to continue our mini-series. This a part of a complete post series for RDS 2012 session deployment scenarios.
Please see RDS 2012 Session Host deployment scenarios for an overview of the different ways to deploy RDS on Windows 2012 for additional information.
For Windows 2012 R2, the most typical scenario and best practice is to do a Standard Deployment. Why? As previously mentioned, it gives you all the consoles for management of your collections. It supports both all in one to multiple servers being deployed to. It allows each role (RDWeb, Connection Broker, RDSH) to be installed on the same or different servers. It has all the features required for RemoteApp, RDWeb, and Connection Broker. Unlike previous versions, all deployment, configuration, and management is performed from the Connection Broker. In summary, if you are deploying RDSH for production to multiple servers, then this your option.
For Standard Deployment, all installation, configuration, and management of the RDS session deployment should be done from the Connection Broker. The Connection Broker maintains all of the static configuration and dynamic session information for the collections in a Windows Internal Database (WID) on the local server. HA for connection brokers can be setup as well using remote SQL instance but that is another topic.
NOTE: At this time, only two connection brokers are supported in a deployment. More can be added without warning and will function under most scenarios but this is NOT supported.
DEPLOYING ‘STANDARD DEPLOYMENT’:
1. On the server that will become the Connection Broker, logon with a domain account that is an administrator. Start Server Manager, and from the Manage menu dropdown, select Add Servers.
2. In the Add Servers dialog, select and add all servers that will be in this deployment. This includes all Connection Brokers (up to 2), RDS session host servers, and RDWeb servers.
NOTE: At this time, only two connection brokers are supported in a deployment. More can be added without warning and will function under most scenarios but this is NOT supported.
3. After adding all servers for this deployment, from the 'Manage' menu dropdown, select Add Roles and Features.
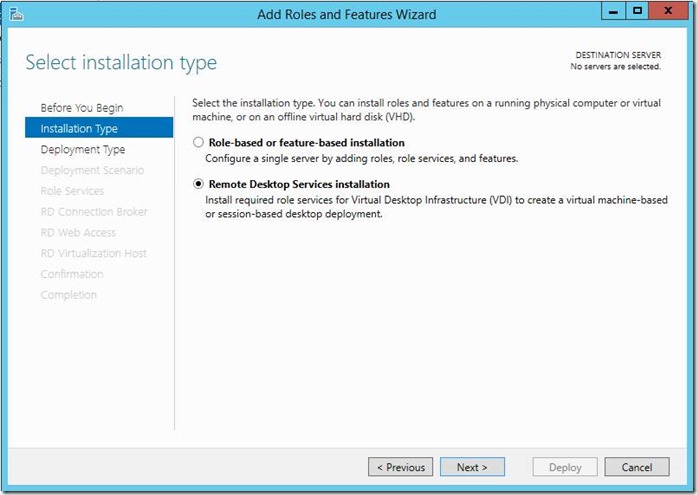
4. Select Remote Desktop Services installation.
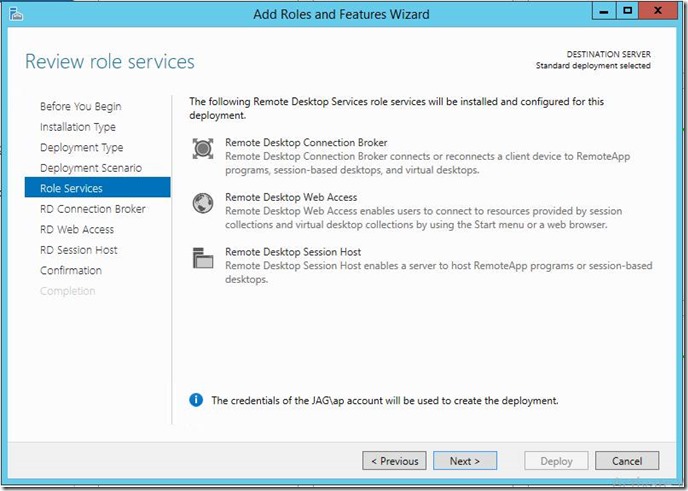
5. Select Standard deployment
6. Select Session-based desktop deployment.
7. Select Next.
8. Add your local server to the Selected list for Specify RD Connection Broker server. Note: only one Connection Broker (your local server) can be added at this time. Configuration of a Connection Broker for HA is done after initial installation of first Connection Broker.
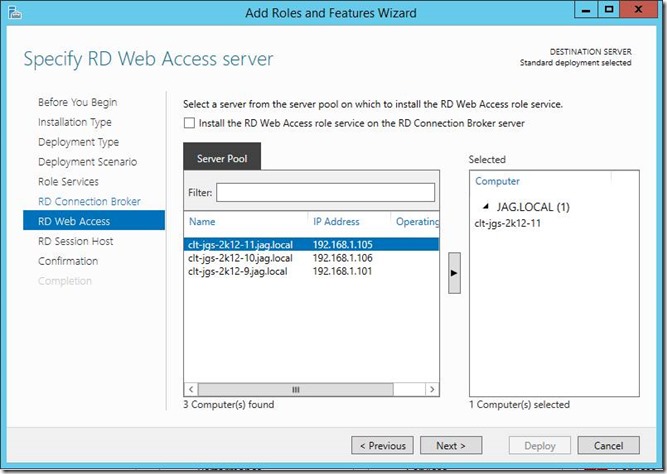
9. Next, select the server that will be used for RDWeb. RDWeb provides access to RemoteApps (published applications) through a web page or via RemoteApps and Desktop Connections applet in Control Panel. Again only one server can be selected at this time. Additional RDWeb servers can be added after initial deployment. You also have the choice to instead install RDWeb on the Connection Broker. The Connection Broker unless in very large environments can be used as the RDWeb server too.
10. The last selection is the selection of the RDSH servers. This selection can be used to specify one or more RDSH servers. In this example we will only use one.
11. On the Confirm Selections dialog, check Restart the destination server automatically if required. The RDSH servers will require a restart, but the Connection Broker and RDWeb servers will not.
12. The RDS session deployment will now begin the install to all the servers and components selected. A progress dialog will be shown.
13. When the deployment has finished, the View progress dialog will show the final status. Verify all component installations show Succeeded.
14. Now in the Server Manager Dashboard, there will be a Remote Desktop Services role listed in the left navigation pane.
15. Selecting Remote Desktop Services will display the ‘Overview’ of the new deployment. From this page, the next steps would be to add / specify both the license server(s) and RD Gateway(s). Additional servers for existing roles can be added and collections can be created.
LICENSING:
There are multiple ways to configure licensing in RDS 2012 and this can be confusing. Group Policy always takes precedence and will NOT show in the Connection Broker console if configured, however the settings will show in the RD Licensing Diagnoser console if installed. Do not mix methods of setting licensing. For example, do not set in GPO and also in Server Manager Gui as this may result in errors. A more detailed post about licensing methods will be following this post series.
1. To add a new license server through Gui, simply click on RD Licensing node. The Add RD Licensing Servers dialog will be displayed. See next step to add an existing license server.
2. To add an existing license server, in Deployment Overview, click on TASKS, and select Edit Deployment Properties.
3. In Configure the deployment, select RD Licensing. Best practice is to use Per User mode as it provides better resiliency in case of a license server outage. Enter the license server and select Add.
Not covered in this post, but is the next step after deployment is to create a Session Collection. Simply right click on RD Session Host in Deployment Overview to get started.
Congratulations! You now have a new 2012 RDS session deployment. J
-Jason
Comments
- Anonymous
April 07, 2015
Hello AskPerf! Jason here again to continue our mini-series. This a part of a complete post series for


