Setting up FBA Claims in SharePoint 2010 with Active Directory Membership Provider
This is a walk-through on setting up FBA Claims in SharePoint 2010 using the Active Directory Membership Provider.
The very first step is to create a web application AND create that with claims authentication mode. I am going to provision a web application with claims auth mode enabled at a URL https://moss.claims.contoso.com.

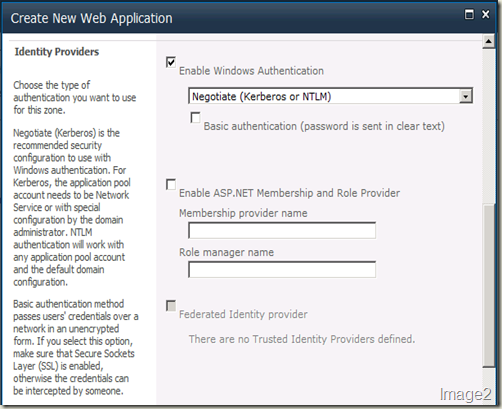
Another important section in this “Create New Web Application” screen is the “Identity Providers” section. Once we select the authentication mode to be claims, Windows Authentication is also plugged in as one of the provider. Check the “Enable Windows Authentication” check box if you’d like Windows Authentication ALSO enabled for this web application.
We can also choose to enable ASP.NET Membership and Role Provider here. In this case, we’ll need to provide the corresponding provider names in the text boxes. The web.config file entries can be added later.

Those are the important parts. You can choose the other values as you’d normally would and create the new web application.
Once the web application is created, we’ll first configure this web application for claims authentication using Active Directory Membership Provider and then create a site collection.
There are 3 web.config files we need to edit for enabling claims:
- The config file of the Central Administration site.
- The config file of the Web Application.
- The config file of the STS (SecurityTokenService) Application. This is important because it is this service that will ensure claims tokens are being passed correctly between the provider (in our case AD) and the consumer (CA and our Web Application). Further, we can have multiple providers plugged in. STS Application manages all of these interaction for us.
Central Administration web.config changes
Open the web.config file of your SharePoint 2010 Central Administration site and add the following entries (NOTE: The value you need to change according to your environment are presented in red).
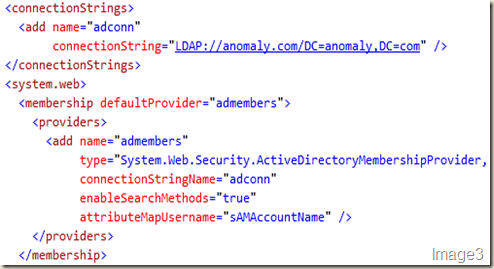
First the connection string:
<connectionStrings>
<add name="adconn"
connectionString="LDAP://anomaly.com/DC=anomaly,DC=com" />
</connectionStrings>
And then the provider:
<membership defaultProvider="admembers">
<providers>
<add name="admembers"
type="System.Web.Security.ActiveDirectoryMembershipProvider, System.Web, Version=2.0.0.0, Culture=neutral, PublicKeyToken=b03f5f7f11d50a3a"
connectionStringName="adconn"
enableSearchMethods="true"
attributeMapUsername="sAMAccountName" />
</providers>
</membership>
NOTE: The connection string element should be present outside of the <system.web></system.web> section and the provider element should be present within <system.web></system.web> section of the web.config file.
After this change, the web.config file of the Central Administration site should look like what’s shown in Image3.
Web Application web.config changes
Open the web.config file of the newly created web application and add the following entries
First the connection string:
<connectionStrings>
<add name="adconn" connectionString=LDAP://anomaly.com/DC=anomaly,DC=com />
</connectionStrings>
NOTE: This entry should be made outside of <system.web></system.web> section in the web application’s web.config file. Just like the one for Central Administration site.
And then the provider:
<membership defaultProvider="admembers">
<providers>
<add name="admembers"
type="System.Web.Security.ActiveDirectoryMembershipProvider, System.Web, Version=2.0.0.0, Culture=neutral, PublicKeyToken=b03f5f7f11d50a3a"
connectionStringName="adconn"
enableSearchMethods="true"
attributeMapUsername="sAMAccountName" />
</providers>
</membership>
NOTE: This one is a bit different. In the web application’s web.config file search for “<membership” (without “”).
You will find there’s already a membership and role provider plugged in (shown in Image4). SPClaimsAuthMembershipProvider & SPClaimsAuthRoleProvider in Microsoft.SharePoint.Administration. Claims implements the default claims provider and Windows authentication type is plugged in through HTTPModule (shown in Image5).


Now, we will plug in our Active Directory membership provider to this by adding our provider entry shown above to the <providers> element (shown in Image4). The result should look like Image6.

Save and close this web.config file.
STS Application web.config changes
The next thing to do is to get your provider entry in the STS application’s web.config file. Open Internet Information Services (IIS) Manager on your SharePoint 2010 box. And find the STS application (shown in Image7).

Right-click > Explore to open the files within this application in explorer.
You should now be in this path: C:\Program Files\Common Files\Microsoft Shared\Web Server Extensions\14\WebServices\SecurityToken. And you will find a web.config file in there. That’s the Security Token Service Application’s web.config you need to add your provider and connection information to.
Open this web.config file. If this is the first time you are configuring claims, you’ll not find <system.web></system.web> section in it. That’s not a problem, just add that section yourself. What works out for me, is to go to the end of this web.config file and do the following:
First add the connection information just before </configuration>. And then after the <connectionStrings></connectionStrings> section, add a <system.web></system.web> section and add our provider information into it. The result should look like Image8.

After this doing an IISRESET might be a good idea.
You are good now with regards to web.config file entries. Now you have to get some configuration done through UI to wire-up our provider to the web application. First, go to the Web Applications Management page in Central Administration site, click the web application you want to enable FBA claims on and choose Authentication Providers from the ribbon. From the Authentication Providers dialog, choose Default. Scroll a bit down to find Identity Providers section. Check Enable ASP.NET Membership and Role Provider (NOTE: You can also do this at the time of creating this web application) and type in the name of your provider. In my case, it is admembers. After you do this, UI should like Image9. Hit Save.
Close the Authentication Providers Dialog UI.

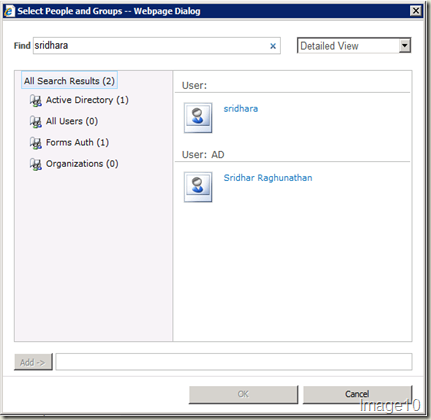
Now, hit User Policy ribbon option in the Web Applications Management page having selected your web application. Hit Add Users in the Policy for Web Application dialog. Hit Next in Add Users dialog. Use the Browse button in the Choose Users people picker control. Notice the Select People and Groups dialog that comes up is changed. Noticeable difference is that there are sections like Active Directory, All Users, Forms Auth & Organizations. Type in an active directory user alias and search. There should be 2 results for the same user. One identified through NTLM authentication and the other through FBA Claims authentication that’s using Active Directory membership provider (refer Image10).
Select the user from Forms Auth result. In my case, it’s the first user displayed in Image10. Hit Add and then OK in the Select People and Groups dialog. In the Add Users dialog, check Full Control - Has full control for the Choose Permissions section and hit Finish. NOTE: If you want to provide full control to other users either from FBA Claims authentication or NTLM authentication, you can do that here.
Now, your Policy for Web Application dialog should look like Image11. Hit OK.

Now, you can create your top-level site collection in this web application. Click Application Management from the left navigation in Central Administration site. Click Create Site Collections. Ensure that your web application plugged in with FBA Claims is selected in the Web Applications drop-down. Provide a title, description and pick up a template of your choice. In the Primary Site Collection Administrator section, type in the alias of the site collection administrator. This should be the NTLM authenticated user. The entries should look like Image12. Hit OK to create the site collection.

Once the site collection is created, browse to it. A page as shown in Image13 will be displayed.

Choose Windows Authentication from the drop-down and you’ll log into the newly created site collection using Windows Authentication. Now, you need to add another site collection administrator. But this must be from the active directory membership provider. You can login through forms authentication using the user you added with full control in user policy settings above. If you choose to not do that (which most customers do), you can do one of the following steps to add another site collection administrator to this FBA Claims Authentication enabled site.
- Go to Central Administration site > Application Management from left navigation > Change site collection administrators > add the alias of the user from FBA Claims Authentication as the secondary site collection administrator and click the Check Names button to resolve it.
- Login to the Claims Authentication enabled site using Windows Authentication. Site Actions > Site Settings > Site collection administrators > type the alias of the user from FBA Claims Authentication in the Site Collection Administrators and click the Check Names button to resolve it. This is shown in Image 14.

After this, you should be able to login to this site using the same URL with both Windows and Forms Authentication (Forms Authentication login shown in Image15)
WARNING: Take utmost care when making the web.config file entries because that’s where thing go wrong. And if it does, identifying and fixing it might be a herculean task – trust me :) Hope this post was helpful! In my next post on FBA Claims, I’ll cover configuring Office LDAP Claims with some tips on Claims itself.
Comments
Anonymous
January 12, 2010
can u show how to setting FBA Claims in sharepoint 2010 using SQL Server???Anonymous
February 11, 2010
Que pasa con "My Profile" NO funciona. Esto parece suceder porque mi aplicacion web esta sobre el puerto xxxx y "My Profile" sobre el 80. Entonces tambien es necesario configurar Claims sobre el puerto 80??Anonymous
March 04, 2010
Okay this is strange. I can see the usernames when I add users. But when I go to the site I get an error message 500.19 "configuration file is not well formed xml" related to the web.config connection string: connectionString=LDAP://mydomain.net/DC=mydomain,DC=net /> It's the same code in the other two and successfully connects me in the Central Administration. Any suggestions?Anonymous
March 04, 2010
Sorry. False alarm. Must be getting a little punchy and forgot to enclose it in quotes. LOLAnonymous
March 04, 2010
I think this is my last question. I'm still getting an error after resolving my problem. Unable to establish secure connection to the server. If my OUs that contain my users are farther down, do I have to supply more information in the connection string?Anonymous
April 28, 2010
Great article! I came to the same conclusions when setting up a sql memberhip provider with mixed authentication. I have however run into one additional problem: I can search for roles in the "Select People and Groups" form. The search is case sensitive, but they do show up in the results under the Forms Auth group. However, when I select a role, add it and press ok it is not recognized as valid in the web page. Is there a solution for this issue?Anonymous
May 03, 2010
Very Interesting article. Once this FBA Claims is in place, you can get an example of utilization here: http://www.pascalbonheur.com/2010/03/claims-based-authorization-in-sharepoint-2010-real-life-example-part-1/Anonymous
June 01, 2010
Thats great. To bad, MS Live Writer (for blogging) will not login anymore if FBA or claims authentication is enabled. Hope for the next version of it! Thanks for that blog!!Anonymous
June 30, 2010
when adding users it could be possible you do not see both users (forms and AD). This could be due to different search algorithms. The forms authentication requires a complete name to be found (e.g. 'administrators'). Only then both ad and forms will find the (same) user. if you search for e.g. 'administr' it only will find ad account.Anonymous
July 22, 2010
Hi there, Great post and thanks for the information. I was just wondering whether this can also apply to a workgroup server (standalone - not in the domain) or does the server need to be part of the domain before this will work? cheers and thanks !!Anonymous
September 10, 2010
The comment has been removedAnonymous
September 27, 2010
I'm planning to implement mixed mode authentication for my web application. Integrated authentication while accessing from inside the network and forms based authentication (to the same web application) while accessing it from outside the network. All the users are present in the AD. So, I'll configure FBA with AD for external access. Is there any way I can avoid entering the same user twice (one for integrated authentication and one for FBA) by somehow mapping the same user to both the authentication providers? Because in my case, both integrated and FBA users are the same (present in AD) and they will have same permissions into their sites while accessing both from inside network and from outside network. Any suggestions will be appreciated.Anonymous
October 04, 2010
The comment has been removedAnonymous
October 11, 2010
Another detailed post.....excellent Sri !Anonymous
October 25, 2010
Hi I am unable to see any users under Forms Auth according to image 10. Do I need to explicitly add user into database ?Anonymous
November 10, 2010
@Venkatesh Basi: i thing that you need in web.config file of Central Administration, add tag <add key="admembers" value="%" /> in to <PeoplePickerWildcards> tag block. You must get something like this: <PeoplePickerWildcards> <clear /> <add key="AspNetSqlMembershipProvider" value="%" /> <add key="admembers" value="%" /> </PeoplePickerWildcards> P.S. admembers - it's name of you membership providerAnonymous
November 19, 2010
The comment has been removedAnonymous
April 19, 2011
I'm in the same boat as Saji. Trying to connect both FBA and Windows auth to AD and would like to not add users twice. The same permissions are needed for FBAuser1 and NTLMuser1, depending on which way they entered the site. Has anyone solved this? I have come across this question multiple times, but no one seems to have it working.Anonymous
May 02, 2011
Would love to get that answer that Tom and Saji is looking. 2 different users are 2 DIFFERENT users. Different colleagues, different Newsstream, etc.Anonymous
June 17, 2011
@sridhara2: Have you ever succeeded in displaying correct display name for FBA users in SharePoint 2010 claims? I saw in this example the display name for FBA user is sridhara (unlike AD users). I did a little code trace and it seemed that the problem is in claim provider itself....Anonymous
July 24, 2011
Hi, Is Mapping of users for FBA to AD done automatically?Anonymous
August 18, 2011
The comment has been removedAnonymous
November 01, 2011
The comment has been removedAnonymous
July 01, 2012
The comment has been removedAnonymous
August 02, 2012
Read Forms Based Authentication FBA In SharePoint 2010 csharpdotnetfreak.blogspot.com/.../sharepoint2010-forms-based-authentication-fba-claims.htmlAnonymous
November 21, 2012
Hello Shridhar, Thanks for nice article! Its fine working with me. Now i have one more scenario, I have done form based authentication from active directory in sharepoint foundation 2010 intranet application. And i have one more application Sharepoint 2007 which is windows authentication. Now I have to give a link from sharepoint 2010 site which redirect to Sharepoint 2007 site, now i dont want authenticate already logged in user in sharepoint 2010 site in sharepoint 2007 site. One more scenario is we have one syatem and more than one users. Is there any way to authentcate users which scenario i have?????? Thanks in AdvanceAnonymous
June 10, 2013
Hello, if I want to modify the login page which file you want to modify it? Thank you.Anonymous
June 10, 2013
The comment has been removedAnonymous
December 10, 2014
Hi Arthur1977, Did you resolve the issue

