Configure Remote Blob Storage (RBS) with SharePoint 2010
With Sharepoint 2010, the Remote Blob Storage (RBS) functionality, which allows putting documents into the database filesystem instead of the database itself, came into focus again. To make that happen each content database is located in a specific section of the file system where all the documents are stored. This documents are none the less managed by Sharepoint, a database is mandatory even if the documents are stored as BLOB because metadata is written exclusively into databases.
The following installation routines and steps to activate RBS are based on Technet and the blogs of Jie Li and Todd Klindts.
All the following installations have been done on Microsoft Windows Server 2008 R2 and Microsoft SQL Server 2008 R2 as there is no support for RBS on Microsoft SQL Server 2005.
First of all we have to activate FILESTREAM on the SQL instance that you want to put to the BLOB.
Connect to SQL Server
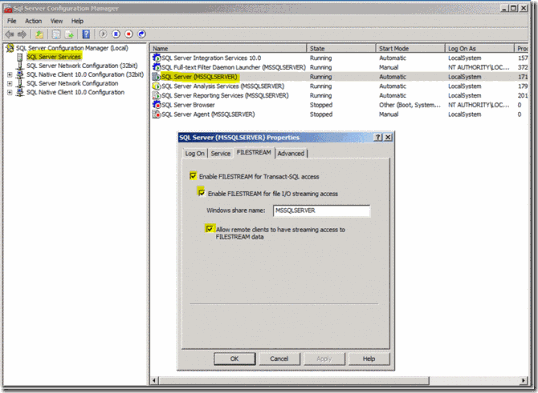
Start –> All Programs –> Microsoft SQL Server 2008 R2 –> Configuration Tools –> SQL Server Configurations ManagerIn the Services list, click “SQL Server Services”
Choose your SQL instance (here “SQL Server (MSSQLSERVER) ”) and right click Properties.
Switch to the FILESTREAM tab and check all the available checkboxes
Now start SQL Server Management Studio
Start –> All Programs –> Microsoft SQL Server 2008 R2 –>SQL Server Management StudioOpen a query windows and start the following SQL statement
 For easier reference, just copy the text below
EXEC sp_configure filestream_access_level, 2
RECONFIGURE
This was the first step, FILESTREAM is now successfully activated.
All further steps requires SharePoint to be installed properly and that a WebApplication has already been created. The Content Database in this case I created by Powershell:
Connect to a Front End Server Start –> Microsoft SharePoint 2010 Products –> SharePoint 2010 Management Shell Create a Content Database
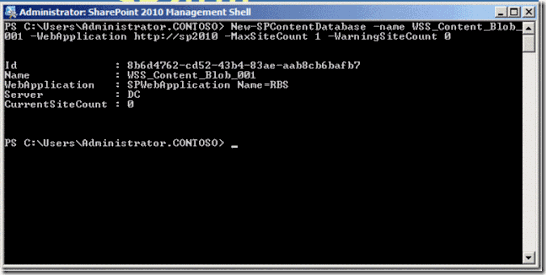 For easier reference, just copy the text below
New-SPContentDatabase –name WSS_Content_Blob_001 –WebApplication https://sp2010 –MaxSiteCount 1 –WarningSiteCount 0
Now the new content database (in this case “WSS_Content_Blob_001”) has to be prepared for use with FILESTREAM.
- Connect to your SQL Server
Start –> All Programs –> Microsoft SQL Server 2008 R2 –>SQL Server Management Studio
Open a query and execute the statement below. Replace “C:\Blobstore“ by your storage-path. The directory must not exist when executing the statement, otherwise an error will be given.

For easier reference, just copy the text below
use [WSS_Content_Blob_001]
if not exists (select * from sys.symmetric_keys where name = N'##MS_DatabaseMasterKey##')create master key encryption by password = N'Admin Key Password !2#4'
use [WSS_Content_Blob_001]
if not exists (select groupname from sysfilegroups where groupname=N'RBSFilestreamProvider')alter database [WSS_Content_Blob_001] add filegroup RBSFilestreamProvider contains filestream
use [WSS_Content_Blob_001]
alter database [WSS_Content_Blob_001] add file (name = RBSFilestreamFile, filename = 'c:\Blob_001') to filegroup RBSFilestreamProvider
Now the direcory for the Blobstore has been created in “C:\Blob_001”
Next you have to download the EXE for RBS, and it has to be copied to each Web Frontend Server (please, do not rename the file). During all the following steps mind checking the log files for errors.
Connect to the Web Front End hosting the Central Admin Console
Open a Command Prompt (IMPORTANT -> run with elevated permissions)

Change to the directory containing the previously downloaded RBS.exe
Delete or rename a already existing „rbs_install_log.txt“ if applicable.
Run the follwoing command, replace DBNAME with your content database and DBINSTANCE with your SQL instance. Mind that this command only works once, if you want to configure a second database, chose the option “Configure additional database” (see below).
msiexec /qn /lvx* rbs_install_log.txt /i RBS.msi TRUSTSERVERCERTIFICATE=true FILEGROUP=PRIMARY DBNAME="WSS_Content_Blob_001" DBINSTANCE="DC" FILESTREAMFILEGROUP=RBSFilestreamProvider FILESTREAMSTORENAME=FilestreamProvider_1
After this process has completed (it may take a minute or two, the log reads “Verbose Logging stopped”), check the “rbs_install_log.txt” if it contains the following line of text (it should be approximately 21 lines before the end of the file:
"Product: SQL Remote Blob Storage -- Configuration completed successfully"
If that is not the case you have an issue. Check the following:
- Are you in the right directory
- Did you make a typo
- Did you run the prompt with elevated privilegesIf you have more than one WFE in your farm, you now have to change to the other servers and run the following command:
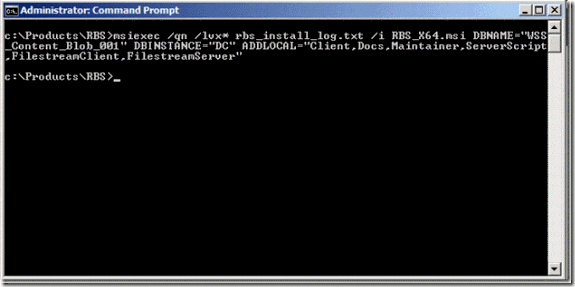 For easier reference, just copy the text below
msiexec /qn /lvx* rbs_install_log.txt /i RBS.msi DBNAME="WSS_Content_Blob_001" DBINSTANCE="DC" ADDLOCAL="Client,Docs,Maintainer,FilestreamClient,FilestreamServer"**
Check the “rbs_install_log.txt” if it contains the following line of text (it should be approximately 21 lines before the end of the file:
"Product: SQL Remote Blob Storage -- Configuration completed successfully"
Execute all steps from step 7 on every additional WFE. This is mandatory, otherwise problems might occur.
The script has created a few tables in the database, check if they are existing:
Connect to SQL Server
Start –> All Programs –> Microsoft SQL Server 2008 R2 –>SQL Server Management StudioExecute the following query
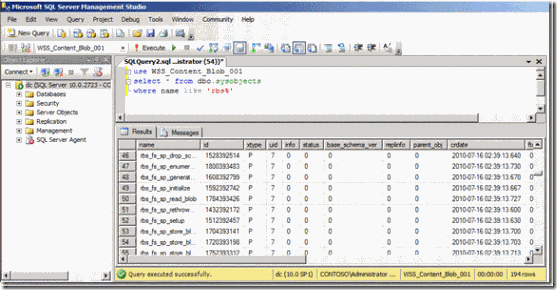 For easier reference, just copy the text below
use WSS_Content_Blob_001
select * from dbo.sysobjects where name like ‘rbs%’
The result should show the RBS tables. This may take a while.
As one last step you have to tell Sharepoint that the content database uses RBS. To do that you have to execute the following command:
Connect to WFE
Start –> Microsoft SharePoint 2010 Products –> SharePoint 2010 Management ShellExecute the following commands in sequence:
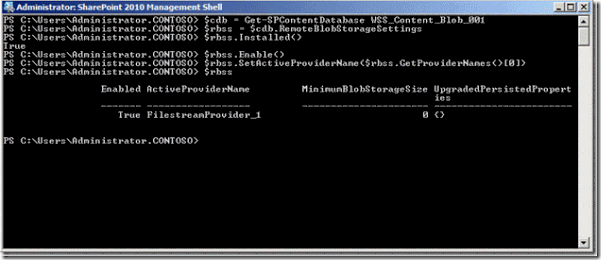 For easier reference, just copy the text below
$cdb = Get-SPContentDatabase WSS_Content_Blob_001
$rbss = $cdb.RemoteBlobStorageSettings
$rbss.Installed()
$rbss.Enable()
$rbss.SetActiveProviderName($rbss.GetProviderNames()[0])
$rbss
Since all has been prepared we can check the functionality. Just create a site collection and make sure the content database used is “WSS_Content_Blob_001”. (or whatever you chose during install).
- Connect to WFE
Start –> Microsoft SharePoint 2010 Products –> SharePoint 2010 Central Administration - Application Management – Manage Content Databases
- Choose the applicable Web Application
- Configure the Content Database to put the next site collection to “WSS_Content_Blob_001”
– If you have multiple databases, set “Maximum Number of Site Collections” to the current value
– “WSS_Content_Blob_001” should not contain any site collections - Go back to the main site of Central Administration
- Application Management – Create Site Collection
- Enter all the required data
- OK - As soon as the site collection creation is finished, all newly uploaded documents should be created in the filesystem.
Notice:
Documents below 100 kB will not be put to the file system but will be stored in the database.
If you like to change this value, you can use this command (to set the value to 1MB):
$cbd = Get-SPContentDatabase “WSS_Content”
$cbd.RemoteBlobStorageSettings.MinimumBlobStorageSize=1048576
$cbd.Update()
Configure additional content databases:
If you want to configure more than one content database for RBS, all the steps above have to be executed. The only difference is the command in step 5. This one dies not work, and no RBS tables are created. Therefore use the command below:
msiexec /qn /i rbs.msi REMOTEBLOBENABLE=1 FILESTREAMPROVIDERENABLE=1 DBNAME=WSS_Content_Blob_002 FILESTREAMSTORENAME=FilestreamProvider_1 ADDLOCAL=EnableRBS,FilestreamRunScript DBINSTANCE=CD
Info about Backup:
If a content database is set to use the SQL FILESTREAM remote BLOB storage (RBS) provider, the RBS provider must be installed both on the database server that is being backed up and on the database server that is being recovered to.References :
- Overview of Remote BLOB Storage (SharePoint Foundation 2010)
- Plan for remote BLOB storage (RBS) (SharePoint Foundation 2010)
- Manage Remote BLOB Storage (SharePoint Foundation 2010)
- Microsoft® SQL Server® 2008 R2 Feature Pack
- SQL Server 2008 R2 Remote BLOB Storage Overview
- How to: Enable FILESTREAM
- Install and configure Remote BLOB Storage (RBS) with the FILESTREAM provider(SharePoint Foundation 2010)
- Install and configure Remote BLOB Storage (RBS) without the FILESTREAM provider (SharePoint Foundation 2010)
- Set a content database to use Remote Blob Storage (RBS) (SharePoint Foundation 2010)
Updates:
25th June 2012:
- Changed the wrong command at step 7 - halfway down (thanks Shannon)
07. March 2011:
- Old Name RBS_X64.exe, new Name RBS.msi - Changed in all text and commands
Add new interesting link to the "SQL Server 2008 R2 Remote BLOB Storage Overview"
Comments
Anonymous
October 30, 2010
The comment has been removedAnonymous
November 11, 2010
Hi Venkat.KL First you work with the Content-DB "WSS_Content_Blob_ca4557eec6434e8e9a7920dfba1e9a2c", but your script use the DB "WSS_Content_Database". Replace this with your database ant try again. msiexec /qn /i rbs.msi REMOTEBLOBENABLE=1 FILESTREAMPROVIDERENABLE=1 DBNAME=WSS_Content_Blob_ca4557eec6434e8e9a7920dfba1e9a2c FILESTREAMSTORENAME=WSSDocuments_1 ADDLOCAL=EnableRBS,FilestreamRunScript DBINSTANCE=MSSQLSERVERAnonymous
December 16, 2010
I have a couple questions. I'm working on setting up a second RBS database and in looking at your commands, you specify FILESTREAMSTORENAME=FilestreamProvider_1 for both the first and any additional databases you configure. Is this correct? So the only thing different you specify is the DB name? Great walk through! Thanks for taking the time to put this together. Very well done! Conrad E.Anonymous
March 19, 2012
Hi Conrad Yes, that's correct. You only define one Filestream Provider for multiple databases.Anonymous
April 29, 2013
Hi, For additional content database, do you run the same command for step 7: msiexec /qn /lvx* rbs_install_log.txt /i RBS.msi DBNAME="WSS_Content_Blob_001" DBINSTANCE="DC" ADDLOCAL="Client,Docs,Maintainer,FilestreamClient,FilestreamServer
