Identifying (and Counting) Computers Sending BADMIF Files
Yesterday, a customer asked me to look for trends within his BADMIFs folder and tell him if there were specific computers that were repeat offenders. This blog is about what I did to solve that request. Hopefully it will prove helpful for those of you who need to do the same thing.
What are BADMIFs?
First a bit of context…what exactly are BADMIFs? In fact, what are MIFs? The acronym MIF stands for Management Information File and these files are used by SCCM clients to submit hardware inventory to their site’s database. When a MIF is submitted by a client, it is processed by the client’s chosen Management Point (MP) and if nothing is wrong with it, the data gets added to the ConfigMgr database. This happens all the time (depending on the frequency of hardware inventory in the environment) and usually there is no need to intervene or even be aware of this process.
Sometimes, however, MIF files cannot be processed for one reason or another. In these cases, the MP will drop the MIF files into a folder called BadMifs. This is located within Inboxes\auth\dataldr.box\BadMifs and depending on how you’ve structured your ConfigMgr folders, it may be in different places on your MP. For example, on an MP that is remote from the Site Server itself, this may be located at C:\Program files\SMS_CCM\Inboxes\auth\dataldr.box\BadMifs.
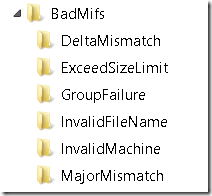
Below is an example of what the BadMifs folder might look like in a production environment:
Within the BadMifs folder, there will be subfolders indicating the sort of issue that the MIF file had. The purpose of this is to categorize the reasons for these files not being submitted in order to make analysis and troubleshooting easier. You can read about the different categories of subfolders that might be created in the BadMifs folder by reading this excellent blog by Umair Khan.
One thing to note about MIFs that make their way into the BadMifs folder…just because you see files in here (maybe a lot of files here), this does not necessarily indicate there is a problem. Over time, you should expect to see MIFs fail to be processed and be placed in the BadMifs folder. For example, if a MIF is submitted after a delta sync has occurred and the ConfigMgr database does not have a record of the machine’s previous delta sync for some reason (maybe there was a network glitch for a short time, for instance, and the previous MIF never arrived), it will redirect the MIF to the BadMifs folder and request the client to send a full inventory. This is very normal and not an indication of a problem. I say this because I don’t want anyone reading this and deciding their environment has big problems when things are completely normal.
I’ll say it again…just because you have MIFs (maybe a lot of MIFs) in your BadMifs folders does not mean there is an issue. Yes, you want to take a look and see what’s up. But the presence of these files should not cause anyone to panic.
Now that we’ve gotten that out of the way, we can proceed.
Understanding MIFs
While it’s useful to explain what a MIF is, I always find it helpful to actually see what we’re talking about. To do this in my lab (don’t try this in production), I turned off my SQL Server so that my Site Server would not be able to submit the MIF to the database. If I hadn’t done that, I could see the MIFs appear and disappear too rapidly to do anything.
If you are working in a lab environment and want to replicate what I’ve done, here are the steps:
- Turn off the SQL Server database. This might be stopping the SQL Server service or turning off the SQL VM itself. But regardless, do not attempt this in a production environment
- Open a ConfigMgr client and navigate to the Control Panel
- Open the Configuration Manager app and select the Action tab
- Choose Hardware Inventory Cycle and select ‘Run Now’
Below is a screenshot of the Configuration Manager app’s Actions tab
After clicking ‘Run Now’ navigate to the auth\dataldr.box folder and after a short time you should see a .MIF file appear, as the screenshot below shows:
MIF files are readable with Notepad, so feel free to open it and have a look. Below is what the MIF from the screenshot above looks like when I open it:
As can be seen, there is a great deal of information in a MIF (and much more than this screenshot can capture). This is the information that is destined for the ConfigMgr database. What interests us, however, is the computer name that I’ve highlighted in red. In this case, my computer is named PRI and I can see its name listed next to the NetBIOS Name above. This is how we tell which client submitted a particular MIF.
Conducting Large Scale Analysis of the BadMifs Folders
While it’s easy to look at a single MIF to identify the computer that submitted it, what if you’re working in an environment where there are hundreds or even thousands of MIFs in the BadMifs folders? I recently worked with a customer that had nearly 40,000 files in his BadMifs folders and we needed to determine whether there were certain computers that were producing all of the MIFs or if this was normal for his environment (and as of this writing, this does appear to be normal behavior).
The rest of this blog describe the analysis process and shows how to identify which computers are submitting MIFs that end up in the BadMifs folders. Not only that, but I show a way to count the number of MIFs from each client. This is useful to determine if a specific computer is sending more than its share of MIFs into the BadMifs folders.
Using PowerShell to Extract NetBIOS Names
The first step in identifying whether there is a problem with certain clients is to identify all of the clients that have submitted bad MIFs to the BadMifs folders in the first place. If you have only a few of these, opening them manually might be fine. But if you have more than a few files to go through, this quickly becomes untenable. What’s needed is a programmatic way to extract these computer names.
As I searched, I found a blog that seems to do the trick with LogParser. However, since everything is going to PowerShell I wanted to see if I could find a similar script to extract these names using it instead of relying on additional software. I did a bit of searching around and found the following script that I tested and confirmed works great in my lab to extract the NetBIOS name from MIF files in every BadMifs folder:
$ConfigMgrBoxPath = "<file path>"
Get-ChildItem -Path $ConfigMgrBoxPath -Include *.MIF -Recurse -Force -ErrorAction SilentlyContinue | ForEach-Object {
$File = $_.FullName ;
try {
(
Get-Content -ReadCount 1 -TotalCount 6 -Path $_.FullName -ErrorAction Stop |
Select-String -Pattern "//KeyAttribute<NetBIOS\sName><(?<ComputerName>.*)>" -ErrorAction Stop
).Matches.Groups[-1].Value
} catch {
Write-Warning -Message "Failed for $File"
}
}
FULL DISCLOSURE: This is not my script. I found it here and have used it as part of my analysis. It does an excellent job of extracting the data I need, so hopefully others will find it useful as well.
The results of running this script in my lab can be seen below:
This list represents a series of MIFs I configured in my lab for this test. As can be seen, I have several instances of each device and there is no organization around it. The script above prints to the screen, so if I have a large number of computers, I may have difficulty grabbing them and manipulating them further. But at the outset, I can already use the script to manually review my list and see if anything jumps out. For my example, it seems that DM-AA is represented more than other devices, and this may bear some further scrutiny.
If I am dealing with more than just this small list of machines (as we often are in a production environment), the output can easily be sent to a text file by adding the following at the end of the script above:
| out-file –FilePath “<file path>”
In my lab, the complete script looks like this:
$ConfigMgrBoxPath = "C:\Program Files\Microsoft Configuration Manager\inboxes\auth\dataldr.box\BADMIFS"
Get-ChildItem -Path $ConfigMgrBoxPath -Include *.MIF -Recurse -Force -ErrorAction SilentlyContinue | ForEach-Object {
$File = $_.FullName ;
try {
(
Get-Content -ReadCount 1 -TotalCount 6 -Path $_.FullName -ErrorAction Stop |
Select-String -Pattern "//KeyAttribute<NetBIOS\sName><(?<ComputerName>.*)>" -ErrorAction Stop
).Matches.Groups[-1].Value
} catch {
Write-Warning -Message "Failed for $File"
}
} | out-file -FilePath "c:\test\output.txt"
One final note here…it is entirely possible to export the list of clients directly to a .csv or an Excel file. I have chosen to export to a .txt and then copy/paste the results into Excel. But there is no need to do this extra step unless it’s your preference.
Parsing the Data
Now that we’ve extracted the data, we want to work with it a bit to find out how many times each client name shows up in the list. As you can see, the list above is not in any particular order and while this may be fine for small environments, we’ll need a better way if we’re dealing with larger environments (or at least larger lists).
I investigated various ways to parse the list of computers generated from the PowerShell script, but eventually came up with the following (and in my lab, I am using Excel 2013, though this same technique should work with earlier versions of Excel):
- We start by taking the list of clients and getting them into Excel (I copied/pasted out of my .txt file, but that’s certainly not the only way). I also added a header in Excel called Computers. The header becomes important in a later step. The resulting screenshot below shows this step:
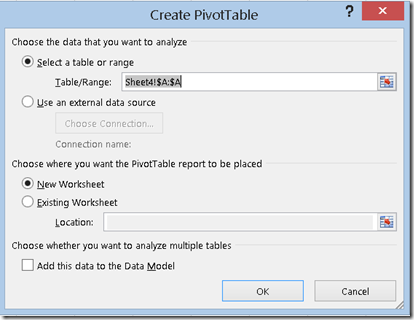
- Select the entire column and navigate to the Insert option on the menu bar. From here, select Pivot Table. A pop-up box will appear as follows:
- In here, ensure the buttons in the screenshot are selected and click ‘OK’
- Another screen will open and on the right-hand side you will see the following (Note: your column header may be different depending on what you selected for the header of your column containing the computer names)
- At this point, select the checkbox to the left of your column header (Computers, in my case) and also drag/drop the column header down to the Values area as shown below
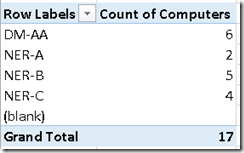
- After doing this, the left-hand side of the spreadsheet will populate with a count of each computer name (seriously, it’s almost like magic) as shown here
Not only do we see a count of each computer that is in our list, we see the grand total telling us how many MIFs are located in our BadMifs folders in the first place.
From here, you can copy the table and paste it else where if you want to manipulate it (I wanted to filter my list so I could see the computers showing up the most frequently at the top of my list, for instance). This is Excel 101 stuff and I won’t bore you with those details. But hopefully this technique proves useful if you ever find yourself having to answer questions about which computers are sending MIFs to the BadMifs folder (and how many times).
Summary
This brief article’s purpose has been to show a technique I came up with to answer a very specific customer question. It seems to be the sort of question that might come up frequently enough that I felt it would be helpful to document it. Even if you’re not troubleshooting MIFs being sent to your BadMifs folders, it’s always a good idea to keep track of how many files are in your BadMifs folders. This technique should help in that effort.
Comments
- Anonymous
April 29, 2015
I would try the sortmif tool .This tool does many things like getting computer name with count of mif files ,IP address ,when was the last inventory and status if client has resynced or not .more viahttp://eskonr.com/2010/01/inventory-data-loader-issues-in-sccm-inboxes/ - Anonymous
April 30, 2015
thanks - Anonymous
June 05, 2015
Nice article helpfull - Anonymous
November 24, 2015
Great read. Thanks


