Microsoft and SAP NetWeaver - step by step up to the cloud - Part II : automated installation of a SAP dialog instance
Microsoft Private Cloud for SAP NetWeaver
In part I of the blog series :
it was described that one important aspect of private cloud is automation. It also mentioned that System
Center 2012 plays an essential role in the Microsoft private cloud story. While Hyper-V or products like
App-V add key capabilities for virtualization it's System Center which offers automation and self-service.
This blog will show a first use case in the SAP world. It's about a fully automated installation of a SAP
dialog instance in an existing SAP landscape. Question is if and how this can be accomplished using
System Center 2012. Contrary to the SCOM integration sample in the first blog one can get very far
just using the Microsoft products. The challenge comes up again once it is necessary or desirable to
access the SAP system. Like with SCOM 2012 there is no out-of-the-box SAP integration with VMM
2012 or Orchestrator 2012.
As an example for SAP system access the assignment of the newly created dialog instance to a
SAP "Logon Group" was chosen. While it's not a big deal to do this manually via SAP GUI transaction
SMLG the idea was to also automate this last step of the whole dialog instance installation process.
Similar to the SCOM-SAP integration described in the first blog a 3rd-party tool was used to connect
to the SAP system and fulfill the task.
"EasyCloud" from connmove was used in the following sample to cover the logon group assignment.
They are working on a new version of "EasyCloud" which will be a collection of PowerShell cmdlets to
access a SAP system and execute all kinds of typical tasks. The approach also allows an easy
integration into Orchestrator.
https://connmove.eu/en/software/easycloud/
The usage of the "Set-SMLGLogonGroup" cmdlet out of the new connmove "EasyCloud" product can
be seen in the walkthrough section of the blog further down.
System Center 2012 is a product suite which consists of several components :
App Controller, Configuration Manager, Data Protection Manager, Endpoint Protection,
Operations Manager, Orchestrator, Service Manager, Virtual Machine Manager
To implement the SAP dialog instance sample two components of the System Center 2012 suite
were used :
1. Orchestrator 2012
„Orchestrator is a workflow management solution for the data center. Orchestrator lets you automate
the creation, monitoring, and deployment of resources in your environment.“
https://technet.microsoft.com/en-us/library/hh237242.aspx
2. Virtual Machine Manager VMM 2012
„Virtual Machine Manager (VMM) is a management solution for the virtualized datacenter, enabling
you to configure and manage your virtualization host, networking, and storage resources in order to
create and deploy virtual machines and services to private clouds that you have created.”
https://technet.microsoft.com/en-us/library/gg610610.aspx
The following walkthrough should be seen as an example how automation in a SAP landscape using
System Center could look like. The use case is one piece of a full SAP private cloud implementation.
More scenarios will be described in the next upcoming blogs.
IMPORTANT - here are two key prerequisites for the following walkthrough which are not described in
detail in this blog :
1. a simple VM template with Windows 2008 R2 was created in VMM 2012
( https://technet.microsoft.com/en-us/library/hh427282.aspx )
2. a sapinst installation in unattended mode was prepared as described in SAP Note 950619
( SAP Note 950619 - Installation of SAP Systems with Unattended Mode )
The basic workflow of the automated installation of a SAP dialog instance which is described in detail in
the walkthrough section looks like this :
a, create a new VM with Windows 2008 R2 from a VM template in VMM 2012
b, run a sapinst installation of the new dialog instance in unattended mode on the newly created VM
( the SAP software is placed on a share in the network outside of the VM )
c, once the new dialog instance is installed it will be assigned to a new logon group
Fully automated installation of a SAP Dialog Instance
Figure 1 : starting point is an existing SAP system with SID "B74" and system number 10
Figure 2 : the instance with system number 10 is assigned to logon group "LogonGprivCloud1"
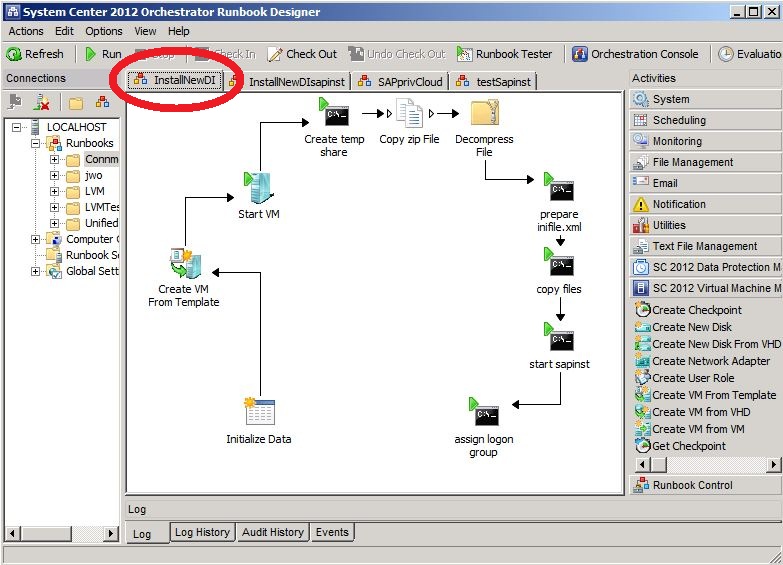
Figure 3 : the Orchestrator "Runbook Designer" was used to define the workflow which would automate
the installation of a new SAP dialog instance. There are a lot of out-of-the-box "activities"
which can be easily put together via drag&drop to build a complete workflow / process chain
Figure 4 : in addition to the default "activities" it's possible to install so-called "integration packs" which
extend the list of available "activities" in the Orchestrator Runbook Designer. The screenshot
shows a list of activities which are part of the VMM 2012 integration pack.This allows easy
access to VMM functionality ( e.g. start / stop VM ) out of an Orchestrator runbook
( Orchestrator integration packs : https://technet.microsoft.com/en-us/library/hh295851.aspx )
Figure 5 : for the SAP sample two runbooks were created. The first one includes just one activity to set
some parameters like the name of the new VM which will include the new SAP dialog instance
( wsiv5200 ) as well as the system number for the new instance ( 09 ). Not everything was
parameterized in the workflow ( e.g. domain join is hard-coded ). But the used parameters
prove that it's possible to fully parameterize all critical values. The activity will invoke the
second runbook and hand over the parameters
Figure 6 : the second runbook includes the whole workflow which will install a new SAP dialog instance.
It's pretty straight forward :
1. activity : Initialize Data - get parameters from the calling runbook
2. activity : Create VM from Template ( triggers the creation in VMM 2012 )
3. activity : Start the newly created VM
4. activity : Create a share on the file system in the new VM
5. activity : Copy a zip file to the share in the new VM ( sapinst related )
6. activity : Unpack the zip file
7. activity : Prepare the infile.xml for sapinst in unattended mode
8. activity : Create directories and copy files for sapinst
9. activity : Start sapinst in unattended mode to install the new SAP instance
10. activity : Assign a new SAP logon group to the new dialog instance
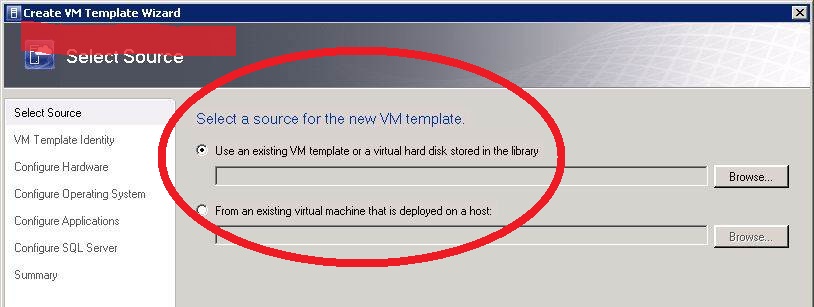
Figure 7 : a short excursion to VMM 2012. The runbook will create a new VM from an existing VM
template. For those who haven't seen VMM yet - it has a simple "create VM template wizard"
which makes it really easy to create templates and store them on a template library
Figure 8 : there are many options defining the details of a VM template which is beyond the scope
of this blog. One important setting can be seen here - the domain information. Instead of
defining it in the VM template the domain join will be done via the Orchestrator runbook to
be more flexible
Figure 9 : the first activity in the installation workflow "Initialize Data" just takes the parameters from the
calling runbook and provides them to the other activities in the workflow. It's the starting point
of the process chain and the next activity will be triggered
Figure 10 : the second activity in the runbook will create a new VM from an existing template in VMM.
It's an activity out of the VMM 2012 integration pack and needs a connection to an
existing VMM server. In this sample the domain join of the new VM was defined within the
runbook activity. This gives much more flexibility than defining it inside the VM template.
Figure 11 : other parameters in the list for creating a new VM are the path on the file system where
the vhd file should end up ( cluster shared volume in this sample ), hostname of the new
VM, name of the VM template and so on. The VM name was parameterized to show
how it works and that in principle all of the settings could be variables.
Figuer 12 : parameterization of the activities in a runbook is a key feature to keep everything
flexible. Just do a right-click on the value field and then select "Subscribe". There
will be a choice between runbook variables and "Published Data" which comes
from other activities
Figure 13 : after selecting "Published Data" one gets a dialog which shows a list of activities and the
data which they provide and which can be used as input for the current activity settings.
Therefore only activities will show up in the list which will be processed before the
current one except the "Initialize Data" activity. The latter one is always available like a
global variable. In the sample one parameter for calling the runbook is the name of the
new VM. As it's a parameter of "Initialize Data" it can be used anywhere by every activity
in the whole chain.
Figure 14 : the third activity is of type "run program" and allows to run programs or commands on
remote computers. Here it is used to create a simple share on the new VM to prepare
for the sapinst unattended install. More details will follow below.
For those who are interested in how the program start will be done :
https://technet.microsoft.com/en-us/library/hh206096.aspx
“The Run Program activity is based on PsExec.”
Figure 15 : after creating the share it's easy to use a "copy file activity" to copy a prepared zip file from
the local Orchestrator server to the new VM. The content of the zip file is explained on
figure 16 below
Figure 16 : the zip file prepared on the local Orchestrator server includes the following files :
- copy_sap_files.bat ( a simple bat file to create directories and copy files )
- doc.dtd, inifile_template.xml, keydb.dtd ( files related to sapinst unattended install )
- prep_inifile.ps1, replace_SAP_var.bat ( two scripts to create inifile.xml )
- start_dir.cd ( related to sapinst -> includes path to SAP software )
- start_sapinst.bat ( simple bat file to start sapinst in unattended mode )
SAP Note 950619 ( "Installation of SAP Systems with Unattended Mode" ) describes the
details regarding the installation process in unattended mode. One outcome is the inifile.xml.
For the sample this file was renamed to "inifile_template.xml" and some key values like
hostname were replaced by placeholder strings. The simple prep_inifile.ps1 script will then
replace these placeholder strings by the actual parameters of the Orchestrator runbook and
provide the final inifile.xml for sapinst
Figure 17 : the start_dir.cd file simply includes the path to the SAP software. In the sample case it was
also placed on the local Orchestrator server
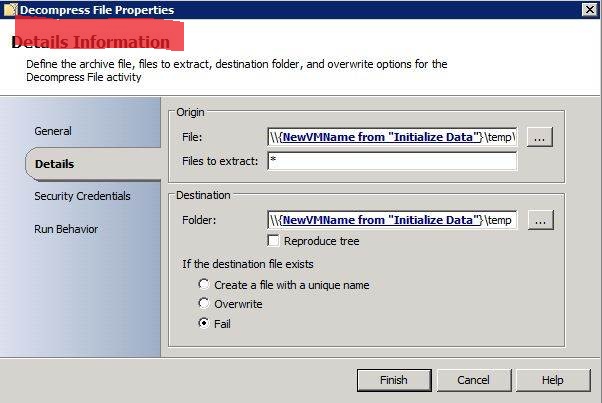
Figure 18 : there is a dedicated "Decompress File" activity available. The purpose is self-explanatory.
Figure 19 : another "run command" activity was used to prepare the inifile.xml. As mentioned above
there is an inifile.xml template in the custom zip file which includes some placeholders.
The bat file calls the ps1 script to replace these strings. This was done to evaluate
different ways of calling a Powershell script out of Orchestrator. It's not as easy as it looks
like. The issue was that control wasn't given back to the runbook and the activity remained
in status "running". A partner in Germany ( https://www.vaserv.eu/index.php/en ) found an
interesting workaround by putting the following two lines at the end of the Powershell
script :
$objCurrentPSProcess = [System.Diagnostics.Process]::GetCurrentProcess();
Stop-Process -Id $objCurrentPSProcess.ID;
Another possibility how to call a Powershell script directly is described when calling the
SAP logon group assignment script further down.
Figure 20 : this is the trivial Powershell script which will replace some self-defined placeholders in the
infifile_template.xml file and create the inifile.xml required by sapinst in unattended mode.
Figure 21 : now as the inifile.xml is prepared the next activity in the runbook will call a little bat file to
create some directories and copy the content of the zip file to the correct places
Figure 22 : the simple bat file which is called out of the runbook does the following :
a, create two directories for sapinst in unattended mode
b, it's necessary to put inifile.xml, keydb.dtd and doc.dtd in a different
directory than start_dir.cd. In addition sapinst has to be called in the
same directory where start_dir.cd was copied to
c, another directory will be created to unpack sapinst.exe - see details below
Figure 23 : now everything is ready to call sapinst. There is again a little script which was part of the
zip file which will be called out of a "Run Program" activity
Figure 24 : the script to start sapinst shows a little issue which has to be considered. For the
unattended mode some parameters are required. But this would NOT work when
calling sapinst.exe directly on the SAP software share. Reason for this is that sapinst.exe
on the SAP media is in fact a self-extractor. There is an option how to extract the files
from the sapinst.exe package : sapinst.exe -extract
It turned out to perform more stable when doing the extract on the new VM. Therefore a
separate directory was created for this purpose. The extract call will then unpack all the
related programs and so on into the newly created directory on the new VM including the
"real" sapinst.exe installer. Afterwards sapinst.exe will be called using the appropriate
parameters for unattended mode ( see SAP Note 950619 ) :
SAPINST_PARAMETER_CONTAINER_URL
SAPINST_EXECUTE_PRODUCT_ID
SAPINST_SKIP_DIALOGS=true
-nogui
-noguiserver
SAPINST_START_GUI=false
<SAP Software Share\SAP_Netweaver_7.30_OS-DB_dependent.........>\product.catalog
Figure 25 : to make it more clear this screenshot shows the file size of the sapinst.exe self-extractor on
the SAP software share
Figure 26 : after extracting all files from the sapinst.exe package one will find the "real" sapinst.exe
installer which is of course considerably smaller than the self-extractor
Figure 27 : last but not least after the new dialog instance was installed the ps1 script will be called
to assign the new instance to a new logon group. As already mentioned earlier there is a
problem when simply calling a ps1 script out of Orchestrator. It doesn't realize when the
script is finished and remains in running mode. Here is a workaround how it can be
accomplished :
cmd.exe /c | C:\Windows\SysWOW64\WindowsPowerShell\v1.0\powershell.exe -c
c:\SAP_Software\SAP_assign_lg.ps1 < parameters >
The little ps1 script was stored on the local Orchestrator server.
Figure 28 : the ps1 script which assigns the new logon group to the new dialog instance shows the
usage of the SMLG cmdlet from the connmove EasyCloud product. It's straight forward.
A variable stores the connection data and then a simple call of Set-SMLGLogonGroup
does the job. For the sample the password of the SAP user was just put into the script.
connmove is working on SNC support for their new cmdlet based EasyCloud version.
Figure 29 : once the Orchestrator runbook started one can check the VMM side. There should be a job
triggered by the runbook to create the new VM out of the existing VM template
Figure 30 : at the end there should be "success" for every activity in the runbook
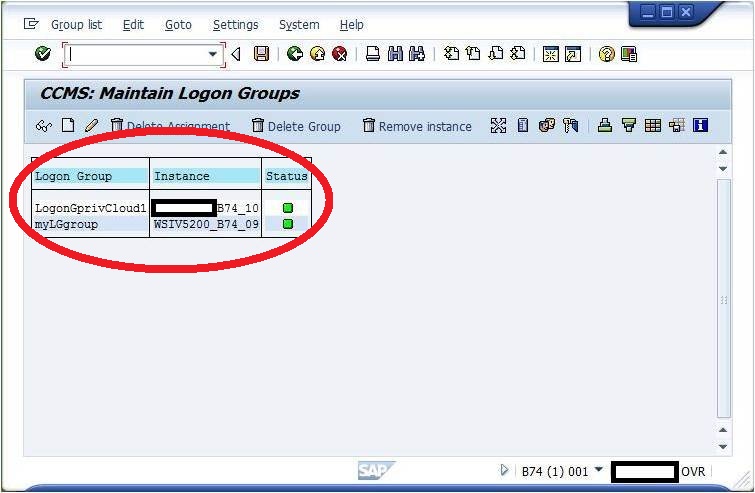
Figure 31 : transaction SMLG shows that the new dialog instance with instance number 09 was
correctly assigned to the new logon group "myLGgroup"
Figure 32 : it's a good idea to double-check via transaction SM51 that the new dialog instance is
really available
Figure 33 : last check is the SAP MMC which also shows the correct entry for the new instance


