Deploy your first smart contract on azure ethereum consortium blockchain
As we know Blockchain like Bitcoin and Ethereum, ledgers for recording virtual currency transactions, is booming, however, it is much more than just a virtual currency. It’s a transformational technology with the potential to extend digital transformation beyond a company’s walls and into the processes it shares with suppliers, customers and partners. Microsoft Azure provide a strong backbone for this transformational technology implementation. Azure as an open, flexible, and scalable platform, supports a rapidly growing number of distributed ledger technologies that address specific business and technical requirements for security, performance, and operational processes.
Although, Financial use cases and implementation of blockchain technology are in the highlight because of substantial interest of influential parties such as financial institutes, banks, Financial tech start-ups and investors. At the same time non-financial use cases of Blockchain are getting momentum and equally significant importance to a number of industries like supply chain, manufacturing, healthcare and many more.
Today, Let’s take a scenario of non-financial sector i. e. an Automaker which releases a product containing defective parts resulting in costly recalls and repairs. They can use blockchain to trace the supplier of the faulty parts more efficiently. Finally reducing time and labour costs.

Let’s scope the scenario
We will create Automaker Scenario on Azure Blockchain. In this blog we will limit our scope for entry raw material and finding details of raw material in our Blockchain Network
Let’s get started.
To get this implemented, at high level we will follow below steps:
- Create azure ethereum consortium blockchain
- Create smart contracts
- Deploy smart contracts on azure ethereum consortium blockchain
- Test our contract on azure ethereum consortium blockchain.
Prerequisite
You will need:
- A desktop computer (Host) running on Windows 10 or Mac OSX
- An active Azure subscription
- An Active internet connection
Step 1: Create azure ethereum consortium blockchain
Go to https://portal.azure.com click on  and select Ethereum Consortium Blockchain.

On next few screens put all required information and click on create. Deployment should take 5-10 minutes to complete.
Now we have created Ethereum Consortium Blockchain.
We would need RPC details of our blockchain network in further steps. We will save these values at some place for later use. To get those values
Click on  from left side. Select your resource group. From “overview” tab find details on “Deployments”.

It will provide you details of the deployments. Like shown below

Select first deployment, which looks like “microsoft-azure-blockchain.azure-blockchain-servi-<timestamp>”.
In next window copy value of “ethereum-rpc-endpoint” from output section. We would need this value in next steps to deploy contract on Ethereum Consortium Blockchain network.

It’s time to move to next step to create smart contracts
Step 2: Create smart contracts
We will use Solidity to write smart contract. To get more details on Solidity, please go through solidity documentation https://solidity.readthedocs.io/en/develop/. To create a solidity smart contract you can use Visual studio code with Solidity extension or Remix. You can download Solidity extension for Visual studio code from https://marketplace.visualstudio.com/items?itemName=ConsenSys.Solidity
You can get more details about Remix from github location
https://github.com/ethereum/remix
Today we will use remix to write smart contract. We will write 1 smart contract to push Raw material details and search for it in blockchain.
Open https://remix.ethereum.org/
in your browser. Click on symbol located on top left side of the window. Write file name as Manufacturing_RM.sol and click on OK.

Copy past below code in Code window
pragma solidity ^0.4.18;
contract manufacturing_RM_Contract {
address owner;
struct Raw_Material
{
string PartNumber;
uint Quantity;
string Supplier;
}
mapping (string => Raw_Material) Raw_Materials;
address[] public Address_Raw_MaterialsAccts;
string[] public Raw_MaterialsAccts;
function setRaw_Material(address _creater, string _PartNumber, uint _Quantity, string _Supplier) public {
var RM = Raw_Materials[_PartNumber];
RM.PartNumber=_PartNumber;
RM.Quantity=_Quantity;
RM.Supplier=_Supplier;
Address_Raw_MaterialsAccts.push(_creater) -1;
}
function getRaw_Materials() constant public returns (address[]) {
return Address_Raw_MaterialsAccts;
}
function getRaw_Materials(string _PartNumber) constant public returns (string,uint,string ) {
return (Raw_Materials[_PartNumber].PartNumber,Raw_Materials[_PartNumber].Quantity,
Raw_Materials[_PartNumber].Supplier);
}
function countRaw_Materialss() constant public returns (uint) {
return Address_Raw_MaterialsAccts.length;
}
}
In Above code snippet, we have 1 struct with name “Raw_Material”. Which holds basic information of raw material like PartNumber, Quantity and Supplier details. You can add more details as per your requirements.
Remix will auto compile the code if you have selected “Auto Compile” else click on  to compile you code. Now we will deploy this smart contract in Ethereum Consortium Blockchain, which we had created in Step 1.
Step 3: Deploy smart contracts on azure ethereum consortium blockchain
To deploy smart contract, we will use Remix only. In remix browser click on “Run” tab, which is located on top right side of screen

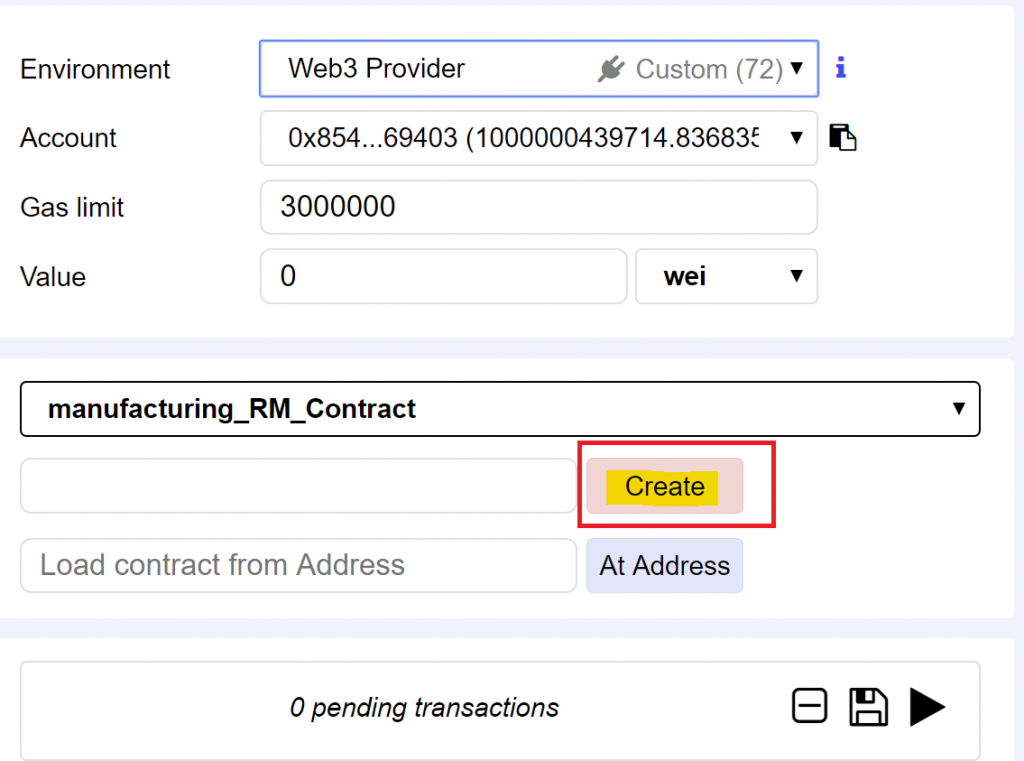
From “Environment” drop down select “Web3 Provider”. It will show a pop up like shown below.

Click on OK. Now you need to provide “Web3 Provider Endpoint” for you Ethereum blockchain network. It is the “ethereum-rpc-endpoint” value which we had saved from Azure portal as part of step1. Paste this value in popup window and click on “OK”.

Now It will show you some values in “Account” dropdown, which was earlier blank. Now we have connected remix IDE with in Ethereum Consortium Blockchain. Lets deploy smart contract. Click on “Create”

Now it will show 1 Pending transaction.

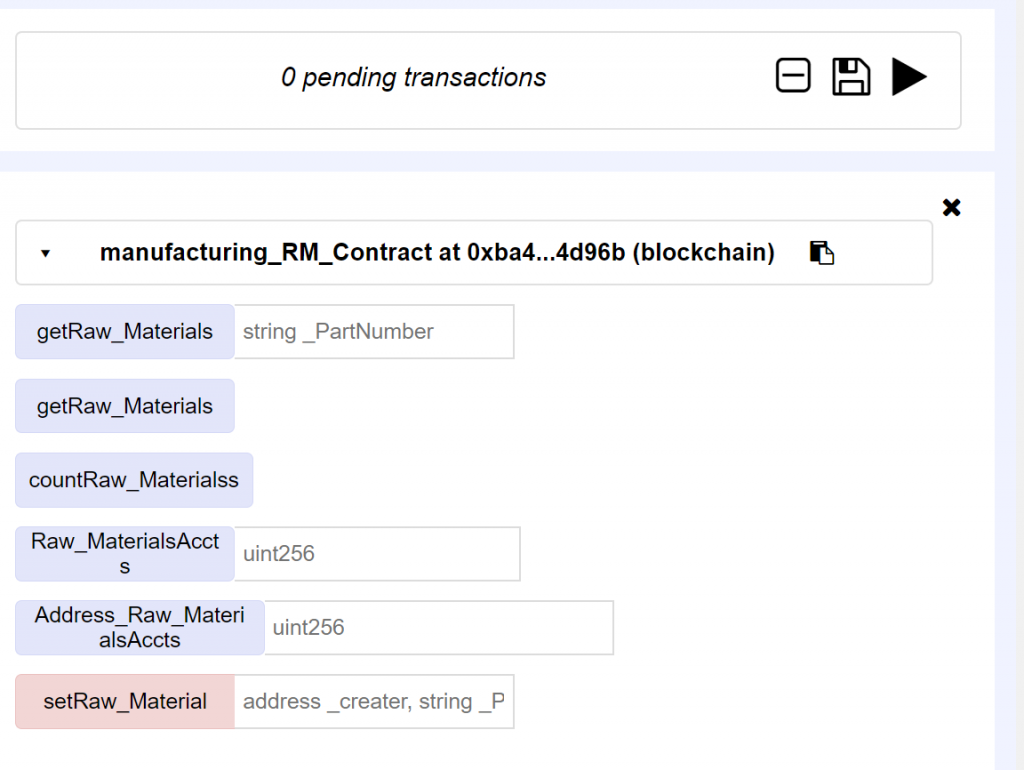
It will take few minutes to deploy contract and returns address on contact and interface for contract functions. It will look like

And in you console window you can see details on transaction. If you want to get more information, Click on “Details” button.

Now it’s time to test our smart contract. First, we will test “setRaw_Material” function. In our contact this function accepts 4 inputs, address on transaction creator, part Number, quantity and Supplier details. You can get address on creator from “Accounts” drop down. Click on Copy icon next to Accounts dropdown.
There is a textbox next to “setRaw_Material” button. Write your inputs in same text box. It will be something like below.
"<AccountAddress>", "Tyre",4,"Supplier1"
Replace <AccountAddress> with the value you had copied from “Accounts” drop down. Now click on “setRat_Metrial” button. 
In console window It will return Block number and few details about transaction once it’s done.

Now Let’s try to get details on transaction which we had inserted in our Blockchain network.
Click on “countRaw_Materialss” button. It will return count 1, as we had inserted only 1 Raw material detail

Let’s try to execute another function “getRaw_Materials”. In input box type “Tyre” and click on “getRaw_Materials “ button. It will show you all values that you had inserted using “setRaw_Material” function.

Recap:
We had created a ethereum consortium blockchain on Azure. Then we wrote a smart contract using remix. We deployed smart contract on our ethereum consortium blockchain. Finally, we were able to test it successfully.