First Windows 8 App
Alright, so last week I posted about how to write your Your First Windows Phone App. I figured I would follow that up by doing the same username generator app for windows 8.1 to give people a starting point for both Windows 8.1 and Windows Phone. With that said, this will be very similar to the Windows Phone version, but nevertheless, we will walk through the how to steps for Windows 8.
So, first thing we are going to is create a black Windows 8 app by going to File->New->Project and then Templates->Visual C#->Windows Store-> and finally select Black App (XAML). Give it a name, and click OK.
Now that we have a project created, we need to design the UI for the app. This part is going to be fairly simple. We only need three things; a textblock for a title, textblock to display the username, and a button to generate the username. So, go ahead and open up the MainPage.xaml. Now, open up the toolbox (you can find it under the “view” tab), and click and drag two “textblocks” and a button onto the visual editor. You can arrange the controls and edit them (mainly font size and text to display) how you want. but we are looking for something similar to the following.
Once you have the general layout here, we need do a couple of things, the first of which is to give a name to our textblock that will display the username. You can call it what you want, but I am going to call it “Username_Text”. You can give it this name by adding the following line of code to the xaml within the textblock tags.
x:Name="Username_Text"
After you have named your textblock, we need do add the “Click Handler” for our button. Visual Studio makes this very easy on us, as we can simple double click on the button in our visual editor, and it will create the handler method for us as well as take us to the code behind page as shown below.
Now, we have our layout and the handler method for our button. The last thing we need to do is add the logic for our app. The basic idea here is to have an array of adjectives and an array of animals, take a random one from each, and combine them with a random number to create the username. So, let’s first declare and initialize our arrays to store the adjectives and animals. We will declare the two arrays as members of our class just before the MainPage constructor like this. We will also declare a Random variable, that we will use in a minute.
string[] ajectives_array;
string[] animals_array;
Random r;
Then we create a method called InitializeArrays() and call it from the MainPage() constructor to…yep, you guessed it, initialize the two arrays and the Random variable. I am going to keep it simple and just add 5 to each.
ajectives_array = new string[5]{"happy", "sad", "tired", "funny", "athletic"};
animals_array = new string[5] { "dog", "cat", "bird", "fish", "snake" };
r = new Random();
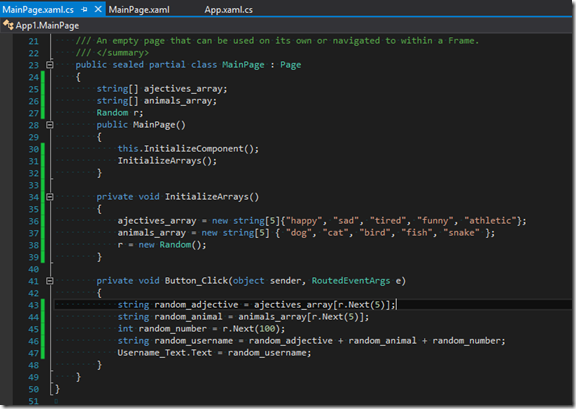
Now, the last thing we need to do is add the logic for actually generating the random username. The idea is pretty simple. Get a random number between 0 and 4 to pull both a random adjective and animal, and then a random number between 0 and 99 to tack on the end. Put all of these together, and set the text field for our username textblock to the new username and voila, you’ve done it. When you’ve got all of the code, it should look like this.
Alright, you should now have a very basic username generator. I encourage everyone to customize and improve this very simple UI, and then maybe add some different words to pull from for the username generator. This is a great app to start with, so feel free to use what we have done here to publish your first Windows 8 app :).
In the meantime you can find my very simple username generator in the store, here.


