Adding a corporate (or self-signed) certificate authority to git.exe’s store
This is a topic that I touched on a little bit in my last post, "Git network operations in Visual Studio 2013.” If your organization has an on-premises installation of Team Foundation Server 2013 or later, and you connect using HTTPS, then the root certificate which vouches for the authenticity of your SSL cert is probably private to your organization. That root certificate is probably distributed to all domain-joined machines in your organization via group policy, and it is stored in the Windows certificate store for your machine.
Any application written to use the Windows crypto APIs will have access to that root certificate, and will consider your TFS deployment to be trusted. Applications using the Windows certificate store include Internet Explorer, Google Chrome, and Visual Studio 2013. However, Git for Windows (git.exe) uses OpenSSL for its crypto stack, and the Git for Windows distribution includes a set of trusted root certificates in a simple text file. Your organization’s root certificate will not be in this list, and if you try to use git.exe to perform network operations against your TFS server, you’ll get an error like this:
F:\>git clone https://myserver/tfs/DefaultCollection/_git/Proj
Cloning into 'Proj'...
fatal: unable to access 'https://myserver/tfs/DefaultCollection/_git/Proj/': SSL certificate problem: unable to get local issuer certificate
You have a couple of different options for how to work around this problem. The easy way is to just disable SSL certificate validation entirely – if this is what you want to do, you can find numerous articles on the web about how to do this. I won’t address it here because unfortunately, it defeats one of the purposes of having SSL to begin with – server authentication. Your organization probably has HTTPS turned on for a reason. What if we wanted to add the root certificate to git.exe’s certificate store, in the same way that domain membership in your organization has added it to your Windows certificate store? Here’s how.
Step 1. Extract the root certificate as a base64-encoded X.509 CER/PEM file
(These steps were written using Internet Explorer 11. On other versions of IE, I suspect the same steps are still possible, but they may be slightly different.) Open Internet Explorer and visit your TFS server in the web browser. For our example above, the URI would be https://myserver/tfs. At the right of the address bar is a lock icon which you can click to learn more about the details of how your connection to the server has been secured.
At the bottom of the drop-down is a link to “View certificates.” If you click the “Certification Path” tab of the dialog box which comes up, you can see the entire chain of trust. Select the top-most certificate in the chain – this is the root certificate.
Then click “View Certificate” to open up that root certificate, and go to the Details tab.
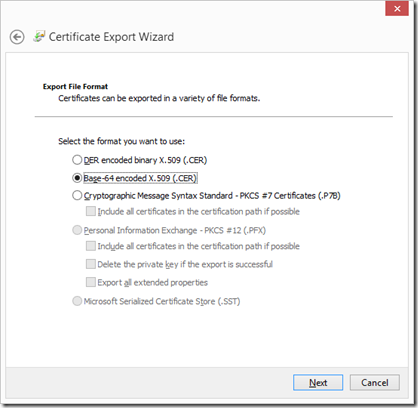
On the Details tab, you can select “Copy to File…”, which will start the export wizard for certificates. On the second page of the wizard, you will be asked what format to use for exporting your certificate. Choose the second option: base64 encoded X.509.
Save the certificate somewhere on your disk. You’ll need this for step 2.
Step 2. Switch to using a private copy of the Git root certificate store
When you install Git for Windows (msysgit) on your machine, it drops a file called curl-ca-bundle.crt in your Program Files directory. This is the root certificate store for git.exe. It’s just a text file containing all of the certificates that git.exe trusts, one after another. The text file has UNIX (\n) line endings, though, so if you open it up in Notepad, it won’t look too pretty.
What we want to do in this step is to make a copy of the curl-ca-bundle.crt file (which is installed on a per-machine basis) that will be private for just your Windows user. The ideal place to store the file is in your %USERPROFILE% (C:\Users\yourname) directory, right alongside your per-user (“global”) .gitconfig file. On my machine, the following command does it – if you are using 32-bit Windows, you’ll want to fix up the Program Files part of the path so there isn’t an “x86” section.
(If you don’t know where your user profile directory is, you can just run “echo %USERPROFILE%” at the command prompt. For example, mine is C:\Users\phkelley.)
copy "C:\Program Files (x86)\Git\bin\curl-ca-bundle.crt" C:\Users\yourname
(Note: In the Git for Windows 2.x series, the path has changed to C:\Program Files (x86)\Git\mingw32\ssl\certs\ca-bundle.crt. Thanks Craig for the tip.)
Next, we’ll want to configure Git to use this private copy of the certificate store. You can set this up with the following command:
git config --global http.sslCAInfo C:/Users/yourname/ curl-ca-bundle.crt
(Note the use of forward slashes and not backslashes above.) As a quick sanity check, try to clone a repository from GitHub to make sure that everything is still working:
git clone https://github.com/libgit2/EmptyGitRepository
Step 3. Add the exported root certificate to the private copy of the store
The last step is to open up the curl-ca-bundle.crt file (the private copy we made in step 2) in a text editor and add an entry at the bottom for your exported root certificate. I used the “unix2dos” tool available here to change the line endings in the file from \n to \r\n so that I could open the file up in Notepad:
unix2dos C:\Users\yourname\curl-ca-bundle.crt
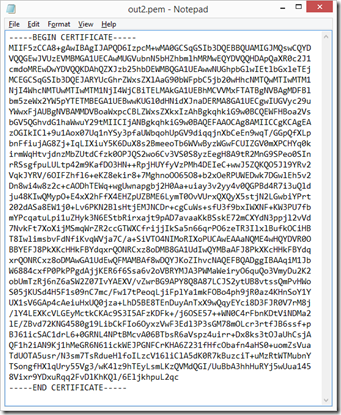
Then I opened up the exported certificate from step 1 in Notepad and put its entire contents onto the clipboard.
Next, I opened up the C:\Users\yourname\curl-ca-bundle.crt file, added an entry for this certificate at the end, pasted in the cert, and saved the file. All done!
Step 4. Try it out…
F:\>git clone https://myserver/tfs/DefaultCollection/_git/Proj
Username for 'https://myserver': domain\username
Password for 'https://domain\username@myserver':
remote:
remote: fTfs
remote: fSSSSSSSs
remote: fSSSSSSSSSS
remote: TSSf fSSSSSSSSSSSS
remote: SSSSSF fSSSSSSST SSSSS
remote: SSfSSSSSsfSSSSSSSt SSSSS
remote: SS tSSSSSSSSSs SSSSS
remote: SS fSSSSSSST SSSSS
remote: SS fSSSSSFSSSSSSf SSSSS
remote: SSSSSST FSSSSSSFt SSSSS
remote: SSSSt FSSSSSSSSSSSS
remote: FSSSSSSSSSS
remote: FSSSSSSs
remote: FSFs (TM)
remote:
remote: Microsoft (R) Visual Studio (R) Team Foundation Server
remote:
Receiving objects: 100% (6781/6781), 47.12 MiB | 32.56 MiB/s, done.
Resolving deltas: 100% (4553/4553), done.
Checking connectivity... done
Not bad! The steps above for adding a root certificate apply to anyone using git.exe in corporate/self-signed scenarios like this, not just Team Foundation Server 2013 or later.
Comments
Anonymous
April 07, 2015
Bravo - you saved me SO much headache with this! I've been around the block with TFSVC but am very new to Git and Git TF. Thanks for the help!!Anonymous
July 23, 2015
It works on Windows - but I can't get it to work on Unix. Problem: The username must be prefixed with the Domain name. On Windows the Git bash asks me for the user and I can enter it like Domainuser - but on Unix there is no such dialogue. I also tried git clone https://"domainuser@gitserver but it does not work either :(Anonymous
August 12, 2015
Seriously, thank you!! It worked for me after step 2 itself. I was able to clone. I have not attempted checking in code yet but so far so good.Anonymous
August 19, 2015
As of v2.5.0 of Git for Windows (git-for-windows.github.io), the installed certificate file has moved to "C:Program Files (x86)Gitmingw32sslcertsca-bundle.crt".Anonymous
May 01, 2017
Update to certificate path: C:\Program Files\Git\usr\ssl\certs\ca-bundle.crt


