WpfAboutBox: Dialog Layout and Styles
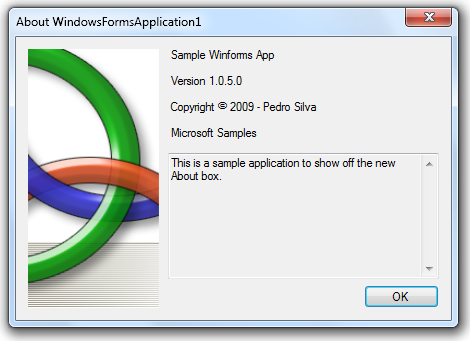
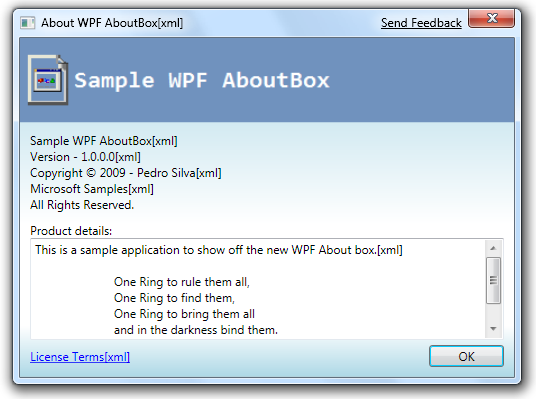
I wanted to make an AboutBox that is as easy to use as the one that comes with Winforms. But, I also wanted to make use of some of the cool new UI capabilities in WPF and make it look a little snazzier than the default WinForms one… Below are the two different AboutBoxes:


As you can see the WPF one makes use of some nice gradients and coloring that is easy to do with XAML. And, I adjusted the layout to look like About boxes that you see in many professional applications today. The XAML for this is very straightforward and makes heavy use of the StackPanel for laying out the WPF controls. The following listing is the code to make this dialog (listing from AboutBoxSimple.xaml):
<StackPanel x:Uid="clientArea" Style="{StaticResource BackgroundStyle}">
<StaticResource ResourceKey="aboutLogo" />
<StackPanel x:Uid="displayArea" Style="{StaticResource DisplayAreaStyle}"
DataContext="{StaticResource aboutProvider}">
<Label x:Name="productName" x:Uid="productName" Content="{Binding Mode=OneTime, XPath=Product}" />
<StackPanel x:Uid="versionArea" Orientation="Horizontal">
<Label x:Name="versionLabel" x:Uid="VersionLabel" Content="Version - " />
<Label x:Name="version" x:Uid="version" Content="{Binding Mode=OneTime, XPath=Version}" />
</StackPanel>
<Label x:Name="copyright" x:Uid="copyright" Content="{Binding Mode=OneTime, XPath=Copyright}" />
<Label x:Name="company" x:Uid="company" Content="{Binding Mode=OneTime, XPath=Company}" />
<Label x:Name="reserved" x:Uid="reserved" Content="All Rights Reserved." />
<Label x:Name="info" x:Uid="info" Style="{StaticResource ParagraphSeparator}"
Content="Product details:" />
<TextBox x:Name="description" x:Uid="description" Text="{Binding Mode=OneTime, XPath=Description}"
Style="{StaticResource ReadOnlyDescStyle}" />
<DockPanel x:Uid="buttonArea">
<Button x:Name="okButton" x:Uid="okButton" Style="{StaticResource OkButtonStyle}"
Content="OK" />
<Label x:Name="productLink" x:Uid="productLink" Style="{StaticResource LinkLabelStyle}" >
<Hyperlink x:Name="hyperlink" x:Uid="hyperlink" NavigateUri="{Binding Mode=OneTime, XPath=Link/@Uri}" Style="{StaticResource LinkLabelStyle}"
Hyperlink.RequestNavigate="hyperlink_RequestNavigate">
<TextBlock Text="{Binding Mode=OneTime, XPath=Link}" />
</Hyperlink>
</Label>
</DockPanel>
</StackPanel>
</StackPanel>
Looks pretty straightforward… lots of Labels, a Button, an Image, and a Textbox with a few StackPanels to do some fancier layout. The StackPanel just makes sure each child control in it is stacked one on top of the other (for vertical panels). One interesting “control” you’ll notice is the HyperLink control that’s used for the License link… I described how to make that work in an earlier post.
You’ll notice that there’s no styling information (colors, sizes, fonts, etc) in this section. All of that is done through WPF Styles. This is similar in concept to styles in HTML. You define a style with an id, and then use it on the controls that you want that style to apply to. You’ll notice that many of the controls above have a Style attribute assigned. This is what connects a style to this control. But, where are styles defined… well they can be defined in multiple places… in a resource for this window, as an application resource, or as a separate resource dictionary file that can be included in other files. For this example, I’ve just included the resources in this XAML file. The following is a list of the resources used for the AboutBox.
<Window.Resources>
<Style x:Key="DisplayAreaStyle" TargetType="{x:Type StackPanel}">
<Setter Property="Margin" Value="10,10,10,5" />
</Style>
<Style x:Key="BackgroundStyle" TargetType="{x:Type StackPanel}">
<Setter Property="Background">
<Setter.Value>
<LinearGradientBrush EndPoint="0,1">
<GradientStop Offset="0" Color="LightBlue" />
<GradientStop Offset="0.55" Color="White" />
<GradientStop Offset="0.85" Color="White" />
<GradientStop Offset="1" Color="LightBlue" />
</LinearGradientBrush>
</Setter.Value>
</Setter>
</Style>
<Style TargetType="Label">
<Setter Property="Padding" Value="0" />
</Style>
<Style x:Key="ParagraphSeparator" TargetType="{x:Type Label}">
<Setter Property="Padding" Value="0,10,0,0" />
</Style>
<Style x:Key="LinkLabelStyle">
<Setter Property="Control.Padding" Value="0" />
<Setter Property="Control.VerticalAlignment" Value="Center" />
</Style>
<Style x:Key="ReadOnlyDescStyle" TargetType="{x:Type TextBox}">
<Setter Property="MinLines" Value="6" />
<Setter Property="MaxLines" Value="6" />
<Setter Property="IsReadOnly" Value="True" />
<Setter Property="TextWrapping" Value="WrapWithOverflow" />
<Setter Property="VerticalScrollBarVisibility" Value="Visible" />
</Style>
<Style x:Key="OkButtonStyle" TargetType="{x:Type Button}">
<Setter Property="MinWidth" Value="75" />
<Setter Property="Margin" Value="0,5" />
<Setter Property="DockPanel.Dock" Value="Right" />
<Setter Property="IsDefault" Value="True" />
<Setter Property="IsCancel" Value="True" />
</Style>
</Window.Resources>
The <Style> tag allows you to put a key for each style, which is then used when assigning it to a control. You can also specify a TargetType, which tells us what type of controls this style can apply to. If you try to apply a style to an inappropriate type, you’ll get an error (but you can also target a base class, like Control, that would affect multiple types). Then, the body of the <Style> is just a list of <Setter> tags with properties and values that you want to set for this style. And, as you can see from the BackgroundStyle, some of the Setters can be complex types like gradients that require setting more than just a single value. Without this information, the layout of the controls XAML would be pretty spread out and not very colorful. Also, you may wonder why none of the Labels in the listing specify a Style attribute at all. This is because you can use a Style without a Key specified, in that case, that style applies to all types in this context (in our case this dialog). So,
<Style TargetType="Label">
<Setter Property="Padding" Value="0" />
</Style>
applies to all labels in the About box. This is handy because we don’t have to put that Style attribute on every Label control on the dialog.
The reason to use Styles is to separate the structure of your layout (controls, panels, etc) from the UI stylings for them. This makes it easier to maintain and change colors, fonts, and spacing. Also doing it this way, allows you to do skinning by completely replacing these styles with one that have the same key, but have different style properties set (will look at that in an upcoming post). For a more detailed description of how the Style tags work, I highly recommend the WPF Unleashed book.
One thing to note… in Visual Studio 2008, it’s a little difficult to work with styles in resources because the XAML designer doesn’t recognize them. So, if you select a control with styles, you won’t see the properties set within the style. And, changes you make through the property grid will be applied to the control, not the style. But, the power of using styles makes it worth doing, even despite this.
So, far the AboutBox has been completely done without writing any C# code… pretty cool. The only code I did have to write for this simple About box is to handle the Click event to navigate the HyperLink’s URI.
This topic has been all about layout and XAML. You’ll notice in the XAML above all of the Content sections don’t have the text that is displayed in the dialog… actually all they have is this funky syntax {Binding}. That’s because it uses databinding to retrieve the data that is displayed in the controls. We’ll talk about databinding in the next post…
Download
I’ve attached a ZIP file to this post with the project that I created for testing About boxes. This has all of the code for three different types of About boxes, but this article just discusses AboutBoxSimple.xaml and AboutBoxSimple.xaml.cs). I’ll be describing interesting parts of all of them in upcoming posts.
Comments
- Anonymous
May 08, 2009
PingBack from http://asp-net-hosting.simplynetdev.com/wpfaboutbox-dialog-layout-and-styles/