Updating Secondary Tiles using Background Task
In this blog post, I will be discussing how to update secondary tiles using background tasks in a Windows Store App. I’ll be using the example of TFS Dashboard App in which I connect to OData Service for Team Foundation Server to retrieve data from TFServer. The source code of this App is available for download. Consider a scenario where you pin a query from your WorkItems to the Start screen and would like to see it update every 15 minutes with the latest result information even when the App is not running.
Let’s go through the steps of pinning a tile:
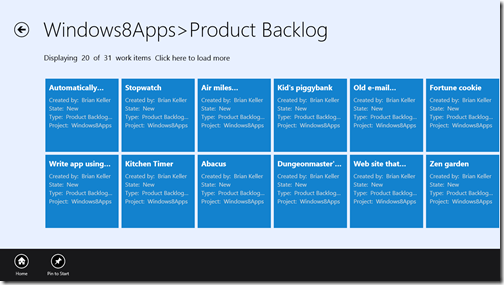
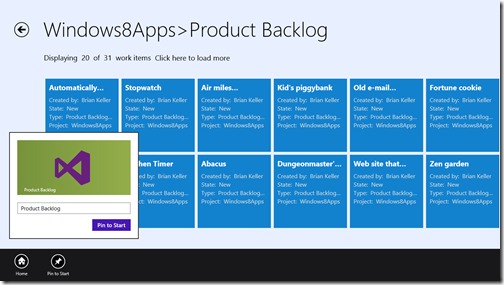
The above screen shows a query ‘Product Backlog’ and the resulting WorkItems that fall under that query. I can swipe from the bottom of the screen and bring up the AppBar.
Then I can click on the ‘Pin to Start’ button to pin the query to the Start screen.
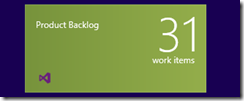
The Start screen will then show my pinned query ‘Product Backlog’ as a tile which updates to show the latest count of WorkItems. Each of the pinned tiles will ping the OData Service and display the updated number of WorkItems, even when the App is not running.
I can pin multiple tiles from the App and change their size on the Start screen to be smaller (square) or larger (wide).
To achieve this, we will follow these steps:
Step 1: Create Pin and Unpin buttons as part of BottomAppBar for the tile on the xaml page where you want to be able to pin the items. In my case, I’ll add the buttons to the ItemDetailPage.xaml. You can add Page.BottomAppBar at the same level as Page.Resources section.
XAML
<Page.BottomAppBar>
< AppBar x:Name="PageAppBar" Padding="10,0,10,0">
<Grid>
< StackPanel x:Name="LeftCommands" Orientation="Horizontal" HorizontalAlignment="Left">
<Button x:Name="HomeButton" HorizontalAlignment="Left" Style="{StaticResource HomeAppBarButtonStyle}"
Click="HomeButtonClicked"/>
<Button x:Name="PinTileButton" HorizontalAlignment="Left" Style="{StaticResource PinAppBarButtonStyle}"
Click="OnPinTileButtonClicked" Visibility="{Binding PinSecondaryTileButtonVisibility}"/>
<Button x:Name="UnpinTileButton" HorizontalAlignment="Left" Style="{StaticResource UnpinAppBarButtonStyle}"
Click="UnpinTileButtonClicked" Visibility="{Binding UnpinSecondaryTileButtonVisibility}"/>
</StackPanel>
</Grid>
</AppBar>
</Page.BottomAppBar>
The OnPinTileButtonClicked and UnpinTileButtonClicked event handlers used in the buttons above can be defined in ItemDetailPage.xaml.cs:
C#
private async void OnPinTileButtonClicked(object sender, RoutedEventArgs e)
{
this.BottomAppBar.IsSticky = true;
this.BottomAppBar.IsOpen = true;
Query item = (Query)navigationParam;
await BackgroundTaskHelper.CreateTile(item, (Visibility)this.DefaultViewModel["PinSecondaryTileButtonVisibility"],
(Visibility)this.DefaultViewModel["UnpinSecondaryTileButtonVisibility"]);
SetVisibility(item);
this.BottomAppBar.IsOpen = false;
this.BottomAppBar.IsSticky = false;
}
private async void UnpinTileButtonClicked(object sender, RoutedEventArgs e)
{
// Keep AppBar open until done.
this.BottomAppBar.IsSticky = true;
this.BottomAppBar.IsOpen = true;
Query item = (Query)navigationParam;
await BackgroundTaskHelper.DeleteTile(item, sender, (Visibility)this.DefaultViewModel["PinSecondaryTileButtonVisibility"],
(Visibility)this.DefaultViewModel["UnpinSecondaryTileButtonVisibility"]);
SetVisibility(item);
this.BottomAppBar.IsOpen = false;
this.BottomAppBar.IsSticky = false;
}
For information on how to toggle between Pin and Unpin button in the bottom AppBar, please see the source code.
Step 2: Create Secondary Tiles in your Windows Store App
I have created a class BackgroundTaskHelper where CreateTile and DeleteTile methods are defined. The CreateTile method is used to create a Secondary tile whenever OnPinTileButtonClicked event is called.
C#
public async static Task CreateTile(Query item, Visibility PinTileButton, Visibility UnpinTileButton)
{
var squareLogo = new Uri("ms-appx:///Assets/TFSLogo150_150.png");
var wideLogo = new Uri("ms-appx:///Assets/TFSLogo310_150.png");
//checking if tile has already been pinned
if (!SecondaryTile.Exists(GetTileId(item.Title)))
{
SecondaryTile tile = new SecondaryTile(
GetTileId(item.Title), // Tile ID
item.Subtitle, // Tile short name
item.Subtitle, // Tile display name
item.UniqueId, // Activation argument
TileOptions.ShowNameOnLogo | TileOptions.ShowNameOnWideLogo, // Tile options
wideLogo // Tile logo URI
);
tile.WideLogo = wideLogo;
bool isPinned = await tile.RequestCreateAsync();
if (isPinned)
{
BackgroundTaskHelper.UpdateSecondaryTile(item, tile);
}
}
}
Note: SecondaryTile constructor requires a Tile ID that has a length not greater than 64. And Tile ID must begin with a number or letter and be composed of the characters a-z, A-Z, 0-9, period (.), or underscore (_). It cannot contain spaces, commas, or any of these characters: | > < " / ? * \ ; : ! '
Once the tile is pinned, we want the user to be able to unpin the tile from the UI. Whenever the user unpins a tile, we will call the UnpinTileButtonClicked event handler and consequently call the DeleteTile method that would delete the tile.
public async static Task DeleteTile(Query item, object sender, Visibility PinTileButton, Visibility UnpinTileButton)
{
//checking if tile has already been pinned
if (SecondaryTile.Exists(GetTileId(item.Title)))
{
SecondaryTile secondaryTile = new SecondaryTile(GetTileId(item.Title));
await secondaryTile.RequestDeleteForSelectionAsync(GetElementRect((FrameworkElement)sender), Windows.UI.Popups.Placement.Above);
}
}
After creating a Secondary tile, you may want to apply a tile template to it. Check out tile templates for more information on it. This is how I update the Secondary tile after creating it:
public static async void UpdateSecondaryTile(Query item, SecondaryTile tile)
{
if (SecondaryTile.Exists(tile.TileId))
{
TileUpdater tileUpdater = TileUpdateManager.CreateTileUpdaterForSecondaryTile(tile.TileId);
XmlDocument tileXml = TileUpdateManager.GetTemplateContent(TileTemplateType.TileSquareBlock);
XmlDocument tileWideXml = TileUpdateManager.GetTemplateContent(TileTemplateType.TileWideBlockAndText02);
XmlElement visualElement = ((XmlElement)tileWideXml.GetElementsByTagName("visual")[0]);
//wide tile setting
XmlElement textElem = (XmlElement)tileWideXml.GetElementsByTagName("text")[0];
textElem.AppendChild(tileWideXml.CreateTextNode(tile.ShortName));
textElem = (XmlElement)tileWideXml.GetElementsByTagName("text")[1];
textElem.AppendChild(tileWideXml.CreateTextNode(item.ActualCount.ToString()));
textElem = (XmlElement)tileWideXml.GetElementsByTagName("text")[2];
textElem.AppendChild(tileWideXml.CreateTextNode("work items"));
// square tile setting
XmlElement textElement = (XmlElement)tileXml.GetElementsByTagName("text")[0];
textElement.AppendChild(tileXml.CreateTextNode(item.ActualCount.ToString()));
textElement = (XmlElement)tileXml.GetElementsByTagName("text")[1];
textElement.AppendChild(tileXml.CreateTextNode(tile.ShortName));
IXmlNode node = tileWideXml.ImportNode(tileXml.GetElementsByTagName("binding").Item(0), true);
visualElement.AppendChild(node);
tileUpdater.Update(new TileNotification(tileWideXml));
}
}
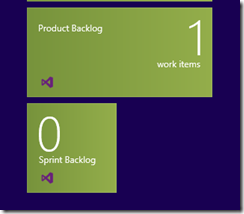
This is how the tile looks in wide and square tile format:
Step 3: Add a WindowsRuntimeComponent project in your solution to create a background task.
Go to your solution in Visual Studio, right click on the solution and click on Add->New Project, select ‘WindowsRuntimeComponent’ and rename the project. I have renamed it to ‘Testing’. And then hit the OK button.
Edit the existing class ‘Class1.cs’ or include a new class file that implements the interface IBackgroundTask. In this sample, I have a TFSTasks class that implements the IBackgroundTask interface. This is how the Run method of the IBackgroundTask is implemented:
//Main Run method which is activated every 15 minutes
public async void Run(IBackgroundTaskInstance taskInstance)
{
// Associate a cancellation handler with the background task.
taskInstance.Canceled += new BackgroundTaskCanceledEventHandler(OnCanceled);
// Because these methods are async, you must use a deferral
// to wait for all of them to complete
BackgroundTaskDeferral deferral = taskInstance.GetDeferral();
ApplicationDataContainer roamingSettings = ApplicationData.Current.RoamingSettings;
//get the authorization details
ApplicationDataCompositeValue composite =
(ApplicationDataCompositeValue)roamingSettings.Values["authorizationCompositeSetting"];
IReadOnlyCollection<SecondaryTile> tiles = await SecondaryTile.FindAllForPackageAsync();
if (composite != null && tiles != null)
{
foreach(SecondaryTile tile in tiles)
{
HttpWebRequest Request = (HttpWebRequest)WebRequest.Create(tile.Arguments + "/WorkItems/$count");
Request.Method = "GET";
Request.Headers["Authorization"] = composite["authHeader"].ToString();
try
{
HttpWebResponse Response = (HttpWebResponse)await Request.GetResponseAsync();
if (Response != null)
{
StreamReader ResponseDataStream = new StreamReader(Response.GetResponseStream());
string response = ResponseDataStream.ReadToEnd();
if (SecondaryTile.Exists(tile.TileId))
{
TileUpdater tileUpdater = TileUpdateManager.CreateTileUpdaterForSecondaryTile(tile.TileId);
XmlDocument tileXml = TileUpdateManager.GetTemplateContent(TileTemplateType.TileSquareBlock);
XmlDocument tileWideXml = TileUpdateManager.GetTemplateContent(TileTemplateType.TileWideBlockAndText02);
XmlElement visualElement = ((XmlElement)tileWideXml.GetElementsByTagName("visual")[0]);
//wide tile setting
XmlElement textElem = (XmlElement)tileWideXml.GetElementsByTagName("text")[0];
textElem.AppendChild(tileWideXml.CreateTextNode(tile.ShortName));
textElem = (XmlElement)tileWideXml.GetElementsByTagName("text")[1];
textElem.AppendChild(tileWideXml.CreateTextNode(response));
textElem = (XmlElement)tileWideXml.GetElementsByTagName("text")[2];
textElem.AppendChild(tileWideXml.CreateTextNode("work items"));
// square tile setting
XmlElement textElement = (XmlElement)tileXml.GetElementsByTagName("text")[0];
textElement.AppendChild(tileXml.CreateTextNode(response));
textElement = (XmlElement)tileXml.GetElementsByTagName("text")[1];
textElement.AppendChild(tileXml.CreateTextNode(tile.ShortName));
IXmlNode node = tileWideXml.ImportNode(tileXml.GetElementsByTagName("binding").Item(0), true);
visualElement.AppendChild(node);
tileUpdater.Update(new TileNotification(tileWideXml));
}
}
}
catch (Exception ex)
{
Debug.WriteLine(ex.Message);
}
}
}
deferral.Complete();
}
The Run method will be activated every 15 minutes. In this method, we look for authorization data in the roaming settings and find all the tiles that are currently pinned. For every tile that exists, we will send an HTTP request to the OData Service for TFS to return the count of WorkItems. For instance, a sample URL like this would return the count of WorkItems existing in a Query identified by GUID - '615dfb1f-e21f-4a8c-b45a-da396feb2c7b':
Include the following using statements in the beginning of your class file.
using Windows.ApplicationModel.Background;
using Windows.Data.Xml.Dom;
using Windows.Storage;
using Windows.UI.Notifications;
using Windows.UI.StartScreen;
Step 4: Add the above WindowsRuntimeComponent to your WindowsStoreApp.
Right click on your App project and click on “Add Reference” and select ‘Testing’ project under the Projects section.
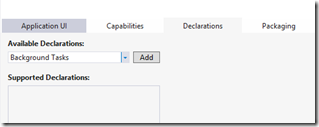
Hit the OK button and the project reference is added to your project. Now double click on the Package.appxmanifest file in the SolutionExplorer and go to the Declarations tab.
Select Background Tasks from the list of ‘Available Declarations’ and hit the Add button.
I have selected ‘System event’ in the ‘Supported task types’ property of the Declarations tab. And I have set the entry point as ‘Testing.TFSTasks’. Note that the entry point has to be entered in the form of ‘<Namespace>.<Classname>’.
Step 5: Register the background task in App.xaml.cs:
public static void CheckIfBackgroundTaskExist()
{
if (BackgroundTaskRegistration.AllTasks.Count < 1)
{
RegisterBackgroundTask();
}
}
//Registering the maintenance trigger background task
public static void RegisterBackgroundTask()
{
BackgroundTaskBuilder builder = new BackgroundTaskBuilder();
builder.Name = "SecondaryTileUpdate";
builder.TaskEntryPoint = "Testing.TFSTasks";
IBackgroundTrigger trigger = new MaintenanceTrigger(15, false);
builder.SetTrigger(trigger);
IBackgroundTaskRegistration task = builder.Register();
}
Before you register, call the CheckIfBackgroundTaskExist() method that checks if the background task is already registered. If your App has more than one background task registered, then you loop through all the tasks and look for the Name property in the value part of theBackgroundTaskRegistration.AllTasks key – value pair to check whether the task you are trying to register already exists. While registering the background task, I have to give a name to the BackgroundTask and provide an entry point. The maintenance trigger is set to 15 minutes. We are almost done here.
Step 6: Activating the App from the tile
If a user clicks on a certain tile on the Start screen, he would expect to be navigated to the related page in your App for that tile. To enable this, in the OnLaunched method of App.xaml.cs, add the following lines of code:
if (!String.IsNullOrEmpty(args.Arguments))
{
((Frame)Window.Current.Content).Navigate(typeof(ItemDetailPage), args.Arguments);
}
Window.Current.Activate();
return;
To summarize, we created and updated Secondary tiles then we wrote background tasks that will update the tiles after an interval of 15 minutes. We registered that background task in our Windows Store App and now we are ready to have fun with Live tiles!!
Comments
- Anonymous
August 28, 2015
challya ni yaar! ki karaa hun main!
