Network Load Balancing Microsoft Dynamics CRM 2013
Deploying Microsoft Dynamics CRM on a Network Load Balanced (NLB) server cluster is a supported way to get increased scalability and performance from your CRM deployment.
In this blog I will walk you through the steps you have to follow to setup CRM 2013 in a NLB mode.
My Infrastructure Details
Before you go about the setup I would suggest you go through the below articles for the best possible configuration.
Network Load Balancing Deployment Guide
Checklist: Preparing to Implement the Cluster
Network Load Balancing Best practices
Network Load Balancing Manager Properties
Step 1: Enable network load balancing
Step 2: Configure Active Directory
Step 3: Install Microsoft Dynamics CRM servers
Step 4: Configure NLB for the deployment
Step 5: Test it out
Step1: Enable network load balancing
1. On CRM1 and CRM2 Add the Network Load balancing feature through the Server Manager.
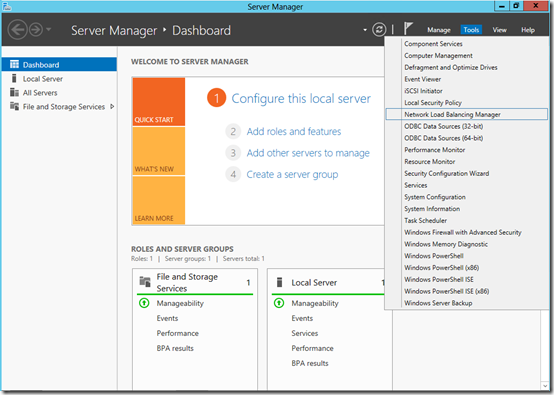
2. Open Network Load Balancing Manager, click Server Manager, click Tools, and then click Network Load Balancing Manager. You can also open Network Load Balancing Manager by typing Nlbmgr at a command prompt.
3. Right-click Network Load Balancing Clusters, and then click New Cluster.
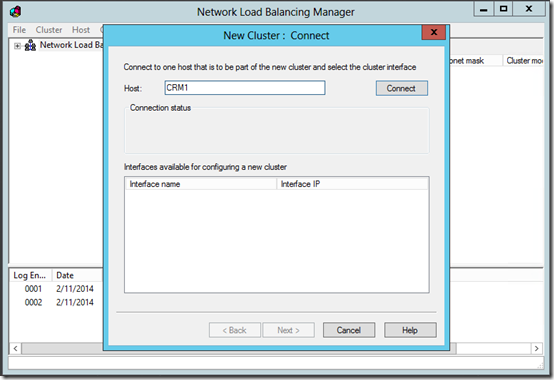
4. To connect to the host that is to be a part of the new cluster, in the Host text box, type the name of the host, and then click Connect.
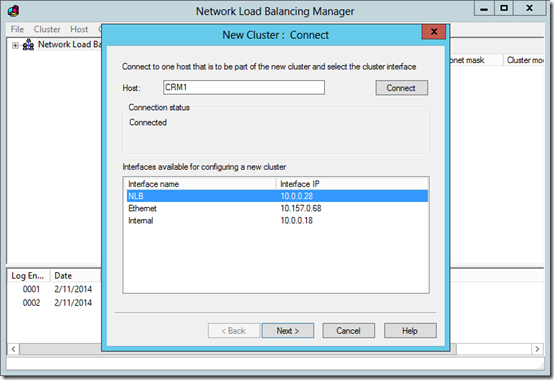
5. Select the interface that you want to use with the cluster, and then click Next. (The interface hosts the virtual IP address and receives the client traffic to load balance.)
6. In Host Parameters, select a value in Priority (Unique host identifier), and provide a Initial host state.
The Priority (Unique host ID) parameter specifies a unique ID for each host. The host with the lowest numerical priority among the current members of the cluster handles all of the cluster's network traffic that is not covered by a port rule. You can override these priorities or provide load balancing for specific ranges of ports by specifying rules in the Port rules tab.
If a new host joins the cluster and its priority conflicts with another host in the cluster, the host is not accepted as part of the cluster. The rest of the cluster will continue to handle the traffic. A message describing the issue is written to the Windows event log.
The IP address parameter specifies this host's unique IP address, which is used for network traffic that is not associated with the cluster .This IP address is used to individually address each host in the cluster, and it should be unique for each host. The dedicated IP address should always be entered first in TCP/IP properties.
The Initial host state parameter specifies whether NLB will start and whether the host will immediately join the cluster when the operating system is started. For example, you might want to start other services manually and in a specific order before starting NLB. Hosts can be commanded to join and leave the cluster dynamically by using the Start and Stop commands in NLB command-line control.
If the Retain suspended state after computer starts check box is selected, when the host is shut down while in a suspended state, the host will remain suspended when Windows is started.
7. In Cluster IP Addresses, click Add and type the cluster IP address that is shared by every host in the cluster. NLB adds this IP address to the TCP/IP stack on the selected interface of all hosts that are chosen to be part of the cluster.
8. In Cluster Parameters, select values in IP Address and Subnet mask. Type the full Internet name that users will use to access this NLB cluster.
The Cluster operation mode parameters specify whether a multicast MAC address should be used for cluster operations.
If multicast is enabled, NLB converts the cluster MAC address that belongs to the cluster adapter into a multicast address. It also ensures that the cluster's primary IP address resolves to this multicast address as part of the ARP protocol. The adapter can now use its original, built-in MAC address that was disabled in unicast mode.
In multicast mode, you can also enable Internet Group Management Protocol (IGMP) support, which limits switch flooding by limiting traffic to Network Load Balancing ports only. That is, enabling IGMP support ensures that traffic intended for an NLB cluster passes through only those ports that are serving the cluster hosts and not all switch ports.
If you select unicast support, NLB automatically instructs the driver that belongs to the cluster adapter to override the adapter's unique, built-in network address and to change its MAC address to the cluster's MAC address. This is the address used on all cluster hosts. You do not need to manually configure the network adapter to recognize this address. (Note that some network adapters do not support changing their MAC addresses. If you experience this issue, you must install a network adapter that does.)
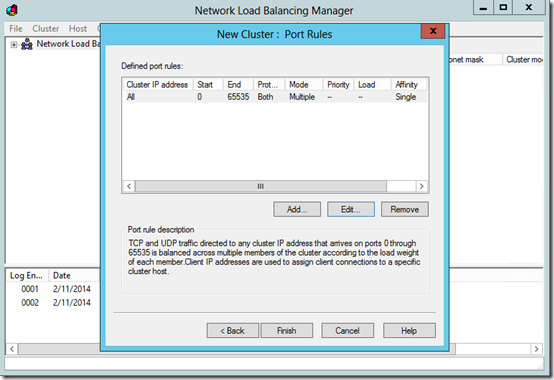
9. On the Port Rules page, click Edit to modify the default port rules if you need advanced rules. Otherwise we recommend that you use the following port-rule settings
- Port range. Leave the default range, which is from 0 to 65535.
- Protocols. Both
- Affinity. Single
10. Click Finish to create the cluster
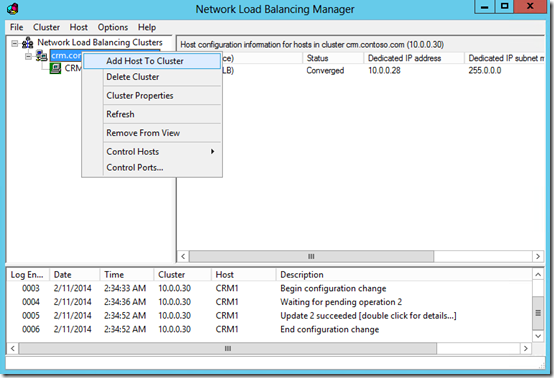
11. To add more hosts to the cluster, right-click the new cluster, and then click Add Host to Cluster.
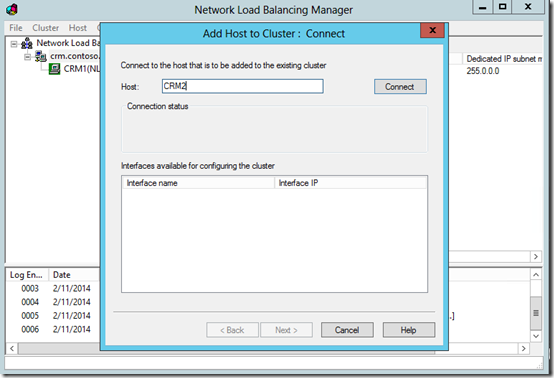
12. Type the name of the host, and then click Connect
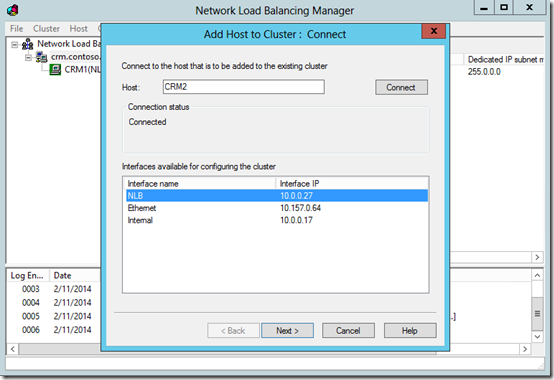
13. Select the interface that you want to use with the cluster, and then click Next.
14. Specify the priority, Initial host state and click on Next
15. On the Port Rules page, click Edit to modify the default port rules if you need advanced rules. Otherwise we recommend that you use the following port-rule settings
- Port range. Leave the default range, which is from 0 to 65535.
- Protocols. Both
- Affinity. Single
16. Click Finish
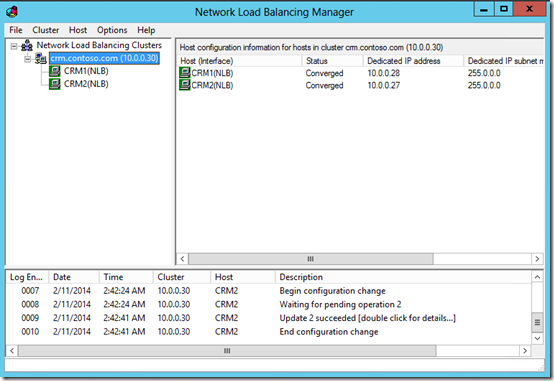
Now your NLB cluster is ready.
Setup IIS on both the machines by adding the WebServer role in Server Manager.
Step 2: Configure Active Directory
Configure Active Directory by creating an account to run the CRMAppPool service and use a Service Principal Name (SPN). Active Directory uses the SPN for mutual authentication of a service instance, which enables the service instance to correctly authenticate when a user attempts to access resources that are located on other domain-member computers.
Create SPN’s
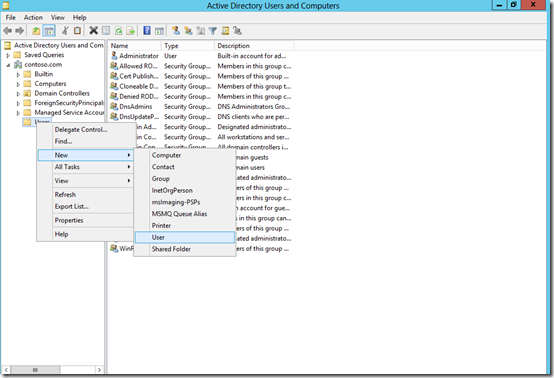
1. Open Active Directory Users and Computers.
2. Create a user account to run the CRMAppPool application pool in IIS. To do this, we recommend that you use a name that describes what the account will be used for, such as CRMService.
3. Provide the password and then finish the wizard.
4. Close Active Directory Users and Computers.
5. Click start, type adsi edit, and then press ENTER.
6. Expand the domain, expand the node that begins with DC= , and then expand CN=Users.
7. Right-click the user account that you created in the previous step, such as CRMService, and then click Properties.
8. In the Attribute list, scroll down, select servicePrincipalName, and then click Edit.
9. In the Value to add box, type HTTP/CRMNLBName. FQDN and then click Add. Where, CRMNLBName, is the NLB cluster name and FQDN is the fully qualified domain name
10. Click OK and exit ADSI Edit
 Important
If IIS is configured to use kernel mode authentication, you must configure IIS to use the Web application pool’s identity for internal virtual directories used by Microsoft Dynamics CRM. You can do so by modifying the windowsAuthentication element for the default Web site on the Web site where Microsoft Dynamics CRM is installed.
To configure useAppPoolCredentials using the ApplicationHost.config file open the ApplicationHost.config file in a text editor. By default, this file is located at %windir%\system32\inetsrv\config\.
For all folders under the Default Web Site location path, set the value of the WindowsAuthentication element and the useAppPoolCredentials attribute to true.
For example:
 <system.webServer>
   <security>
      <authentication>
         <windowsAuthentication enabled="true" useAppPoolCredentials="true" />
      </authentication>
   </security>
</system.webServer>
You can also do this within the IIS Manager by going to IIS Manager-> Configuration Editor and setting the useAppPoolCredentials attribute to true
Step 3: Install Microsoft Dynamics CRM servers
Install the first instance Microsoft Dynamics CRM on CRM1:
1. Run Microsoft Dynamics CRM Setup on server CRM1. For step-by-step guidance see the blog below
2. On the Specify Deployment Options page, select the instance of SQL Server that will be used for the Microsoft Dynamics CRM databases. Then, select the Create a new deployment option. Click Next and continue Setup.
3. On the Specify Security Account page, select the domain user account (for example, CRMService) created previously.
4. Continue to run Setup until the installation is completed.
Install the second instance Microsoft Dynamics CRM on CRM2:
1. Run Microsoft Dynamics CRM Setup on server CRM2.
2. On the Specify Deployment Options page, enter or select the name of the computer that is running SQL Server where the Microsoft Dynamics CRM databases are stored (from the installation of CRM1), and then click Connect to, and if necessary, upgrade an existing deployment. Click Next.
3. On the Specify Security Account page, select the domain user account (for example, CRMService) created previously.
4. Continue to run Setup until the installation is completed.
Step 4: Configure NLB for the deployment
After the Microsoft Dynamics CRM Server 2013 installations are complete, run Deployment Manager to configure NLB for the deployment.
Verify or change the Web addresses
On the Microsoft Dynamics CRM server, start Deployment Manager.
In the console tree, right-click Microsoft Dynamics CRM, and then click Properties.
Click the Web Address tab and make sure that the virtual cluster name, such as crm.contoso.com:80 appears.

Set NLB for the deployment
On the Microsoft Dynamics CRM server, start Deployment Manager.
In the console tree, right-click Microsoft Dynamics CRM, and then click Properties.
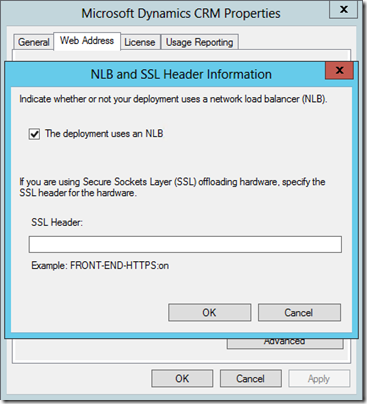
Click the Web Address tab and then click Advanced.
In the NLB and SSL Header Information dialog box, specify if you are using network load-balancing (NLB) and the header for the Secure Sockets Layer (SSL) offloading system.
To make Microsoft Dynamics CRM aware of the NLB cluster, you must select The deployment uses an NLB option. Selecting The deployment uses an NLB sets Microsoft Dynamics CRM to configure Windows Identity Foundation (WIF) to use the encryption certificate to encrypt, decrypt, and sign the Microsoft Dynamics CRM session authentication cookies. The encrypted cookies can then be processed by any server in the NLB cluster.
Click OK and then close Deployment Manager.
Step 5: Test it out
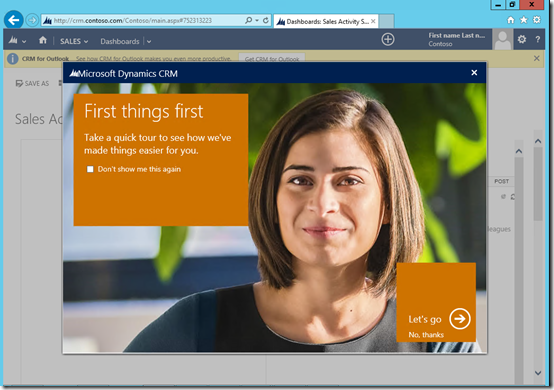
Browse https://crm.contoso.com and you should see the CRM Page appear.
I hope this article has been helpful.
Comments
Anonymous
June 18, 2014
Great article Niran! Thanks a lot for this clearly illustrated guide. :)Anonymous
June 23, 2014
The comment has been removedAnonymous
November 03, 2014
Great article! Quick question, though. What if I decide to go load-balancing after the initial deployment of CRM1? My concern is around the SPNs. Does the actions change if I have to perform them retroactively? Regards, P.


