Using hierarchical page navigation and MVVM in Xamarin Forms
In this post I’ll explain how to use hierarchical page navigation in a Xamarin Forms application. To demonstrate this, we’ll use the Xamarin Alliance template application, that we use in the Xamarin Alliance program. This program consists of a set of coding challenges to get hands-on experience with Xamarin and Azure to build connected mobile applications.
If you’ve never used Xamarin before, make sure to check the first challenge of the Xamarin Aliance, where you’ll set up your developer machine to get started. If you already have your developer machine set up, you can just download the source code from the GitHub repo to follow along.
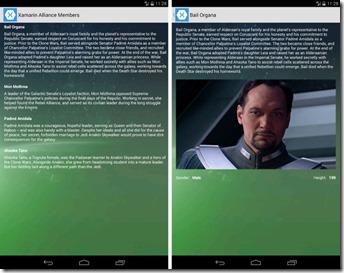
Here you can see a screenshot of what we’ll be building - a main page that contains a list of Star Wars characters and a detail page that shows the details for the selected character.
Hierarchical Page Navigation
Xamarin Forms has multiple ways to implement page navigation:
In this post I’ll explain how to leverage hierarchical page navigation – for more details on other navigation experiences, you can check the online documentation.
The hierarchical page navigation implements the page navigation as a stack, where you push pages onto a stack to navigate forwards and pop off the last page on the stack to navigate backwards (LIFO – last in, first out).
To implement this navigation model, we make use of the NavigationPage class, that allows navigating through a stack of ContentPage objects. Out of the box, the NavigationPage already adds some navigation UX to your application: a page icon, title and back button. And the nice thing is that Xamarin Forms makes sure this matches the specific paradigms of the different mobile OSes.
Setting the main page
The first step in adding hierarchical page navigation to your app is to change the app’s main page to be a NavigationPage instead of a ContentPage– this is done in the App.cs file:
[csharp]
public App()
{
// The root page of your application
MainPage = new NavigationPage(new CharacterListPage());
}
[/csharp]
You notice that in the NavigationPage constructor we pass in a new instance of the CharacterListPage class to immediately set the root page for the app. The CharacterListPage is of type ContentPage.
[csharp]
public partial class CharacterListPage : ContentPage
[/csharp]
Adding a detail page
So far we have a NavigationPage which has just a root page that is our CharacterListPage, showing the list of Star Wars characters. We now need to add a detail page for displaying the selected character. In addition, we need to implement the navigation from the root page to the detail page.
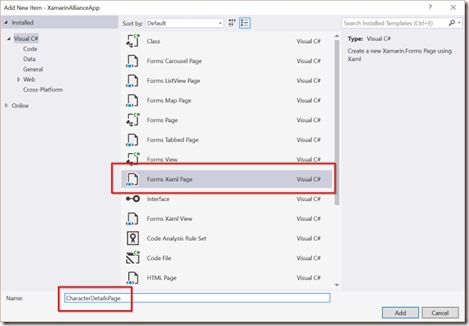
The detail page is of type ContentPage and can be created by adding a new item of type Forms Xaml Page and name it CharacterDetailPage:
Navigate to the detail page
Our main page contains a ListView of characters and upon tapping one of them, we need to navigate to the detail page, showing the details of the selected item. The first step to achieve this is to handle the ItemSelected event on the ListView. You could do this entirely programmatically in the code-behind CharacterListPage or use both XAML and code-behind.
To programmatically handle the event, update the constructor of the CharacterListPage (CharacterListPage.xaml.cs); in a second step we’ll add the actual event handler code to this file.
[csharp highlight="5"]
public CharacterListPage()
{
InitializeComponent();
// Programmatically handle the ItemSelected event on the ListView
characterList.ItemSelected += OnItemSelected;
BindingContext = viewModel = new CharacterListViewModel();
}
[/csharp]
To declaratively handle the event in XAML, modify the CharacterListPage.xml file and add the ItemSelected attribute:
[xml highlight="5"]
<ListView x:Name="characterList"
ItemsSource="{Binding Items}"
RefreshCommand="{Binding LoadItemsCommand}"
IsRefreshing="{Binding IsBusy, Mode=OneWay}"
ItemSelected="OnItemSelected"
IsPullToRefreshEnabled="True"
HasUnevenRows="true"
Grid.Row="1">
<ListView.ItemTemplate>
<DataTemplate>
<ViewCell>
<StackLayout HorizontalOptions="Start" Orientation="Vertical" Padding="15,5,5,15" >
<Label Text="{Binding Name}" Style="{StaticResource LabelHeaderStyle}" />
<Label Text="{Binding Biography}" Style="{StaticResource LabelNormalStyle}" />
</StackLayout>
</ViewCell>
</DataTemplate>
</ListView.ItemTemplate>
</ListView>
[/xml]
Regardless of how you handle the ItemSelected event, we still need to implement the event handler to perform the actual navigation action. In the CharacterListPage.xaml.cs file, we add the OnItemSelected event handler:
[csharp]
async void OnItemSelected(object sender, SelectedItemChangedEventArgs args)
{
var item = args.SelectedItem as Character;
if (item == null)
{
// the item was deselected
return;
}
// Navigate to the detail page
await Navigation.PushAsync(new CharacterDetailPage(new CharacterDetailViewModel(item)));
// Manually deselect item
characterList.SelectedItem = null;
}
[/csharp]
You notice that we first check if the selected item is not null – the reason for this is that the ItemSelected event is also invoked when an item deselected from the ListView.
To navigate to the detail page, we use the Navigation.PushAsync method, passing in a new instance of the detail page: CharacterDetailPage. The PushAsync method will push the detail page on the navigation stack so that it becomes the active page, sitting on top of the root page in the stack. To navigate backwards we’ll use the corresponding PopAsync method to remove the topmost page from the stack and make the previous page the active one.
How does the detail page know about the selected item? This is achieved by passing this information through the constructor of the CharacterDetailPage. In the next section, we’ll go into more detail about using MVVM. For now, know that conceptually we pass the selected item to the detail page.
Using MVVM
MVVM or Model-View-ViewModel is an architectural pattern that helps in separating the development of the user interface (XAML in our example) from the business logic that drives the user interface. The Model refers to the domain model and represents the state (e.g. Character or Movie in our example). The View refers to the presentation of the information contained in the models (in our example this refers to the XAML pages). Finally, the ViewModel is responsible for converting the data in the model in such a way that it can be represented by the views. It also acts as a mediator to organize the access to the backend logic – in our example we have a viewmodel for each of the two pages.
In our example the view and viewmodel communicate with each other by leveraging XAML based data-binding. For our viewmodels, which are basically just classes, to act as a data binding source, they need to implement a notification protocol: INotifyPropertyChanged. When the view then adds a data binding on the viewmodel, the view will be notified when data changes in the viewmodel and can update the display. You can read more about MVVM and data binding in Xamarin Forms in the online documentation.
In our example we have 2 viewmodels: CharacterListViewModel and CharacterDetailViewModel. To avoid code duplication across viewmodels, these classes derive from a BaseViewModel class, which in turn derives from ObservableObject class. The latter one implements a generic way to add INotifyPropertyChanged to all properties of a class. Check out the source code for the actual imlementation of these base classes.
The CharacterListViewModel contains the Items collection of Character objects that the ListView in the root page will data bind on. In addition, you notice the LoadItemsCommand property; this is used for invoking a method by the view on the viewmodel through data binding. In this case, it is used for refreshing the ListView.
[csharp]
public class CharacterListViewModel : BaseViewModel
{
CharacterService service;
public ObservableRangeCollection<Character> Items { get; set; }
public Command LoadItemsCommand { get; set; }
public CharacterListViewModel()
{
service = new CharacterService();
Items = new ObservableRangeCollection<Character>();
LoadItemsCommand = new Command(async () => await ExecuteLoadItemsCommand());
}
async Task ExecuteLoadItemsCommand()
{
if (IsBusy)
return;
IsBusy = true;
try
{
Items.Clear();
var items = await service.GetCharactersAsync();
Items.ReplaceRange(items);
}
catch (Exception ex)
{
Debug.WriteLine(ex);
}
finally
{
IsBusy = false;
}
}
}
[/csharp]
The viewmodel for the details page is very simple – through the Item property it exposes a single Character object, which is the item that was selected in the root page.
[csharp]
public class CharacterDetailViewModel : BaseViewModel
{
public Character Item { get; set; }
public CharacterDetailViewModel(Character item = null)
{
Title = item.Name;
Item = item;
}
}
[/csharp]
Now that we have our viewmodels defined, we need to data bind the views to them. We do so by setting the BindingContext in the ContentPages.
[csharp highlight="7"]
private CharacterListViewModel viewModel;
public CharacterListPage()
{
InitializeComponent();
BindingContext = viewModel = new CharacterListViewModel();
}
[/csharp]
[csharp highlight="7"]
CharacterDetailViewModel viewModel;
public CharacterDetailPage(CharacterDetailViewModel viewModel)
{
InitializeComponent();
BindingContext = this.viewModel = viewModel;
}
[/csharp]
In the XAML page we can then refer to the indivual properties of the viewmodel by using the {Binding} syntax:
[xml highlight="2-4,13-14"]
<ListView x:Name="characterList"
ItemsSource="{Binding Items}"
RefreshCommand="{Binding LoadItemsCommand}"
IsRefreshing="{Binding IsBusy, Mode=OneWay}"
ItemSelected="OnItemSelected"
IsPullToRefreshEnabled="True"
HasUnevenRows="true"
Grid.Row="1">
<ListView.ItemTemplate>
<DataTemplate>
<ViewCell>
<StackLayout HorizontalOptions="Start" Orientation="Vertical" Padding="15,5,5,15" >
<Label Text="{Binding Name}" Style="{StaticResource LabelHeaderStyle}" />
<Label Text="{Binding Biography}" Style="{StaticResource LabelNormalStyle}" />
</StackLayout>
</ViewCell>
</DataTemplate>
</ListView.ItemTemplate>
</ListView>
[/xml]
[xml highlight="1,4,8"]
<Image Source="{Binding Item.ImageUrl}" />
<StackLayout>
<Label Text="Biography:" Style="{StaticResource LabelHeaderStyle}" />
<Label Text="{Binding Item.Biography}" Style="{StaticResource LabelNormalStyle}" />
</StackLayout>
<StackLayout Orientation="Horizontal">
<Label Text="Gender: " Style="{StaticResource LabelHeaderStyle}" />
<Label Text="{Binding Item.Gender}" Style="{StaticResource LabelNormalStyle}"/>
</StackLayout>
[/xml]
Now that we have the different pieces in place we can run the application. You should see something similar to the image below. In the main page you'll see the page title and icon and when you tap on one of the items in the list, you'll navigate to the details page. The details page also shows the page title, as well as a back button that allows returning to the previous page.
You notice that we didn't have to implement any code to navigate back to the previous page. Is functionality is built into the NavigationPage, which provides the UI and implementation logic. If you want to provide an explicit way of navigating back, you'd have to invoke the Navigation.PopAsync method to do so.
Next steps
- Download the completed source code from GitHub.
- Join the Xamarin Alliance coding challenges to learn more about building connected mobile apps.
- Check out the free Xamarin Forms eBook.
Comments
- Anonymous
November 30, 2017
It's not really MVVM. In the file xaml.cs there should be no logic, as I understand it, but in general, the example is not bad- Anonymous
December 01, 2017
Agree that a pure MVVM solution would have no logic at all in the code behind file. For the sake of simplicity of the example, I've decided to keep the navigation logic itself in the code-behind. However, you could use an EventToCommandBehavior on the ListView, as described here https://developer.xamarin.com/guides/xamarin-forms/enterprise-application-patterns/mvvm/#Invoking_Behaviors_from_a_View
- Anonymous
- Anonymous
March 17, 2018
This is a good example and it helped me out. I have looked for examples where Navigation is handled within the View Model and I have not come across one thus far that didn't required using an additional framework. I believe MVVM is great for binding data from the view model as you have pointed out but handling navigation is some what lacking from within the view model itself. Again you showed case what I suspected. I am not really sure if putting Navigation within the viewmodel is the most productive way to code. Thank you for your example. - Anonymous
April 21, 2018
not so good, you avoid all real hard work " navigating in viewModel"

