How to use C++ AMP from C++ CLR app
Hello, my name Joe Mayo and I am an engineer on the C++ AMP team. I have over a decade of experience working with C# and .NET and in the past couple years have gained experience working with C++ in the GPU space. When I joined the C++ AMP team I was pleased to see how the technology had addressed many of my concerns with bringing GPU programming to the mainstream. While my previous industry years have mostly been spent using .NET, I have come to embrace the power and efficiency of native code and enjoy finding the balance between native and managed code.
Igor Ostrovsky has shown how you can use P/Invoke from C# to call into a native dll library implemented using C++ AMP. He also followed it up with showing how to use C++ AMP from C# using WinRT.
In my first blog post I will show how to utilize C++ AMP from a project written using C++/CLI.
C++ AMP and /clr
The /clr switch tells the compiler that the code is to be run on the common language runtime (CLR) and implies that the code is written to the C++/CLI standard. Visual Studio sets this switch when you create a C++ CLR application or class library.
C++ AMP is not supported when compiling with /clr and thus can only be used from native code.
Workaround Overview
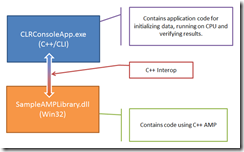
There are many ways in which one can organize their code, libraries and APIs to have robust flexibility when calling from a managed environment to execute code using C++ AMP. I will show one way of organizing projects by separating native code from managed code.
The Win32 DLL project will host only native code where C++ AMP may be used without restraints. In this library we will define a simple vector addition function that operates on large vectors (large_vector_add).
The C++ CLR Console Application will randomly generate each input vector, run the vector addition function using the native library and using a managed CPU implementation and then verify the results. To call the native library we will use a technique called C++ Interop. As mentioned in Performance Considerations for Interop (C++):
“C++ Interop is preferred over P/Invoke because P/Invoke is not type-safe. … C++ Interop also has performance advantages over P/Invoke.”
The marshaling of the CLR arrays to a native type will be done by pinning the managed arrays and passing pointers to them into the native function call.
Below I give instructions on how to setup the two projects. You should first download the code for this post and extract it so you can copy the code files.
Create a C++ DLL project which uses C++ AMP
Create a new Win32 Project and name it SampleAMPLibrary. In the Win32 Application Wizard be sure to select the radio button that says “DLL” and check the box for “Empty project”.
This will create a basic DLL project without any initial files and doesn’t use Precompiled headers. The reason I’m not using precompiled headers here is to keep the library project simpler.
Add a shared library header
Next we’ll create a header file that can be used from within the dll project to declare the exported API and also serve as the header file that can be consumed by a project using it. Why maintain two files when you don’t have to, right?
Add the library’s shared header file located at: CppCLR_referencing_CppAMP\SampleAMPLibrary\sample_amp_library.h
Here we’ve defined two overloaded C++ static functions (called large_vector_add) that perform the addition for two large vectors and returns the result in result.
Also, at the top of the file you’ll find the following code:
 #ifdef SAMPLEAMPLIBRARY_EXPORTS
#define SAMPLEAMPLIBRARY_API __declspec(dllexport)
#else
#define SAMPLEAMPLIBRARY_API
#endif
When you create a native DLL project, Visual Studio sets the project settings to declare a preprocessor definition in the form: [PROJECTNAME]_EXPORTS. In our case: SAMPLEAMPLIBRARY_EXPORTS. We use this macro to control whether we should be exporting the declarations or just linking.
Add the library code
Next, add the file providing the implementation of our library located at: CppCLR_referencing_CppAMP\SampleAMPLibrary\sample_amp_library.cpp
You’ll notice I’m using a template function to handle the actual implementation since the logic of the function is the same no matter what the actual data type of the input arrays is. The details of the C++ AMP code in the function large_vector_add should be quite self-explanatory if you’ve seen the other C++ AMP samples in our previous blog posts. I won’t cover the details here as it’s not the point of this blog post.
Create C++ CLR Console project
Next, create a new C++ CLR Console Project called: CLRConsoleApp
- Right-Click on the solution node in Solution Explorer and click Add -> New Project
- Select Visual C++ -> CLR -> CLR Console Application
- Enter CLRConsoleApp for the Name and click OK.
This will create a project with a bunch of files and automatically open up the cpp file with the program’s entry point with some boiler plate code that prints out “Hello World” to the console.
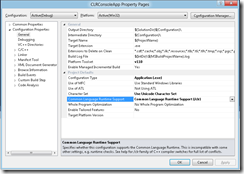
Again, by choosing a C++ CLR project, Visual Studio 2012 has created a project where it is compiled with the /clr command line argument. This is controlled by a setting in the project’s properties as shown below:
This makes all *.cpp files compile with C++/CLI by default. Therefore, no C++ AMP code can appear in these cpp files.
Add reference to C++ library project
To use any Win32 dll in a C++ CLR project all you need to do is add a reference to the project or the dll’s location. Since the library is in the same solution we’ll just add a reference to it.
- Right-click on the CLRConsoleApp project and go to References
- Click “Add New Reference…”
- Select the SampleAMPLibrary project and click “Add”
- Click “Close” to close the “Add Reference” dialog box.
- Click “OK” to save the changes in the project properties dialog.
By adding this reference Visual Studio handles adding SampleAMPLibrary.lib to the compiler arguments with its relative path.
Add library header to include path
Next, to use the library in code we need to make sure the compiler can find the shared header file when we include it. This can be accomplished using one of the following options:
- Specify the header path relative to the cpp file including it. This doesn’t make things very robust if files move around.
- Add the relative path to the folder containing the header file to the application project’s Additional Include Directories settings.
For cleanliness of code I prefer to use option 2.
- In the project properties for the CLRConsoleApp project navigate to Configuration Properties -> C/C++ -> General
- For “Additional Include Directories” enter: ..\SampleAMPLibrary;%(AdditionalIncludeDirectories)
Here we added the relative path (relative to the application project’s vcxproj file) to the folder containing the library’s header file. The relative path is more robust than a full path.
Note, this must be done for all configurations of the project (Debug and Release) so you must do the same thing all configurations.
- Navigate to the “Configurations” drop-down list and add the same include path to Release configuration.
- Click OK to save your settings and dismiss the dialog.
Add code using the library API
Now we’re ready to use the native library in the application.
- Delete the existing CLRConsoleApp.cpp in the project.
- Add the new CLRConsoleApp.cpp from the downloaded code located at: CppCLR_referencing_CppAMP\CLRConsoleApp\CLRConsoleApp.cpp
This new file performs a simple test of the large_vector_add function in the SampleAMPLibrary using the following general steps:
- Randomly generate input data
- Perform addition on the GPU via the SampleAMPLibrary
- Perform addition on the CPU
- Verify the GPU results are the same as the CPU results
This pattern of executing an algorithm using both a C++ AMP implementation and a CPU implementation and then comparing the results is a great way to test the correctness of a library using C++ AMP.
Near the top of the file you’ll find a function large_vector_add which uses CLR data types in its signature. This function is a wrapper around the call to the native library’s large_vector_ add function and handles the memory management between managed and native:
 template<typename T>
array<T>^ large_vector_add(array<T>^ vecA, array<T>^ vecB) {
   if(vecA == nullptr || vecB == nullptr)
      throw gcnew ArgumentNullException();
   if(vecA->Length != vecB->Length)
      throw gcnew ArgumentException("The length of both vectors should be equal.");

   // Create a managed array for the results
   int num_elements = vecA->Length;
   array<T>^ result = gcnew array<T>(num_elements);

   {
      // Need pinned pointers to pass to the native layer so the arrays don't
      // get moved by the GC
      pin_ptr<const T> vecA_ptr = &vecA[0];
      pin_ptr<const T> vecB_ptr = &vecB[0];
      pin_ptr<T> result_ptr = &result[0];

      // Use the native c++ library which uses C++ AMP
      my_math::large_vector_add(vecA_ptr, vecB_ptr, result_ptr, num_elements);

      // The arrays will get unpinned when we exit from the scope.
   }

   return result;
}
This is a simple example of C++ Interop by pinning the managed memory using a pin_ptr (so it doesn’t get moved by the GC) and passing the pointers to the native library function (my_math::large_vector_add). Note that the C++/CLI compiler will resolve the type parameters when used. The sample library’s my_math::large_vector_add function defines overloads for only two element types, namely int and float. If we were to call the managed function where the element type was not one of these two types then the C++/CLI compiler would generate an error. This is one of the benefits over using P/Invoke.
Compile and run
Now we are ready to run the console application.
First we need to make sure the solution is set to run the correct project: Right-click the CLRConsoleApp project and click on “Set as StartUp Project”.
When you press F5, the solution will compile and then run the CLRConsoleApp. You should see the following output to the console:
Summary
What I’ve shown is how to create a native Win32 dll that uses C++ AMP to provide its implementation but doesn’t expose this detail thru its API. Next, I showed how to setup a new C++ CLR Console application project to reference the Win32 library by pinning the managed memory and passing pointers into the native calls. The CLR Console application also shows a way of testing our library function against a CPU implemented version of the same algorithm.
This is only one of many ways to use C++/CLI with C++ AMP, if you prefer an alternative approach I’d love to hear it in the comments below!
Comments
- Anonymous
March 17, 2012
Nice example. Have you more examples ? :-)


