Infrastructure as Code
Editor's note: The following post was written by Visual Studio and Development Technologies MVP Peter Groenewegen *Microsoft Azure MVP Pascal Naber as part of our Technical Tuesday series. Simon Timms of the Technical Committee served as the Technical Reviewer of this piece. *
Your team is in the process of developing a new application feature, and the infrastructure has to be adapted. The first step is to change a file in your source control system that describes your infrastructure. When the changed definition file is saved in your source control system it triggers a new build and release. Your new infrastructure is deployed to your test environment, and the whole process to get the new infrastructure deployed took minutes while you only changed a definition file and you did not touch the infrastructure itself.
Sounds great, right? This is “Infrastructure as Code.” In this article we will explain what Infrastructure as Code (IaC) is, the problems it solves, and how to apply it with Visual Studio Team Services (VSTS).
Manual Infrastructure deployment
We have radically changed the way our infrastructure is treated. Before the change to IaC it looked like this:
Our Operations team was responsible for the infrastructure of the application. That team is very busy because of all their responsibilities, so we have to request changes to the infrastructure well ahead of time.
The infrastructure for the Development, Testing, Acceptance and Production (DTAP) environments was partially created by hand and partly by using seven PowerShell scripts. The order in which the scripts are executed is important and there is only one IT-Pro with the required knowledge. Those PowerShell scripts must be run by multiple people and are located on local machines. The other part of the scripts is stored on a network share so every IT-pro can access it. In the course of time many different versions of the PowerShell scripts are created because it depends on the person who wants to execute it and the project it is executed for.
The configuration of the environment is also done by hand. 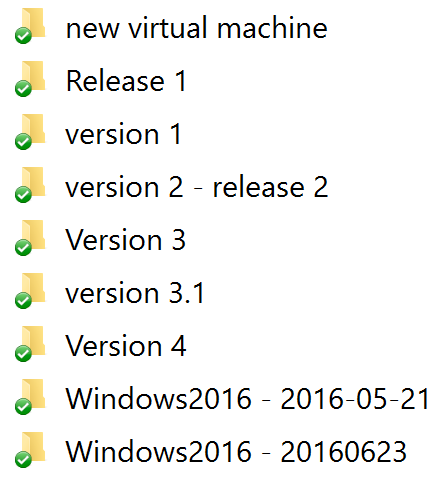
Figure 1, A typical network share
This process creates the following problems:
- Changes take too long before being applied.
- The creation of the environment takes a long time and is of high risk, as the manual steps can be easily forgotten.
- The order of the PowerShell scripts is important, and only a single person knows about the order.
- What’s more, the scripts are executed at a particular point in time and they are updated regularly. However, it is unclear whether the environment will be the same when created again.
- Some scripts are on the work machine of the IT-Pro, sometimes because it’s the person’s expertise area, and sometimes because the scripts are not production code. In either case, nobody else has access to it.
- Some scripts are shared, but many versions of the same script are created over time. It’s not clear what has changed, why it was changed and who changed it. It’s also not clear what the latest version of the script is. (See figure 1)
- The whole process of deploying infrastructure is pretty much trial and error.
As you can see, the creation of infrastructure is an error-prone and risky operation that needs to change in order to deliver high-quality, reproducible infrastructure.
Definition of Infrastructure as Code: Infrastructure as Code is the process of managing and provisioning computing infrastructure and its configuration through machine-processable definition files. It treats the infrastructure as a software system, applying software engineering practices to manage changes to the system in a repeatable, structured and safe way.
Infrastructure as Code characteristics
Our infrastructure deployment example has the following infrastructure provisioning characteristics, which will be explained in the following paragraphs:
- Declarative
- Single source of truth
- Increase repeatability and testability
- Decrease provisioning time
- Rely less on availability of persons to perform tasks
- Use proven software development practices for deploying infrastructure
- Repeatable and testable
- Faster to provision
- Idempotent provisioning and configuration (calls can be executed repeatedly while producing the same result)
Declarative
A practice in Infrastructure as Code is to write your definitions in a declarative way versus an imperative way. You define the state of the infrastructure you want to have and let the system do the work on getting there. In the Azure Cloud, the way to use declarative code definition files are ARM templates. The templates define what you want to deploy. Besides the native tooling you can use a third-party tool like Terraform to deploy declarative files to AzureRM. PowerShell scripts use an imperative way, the code defines how you want to deploy. In PowerShell you specify how you want to reach your goals. 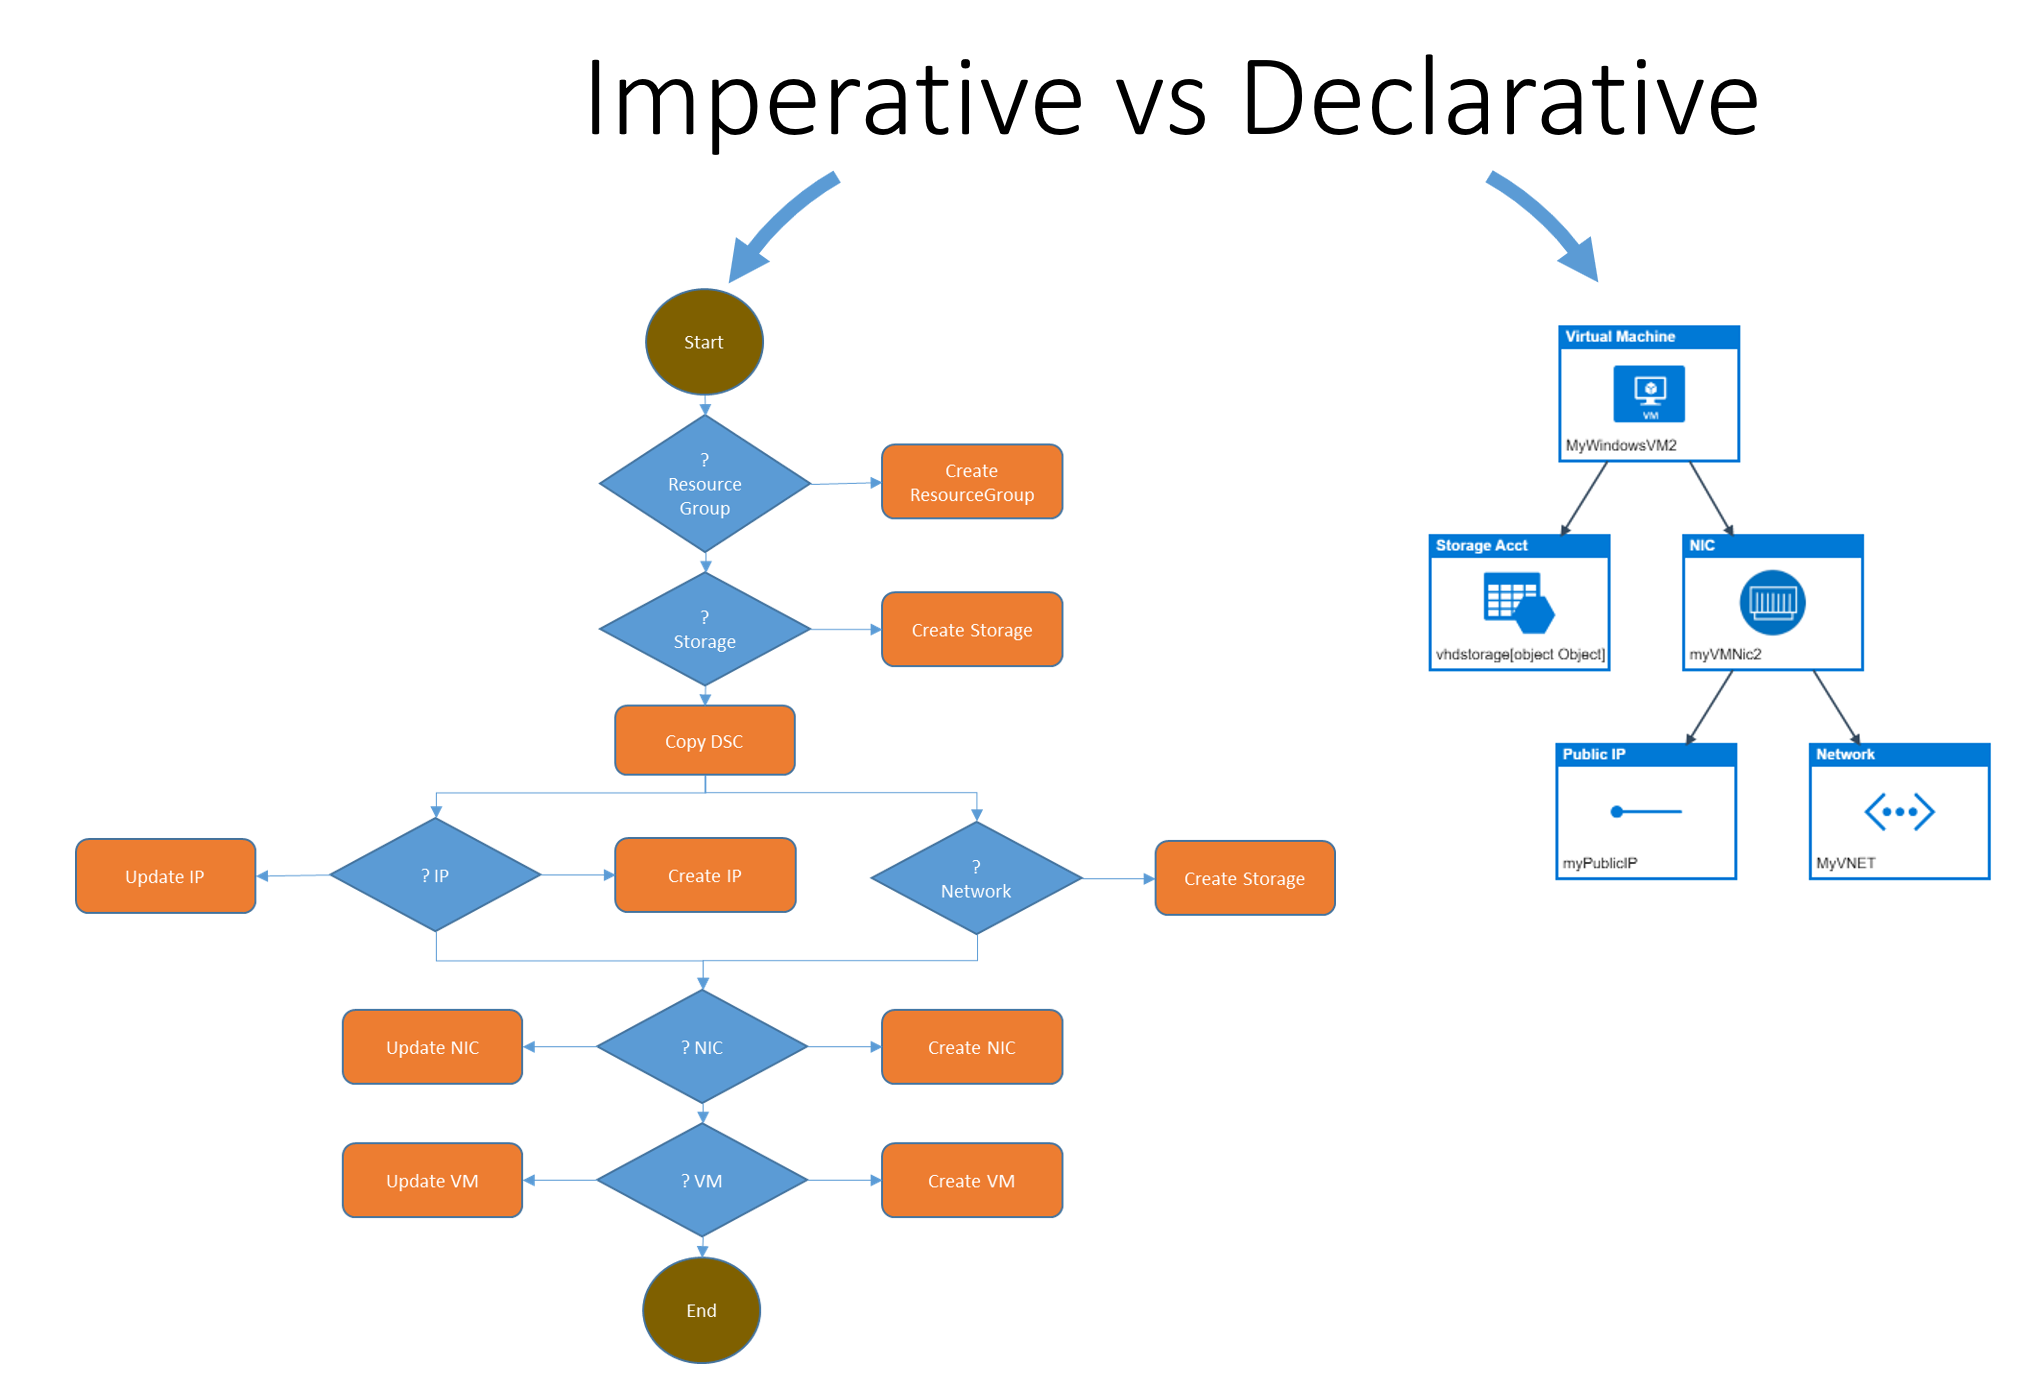
Figure 2, Schematic visualization of Imperative vs Declarative
Single source of truth 
The infrastructure declaration files are placed in a source control repository. This is the single source of truth. All team members can see and work on the files and start their own version of the infrastructure. They can test it, and then commit changes to source control. All changes are under version control and can be linked to work items. The source control repository gives insight into what is changed and by whom. The link to the work item can tell you why it was changed. It’s also clear what the latest version of the file is through source control. Team members can easily work together on the same file. When a file is accepted, a build can be started to verify the quality.
Increase repeatability and testability
When a change to source control is pushed, this initiates a build that can test the change and after that publish an artifact. That will trigger a release which deploys your infrastructure. Infrastructure as Code makes your process repeatable and testable. After deploying your infrastructure, you can run standard tests to see if the deployment is correct. Changes can be deployed and tested in a DTAP pipeline. This makes your process of deploying infrastructure reliable, and when you redeploy, you will get the same environment time after time.
Decrease provisioning time
Everything is automated to create the infrastructure. This results in short provisioning times. In many cases a deployment to a cloud environment has a lead time of 5 to 10 minutes, compared to a deployment time of days, weeks or even months. This is accomplished by skipping manual tasks and waiting time in combination with high-quality, proven templates. The automation creates an environment that should not be touched by hand. Each time a change is made by hand, it is not tested and the environment can be recreated with automation. The infrastructure should be handled like cattle instead of pets*. In case of problems there is no need to log on to infrastructure to see what is going wrong and trying to find the problem and fix it. Just delete the environment and redeploy the infrastructure to get the original working version. 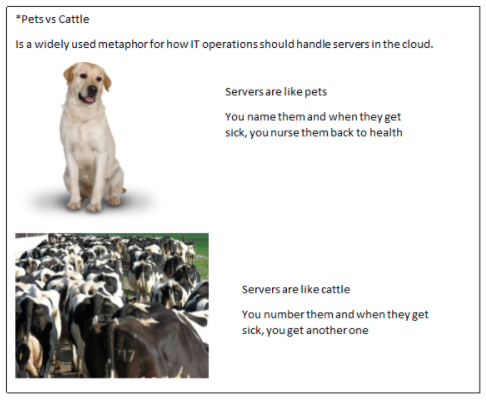
Rely less on availability of persons to perform tasks
In our team, everybody can change and deploy the infrastructure. This removes the dependency on a separate operations team. By having a shared responsibility, the whole team cares and is able to optimize the infrastructure for the application. This will result in more efficient usage of the infrastructure deployed by the team. Operations is now spending more time on developing software than on configuring infrastructure by hand. Operations is moving more to DevOps.
Use proven software development practices for deploying infrastructure
When applying Infrastructure as Code you can use proven software development practices for deploying infrastructure. Handing your infrastructure in the same way you handle your code, helps you to streamline the whole process. You can start and test your infrastructure on each change. Using Source control as a team is a must. The sources that it contains should always be in the state in which they can be executed. Besides the deployment scripts, you also keep the tests for the infrastructure in source control. You can write the tests that check the infrastructure deployments with Pester. Pester is a Powershell unit test framework.
Idempotent provisioning and configuration
Creating an idempotent provisioning and configuration for provisioning will enable you to rerun your releases at any time. ARM Templates are idempotent. This means that every time they will be executed the result will be exactly the same. The configuration is set to what you have configured in your definitions. Because the definitions are declarative, you do not have to think about the steps on how to get there; the system will figure this out for you.
Creating an Infrastructure as Code pipeline with VSTS
There are many tools you can use to create an Infrastructure as Code pipeline. In this sample we will show you how to create a pipeline which deploys an ARM template with a Visual Studio Team Service (VSTS) build and release pipeline. The ARM Template will be placed in a Git repository in VSTS. When you change the template, a build is triggered, and the build will publish the ARM template as an artifact. Subsequently, the release will deploy or apply the template to an Azure Resource group. 
Figure 3, Visual Studio Team Service source control, build and release
Prerequisite
To start building Infrastructure as Code with VSTS you need a VSTS account. If you don’t have a VSTS account, you can create one at https://www.visualstudio.com. This is free for up to 5 users. Within the VSTS Account you create, you then create a new project with a Git repository. The next step is to get some infrastructure definition pushed to the repository.
ARM template
ARM templates are a declarative way of describing your infrastructure. ARM templates are json files that describe your infrastructure and can contain 4 sections: parameters, variables, resources and output. To get started with ARM templates you can read “Resource Manager Template Walkthrough”.1
It is possible to create ARM templates yourself by choosing the project type Cloud → Azure Resource Group in Visual Studio. Another possibility is to download the ARM template of your manually created resoures in a resourcegroup in the Azure Portal. The community has already created a lot of templates that you can reuse or take as a good starting point. The community ARM templates can be found on the “Azure Quickstart Templates”.2 Download them as starting point for your deployments.
ARM templates are supported on Azure and also on-premise with Microsoft Azure Stack.
In our example we want to deploy a Web App with a SQL Server database. The files for this configuration are called “201-web-app-sql-database”.3 Download the ARM template and parameter files and push them in your Git source control repository in your VSTS project. 
Figure 4, ARM template in Git
1 Resource Manager Template Walkthrough https://xpir.it/mag3-iac1 .
2 Azure Quickstart Templates https://xpir.it/mag3-iac2
3 201-web-app-sql-database https://xpir.it/mag3-iac3
VSTS Build
Now you are ready to create the build. Navigate to the build tab in VSTS and add a new build. Use your Git repository as the source. Make sure you have Continuous Integration turned on. This will start the build when code is pushed into the Git repository. As a minimum, the build has to publish your files to an artifact called drop. To do this, add a Copy Publish Artifact step to your build and configure it like this: 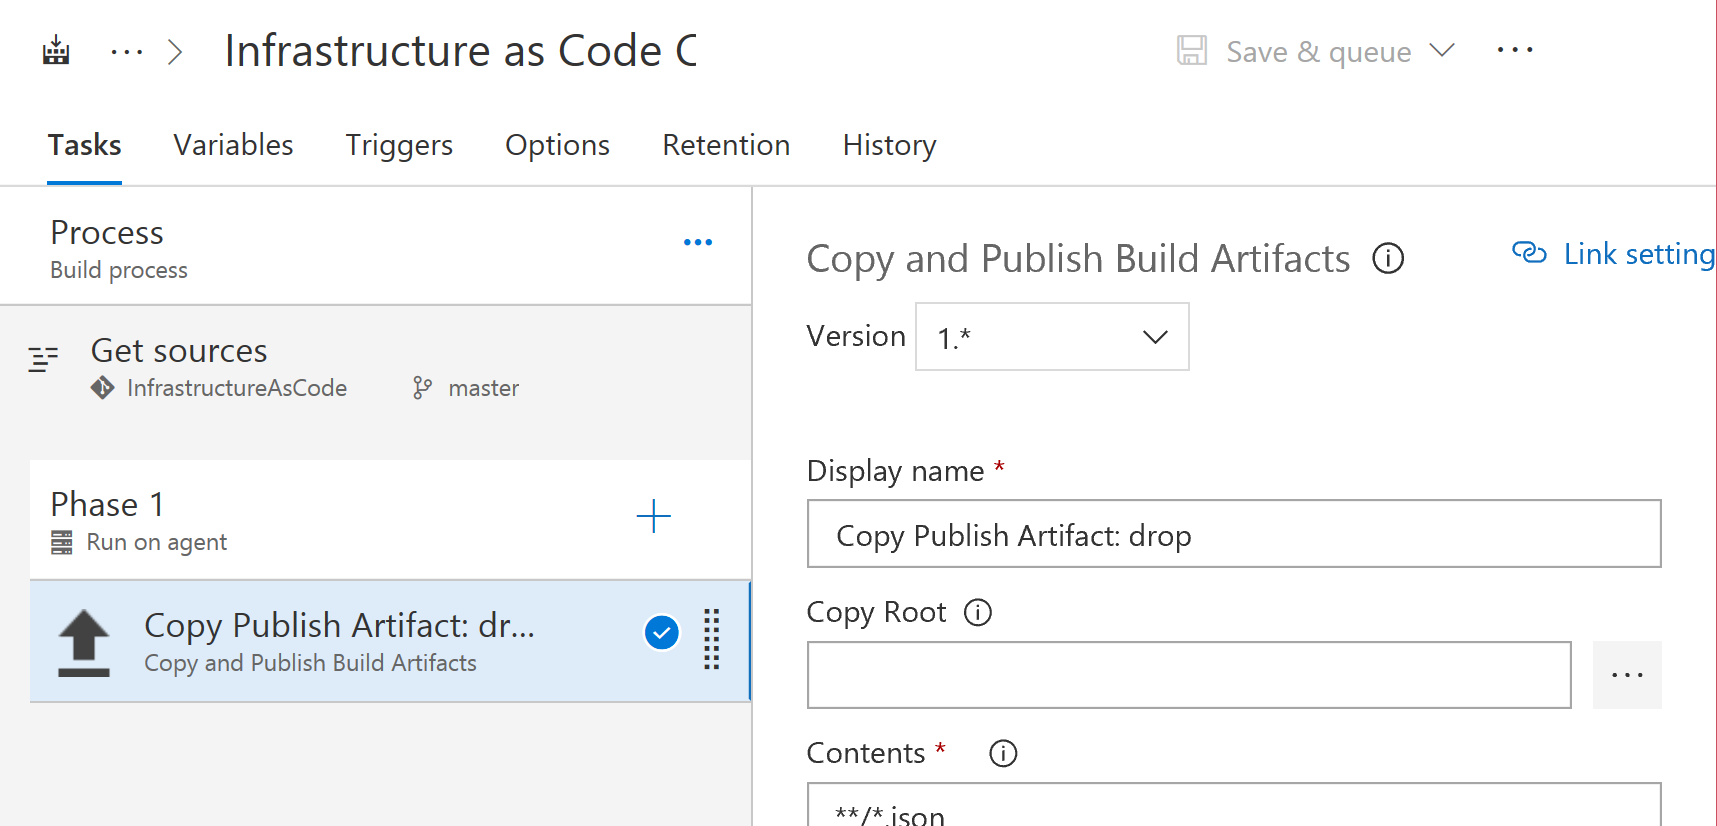
Figure 5, Copy Publish Artifact configuration
VSTS Release
The next step is to use VSTS Release for deploying your infrastructure to Azure. To do so, you navigate to release and add a new Release. Rename the first environment to Development and add the task Azure Resource Group Deployment to the Development environment. This task can deploy your ARM template to an Azure Resource group. To configure your task, you need to add an ARM Service Endpoint to VSTS. You can read how to do this in the following blogpost: https://xpir.it/mg3-iac4. Now you can fill in the remaining information, i.e. the name of the ARM template and the name of the parameters file: 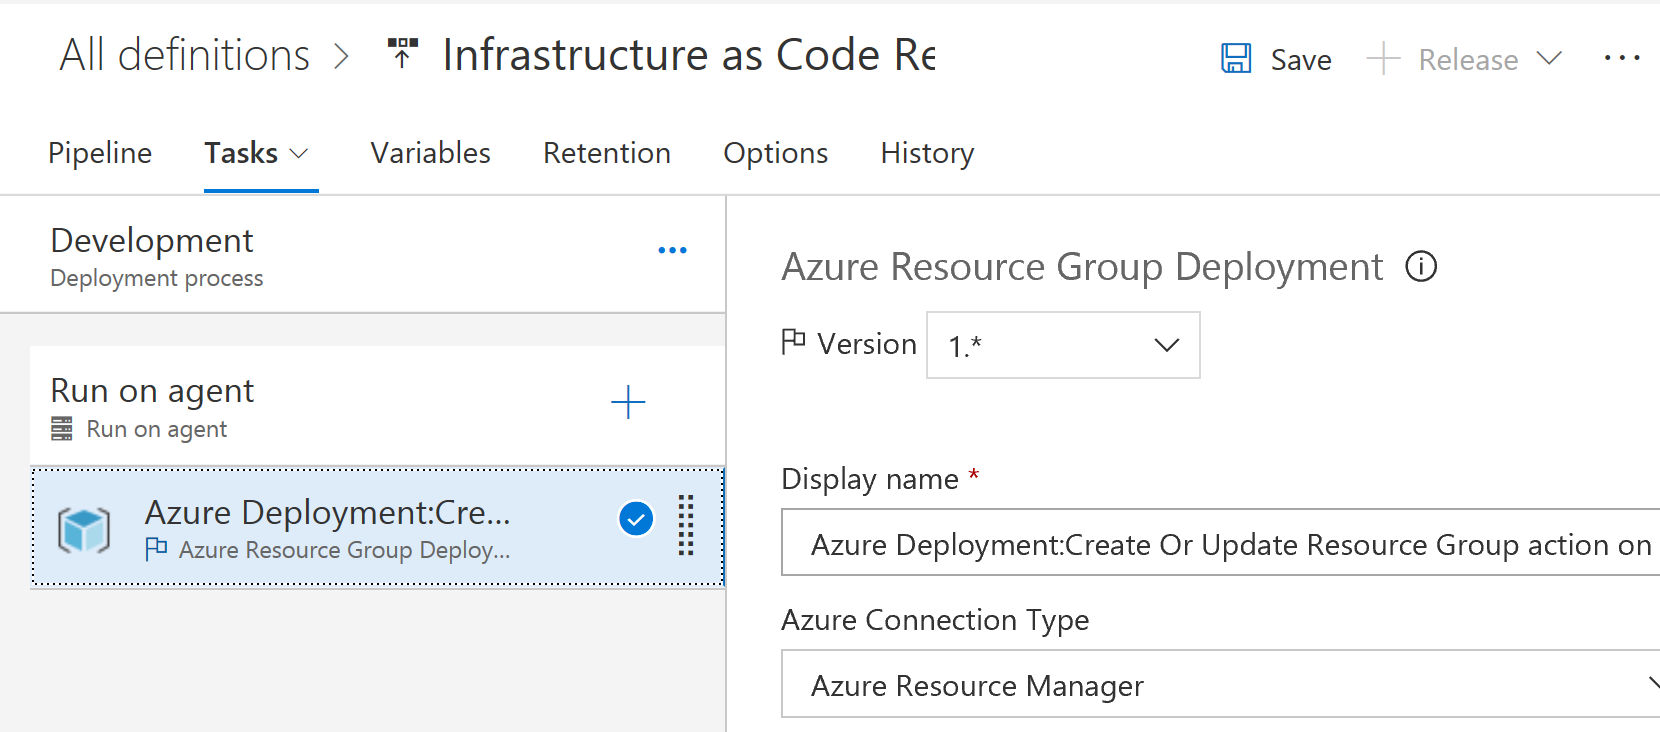
Figure 6, Azure Resource Group deployment configuration
Development, Test, Acceptance and Production environments
At this point you only have a Development environment. Now you are going to add a Test, Acceptance and Production environment. The first step is to create the other environments in VSTS release manager. Add environments by clicking the Add environment button or by cloning the development environment. 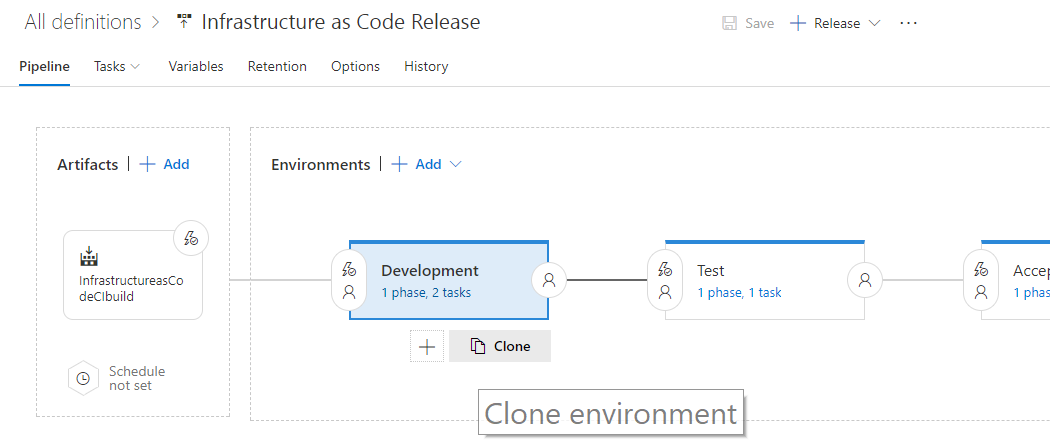
Figure 7, Clone an environment in Release
Each environment needs separate parameters, so you need to create a parameter json file per DTAP environment. Each environment gets its own azuredeploy.{environment}.parameters.json file, where {environment} stands for development, test, acceptance or production. 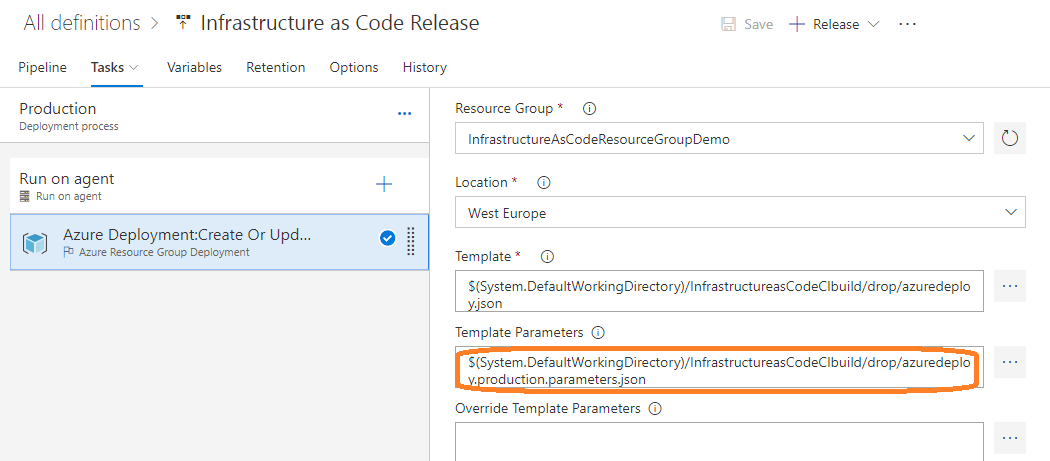
Figure 8, Configure each environment to a different parameters file
The deployment can be changed to meet your wishes. For example, deploy to a separate ResourceGroup in Azure per DTAP environment.
Now you have your first version of an Infrastructure as Code deployment pipeline. The pipeline can be extended in multiple ways. The build can be extended with tests to make sure the infrastructure is configured as it is supposed to be. The release can be extended by adding approvers, which makes sure that an environment will only be deployed after an approval of one or more persons.
Conclusion
Infrastructure as Code will help you to create a robust and reliable infrastructure in a minimum of time. Each time you deploy, the infrastructure will be exactly the same. You can easily change the resources you are using by changing code and not by changing infrastructure.
When you apply Infrastructure as Code, everything should be automated, which will save a lot of time, manual configuration and errors. All configurations are the same, and there are no more surprises when you release your application to production. All changes in the infrastructure are accessible in source control. Source control gives great insight in why and what is changed and by whom.
A DevOps team that applies Infrastructure as Code is self-contained in running its application. The team is responsible for all aspects of the environment they are using. All team members have the same power and responsibilities in keeping everything up and running, and everybody is able to quickly fix, test and deploy changes.
 Peter Groenewegen has been programming computers since he was six. Currently, he focusses on implementing cloud strategies on Microsoft Azure, Software Architecture, DevOps and Application Lifecycle Management. He works as an Azure Cloud Consultant at Xpirit, where he helps clients hands-on with their Cloud implementations. Peter is active on Stackoverflow (https://stackoverflow.com/users/707458/peter), writes blogs (https://pgroene.wordpress.com) and speaks at conferences. Follow him on Twitter @pgroene.
 Pascal Naber helps companies embrace Microsoft Azure and build large scale distributed systems with modern architectures based on microservices. Pascal works as an Azure Cloud Consultant at Xpirit. He is the co-founder of the Dutch Azure Meetup and is awarded by Microsoft with the MVP award for Microsoft Azure. In his spare time he enjoys killing monoliths, just for fun. Follow him on Twitter @pascalnaber.
Comments
- Anonymous
February 14, 2018
Great post! Please double check two images:Figure 5 - Should the image not show how to configure the "Copy Publish Artifact" task?Figure 6 - What's the "Clean resourcegroup" task for and why is it not part of the production release (Figure 8) after cloning the development environment?