Schedule VM Downtime With Azure Automation And PowerShell
Editor's note: The following post was written by Cloud and Datacenter Management MVP Timothy Warner as part of our Technical Tuesday series. Albert Duan of the MVP Award Blog Technical Committee served as the technical reviewer for this piece.
To save money, you want to shut down some of your Windows Server and Linux VMs running in Azure during non-working hours. For example, you probably need all the VMs in your production virtual network (VNet) up 24 hours per day, but you need the VMs in your test/dev VNet online only for particular time intervals.
As I am sure you know, human forgetfulness makes recurring tasks like this difficult to do manually. Today you will learn how to use Azure Automation runbooks to stop and start VMs on a schedule.
In this example, let's assume that I have four VMs in my user acceptance testing (UAT) VNet:
- foo-uat-vm01
- foo-uat-vm02
- foo-uat-vm03
- foo-uat-vm04
Now, let's get to work!
The TL/DR workflow
Before I get into the specifics, allow me to provide you with the "too long/didn't read," CliffsNotes procedure for using Azure Automation runbooks:
- Define an Azure Automation account and Azure Active Directory (Azure AD) security principal
- Add and test a PowerShell workflow-based Azure Automation runbook that performs the VM stop and start operations
- Use the Azure Automation scheduler to execute the runbook on your schedule
Create an Azure Automation account
Have you ever used System Center Orchestrator (SCORCH)? Well, Azure Automation runbooks perform an analogous service in the Microsoft Azure cloud. To use these runbooks, you first need an Azure Automation account.
From the Automation Accounts blade in the Azure portal, click Add and fill in the following properties:
- Friendly name
- An active Azure subscription
- Resource group
- Azure region
As to whether to create an Azure Run As account, definitely choose Yes.
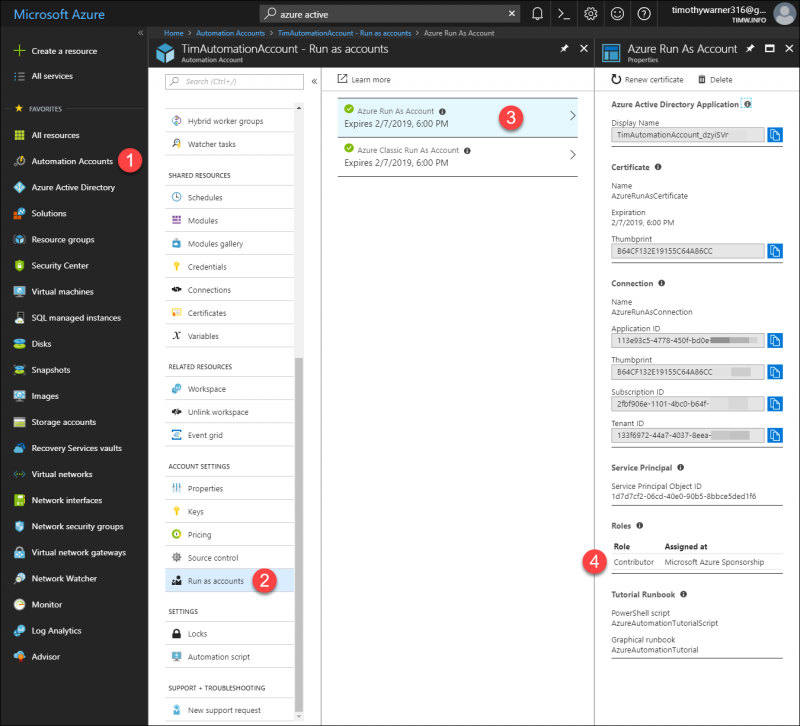
The Azure Run As account is an Azure-created security principal in your Azure AD tenant that provides the security context for your runbooks. The default name for this account is, imaginatively enough, AzureRunAsConnection. The account is granted the Contributor access role at the subscription level in Azure AD; I show you this in Figure 1.
[caption id="attachment_29225" align="alignnone" width="800"] Figure 1. Azure Run As Account details[/caption]
Define the Azure Automation runbook
From your new Azure Automation accounts Settings menu, navigate to Process Automation > Runbooks, and then click Add a runbook. Complete the following properties in the Runbook blade:
- Friendly name (required)
- Runbook type (required)
- Description (optional)
You have five choices for runbook type:
- PowerShell script or function
- Python v2
- Graphical
- PowerShell workflow
- Graphical PowerShell workflow
In this example, we'll use PowerShell Workflow because the workflows give us the flexibility of PowerShell and the robustness and durability of the Windows Workflow foundation. Note that you can also import an existing script if you have one handy. In this example, however, we'll paste our code directly into the Azure portal.
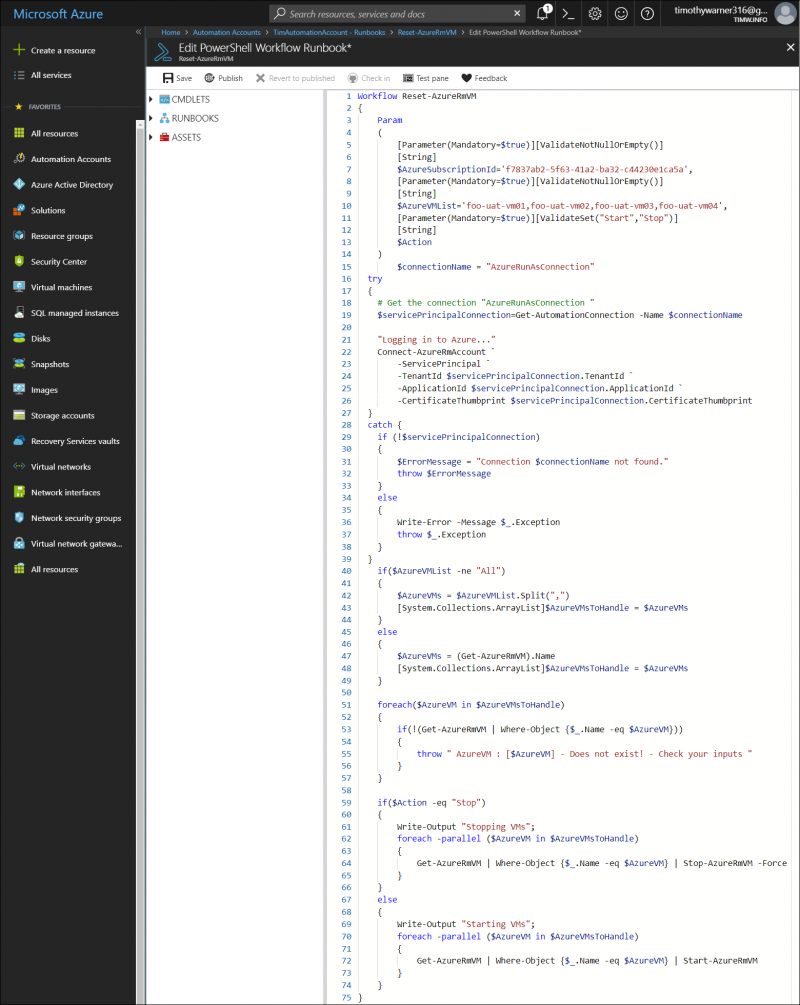
Let me show you my workflow, and then I'll explain the relevant code lines.
[caption id="attachment_29235" align="alignnone" width="800"] Figure 2. Our VM reset workflow[/caption]
NOTE: If you find my Reset-AzureRmVM workflow, then you're free to use it!
- 1: I chose the verb Reset because it's one of the approved verbs (reference: Get-Verb)
- 5-13: Some PowerShell scripters detest default parameter values. In this case it makes sense because your subscription ID and VM names are likely not to change. You can always override with different values as needed anyway
- 15: If you change the identity of your Run As connection, make sure to update this variable's value
- 22-37: Authenticate to your Azure subscription using the Run As connection identity and corresponding digital certificate
- 40: Here we process the states in which the workflow is run with or without the -All switch parameter. In any event, we enumerate the VM names passed into the workflow and generate an array
- 59: This is the logic to stop the VMs
- 69: Otherwise, if -Stop isn't used (implied -Start), we assume we need to start the VMs
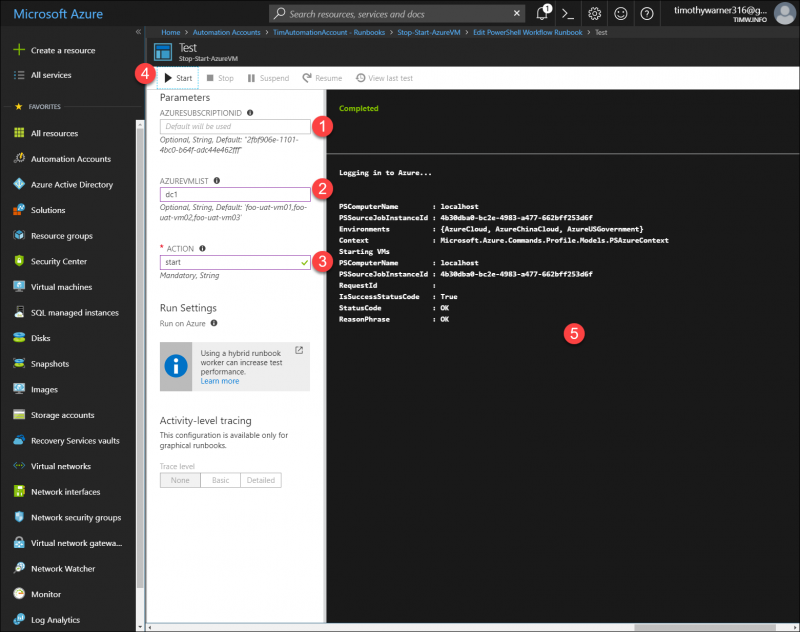
Make sure to click Save from time to time to preserve your work. When you're ready to test, click Test pane to invoke the testing environment. Again, I'll show you an annotated screenshot and explain:
[caption id="attachment_29245" align="alignnone" width="800"] Figure 3. Runbook test environment[/caption]
- 1: Note that Azure respects our default parameter values
- 2: Here I override the default to specify a different VM
- 3: Sadly, the testing interface doesn't present parameter enumerations in a drop-down list control
- 4: Start, stop, suspend, and resume your workflow
- 5. Check status. Note that the runbook actually runs; it's not a "what if" situation
You need to click Publish in the runbook editor to make the new runbook available for production execution.
Schedule the runbook
Schedules are shared objects in Azure Automation; thus, we need to create the schedule, and then bind it to our new PowerShell workflow. Specifically, we will need two schedules: one for VM shutdown, and another for VM startup.
From your Automation account's Settings menu, navigate to Shared Resources > Schedules, and click Add a schedule. Next, fill out the relevant properties:
- Friendly name
- Description
- Start time/date
- Time zone
- Recurrence
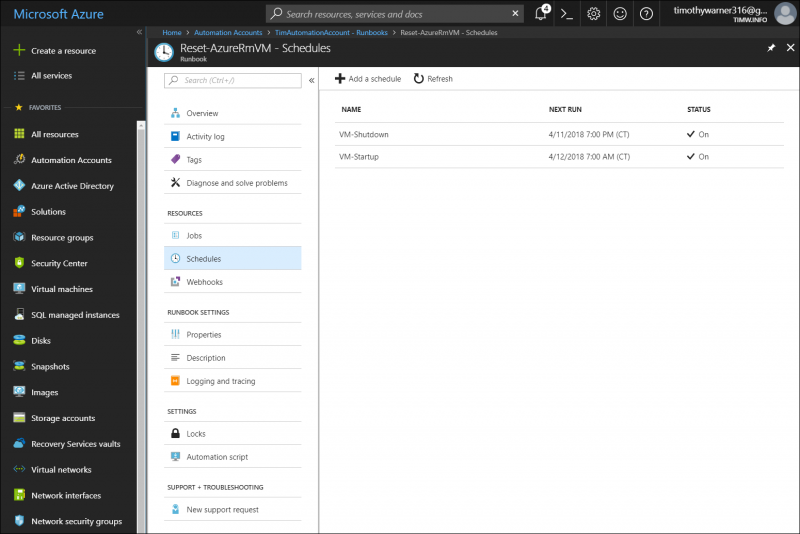
In my lab, I created a schedule named VM-Shutdown that starts at 7:00 P.M. every day, and a schedule named VM-Startup that starts at 7:00 A.M. every day.
Now open your runbook Settings menu, navigate to Resources > Schedules, and then click Add a schedule. Select one of your two schedules, and optionally modify the run settings. Repeat the process, and your runbook properties should look similar to what I have in Figure 4.
[caption id="attachment_29255" align="alignnone" width="800"] Figure 4. Runbook schedules.[/caption]
Next steps
You can do a lot of other cool configuration management tasks with your fancy new Azure automation account:
- Inventory
- Change Tracking
- Update Management
- PowerShell Desired State Configuration (DSC)
If you're thinking, "Hey! Those look like similar features to System Center Configuration Manager," then congratulations--you're correct. The Azure management solutions are what I like to call SCCM's cloud counterpart.
I hope you found this tutorial useful, and I wish you all the best.
 Timothy Warner is a Microsoft Most Valuable Professional (MVP) in Cloud and Datacenter Management who is based in Nashville, TN. His professional specialties include Microsoft Azure, cross-platform PowerShell, and all things Windows Server-related. You can reach Tim via Twitter @TechTrainerTim, LinkedIn or his personal website, techtrainertim.com.