Starting with Universal Apps on Visual Studio 2013
As probably so many of you are still excited after Build Event, this is the best moment to start practicing what we’ve learnt from the online sessions.
Today I’m going to start creating my first Universal App, so let’s go step by step.
What is a universal app? In few words, an application that you develop once and you can deploy on Windows, Windows Phone or XBOX. The goal is to maximize the reuse of code.
Let’s create our first app:
1/ First, update your Visual Studio 2013 to the Update 2 RC: https://www.microsoft.com/en-us/download/confirmation.aspx?id=42307
2/ Open Visual Studio (recommended Ultimate if you want to have the full set of cool tools and you want to do good testing) and select Store Apps –> Universal Apps.
The beauty of Universal apps is that you will leverage your code on only one runtime (WinRT) that is the same for Windows 8.1 or Windows Phone 8.1 devices.
If you remember from Build, when you create a Windows Phone application you can use the Silverlight runtime (version 8.0 or 8.1) or you can use WinRT runtime (the one from Universal Apps). The WinRT runtime enables you to create one application that will run on Windows, Windows Phone or even Xbox One. You only have to take care about the App Size (screen size) not the device resolution.
Said that, we are finding one framework (XAML) to develop an app for multiple platforms. On this version we have a API convergence of 90%, still there is a small set not converget yet, that are Phone features only available in Silverlight such:
- Lenses Support
- VOIP Suport
- Camera Capture Task
- Clipboard APIs
- Lock Screen Wallpaper API
Coming back to the main steps.
3) On the Windows 8.1 project, open the MainPage.xaml and drag and drop the DatePicker and TimePicker into the designer like this:
4) Move the MainPage.xaml to the Shared project and delete the MainPage.xaml that is inside of your WP8.1 project, so your solution has to look like this:
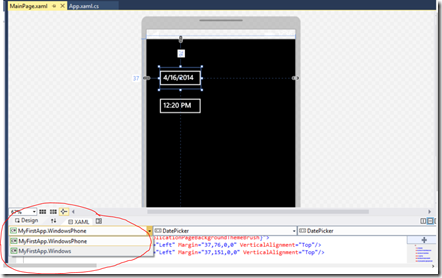
So now all the XAML code (your UI) will be hosted in the shared project and is targeting both projects, W8.1 and WP8.1. If you open the MainPage.xaml you will find that the XAML now applies to both, you can see it just going to the designer and swapping from W8.1 to WP8.1:
The good thing is, if you run the application on Phone, you will see that indeed is the same UI, but the controls are automatically converted to Windows Phone Date and Time pickers, that are slightly different of Windows 8.1 controls :)
5) Adjust the UI for each device: This is sooooo cool, the problem is, if you play with this controls in one view, it will affect to the other view, and what we want is to design for Windows or Phone separately. Until I find a better solution my advice is to design the app for Windows 8.1 from the shared project and once is done, copy it to the Windows Phone project and the Windows project and delete the shared MainPage.xaml, so with that almost all the job will be done, you just have to adjust the content inside each MainPage.xaml ;)
Here you can find some steps in case you want to reuse your code from the Business Logic point of view.
https://msdn.microsoft.com/library/windows/apps/dn609832#Started
Enjoy! and - May the code be with you -
Comments
- Anonymous
September 25, 2014
"Move the MainPage.xaml to the Shared project and delete the MainPage.xaml that is inside of your WP8.1 project" Thank you so much for this information. This was very helpful.


