Using the Domain Service in ASP.NET Applications
Introduction
This post is a preview of the upcoming documentation which describes a new approach for accessing data from an ASP.NET client (Web page) by using the WCF RIA Services domain service. The complete documentation will be available on MSDN.
It is important to notice that the domain service enables you to detach your application from the specific database model. This gives you the advantage of focusing on the business logic and on creating code that is easily portable to a different model.
ASP.NET provides a DomainSourceControl control that can be used by data-bound controls, such as the System.Web.UI.WebControls.GridView control, to access the database and enable the user to perform creates, read, update and delete (CRUD) operations.
The RIA Services domain service provides a pattern to write application logic that runs on the server and controls access to data for queries, changes, and custom operations. It also provides end-to-end support for common tasks such as data validation, authentication and roles by integrating Silverlight client and ASP.NET server applications.
Even though this walkthrough describes the domain service in ASP.NET, the use of the service is not limited to ASP.NET applications. This walkthrough does not address the integration of ASP.NET server with Silverlight client applications.
This topic contains the following procedures:
- Creating an ASP.NET Web Application
- Using the Domain Service
- Testing the Domain Service
Prerequisites
You need the following components to complete this walkthrough:
- Visual Studio 2010 Beta 2 or Visual Web Developer 2010 Express Beta 2
- Silverlight 4 Beta
- WCF RIA Services Preview for Visual Studio 2010
- AdventureWorksLT sample database
A Visual Studio project with source code is available at this location: Using Domain Service.
Procedures
Creating an ASP.NET Web Application
To use the domain service, you must create an ASP.NET Web application capable of interacting with a database. The following are the steps you must perform:
- Creating a Web application. This provides the environment for the use of the domain service.
- Adding a database to the application. This enables you to choose the database for your Web application.
- Creating the database model. You create the model that contains the database entities as CLR types. These are the types used by the domain service to interact with the database. You can use the ADO.NET Entity Framework or LINQ to SQL data model.
The following procedure shows how to create an ASP.NET Web application.
To create an ASP.NET Web application
- In Visual Studio, click the File menu, click New, and then click Project.
- The New Project dialog box is displayed.
- Under Installed Templates, expand Visual C# or Visual Basic, and then select Web.
- In the list of templates, select Empty ASP.NET Web Application.
- Name the project UsingDomainService, specify a location, and then click OK.
- In Solution Explorer, right-click the References folder and select Add Reference.
- The Add Reference dialog box is displayed.
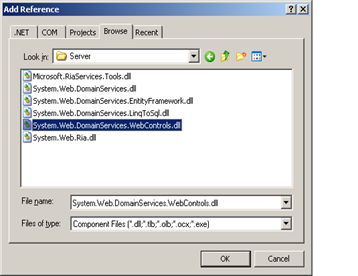
- Click the .NET tab.
- Sort by Component Name and select System.Web.DomainServices.WebControls, which is in the Program Files\Microsoft SDKs\RIA Services\v1.0\Libraries\Server folder. If the assembly does not appear in the list, reference it directly from the location mentioned before.
- Click OK.
- In Solution Explorer, open the Web.config file.
- In the <system.web> section, add the following tag prefix definition:
 <pages>
  <controls>
    <add tagPrefix="asp" namespace="System.Web.DomainServices.WebControls"
         assembly="System.Web.DomainServices.WebControls" />
  </controls>
</pages>
This configuration definition enables you to use the <asp:DomainDataSource> control in a Web page as described later in the "To declare the DomainDataSource control in a page" procedure.
- Build the application.
To add the database to the Web application
- In Solution Explorer, right-click the project name, click Add, and then click Add ASP.NET Folder then select App_Data. This add the App_Data folder to the project.
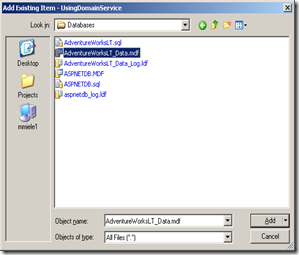
- Right-click the App_Data folder, click Add, and then click Existing Item. The Add Existing Item dialog box is displayed.
- Specify the location for the AdventureWorksLT database file (AdventureWorksLT_Data.mdf), and then click Add. This creates a copy of the database file in the project. For more information, see How to: Connect to the AdventureWorksLT Database using an .MDF File
To create the data model
- In Solution Explorer, right-click the project name, click Add, and then click New Item. The Add New Item dialog box is displayed.
- Under Installed Templates, select Data.
- In the list of templates, select ADO.NET Entity Data Model.
- Name the database model AdventureWorksLT.edmx and then click Add. The Entity Data Model Wizard is displayed.
- On the Choose Model Contents screen, select Generate from database and then click Next.
- On the Choose Your Data Connection screen, under Which data connection should your application use to connect to the database?, select AdventureWorksLT_Data.mdf from the drop-down list.
- Make sure that the Save entity connection settings in Web.config as: check box is selected. You can leave the default connection string name.
- Click Next. The wizard displays a page where you can specify what database objects you want to include in your model.
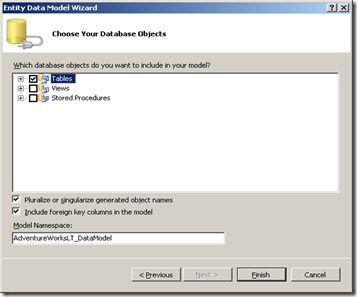
- On the Choose Your Database Objects screen, select the Tables node to select all tables from the database.
- Make sure that the Include foreign key columns in the model check box is selected. You can leave the default model namespace.
Click Finish.
The ADO.NET Entity Data Model Designer is displayed. You have created the data model that represents the AdventureWorksLT database. Notice that the system.config file is updated to contains the connection string and the proper DLL reference as shown next:
 <assemblies>
    <add assembly="System.Data.Entity, Version=4.0.0.0, Culture=neutral,
        PublicKeyToken=b77a5c561934e089" />
</assemblies>
<connectionStrings> <add name="AdventureWorksLT_DataEntities" connectionString="metadata=res://*/AdventureWorksLT.csdl|res://*/AdventureWorksLT.ssdl|res://*/AdventureWorksLT.msl;provider=System.Data.SqlClient;provider connection string=" Data Source=.\SQLEXPRESS;AttachDbFilename=|DataDirectory|\AdventureWorksLT_Data.mdf;Integrated Security=True;User Instance=True;MultipleActiveResultSets=True"" providerName="System.Data.EntityClient" /> </connectionStrings>Close the designer.
Build the solution.
Building makes the AdventureWorksLT_DataEntities context class available to the domain service in the next procedure.
Using the Domain Service
This section describes the steps that you must perform to use the domain service in an ASP.NET application. These steps include the following:
- Adding a domain service class to the project. This creates the class that enables your application to perform CRUD database operations and, very importantly, it enables you to include your business logic. This class operates on the server or middle tier.
- Creating the business logic. You include your code (business logic) in the domain service class.
- Declaring the DomainDataSource control. You do this in a page markup so that the user can interact with the database. This control operates on the client or presentation tier.
To add the domain service class to the project
- In Solution Explorer, right-click the project name, click Add, and then click New Item.
- Under Installed Templates, select Web.
- In the list of templates, select Domain Service Class. Name the file AdventureWorksDomainService.cs and then click Add.
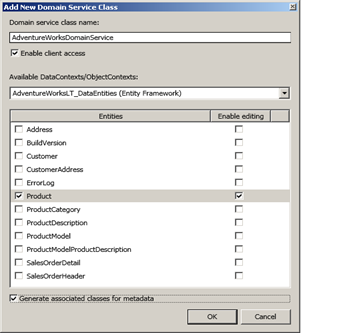
- The Add New Domain Service Class dialog box is displayed. The Domain service class name: box contains the name that you specified.
- Select the Enable client access check box.
- In the Available DataContexts/ObjectContexts: drop-down list, select AdventureWorksLT_DataEntities (Entity Framework). If the drop-down list is empty, you did not build the application. Exit the Add New Domain Service Class dialog box, build the application and repeat the previous steps.
- In the Entities list, select the Product table.
- For the Product table, select the Enable editing check box.
- Select the Generated associated classes for metadata check box.
- Click OK. The AdventureWorksDomainService class and the related metadata file are created. The class contains the methods to allow for database CRUD operations. You can modify both the class and the metadata files to include your business logic. The next procedure will show a simple example. Notice that the project references have been updated to contain the required assemblies and the Web.config file has been updated to contain all the needed configuration elements.
- On the File menu, click Save All.
To create the business logic
The following steps show how to customize the AdventureWorksDomainService class and the related metadata file to include your business logic. The customization is very simple, but gives you an idea of the modifications you can make.
- In Solution Explorer, open the AdventureWorksDomainService.cs file.
- Modify the UpdateProduct method to include validation logic of the ListPrice field, as shown in the following code. Also, update the ModifiedDate field using the current date.
[C#]
         public void UpdateProduct(Product currentProduct)
        {

            if ((currentProduct.EntityState == EntityState.Detached))
            {
                // Custom logic: set a lower limit for the price.
                if (currentProduct.ListPrice < 5)
                    // Throw custom exception.
                    throw new ValidationException(new ValidationResult("The list price must be >= 5.",
                        new[] { "ListPrice" }), null, null);

                this.ObjectContext.AttachAsModified(currentProduct, this.ChangeSet.GetOriginal(currentProduct));

                // Custom logic: set the date to the current value.
                currentProduct.ModifiedDate = DateTime.Today;
            }

        }
[Visual Basic]
        Public Sub UpdateProduct(ByVal currentProduct As Product)

            If (currentProduct.EntityState = EntityState.Detached) Then
                ' Custom logic: set a lower limit for the price.
                If currentProduct.ListPrice < 5 Then
                    ' Throw custom exception.
                    Throw New ValidationException(New ValidationResult("The list price must be >= 5.", _
                           New String() {"ListPrice"}), Nothing, Nothing)
                End If

                Me.ObjectContext.AttachAsModified(currentProduct, Me.ChangeSet.GetOriginal(currentProduct))

                ' Custom logic: set the date to the current value.
                currentProduct.ModifiedDate = DateTime.Today
            End If

        End Sub
When the validation fails, an exception is raised and an error message is sent to the page to be displayed to the user.
- Save and close the file.
- In Solution Explorer, open the AdventureWorksDomainService.metadata.cs file.
- Add the Required attribute to the Color data field entity, as shown in the following code. With this attribute, you force the data field not to be empty as allowed by the database. If the user enters an empty string an error is issued.
[C#]
     // Custom logic: make Color a required field.
    [Required(AllowEmptyStrings = false, ErrorMessage = "Color is required")]
    public string Color;
[Visual Basic]
     ' Custom logic: make Color a required field.
    <Required(AllowEmptyStrings := False, ErrorMessage := "Color is required")> _
    Public Color As String
- Save and close the metadata file.
- Build the solution.
To declare the DomainDataSource control in a page
The following steps show how to declare the DomainDataSource control in a page markup so that the user can interact with the database.
- In Solution Explorer, right-click the project name, click Add, and then click New Item.
- Under Installed Templates, click Web.
- In the list of templates, select Web Form.
- Name the file Default.aspx and then click Add.
- Open Default.aspx in Source view.
- Within the <div> tags, add the following page markup:
         <asp:DomainDataSource
            ID="DomaninDataSourceID"
            EnableDelete="true" EnableInsert="true" EnableUpdate="true"
            DomainServiceTypeName="UsingDomainService.AdventureWorksDomainService"
            SelectMethod="GetProducts"  runat="server" >
        </asp:DomainDataSource>
- Switch to Design view.
- In the Toolbox, from the Data tab, add a GridView control to the page. The GridView appears with the GridView Tasks menu open.
- In the GridView Tasks menu, from the Choose Data Source list, select DomainDataSourceID. This is the ID of the DomainDataSource control that you created in previous steps.
- In the GridView Tasks menu, click Edit Columns. The Fields dialog box is displayed.
- Make sure that the Auto-generate fields check box is unchecked.
- In the Available fields: pane, select BoundField.
- Click Add. The BoundField properties appear on the right.
- In the BoundField properties: pane, in the Appearance group, set the HeaderText property to Name.
- In the Data group, set the DataField property to Name. This sets the name of the Product column to display.
- Repeat the previous four steps to display the columns Color. ListPrice, and ModifiedDate.
- Click OK.
- Save the file and switch to Source view.
- Select the GridView.
- In the Properties window, set the DataKeyNames property to a comma-separated list of all the columns that are not displayed: ProductID,ProductNumber,StandardCost,Size,Weight,ProductCategoryID,ProductModelID, SellStartDate,SellEndDate,DiscontinuedDate,ThumbNailPhotoFileName,rowguid. This is needed by the DomainDataSource control to perform the CRUD operations.
- Set the AutoGenerateColumns property to false. Optionally, set the AllowPaging property to true.
- Enable editing of table rows by setting the AutoGenerateEditButton property to true. Optionally, set the AutoGenerateSelectButton property to true.
- Replace the Columns element with the markup shown next. This markup enables validation for the Color and ListPrice data field values before they are sent to the server on post-back. This is accomplished by using custom templates. The following shows an example of the GridView markup that is generated from the previous steps.
         <asp:GridView ID="GridView1" DataSourceID="DomaninDataSourceID"  CssClass="DDGridView"
                    AutoGenerateColumns="False" runat="server" CellPadding="4" ForeColor="#333333"
                    GridLines="Both"
                    AutoGenerateEditButton="True"
                    AutoGenerateSelectButton="True"
                    DataKeyNames="ProductID,ProductNumber,StandardCost,Size,Weight,ProductCategoryID,
                        ProductModelID,SellStartDate,SellEndDate,DiscontinuedDate,ThumbNailPhotoFileName,rowguid"
                     AllowSorting="true" AllowPaging="True" >
                    <AlternatingRowStyle BackColor="White" ForeColor="#284775" />
                    <Columns>
                        <asp:BoundField DataField="Name" HeaderText="Name" />
                        <asp:TemplateField>
                        <HeaderTemplate>Color</HeaderTemplate>
                            <ItemTemplate>
                                <%#Eval("Color")%>
                            </ItemTemplate>
                            <EditItemTemplate>
                                <asp:TextBox ID="ColorID" runat="server" Text='<%#Bind("Color")%>'></asp:TextBox>
                                <asp:DomainValidator CssClass="DDValidator" runat="server" DataField="Color"></asp:DomainValidator>
                            </EditItemTemplate>
                        </asp:TemplateField>
                        <asp:TemplateField>
                        <HeaderTemplate>ListPrice</HeaderTemplate>
                            <ItemTemplate>
                                <%#Eval("ListPrice")%>
                            </ItemTemplate>
                            <EditItemTemplate>
                                <asp:TextBox ID="ListPriceID" runat="server" Text='<%#Bind("ListPrice")%>'></asp:TextBox>
                                <asp:DomainValidator CssClass="DDValidator" runat="server" DataField="ListPrice"></asp:DomainValidator>
                            </EditItemTemplate>
                        </asp:TemplateField>
                        <asp:BoundField DataField="ModifiedDate" HeaderText="ModifiedDate" />
                    </Columns>
                    <EditRowStyle BackColor="#999999" />
                    <FooterStyle BackColor="#5D7B9D" Font-Bold="True" ForeColor="White" />
                    <HeaderStyle BackColor="#5D7B9D" Font-Bold="True" ForeColor="White" />
                    <PagerStyle BackColor="#284775" ForeColor="White" HorizontalAlign="Center" />
                    <RowStyle BackColor="#F7F6F3" ForeColor="#333333" />
                    <SelectedRowStyle BackColor="#E2DED6" Font-Bold="True" ForeColor="#333333" />
                    <SortedAscendingCellStyle BackColor="#E9E7E2" />
                    <SortedAscendingHeaderStyle BackColor="#506C8C" />
                    <SortedDescendingCellStyle BackColor="#FFFDF8" />
                    <SortedDescendingHeaderStyle BackColor="#6F8DAE" />

       </asp:GridView>
- Before the GridView control, add the following markup to enable validation errors to display:
       <asp:ValidationSummary runat="server"  CssClass="DDValidator" />
      <asp:DomainValidator runat="server" Visible="true" ControlToValidate="GridView1"></asp:DomainValidator>
- Save the Default.aspx file.
- Build the solution.
Testing the Domain Service
This section shows how to test that the domain service capabilities through the use of the GridView control. This procedure verifies the following:
- The interaction with the database, through the custom business logic, works as expected.
- ASP.NET performs the changes that were made by the user to the database fields.
- ASP.NET displays the errors messages generated by the custom logic.
Testing the domain service
- In Solution Explorer, right-click the Default.aspx page and select View in Browser.
- The browser shows a page that displays the Product table.
- On any row, click Edit and modify the ListPrice column value by entering a value less than
- On the same row, click Update. A custom error is displayed stating that the field must be great than or equal to 5.
- On the same row, enter a value that is greater than 5 for the ListPrice column.
- On the same row, click Update.
- ASP.NET updates the ListPrice and the ModifiedDate data fields in the database.
- On any row, click Edit and modify the Color column value by entering an empty string.
- On the same row, click Update.
- ASP.NET displays a custom validation error.
- On the same row, enter a value that is not an empty string for the Color column.
- On the same row, click Update.
- ASP.NET updates the Color and the ModifiedDate data fields in the database
Comments
Anonymous
February 23, 2010
How I use the DomainService in a code behind?Anonymous
January 04, 2011
IC Components http://www.hqew.net electronic components http://www.partinchina.com


