WinRT : Create a custom ItemsPanel for an ItemsControl
When you use a Listbox or a ListView or more generally an ItemsControl, all your rendered items are arranged in the ItemsPanel attached to your control (accessible by the ItemsPanelTemplate property).
Today we will learn to create two ItemsPanel : The first will generate a circle with all items and the second will generate an infinite looping list.
Here is a small video of the final result:
Introduction
The complete source code is available here : ItemsTemplatePanel.zip
Before starting, here is a sample with two ItemsControl (Listbox and GridView) configured with two existing ItemsPanel (VirtualizingStackPanel and WrapGrid) :
 <ListBox   Grid.Column="0" ItemsSource="{Binding Datas}" Margin="10"
    ItemTemplate="{StaticResource ImageDataTemplate}" Width="180" >
 </ListBox>

 <GridView   Grid.Column="1" Background="DarkGray" ItemsSource="{Binding Datas}" Margin="10"
    ItemTemplate="{StaticResource ImageDataTemplate}" Height="180" >
     <GridView.ItemsPanel>
         <ItemsPanelTemplate>
             <VirtualizingStackPanel Orientation="Horizontal"></VirtualizingStackPanel>
         </ItemsPanelTemplate>
     </GridView.ItemsPanel>
 </GridView>

 <GridView   Grid.Column="2" ItemsSource="{Binding Datas}" Margin="10"
    ItemTemplate="{StaticResource ImageDataTemplate}" Height="580"
    Background="DarkGray" >
     <GridView.ItemsPanel>
         <ItemsPanelTemplate>
             <WrapGrid  HorizontalChildrenAlignment="Center" VerticalChildrenAlignment="Top" MaximumRowsOrColumns="4" />
         </ItemsPanelTemplate>
     </GridView.ItemsPanel>
 </GridView>
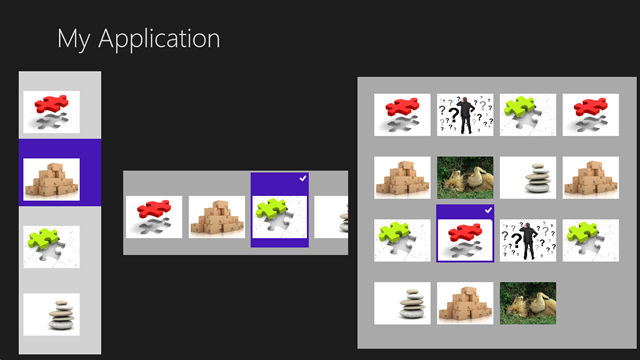
And here is the results :
- A ListBox with default ItemsTemplatePanel (VirtualizingStackPanel)
- A GridView with a VirtualizingStackPanel in Horizontal mode
- A GridView with a WrapGrid
As you can see, each ItemsControl has its own ItemsPanel and every ItemsPanel can work with almost every ItemsControl.
The deal is to create an ItemsPanel which will be used with either an ItemsControl, or a Listbox or maybe a ListView. We don’t take care of the ItemsControl.
CircleItemsPanel
The first ItemsPanel is relatively easy to build, if you remember your math class ![]() The purpose here is not to build a fully operational and functional ItemsPanel (with gestures, animation etc…) but just a simple ItemsPanel to focus on the principal work to create this kind of control.
The purpose here is not to build a fully operational and functional ItemsPanel (with gestures, animation etc…) but just a simple ItemsPanel to focus on the principal work to create this kind of control.
When you create a custom ItemsPanel, first of all, you have to inherit from the simplest layout container : Panel. (Canvas works great too, if you have to deal with ZIndex)
Then you need to override two very important methods :
- MeasureOverride : Use MeasureOverride to report the amount of space you need.
- ArrangeOverride : Use ArrangeOverride to actually layout child controls within your ItemsPanel
In our two custom ItemsPanel, we don’t really need to focus on MeasureOverride because our ItemsPanel will clip its children items. Here is the MeasureOverride method :
 protected override Size MeasureOverride(Size availableSize)
 {
     Size s = base.MeasureOverride(availableSize);

     foreach (UIElement element in this.Children)
         element.Measure(availableSize);

     return s;
 }
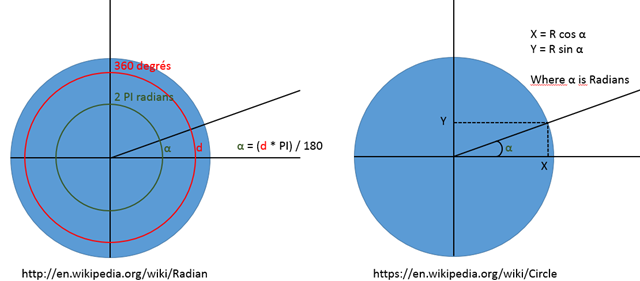
In the ArrangeOverride, we need to arrange every items. I know you remember very well you math class, but to be sure, here is the mathematic formulas we need :
- We need to calculate an angle in degrees and in radians : https://en.wikipedia.org/wiki/Radian
- We need to calculate the X,Y coordinates of each items : https://en.wikipedia.org/wiki/Circle

Ok, now you remember ![]()
Here is the ArrangeOverride implementation :
 protected override Size ArrangeOverride(Size finalSize)
 {
     // Clip to ensure items dont override container
     this.Clip = new RectangleGeometry { Rect = new Rect(0, 0, finalSize.Width, finalSize.Height) };

     // Size and position the child elements
     int i = 0;
     double degreesOffset = 360.0 / this.Children.Count;

     foreach (FrameworkElement element in this.Children)
     {
         double centerX = element.DesiredSize.Width / 2.0;
         double centerY = element.DesiredSize.Height / 2.0;

         // calculate the good angle
         double degreesAngle = degreesOffset * i++;

         RotateTransform transform = new RotateTransform();
         transform.CenterX = centerX;
         transform.CenterY = centerY;
         // must be degrees. It's a shame it's not in radian :)
         transform.Angle = degreesAngle;
         element.RenderTransform = transform;

         // calculate radian angle
         var radianAngle = (Math.PI*degreesAngle)/180.0;

         // get x and y
         double x = this.Radius * Math.Cos(radianAngle);
         double y = this.Radius * Math.Sin(radianAngle);

         // get real X and Y (because 0;0 is on top left and not middle of the circle)
         var rectX = x + (finalSize.Width / 2.0) - centerX;
         var rectY = y + (finalSize.Height / 2.0) - centerY;

         // arrange element
         element.Arrange(new Rect(rectX, rectY, element.DesiredSize.Width, element.DesiredSize.Height));
     }
     return finalSize;
 }
To use this ItemsTemplate, you just have to change the ItemsTemplate property from you ItemsControl, like this;
 <ListBox   Grid.Column="1" Background="DarkGray" ItemsSource="{Binding Datas}" Margin="10"
    ItemTemplate="{StaticResource ImageDataTemplate}" >
     <ListBox.ItemsPanel>
         <ItemsPanelTemplate>
             <controls:CircleItemsPanel Radius="250" />
         </ItemsPanelTemplate>
     </ListBox.ItemsPanel>
 </ListBox>
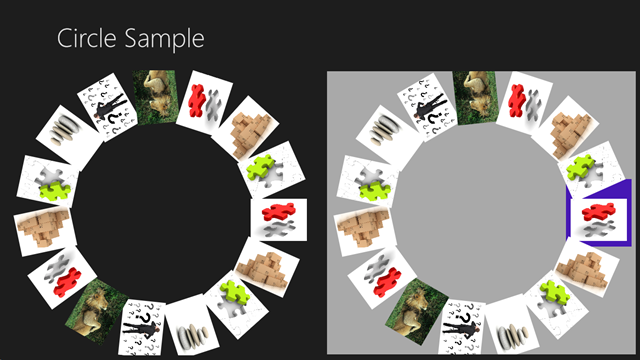
Here is the final result with an ItemsControl on the left and a ListBox on the right :

LoopItemsPanel
In this ItemsPanel, we need to implement an algorithm to move every items when a Touch event occurs (or mouse event, by the way)
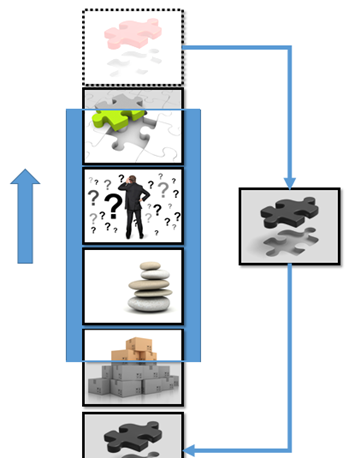
Each item must be moved when they are out of the ItemsControl clip region. In the next picture, the first image must be moved to the bottom before the last image :
 |
 |
To be able to move items, we need to work with a particular RenderTransform on each item : TranslateTransform.
During the ArrangeOverride methods, we will place all items and set the RenderTransform on those items:
 /// <summary>
 /// Arrange all items
 /// </summary>
 protected override Size ArrangeOverride(Size finalSize)
 {
     // Clip to ensure items dont override container
     this.Clip = new RectangleGeometry { Rect = new Rect(0, 0, finalSize.Width, finalSize.Height) };

     Double positionTop = 0d;

     // Must Create looping items count
     foreach (UIElement item in this.Children)
     {
         if (item == null)
             continue;

         Size desiredSize = item.DesiredSize;

         if (double.IsNaN(desiredSize.Width) || double.IsNaN(desiredSize.Height)) continue;

         // Get rect position
         var rect = new Rect(0, positionTop, desiredSize.Width, desiredSize.Height);
         item.Arrange(rect);

         // set internal CompositeTransform to handle movement
         TranslateTransform compositeTransform = new TranslateTransform();
         item.RenderTransform = compositeTransform;


         positionTop += desiredSize.Height;
     }

     templateApplied = true;

     return finalSize;
 }
Next step, we must listen to the Tap event, and then make the correct TranslateTransform on each items.
Thanks to ManipulationDelta, we will be able to get the entire manipulation step, even if there is inertia :
 /// <summary>
 /// On manipulation delta
 /// </summary>
 private void OnManipulationDelta(object sender, ManipulationDeltaRoutedEventArgs e)
 {
     if (e == null)
         return;

     var translation = e.Delta.Translation;
     this.UpdatePositions(translation.Y  /2 );
 }
The UpdatePositions will make the RenderTransform for all items :
 /// <summary>
 /// Updating position
 /// </summary>
 private void UpdatePositions(Double offsetDelta)
 {
     Double maxLogicalHeight = this.GetItemsCount() * itemHeight;

     // Reaffect correct offsetSeparator
     this.offsetSeparator = (this.offsetSeparator + offsetDelta) % maxLogicalHeight;

     // Get the correct number item
     Int32 itemNumberSeparator = (Int32)(Math.Abs(this.offsetSeparator) / itemHeight);

     Int32 itemIndexChanging;
     Double offsetAfter;
     Double offsetBefore;

     if (this.offsetSeparator > 0)
     {
         itemIndexChanging = this.GetItemsCount() - itemNumberSeparator - 1;
         offsetAfter = this.offsetSeparator;

         if (this.offsetSeparator % maxLogicalHeight == 0)
             itemIndexChanging++;

         offsetBefore = offsetAfter - maxLogicalHeight;
     }
     else
     {
         itemIndexChanging = itemNumberSeparator;
         offsetBefore = this.offsetSeparator;
         offsetAfter = maxLogicalHeight + offsetBefore;
     }

     // items that must be before
     this.UpdatePosition(itemIndexChanging, this.GetItemsCount(), offsetBefore);

     // items that must be after
     this.UpdatePosition(0, itemIndexChanging, offsetAfter);
 }

 /// <summary>
 /// Translate items to a new offset
 /// </summary>
 private void UpdatePosition(Int32 startIndex, Int32 endIndex, Double offset)
 {
     for (Int32 i = startIndex; i < endIndex; i++)
     {
         UIElement loopListItem = this.Children[i];

         // Apply Transform
         TranslateTransform compositeTransform = (TranslateTransform)loopListItem.RenderTransform;

         if (compositeTransform == null)
             continue;
         compositeTransform.Y = offset;

     }
 }
Go Further
In the sample, you will find some methods which provide a simple algorithm to center the selected item.
Two point of interests here :
First Point : Get the correct touch item : use the Tap Event, and use the TransformToVisual method to get the correct item :
 private void OnTapped(object sender, TappedRoutedEventArgs args)
 {
     if (this.Children == null || this.Children.Count == 0)
         return;

     var positionY = args.GetPosition(this).Y;

     for (int i = 0; i < this.Children.Count; i++)
     {
         var child = this.Children[i];

         if (child == null)
             continue;

         var rect = child.TransformToVisual(this).TransformBounds(new Rect(0, 0, child.DesiredSize.Width, child.DesiredSize.Height));

         if (!(positionY >= rect.Y) || !(positionY <= (rect.Y + rect.Height))) continue;

         // scroll to Selected
         this.ScrollToSelectedIndex(child, rect);

         break;
     }
 }
Second Point: Animate all the items : I use a slider to animate a Double value and get the Value with the changed event. Then I make an animation with an ease function to get a cool behavior :
 public LoopItemsPanel()
{
    sliderVertical = new Slider
    {
        SmallChange = 0.0000000001,
        Minimum = double.MinValue,
        Maximum = double.MaxValue,
        StepFrequency = 0.0000000001
    };
    sliderVertical.ValueChanged += OnVerticalOffsetChanged;

}

private void OnVerticalOffsetChanged(object sender, RangeBaseValueChangedEventArgs e)
{
    this.UpdatePositions(e.NewValue - e.OldValue);
}

/// <summary>
/// Updating with an animation (after a tap)
/// </summary>
private void UpdatePositionsWithAnimation(Double fromOffset, Double toOffset)
{
    var storyboard = new Storyboard();

    var animationSnap = new DoubleAnimation
    {
        EnableDependentAnimation = true,
        From = fromOffset,
        To = toOffset,
        Duration = animationDuration,
        EasingFunction = new ExponentialEase { EasingMode = EasingMode.EaseInOut }
    };

    storyboard.Children.Add(animationSnap);

    Storyboard.SetTarget(animationSnap, sliderVertical);
    Storyboard.SetTargetProperty(animationSnap, "Value");

    sliderVertical.ValueChanged -= OnVerticalOffsetChanged;
    sliderVertical.Value = fromOffset;
    sliderVertical.ValueChanged += OnVerticalOffsetChanged;

    storyboard.Begin();
}
You’ll find the complete code at the end of this post.
Happy coding.
Comments
Anonymous
April 17, 2013
Looks amazing and a great way to bring back the carousel control. How easy would it be to add manipulation to the CircleItemsPanel so that a user could rotate the list through touch and gesture? ItemsPanels have always befuddled me and this has gone a long way to explain them better for me! Great jobAnonymous
April 18, 2013
You have to implement a RenderTransform Transition (A TranslateTransform). Check the second example, it could help you. SebastienAnonymous
July 15, 2013
Thanks for the amazing and great article! But how could I start the arrange form 12th clock direction, and not the 3rd clock right now?Anonymous
August 16, 2015
This article is amazing. Any idea how to implement an snap effect when dragging the items to a new position ? In addition, how to draw a indicator at the center position of the control to indicate the selection? How to know the selection index at center position ?Anonymous
October 22, 2015
I want LoopItemsPanel To Rotate Horizontal . i Changed Transormation to -90 Degrees. But Still Gestures is Handling in Reverse Direction.How To Solve This.THnaks
