Azure Active Directory B2B Self Service Sign-Up using Logic Apps
Azure Active Directory (AAD) is Microsoft’s multi-tenant, cloud based directory and identity management service. It is used to manage access to services such as Office 365 and the Azure Cloud. Typically an instance of AAD (an AAD tenant) is used by a single organization for their users. In this blog post, I will discuss how to use Azure Logic Apps to create a self service sign-up system for adding users to AAD using AAD B2B.
When an organization wants to interact with external users, they can use Azure Active Directory B2C (Business to Consumer) which is a cloud based identity service for customer facing applications. In AAD B2C, customers generally bring their own identity (Microsoft, Google, Facebook, Twitter, etc.), but it is also possible to invite external users into an organizations directory using Azure Active Directory B2B (Business to Business). With AAD B2B, the invited users become (guest) members of an organizations Directory and can for instance be granted access to Azure resources or sign into applications that use the organizations AAD tenant as an identity source.
Let's suppose that an organization wanted to invite the participants at an event to join an Azure Active Directory. Rather than collecting email addresses from all the participants at the event, the organization would like to hand out a sign-up key or token and have them self-register on a web page to initiate the AAD B2B invitation process. This can be achieved using the Azure serverless platform:
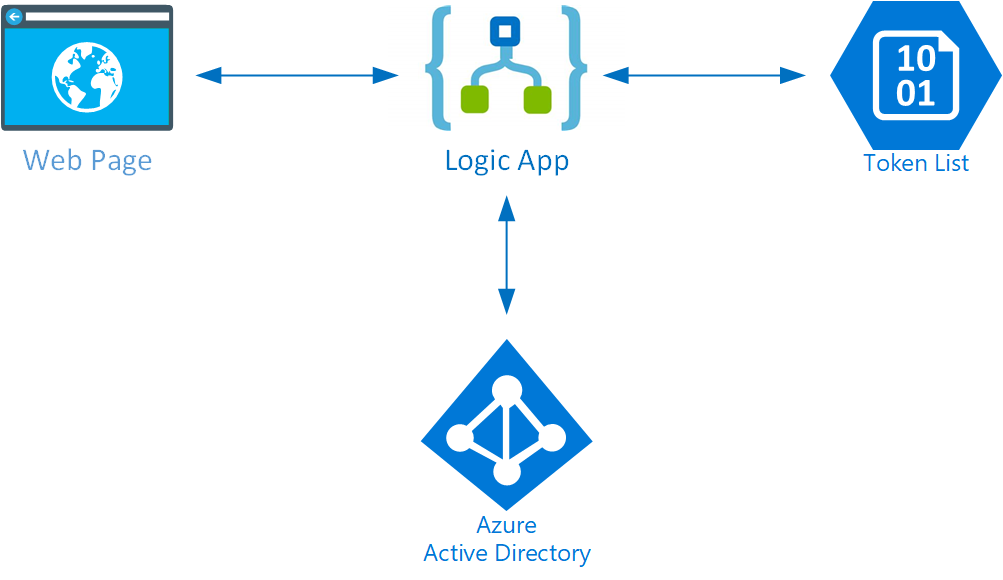
The system consists of a relatively simple HTML page with a sign-up form. When the form is submitted, a JavaScript function will call a Logic App (thanks to Jeff Hollan for a blog on that). The Logic App will check a key/token provided by the user and if it is valid, it will initiate the B2B invitation process using the B2B invitation API.
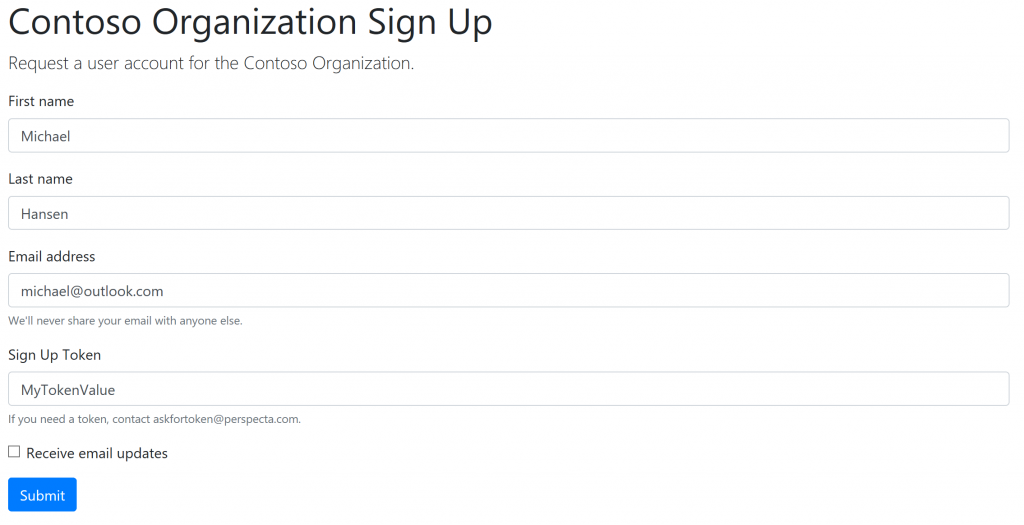
Before we dive into the implementation, let's start with what the user experience would look like. They would go to a web page and fill in a form:
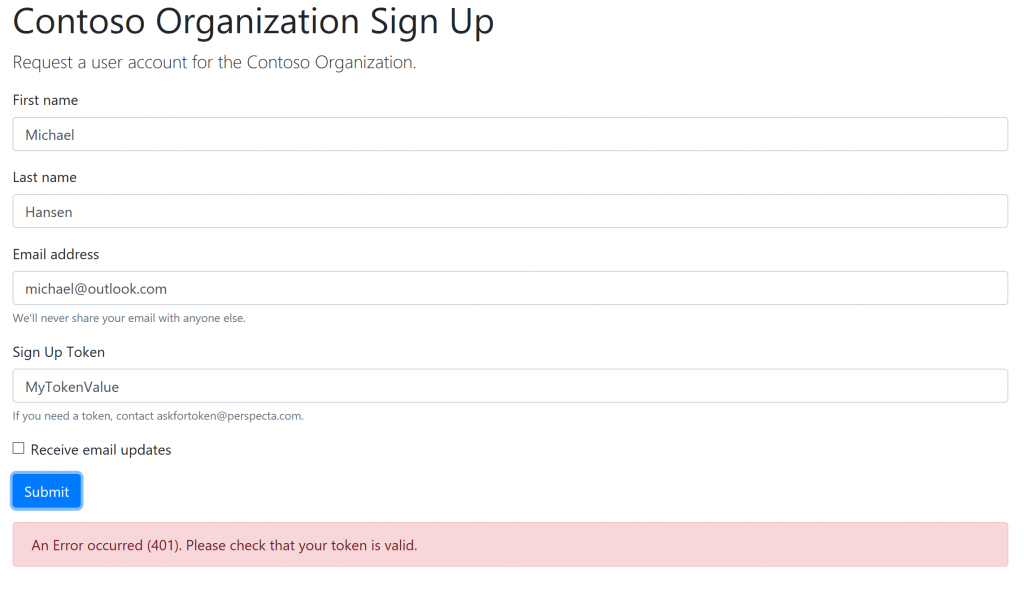
After hitting submit, if the token is not valid, they would see a response like this:
If the token is valid, they would see a response like this:
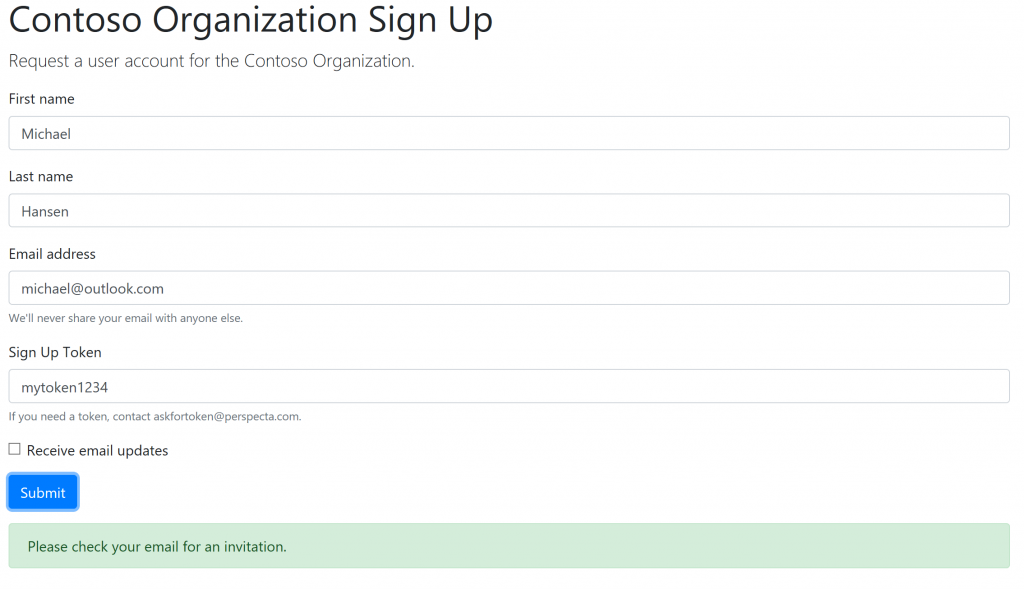
If successful the user would then have an invitation email to join the directory through the B2B process.
Let's dive into how all of this is put together. I will start with the JavaScript that calls the Logic App. I have reproduced it here in its entirety to make sure all the details (secrets have been X'ed out) are there:
[javascript]
function processForm(e) {
if (e.preventDefault) e.preventDefault();
var alertDiv = document.getElementById("feedback");
var xhr = new XMLHttpRequest();
xhr.open("POST", "https://prod-28.eastus.logic.azure.com:443/workflows/XXXXXX/triggers/manual/paths/invoke?api-version=2016-10-01&sp=%2Ftriggers%2Fmanual%2Frun&sv=1.0&sig=XXXXX", true);
xhr.setRequestHeader("Content-Type", "application/json; charset=utf-8");
xhr.timeout = 10000;
xhr.onload = function (e) {
if (xhr.readyState === 4) {
if (xhr.status === 200) {
alertDiv.innerHTML = 'Please check your email for an invitation.';
alertDiv.className = 'alert alert-success';
alertDiv.style.visibility = 'visible';
} else {
alertDiv.innerHTML = 'An Error occurred (' + xhr.status.toString() + '). Please check that your token is valid.';
alertDiv.className = 'alert alert-danger';
alertDiv.style.visibility = 'visible';
}
}
};
xhr.ontimeout = function (e) {
alertDiv.innerHTML = 'The request to server timed out. Please try again later.';
alertDiv.className = 'alert alert-danger';
alertDiv.style.visibility = 'visible';
};
xhr.onerror = function (e) {
alertDiv.innerHTML = 'An error occurred while contacting server.';
alertDiv.className = 'alert alert-danger';
alertDiv.style.visibility = 'visible';
};
var item = {
firstName: document.getElementById("firstName").value,
lastName: document.getElementById("lastName").value,
emailAddress: document.getElementById("emailAddress").value,
signupToken: document.getElementById("signupToken").value,
emailUpdate: document.getElementById("emailUpdateCheck").value == "on" ? true : false
};
alertDiv.innerHTML = 'Processing request....';
alertDiv.className = 'alert alert-light';
alertDiv.style.visibility = 'visible';
xhr.send(JSON.stringify(item));
return false;
}
function attachEvents() {
var form = document.getElementById('signup-form');
if (form.attachEvent) {
form.attachEvent("submit", processForm);
} else {
form.addEventListener("submit", processForm);
}
}
[/javascript]
To make sure that it works, you need to have a form for holding the user provided information and call the attachEvents() function when the page loads, it could look something like this.
Next step is the Logic App doing the work. Here is a quick overview of the flow of the Logic App:
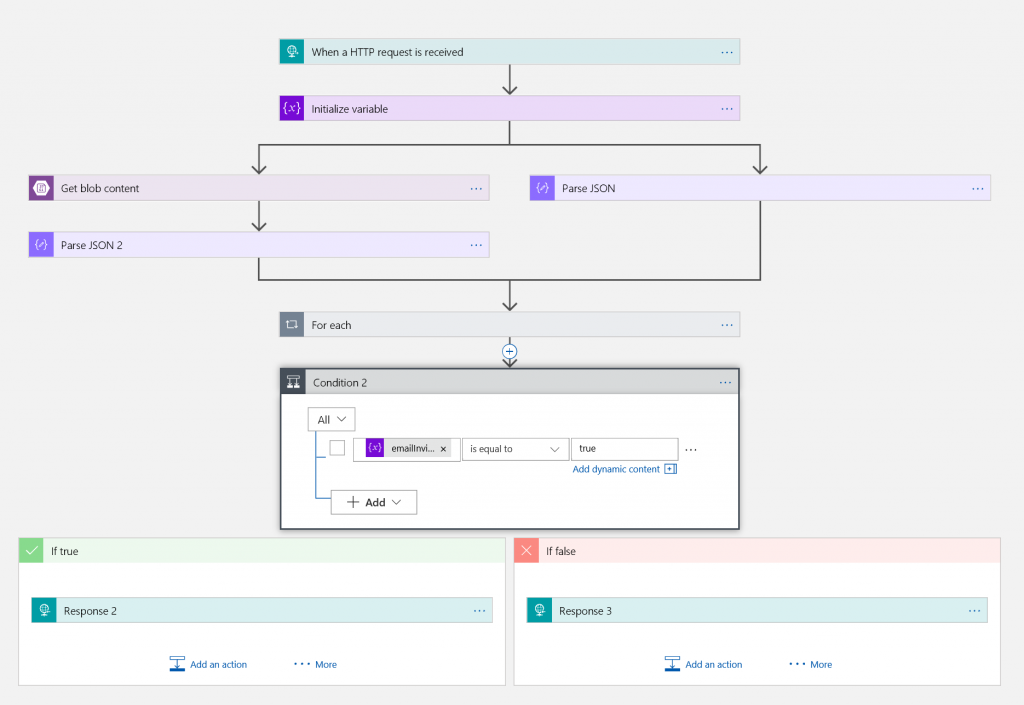
The Logic App receives and HTTP request (from the JavaScript above). The flow splits in two; in one path (left) we read a list of valid tokens from Blob Storage (it is a JSON file and we parse it) and in the other path (right) we parse the JSON received from the JavaScript. We then loop through all valid tokens to see if there is a match (the "For Each" loop). If there is a match, we send an email and set a variable to indicate that the email was sent.
If we take a closer look at the loop, it looks like this:
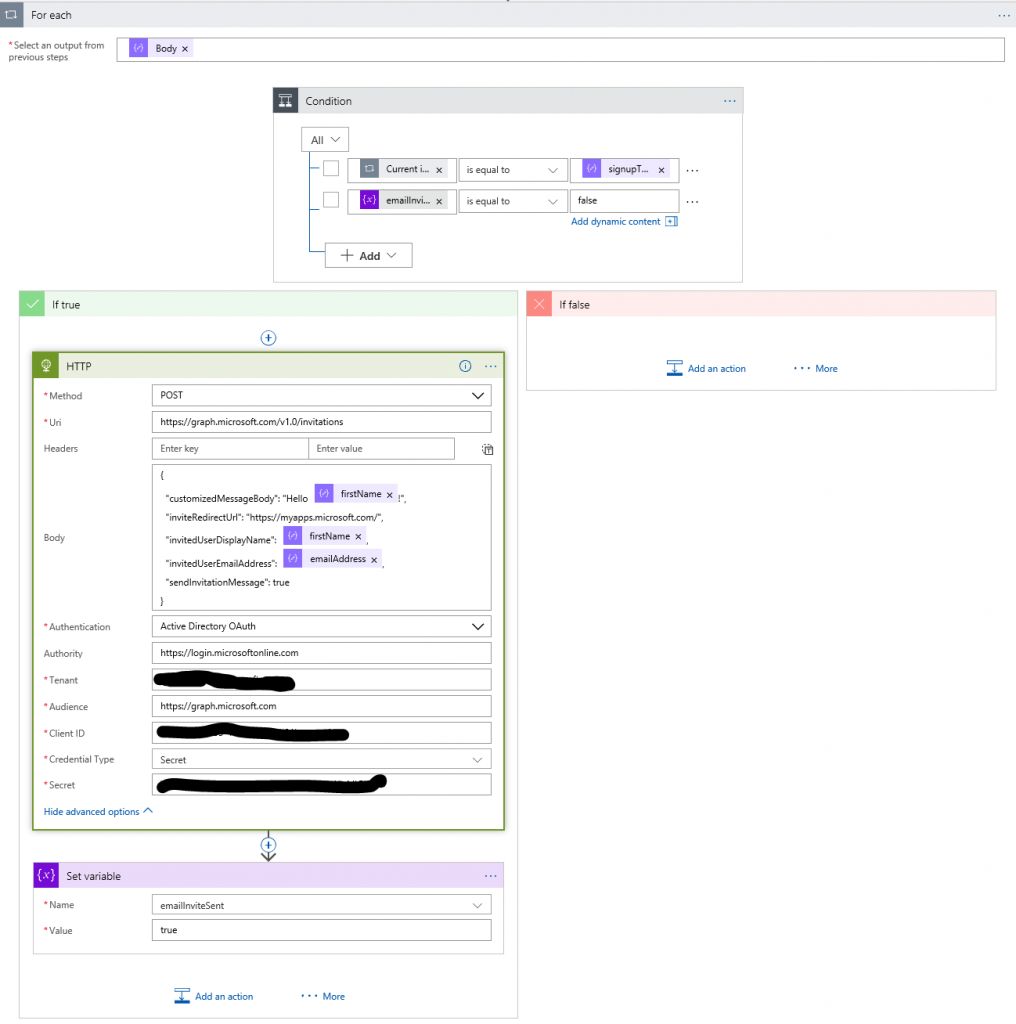
If a match is found, we do an HTTP call with Azure Directory OAuth. You will need to provide an application registration (client id and secret). This application registration must have "Application Permission" to invite users to the directory. You can read about how to create an application registration in the docs. After creating the application and a key for it, you would select the permissions like this:
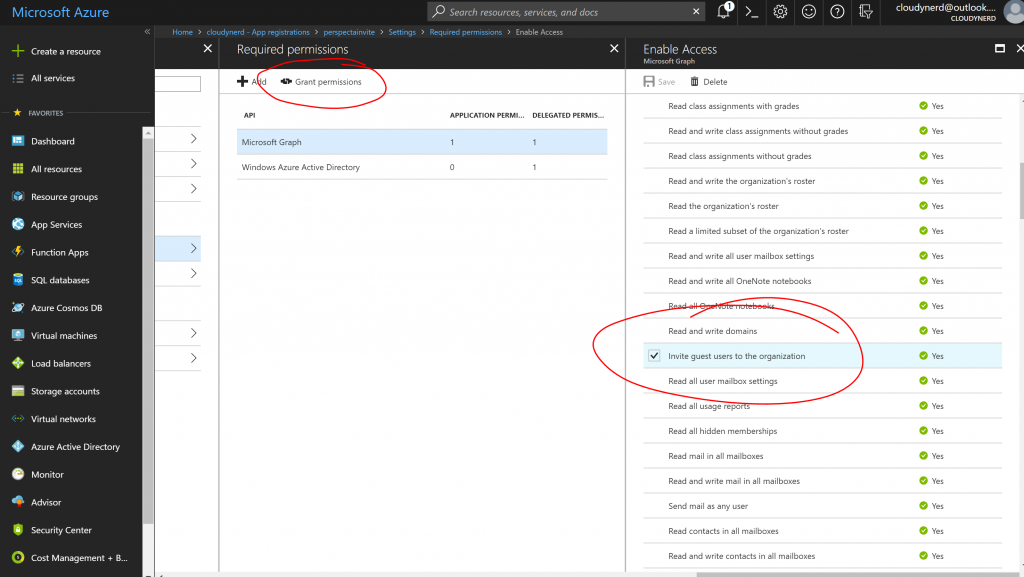
Please note that you need to select the "Invite guest users to the organization" privilege in the "Application Permissions" section. Also note that granting this privilege requires administrative privileges (as indicated by the "Yes") after the privilege. After saving the selection, you must hit the "Grant permissions" link to actually grant the privileges.
The HTTP request itself goes to the Microsoft Graph endpoint https://graph.microsoft.com/v1.0/invitations. You can read more about the message and the parameters here.
At the end we will return either a status 200 (OK) or 401 (Unauthorized) back to the browser, and the status is used in the web page to provide some feedback on the process to the user.
In the simple example I have done here, the token validation process is simply checking if the provided token is in a list of tokens stored in blob storage. Clearly this could be a lot more sophisticated. It would also be possible to add the people that sign up to a database and so on. For simplicity, we have skipped that here.
Conclusions
We have demonstrated that it is pretty easy to set up a self-service sign-up system for Azure Active Directory B2B. The system consists of an HTML form and a backend Logic App to process the request. While there are many additional features that can be added in terms of token security and database logging, it is fully functional.
Let me know if you have questions/comments/suggestions.